Cloudy Kitchen

  • recipes
    • Breads
    • Brownies
    • Cakes
    • Choux
    • Cookies
    • Doughnuts
    • Ice Cream
    • Macarons
    • Pies
    • Quickbreads
    • Small Batch Baking
    • More →
  • about
  • contact
  • products
menu icon
go to homepage
  • recipes
  • about
  • contact
  • products
  • calculators
  • subscribe
    • Facebook
    • Instagram
    • Pinterest
    • TikTok
  • search icon
    Homepage link
    • recipes
    • about
    • contact
    • products
    • calculators
    • subscribe
    • Facebook
    • Instagram
    • Pinterest
    • TikTok
  • ×
    Home

    Mixed Nut and Dulce de Leche Brioche Knot

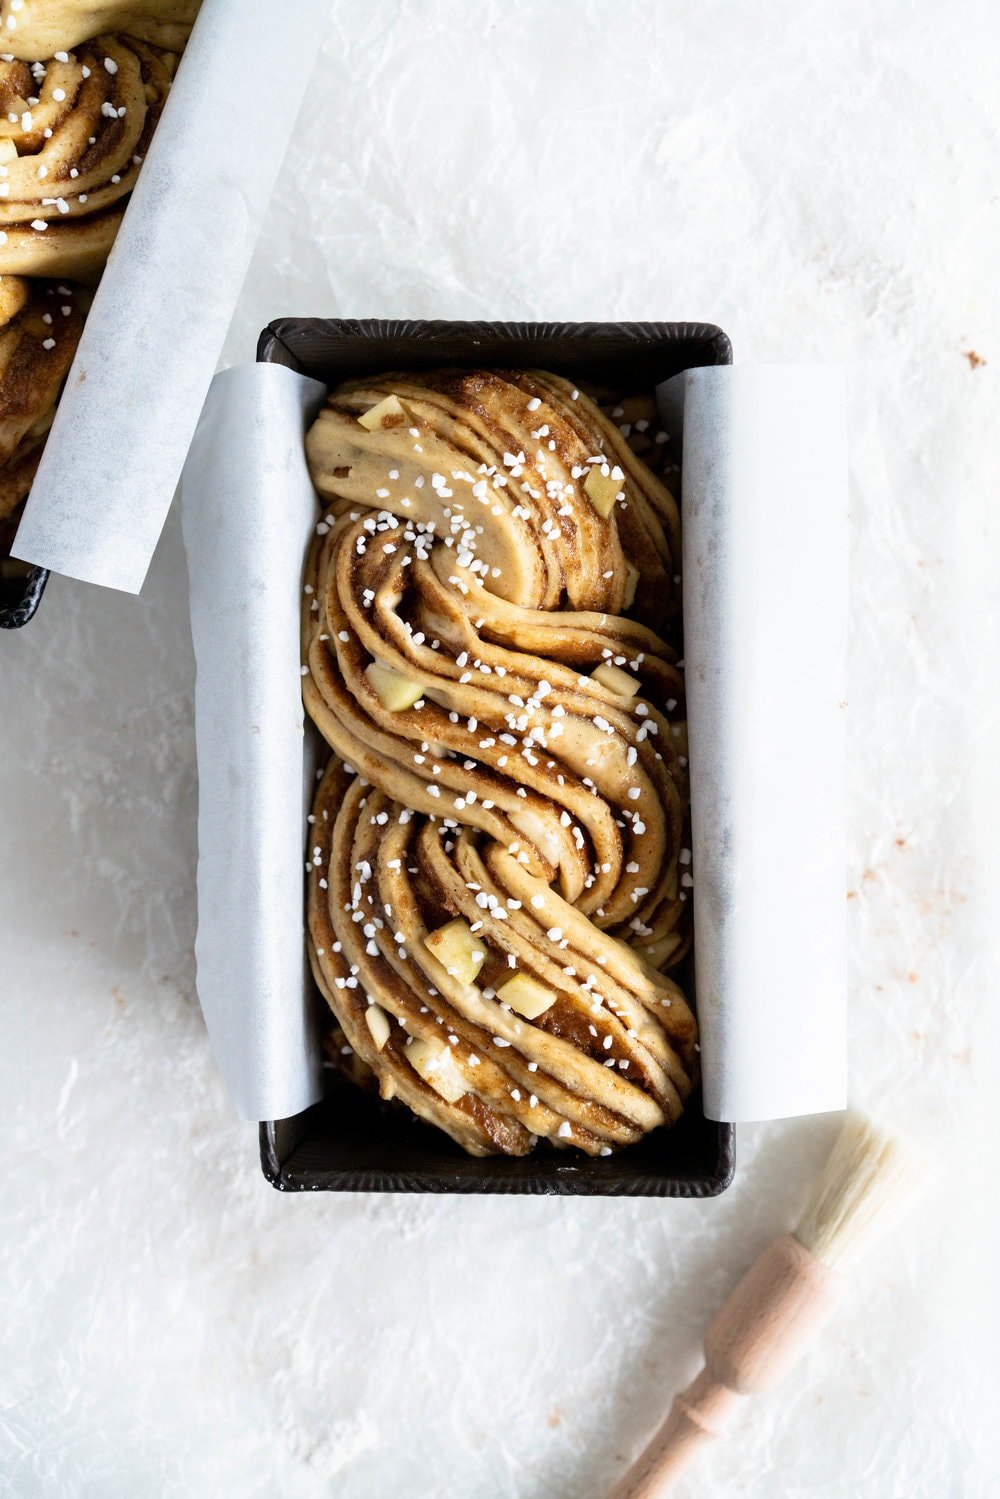
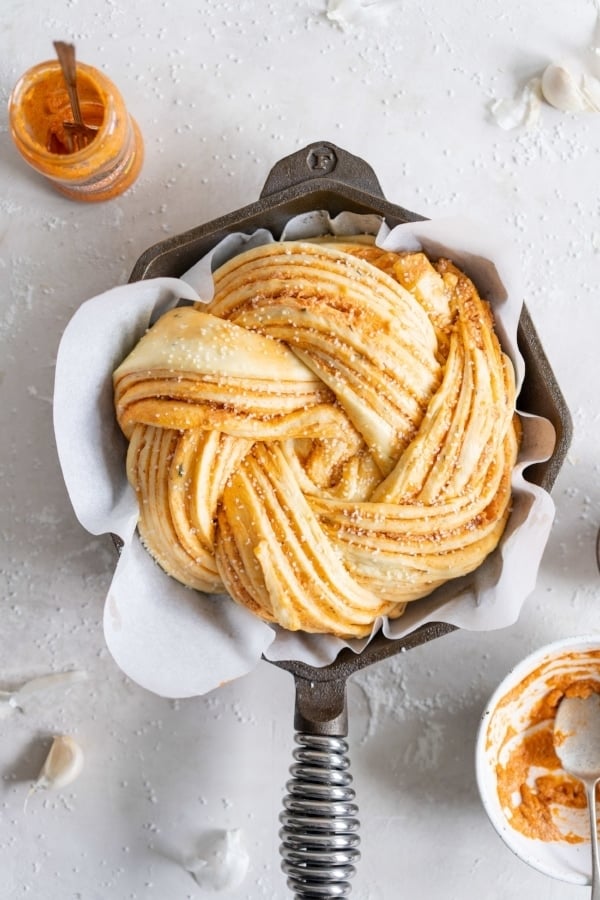
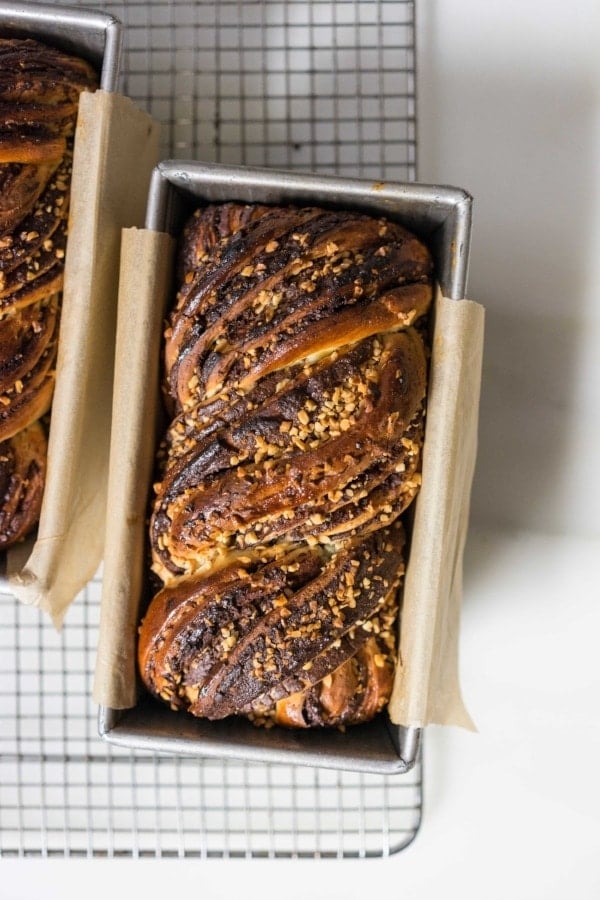
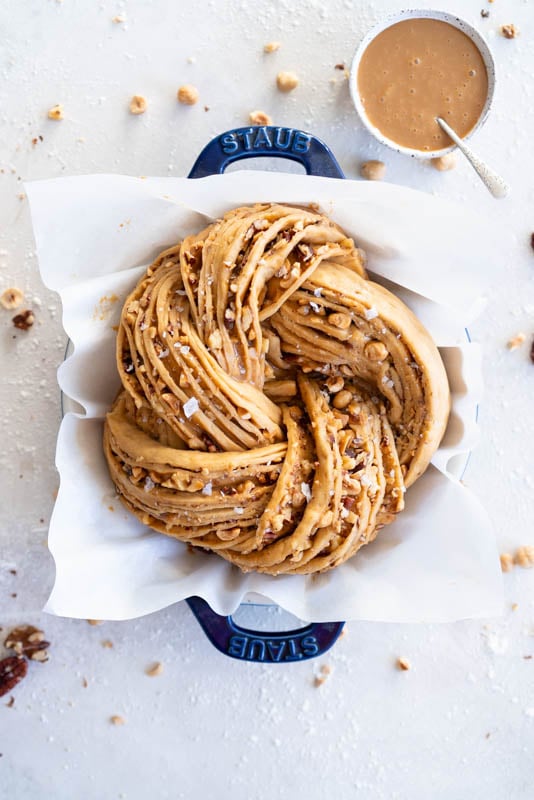
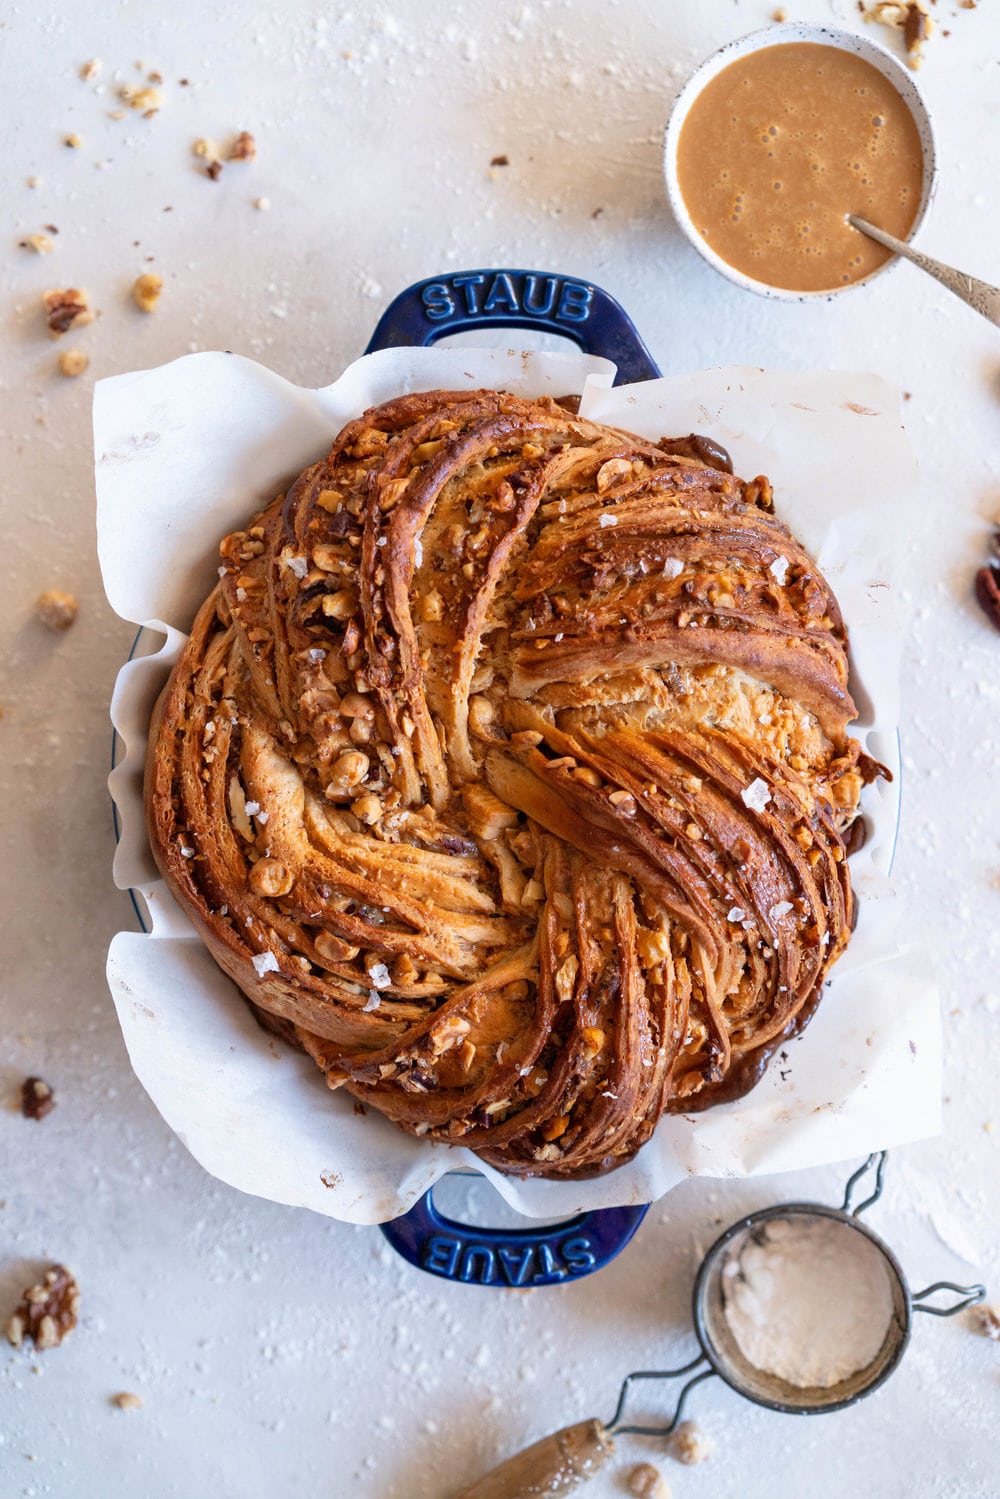
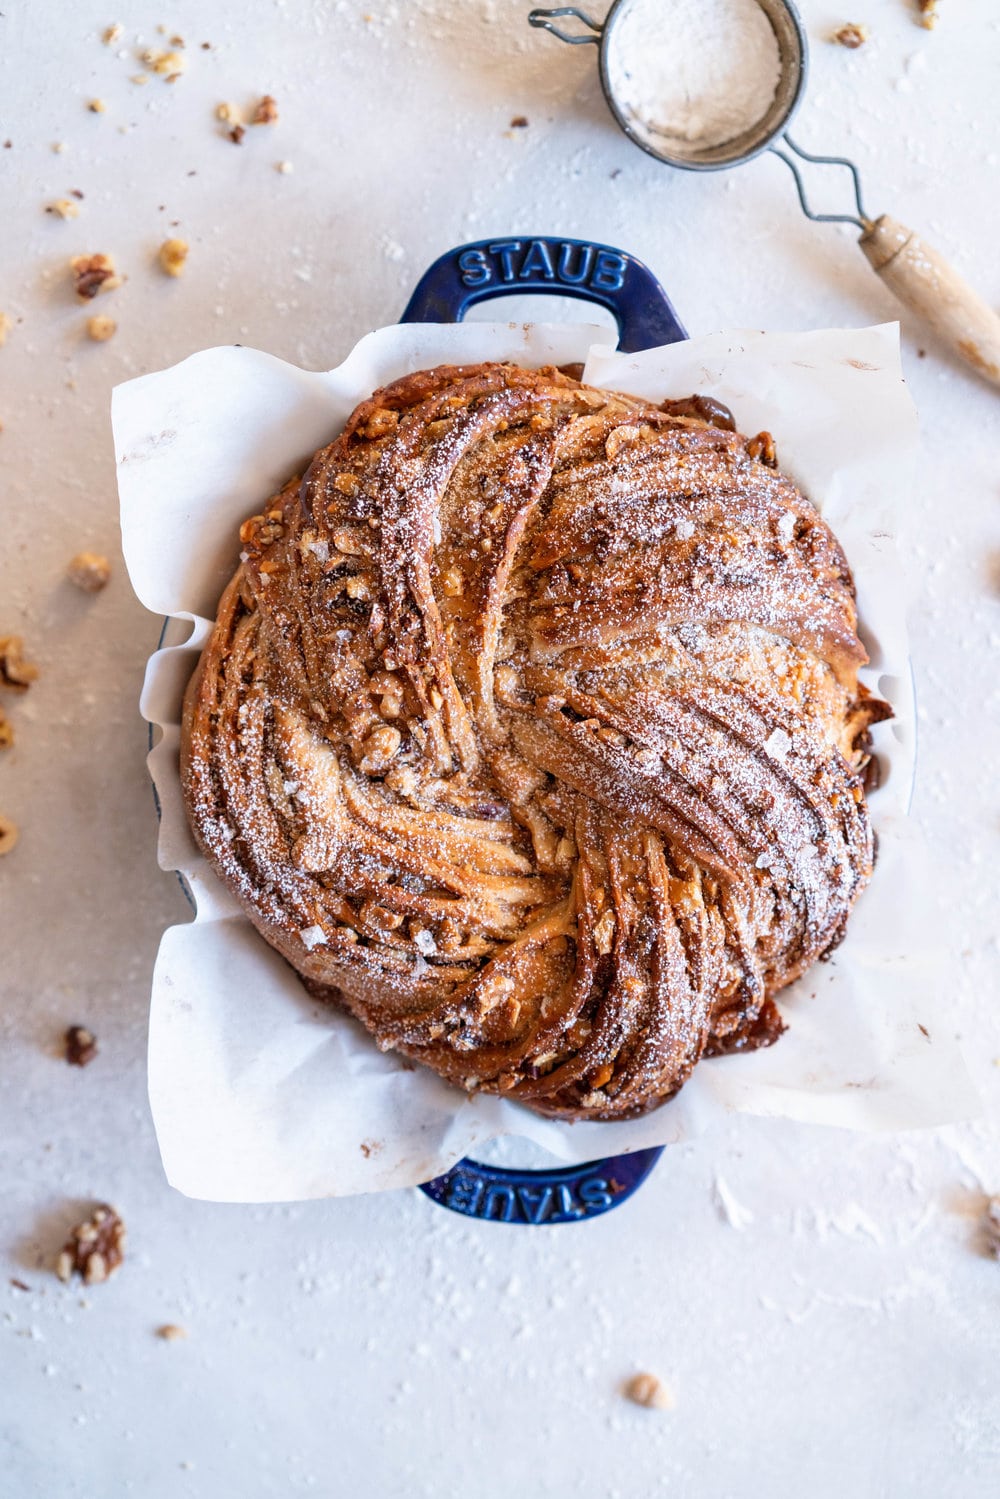
    This mixed nut Dulce de Leche Brioche Knot is made from brioche dough with vanilla bean and muscovado sugar. It is then spread with dulce de leche and sprinkled with mixed nuts. The finished knot is dusted with powdered sugar - the perfect holiday treat to feed a crowd.

    Brioche dough is spiked with vanilla bean and muscovado sugar, and spread with dulce de leche and sprinkled with mixed nuts. The finished knot is dusted with powdered sugar - the perfect christmas treat to feed a crowd.
    Brioche dough is spiked with vanilla bean and muscovado sugar, and spread with dulce de leche and sprinkled with mixed nuts. The finished knot is dusted with powdered sugar - the perfect christmas treat to feed a crowd.
    Brioche dough is spiked with vanilla bean and muscovado sugar, and spread with dulce de leche and sprinkled with mixed nuts. The finished knot is dusted with powdered sugar - the perfect christmas treat to feed a crowd.
    Brioche dough is spiked with vanilla bean and muscovado sugar, and spread with dulce de leche and sprinkled with mixed nuts. The finished knot is dusted with powdered sugar - the perfect christmas treat to feed a crowd.
    Brioche dough is spiked with vanilla bean and muscovado sugar, and spread with dulce de leche and sprinkled with mixed nuts. The finished knot is dusted with powdered sugar - the perfect christmas treat to feed a crowd.

    Mixed nut and Dulce de Leche Brioche Knot

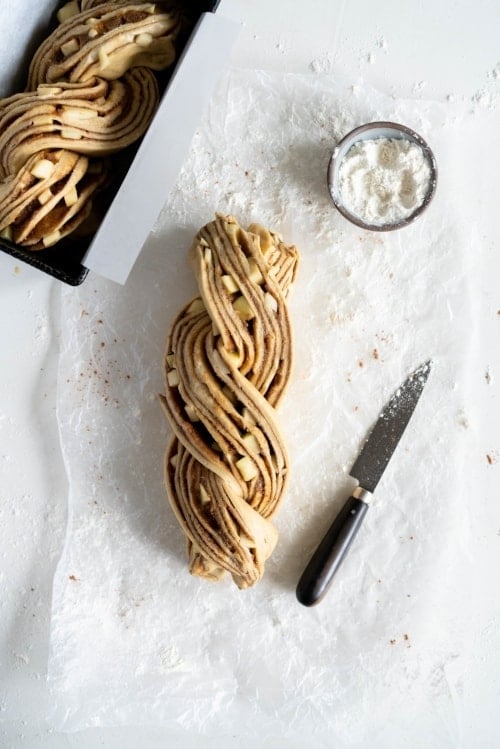
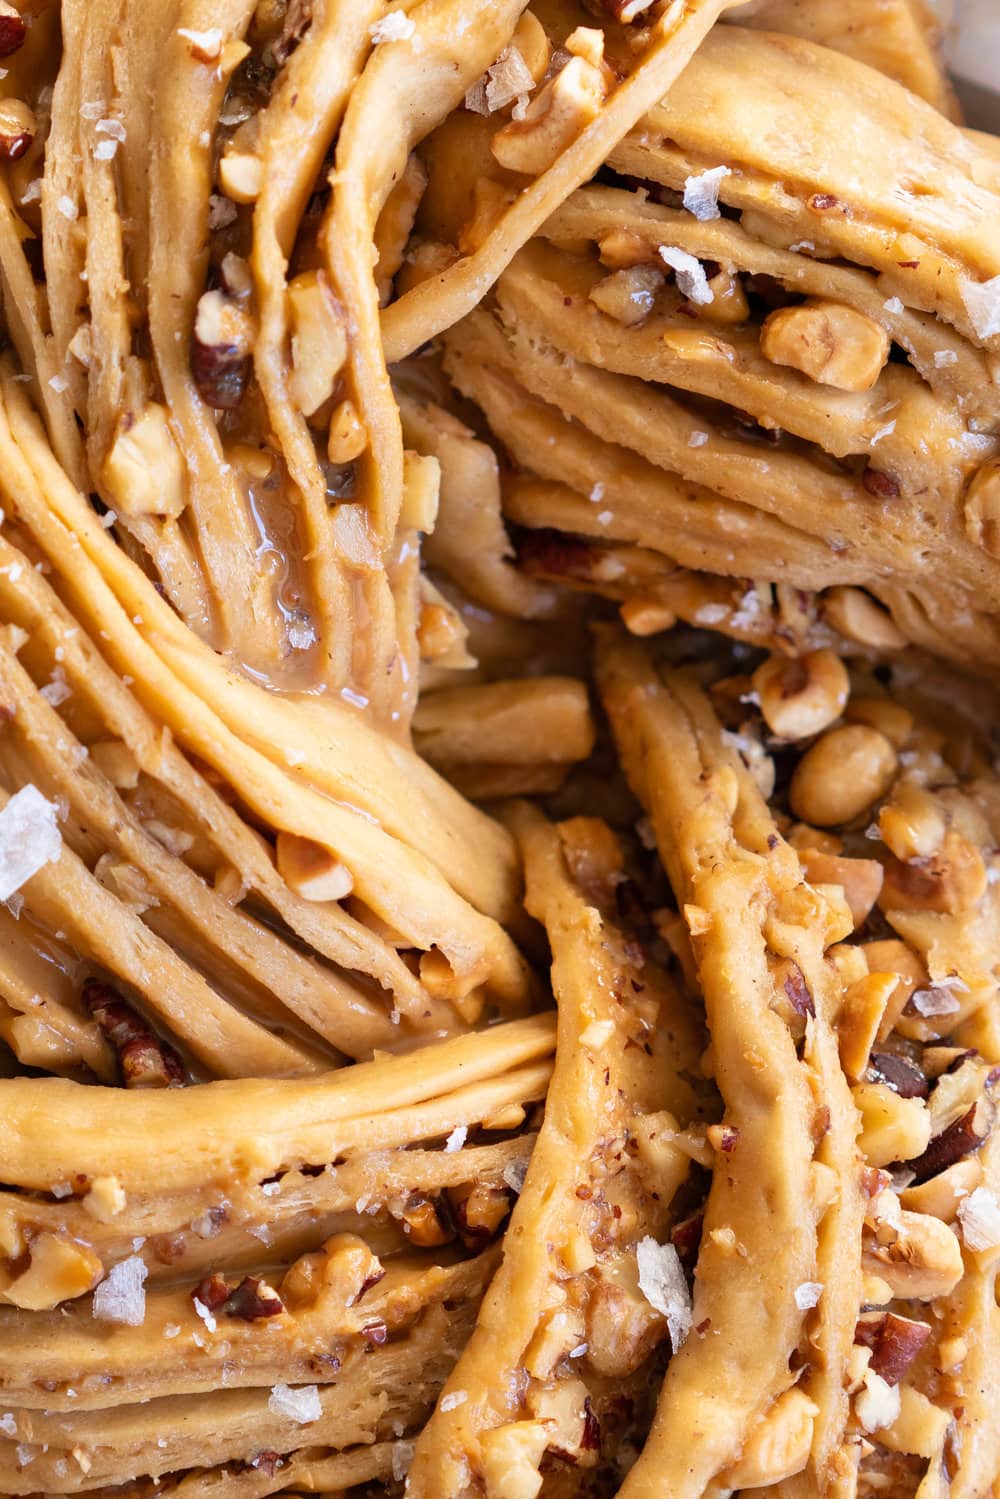
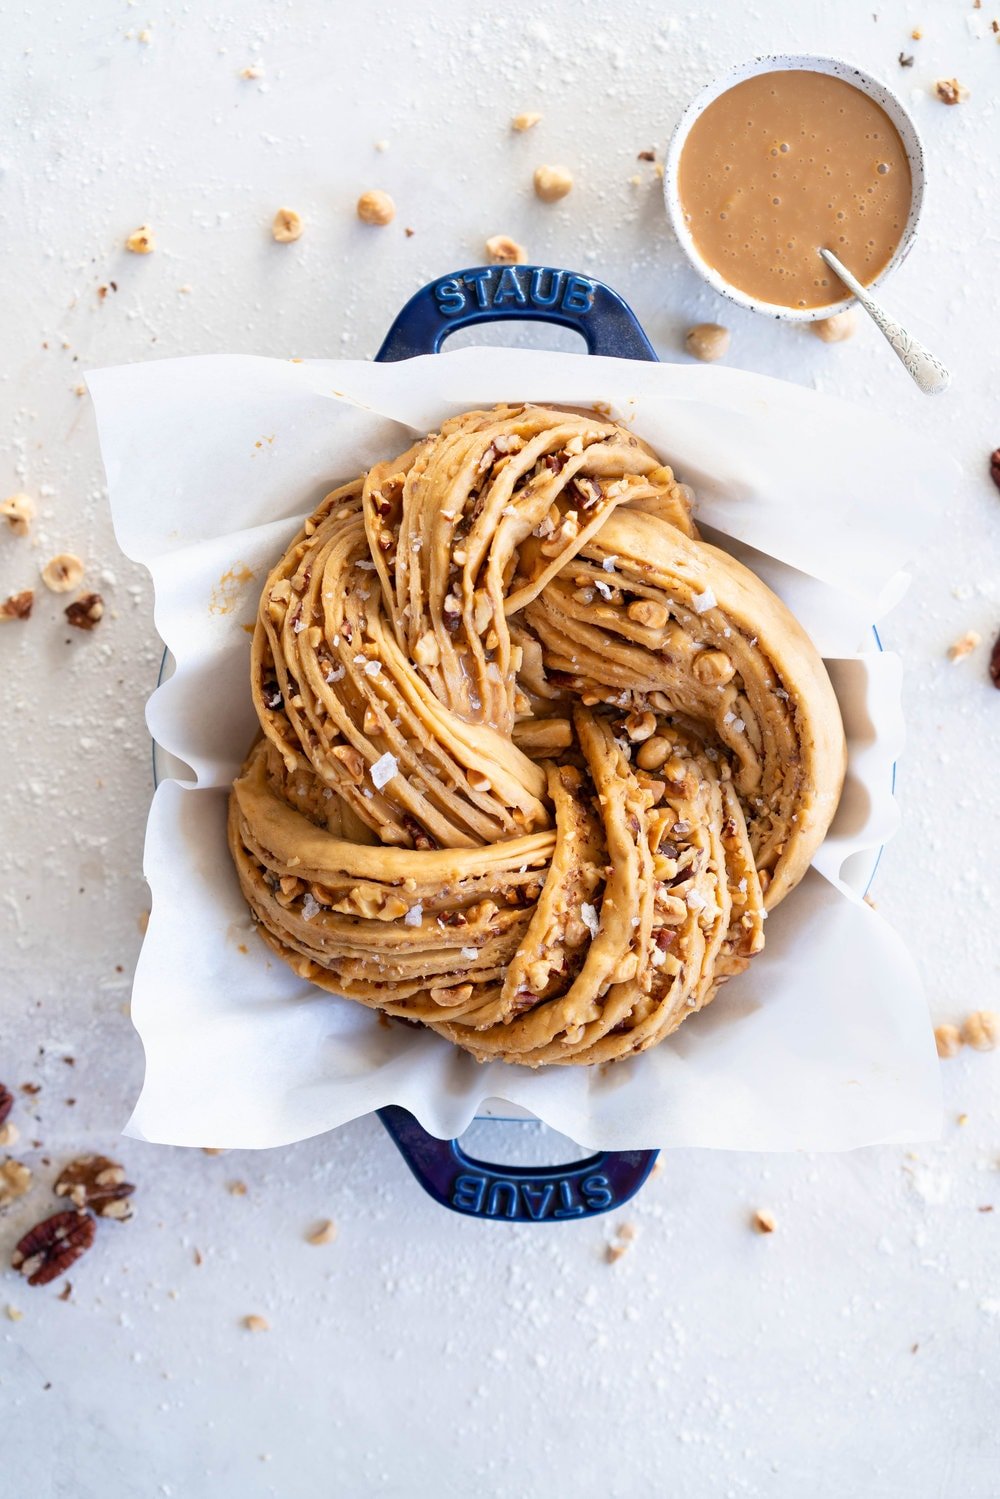
    I do not, in any way, shape, or form, have my shit together for Christmas. We don’t have a single decoration up (and tbh we probably won’t), and I still feel like I have a zillion things to make recipe wise (probably won’t do that either), but I have a few things lined up for you between now and Christmas - starting with this mixed nut and dulce de leche brioche knot. I took my standard brioche dough, spiked it with some vanilla bean and muscovado sugar, and spread it with dulce de leche and sprinkled with mixed nuts. I then rolled it up into a log, cut it lengthwise babka style, then twisted it into a swirly knot. The creamy caramel and crunchy nuts are perfect alongside the fluffy dough - this will give you a little Christmas in your life, even if you have zero of your shit together like me.

    How to make this Dulce de Leche Brioche Knot ahead of time

    I love brioche because it is super versatile and this is no exception - you can make this all in one day, or you can make the dough the evening before and do the first rise in the fridge, in which case you can skip the step of chilling the dough when it is rolled up, as it should already be cold enough to work with.

    A few wee tips for making this brioche knot

    • I made my own Dulce de Leche by boiling a can of condensed milk. To make this, peel the wrapper off a can of condensed milk, and place it on its side in a large pot. Cover with water by at least 2 inches. Bring the water to a boil, then reduce to a simmer. Simmer the can for 3 hours, checking often to make sure the water is well above the level of the can, and topping up when necessary. Remove from the pot with tongs and allow to cool completely, then chill overnight. You can use store bought too if that is easier for you.
    • This is easier to braid than you think! All you do is cross one end over the other, and then tuck the ends under. You look super fancy, but it's super easy.
    • Depending on the weather the dough may need a teeny bit more liquid - add this a teaspoon at a time in the first kneading stage if it is having a hard time forming a soft dough.
    • If you can, don’t skip the toasting of the nuts - they really give them a great depth of flavour.

    Other Brioche Recipes

    • Dulce de Leche Carrot Cake Cinnamon Rolls
    • Roasted Garlic, Tomato and Ricotta Pesto Brioche Knot
    • Brown Butter Cinnamon Rolls
    • Chocolate, Espresso, and Rye Babka

    ❤️ Made this recipe and love it? ❤️

    I would LOVE for you to leave me a review and star rating below to let me know how you liked it! Also, please make sure to tag me on Instagram!

    Answers to your baking questions

    Over the years, many of you have asked me questions about:

    • baking in grams
    • adjusting oven temperatures
    • what kind of salt to use
    • and many more!

    I've curated and answered them all for your easy reference in this frequently asked questions post!

    Filed Under: Babka and Brioche Knots, Brioche

    Earl Grey Sugar Pie

    Earl Grey Sugar Pie - Fragrant Earl grey custard is spiked with vanilla bean, and finished with a hefty dusting of powdered sugar. An egg free version of a custard favourite that bakes perfectly flat and will never crack on you.

    Earl Grey Sugar Pie - Fragrant Earl grey custard is spiked with vanilla bean, and finished with a hefty dusting of powdered sugar. An egg free version of a custard favourite that bakes perfectly flat and will never crack on you.
    Earl Grey Sugar Pie - Fragrant Earl grey custard is spiked with vanilla bean, and finished with a hefty dusting of powdered sugar. An egg free version of a custard favourite that bakes perfectly flat and will never crack on you.
    Earl Grey Sugar Pie - Fragrant Earl grey custard is spiked with vanilla bean, and finished with a hefty dusting of powdered sugar. An egg free version of a custard favourite that bakes perfectly flat and will never crack on you.
    Earl Grey Sugar Pie - Fragrant Earl grey custard is spiked with vanilla bean, and finished with a hefty dusting of powdered sugar. An egg free version of a custard favourite that bakes perfectly flat and will never crack on you.
    Earl Grey Sugar Pie - Fragrant Earl grey custard is spiked with vanilla bean, and finished with a hefty dusting of powdered sugar. An egg free version of a custard favourite that bakes perfectly flat and will never crack on you.
    Earl Grey Sugar Pie - Fragrant Earl grey custard is spiked with vanilla bean, and finished with a hefty dusting of powdered sugar. An egg free version of a custard favourite that bakes perfectly flat and will never crack on you.

    Earl Grey Sugar Pie

    You probably haven’t noticed, but I used to be a bit of a one trick pony when it came to pie. They were almost always double crusted, and always had some sort of fancy border made from a braid or pie stamps. Now I’ve blown my own cover I can explain why - I was scared of crimping.

    The crimp is the fancy pattern you make around the border of a pie - either to seal the top and bottom crust, or to provide a pretty pattern for a single crusted pie. And until recently, I was pretty scared of it. So if you go back and look, there are hardly any single crust pies around here, which is 1. a huge shame because they are delicious and I love them, but also 2. going to change because I’m not scared of crimping dough anymore. And I promise to tell you everything I learnt, so we can be not scared together!

    How to Make a single Crust Pie

    To overcome my fear, I did the same thing I usually do when I want to teach myself something new - just do it a whole heap of times until I’m happy with it. So I made 10 batches of pie dough, and crimped and crimped and crimped until I was happy with my efforts. I strategically timed it with the testing of this pie, which took a zillion tests anyway, so the crusts were getting used.

    The other thing I usually do is ask my friend Erin 12,000 questions. I’ve written about Erin on here before, but she is an amazing, amazing baker food stylist, and all around wizard, and an even more amazing friend. She gave me a crash course in crimping when I went to stay with her for our Pie extravaganza, and I managed to video most of it, and saved it to my highlights so it is always accessible. She drops way more pie tips in her amazing book, which coincidentally where this recipe for Earl Grey Sugar pie is adapted from.

    What is a Sugar Pie?

    If you haven’t had a sugar pie before, now is the time for that to change. They are a custard pie, but, instead of being egg set like a pumpkin pie (and therefore very susceptible to cracking), a sugar pie is flour set, meaning that it bakes up silky smooth and flat every time, and you don’t have to worry about overbaking and running the risk of cracking. It’s super easy to make - you literally just whisk everything up and pour it into your parbaked pie shell. Erin’s version in her book is delicately spiced with nutmeg, but I had to test out my Earl Grey theory (if you can infuse it, you can add earl grey) on the recipe, and it turned out amazingly. Fragrant Earl grey custard is spiked with vanilla bean, and finished with a hefty dusting of powdered sugar. To me, it is perfect.

    I finished the pie off with a new obsession of mine - a stencil. I got Richard to cut these ones out on the laser cutter for me out of some thin plastic, but you can definitely make your own shapes out of card or plastic, or use a material such as lace to add a pattern. You can also just give it a quick dust of powdered sugar without a stencil. You do you here.

    A few wee tips for Earl Grey Sugar Pie

    • The Earl grey in this is on the strong ish side, so feel free to drop the amount by 5g if you like. I used In Pursuit of Tea Earl Grey, which is my very very fave to both drink and bake with.
    • A new pie dough trick I learnt from Erin that is now firmly in my repertoire : After you mix the dough and shape it into discs, rest it in the fridge for about an hour, and then roll it out on a floured surface into a rectangle, fold it in thirds like a letter, then roll again and repeat the folding. Then you shape it into a disc by folding the edges under, rewrap tightly in plastic, and rest for at least two hours before using. What this step does is make the dough homogenous and therefore easy to work with, but also adds layers through the rolling and folding - the same way puff pastry is laminated. It is definitely an optional step but from my experience it makes the world of difference when it comes to rolling out the dough and getting a nice even crimp or lattice work.
    • You want to make sure that this pie is completely cool before you dust it with powdered sugar and slice, in order to get the cleanest slice possible.
    • I like to infuse the tea while the crust is par baking or cooling, so it is ready to go.
    • This is amazing served with a little whipped cream!
    • When you are par baking your pie crust, chill your crust in the fridge rather than the freezer if you can - according to Erin, a longer chill in the fridge is preferable to a short chill in the freezer.
    • The pie dough recipe makes a double crust - so enough for two pies. You might as well make the extra while you are at it in my opinion - pie dough freezes well, tightly wrapped, for at least a few months, or lasts a few days in the fridge. Defrost overnight if using from frozen.

    For more Earl Grey Recipes:

    • Chocolate earl grey ice cream sandwiches
    • Earl Grey Doughnut Bites
    • Earl Grey Layer Cake with Vanilla German Buttercream
    • Earl Grey Crullers with Earl Grey Glaze

    ❤️ Made this recipe and love it? ❤️

    I would LOVE for you to leave me a review and star rating below to let me know how you liked it! Also, please make sure to tag me on Instagram!

    Answers to your baking questions

    Over the years, many of you have asked me questions about:

    • baking in grams
    • adjusting oven temperatures
    • what kind of salt to use
    • and many more!

    I've curated and answered them all for your easy reference in this frequently asked questions post!

    Filed Under: Single-crust pies

    Salted Caramel Snickerdoodles


    Salted caramel snickerdoodles - hard caramel is ground up and mixed into the cookie dough, then chunks of caramel are folded through to form chewy pockets once the cookie has baked. The perfect crowd pleasing christmas cookie.
    Salted caramel snickerdoodles - hard caramel is ground up and mixed into the cookie dough, then chunks of caramel are folded through to form chewy pockets once the cookie has baked. The perfect crowd pleasing christmas cookie.
    Salted caramel snickerdoodles - hard caramel is ground up and mixed into the cookie dough, then chunks of caramel are folded through to form chewy pockets once the cookie has baked. The perfect crowd pleasing christmas cookie.
    Salted caramel snickerdoodles - hard caramel is ground up and mixed into the cookie dough, then chunks of caramel are folded through to form chewy pockets once the cookie has baked. The perfect crowd pleasing christmas cookie.

    Just popping in quickly to share this recipe with you - because I think that it should be right at the very very top of your holiday baking list. This is the cookie that people are going to ask you for the recipe for - the one that is going to make you friends at the holiday party. I know that these are big calls to make, but trust me on this, because these salted caramel snickerdoodles are all kinds of epic.

    I developed this recipe for the holiday cookie issue of Bake from Scratch magazine - it was part of the cookie box on the cover, and it is probably the most made recipe of the six that I contributed. The cookie was inspired by a bakery in Wellington, the town where I went to university. They do a salted caramel cookie that is giant, thin, and has chunks of chewy caramel through it. I get one every single time I go home.

    I tried something new when I made these - I wanted to really get as much caramel flavour into them as possible, so I made a hard caramel (which is super fun, it comes out like a window pane), then divided it in two once it was set. Half the caramel gets ground up and creamed in with the butter and sugar, and half gets bashed up into chunks, which are then folded through the dough, so that when baked, form these melty pockets of caramel which add to the perfect chew of the snickerdoodle. The whole thing is then rolled in a cinnamon sugar, then, once baked, loaded up with flaky sea salt. There you have, in my opinion, the perfect holiday cookie. Pretty simple to make, but a little bit fancy. The best. The recipe also makes loads (I kept them on the small side), so they are perfect for stocking up for the holiday season!

    A few wee tips:

    • The caramel, once ground, will pull moisture out of the environment very quickly and start to clump, so use the ground caramel fresh out of the food processor.
    • I like to use a round cookie cutter, slightly larger than the cookie, to place over the cookie and carefully nudge it into a perfectly round shape just after it comes out of the oven.
    • Pro tip Have everything ready to go for the caramel - there are a few seconds between a toasty caramel and a burnt sugar, so you want to be able to pour out the caramel as soon as it is ready.
    • If you do not want to bake all of these cookies at once, the dough, once rolled in the cinnamon sugar, can be stored in a ziploc bag in the freezer. Freeze until solid on a baking sheet before transferring to a bag.

    ❤️ Made this recipe and love it? ❤️

    I would LOVE for you to leave me a review and star rating below to let me know how you liked it! Also, please make sure to tag me on Instagram!

    Answers to your baking questions

    Over the years, many of you have asked me questions about:

    • baking in grams
    • adjusting oven temperatures
    • what kind of salt to use
    • and many more!

    I've curated and answered them all for your easy reference in this frequently asked questions post!

    Filed Under: Other Cookies

    The Ultimate Vanilla Bean Christmas Treat Box


    The Ultimate Vanilla Bean Christmas Box. All of the christmas treats for your recipe planning for this upcoming holiday season! Chocolate Shortbread cookies with Vanilla bean Dulce de Leche filling, vanilla bean meringues, vanilla bean macarons, Vanilla bean shortbread, vanilla bean passionfruit fudge, vanilla bean salted caramel nut mix, and vanilla bean marshmallows. The perfect treat box for christmas!
    The Ultimate Vanilla Bean Christmas Box. All of the christmas treats for your recipe planning for this upcoming holiday season! Chocolate Shortbread cookies with Vanilla bean Dulce de Leche filling, vanilla bean meringues, vanilla bean macarons, Vanilla bean shortbread, vanilla bean passionfruit fudge, vanilla bean salted caramel nut mix, and vanilla bean marshmallows. The perfect treat box for christmas!
    The Ultimate Vanilla Bean Christmas Box. All of the christmas treats for your recipe planning for this upcoming holiday season! Chocolate Shortbread cookies with Vanilla bean Dulce de Leche filling, vanilla bean meringues, vanilla bean macarons, Vanilla bean shortbread, vanilla bean passionfruit fudge, vanilla bean salted caramel nut mix, and vanilla bean marshmallows. The perfect treat box for christmas!
    The Ultimate Vanilla Bean Christmas Box. All of the christmas treats for your recipe planning for this upcoming holiday season! Chocolate Shortbread cookies with Vanilla bean Dulce de Leche filling, vanilla bean meringues, vanilla bean macarons, Vanilla bean shortbread, vanilla bean passionfruit fudge, vanilla bean salted caramel nut mix, and vanilla bean marshmallows. The perfect treat box for christmas!
    The Ultimate Vanilla Bean Christmas Box. All of the christmas treats for your recipe planning for this upcoming holiday season! Chocolate Shortbread cookies with Vanilla bean Dulce de Leche filling, vanilla bean meringues, vanilla bean macarons, Vanilla bean shortbread, vanilla bean passionfruit fudge, vanilla bean salted caramel nut mix, and vanilla bean marshmallows. The perfect treat box for christmas!
    The Ultimate Vanilla Bean Christmas Box. All of the christmas treats for your recipe planning for this upcoming holiday season! Chocolate Shortbread cookies with Vanilla bean Dulce de Leche filling, vanilla bean meringues, vanilla bean macarons, Vanilla bean shortbread, vanilla bean passionfruit fudge, vanilla bean salted caramel nut mix, and vanilla bean marshmallows. The perfect treat box for christmas!
    The Ultimate Vanilla Bean Christmas Box. All of the christmas treats for your recipe planning for this upcoming holiday season! Chocolate Shortbread cookies with Vanilla bean Dulce de Leche filling, vanilla bean meringues, vanilla bean macarons, Vanilla bean shortbread, vanilla bean passionfruit fudge, vanilla bean salted caramel nut mix, and vanilla bean marshmallows. The perfect treat box for christmas!
    The Ultimate Vanilla Bean Christmas Box. All of the christmas treats for your recipe planning for this upcoming holiday season! Chocolate Shortbread cookies with Vanilla bean Dulce de Leche filling, vanilla bean meringues, vanilla bean macarons, Vanilla bean shortbread, vanilla bean passionfruit fudge, vanilla bean salted caramel nut mix, and vanilla bean marshmallows. The perfect treat box for christmas!
    The Ultimate Vanilla Bean Christmas Box. All of the christmas treats for your recipe planning for this upcoming holiday season! Chocolate Shortbread cookies with Vanilla bean Dulce de Leche filling, vanilla bean meringues, vanilla bean macarons, Vanilla bean shortbread, vanilla bean passionfruit fudge, vanilla bean salted caramel nut mix, and vanilla bean marshmallows. The perfect treat box for christmas!
    The Ultimate Vanilla Bean Christmas Box. All of the christmas treats for your recipe planning for this upcoming holiday season! Chocolate Shortbread cookies with Vanilla bean Dulce de Leche filling, vanilla bean meringues, vanilla bean macarons, Vanilla bean shortbread, vanilla bean passionfruit fudge, vanilla bean salted caramel nut mix, and vanilla bean marshmallows. The perfect treat box for christmas!

    It’s finally (but suddenly already) December, which means it is time for the best part of Christmas - Holiday Cookie Boxes! I’m totally hooked on making these after last year’s one, so was super super excited when Heilala Vanilla asked me to come up with a Christmas treat recipe. I couldn’t help myself and went all out with this vanilla inspired cookie box.

    I’ve spoken about Heilala in the past and how much I love not only their products, but the people behind the company and what they stand for, and I couldn’t be prouder to work with them. Not only do they control the production of the Vanilla from cultivation to processing, but they are doing amazing things in Tonga in terms of injecting money into the economy and increasing employment opportunities for Women. The company is New Zealand owned, and run by amazing people who are so passionate about what they do and giving back. Their vanilla truly is the best I have ever used, and I almost can’t bake without it.

    I wanted to focus a little more on the treats that are made around Christmas this time around, rather than cookies. In New Zealand, it is hot at Christmas time, so we don’t have the same cozy baking traditions I have come to learn are common over here - everyone is too busy staying cool and spending time at the beach. What we do usually have though, is lots of little yummy bits and pieces to snack on or to bring out when guests come - things that you can make a lot of ahead, and keep in a couple of airtight containers to bring out when needed (that’s what happens in my family anyway).

    I started out with a tradition in my family - my Great Great Grandmother’s Shortbread recipe. This was one of the first things I ever learnt to bake with my Grandma, and was always around at Christmas, so I knew it had to be included. They are super simple to make, and the recipe can easily be doubled, so are perfect for times when you will have a lot of people around. I also added my favourite chocolate shortbread cookie, which was sandwiched with a vanilla bean dulce de leche filling. These cookies also make a great roll-out cookie for decorating with royal icing, and are a nice twist on the standard sugar cookie.

    Macarons had to make an appearance, so I stuck with a Vanilla Bean macaron with a Vanilla Bean Swiss meringue buttercream. I added some vanilla bean meringues to the lineup - they are super easy to make, and you can pipe out a bunch of different sizes to use as part of desserts through the holiday season too. I then made a quick batch of vanilla bean marshmallows, using honey and Heilala’s Vanilla sugar. These can also be batch made (you can double the recipe I have here very easily), and last forever kept in an airtight container. They also make perfect S’mores!

    My favourite parts of this treat box are the Vanilla bean Passionfruit fudge, and the Vanilla bean salted caramel nut mix. Both of these, to me, scream Christmas - little treats to pick at, or to pop out for an easy dessert or sweet addition to a cheese board. Both are pretty easy to put together, and make loads, so you will be fully stocked up, although you’re probably going to need to make more of the nuts - I made a big batch two days ago, took them to the studio, and they got totally destroyed. The passionfruit fudge is a total nod to home for me - it is my absolute favourite fruit, and was the perfect addition to fudge to compliment the Vanilla bean.

    So there we are! My Vanilla bean Christmas treat box. These are all perfect in a holiday cookie box, or you can mix and match with some of your favourite recipes too. If you are looking for good christmas gifts or stocking stuffers, I dunno about you but I would be stoked to get a jar of Vanilla. Happy Holidays!

    Here’s what we ended up with:

    • Vanilla bean shortbread
    • Chocolate shortbread with vanilla bean dulce de leche (plus a few piped with royal icing, and a few cut out with stars)
    • Vanilla bean meringues
    • Vanilla bean macarons with a vanilla bean Swiss meringue buttercream
    • Vanilla bean marshmallows
    • Vanilla bean salted caramel nut mix
    • Vanilla bean and passionfruit fudge

    A few wee tips:

    • I used this box to make this cookie box - Rich cut me little dividers on the laser cutter, but the craft wood is soft enough that you can use a craft knife and a ruler. I then just taped the dividers in.
    • Most of the components need to be stored in airtight containers, so make sure that if you are making a cookie box, you account for storage!
    • Mix and match the heck out of this box - use any recipes you like, and arrange the dividers any way you like. There are more ideas here - which actually all utilise vanilla bean too!
    • If you have any questions whatsoever please please feel free to ask - I will do my very best to help out!

    Thank you so much to Heilala Vanilla for sponsoring this post! All opinions are my own.

    ❤️ Made this recipe and love it? ❤️

    I would LOVE for you to leave me a review and star rating below to let me know how you liked it! Also, please make sure to tag me on Instagram!

    Answers to your baking questions

    Over the years, many of you have asked me questions about:

    • baking in grams
    • adjusting oven temperatures
    • what kind of salt to use
    • and many more!

    I've curated and answered them all for your easy reference in this frequently asked questions post!

    Filed Under: Treat Boxes

    Apple and Cardamom Babka


    Apple and Cardamom brioche babka - lightly spiced babka dough is filled with a spiced brown sugar mixture and fresh apple, then rolled into a tight babka swirl. Inspired by the swedish cinnamon roll, this is a perfect fall baking project. #babka #cardamom #brioche
    Apple and Cardamom brioche babka - lightly spiced babka dough is filled with a spiced brown sugar mixture and fresh apple, then rolled into a tight babka swirl. Inspired by the swedish cinnamon roll, this is a perfect fall baking project. #babka #cardamom #brioche
    Apple and Cardamom brioche babka - lightly spiced babka dough is filled with a spiced brown sugar mixture and fresh apple, then rolled into a tight babka swirl. Inspired by the swedish cinnamon roll, this is a perfect fall baking project. #babka #cardamom #brioche
    Apple and Cardamom brioche babka - lightly spiced babka dough is filled with a spiced brown sugar mixture and fresh apple, then rolled into a tight babka swirl. Inspired by the swedish cinnamon roll, this is a perfect fall baking project. #babka #cardamom #brioche
    Apple and Cardamom brioche babka - lightly spiced babka dough is filled with a spiced brown sugar mixture and fresh apple, then rolled into a tight babka swirl. Inspired by the swedish cinnamon roll, this is a perfect fall baking project. #babka #cardamom #brioche
    Apple and Cardamom brioche babka - lightly spiced babka dough is filled with a spiced brown sugar mixture and fresh apple, then rolled into a tight babka swirl. Inspired by the swedish cinnamon roll, this is a perfect fall baking project. #babka #cardamom #brioche
    Apple and Cardamom brioche babka - lightly spiced babka dough is filled with a spiced brown sugar mixture and fresh apple, then rolled into a tight babka swirl. Inspired by the swedish cinnamon roll, this is a perfect fall baking project. #babka #cardamom #brioche

    Hiii! I’ve written and re-written this little top bit a bunch of times now, and I can’t think of anything clever, or witty, or funny to say, or any context that goes along with this recipe other than it’s yum and I think that you should make it. It’s been a bit of a long week. I’ve seen on a few different places people complaining about having to scroll past this part of food blogs to get to the recipe, and how they think it’s bullshit. It keeps rolling round in my mind. That we have gotten to a place where we expect instant gratification. That everything should be served up on a platter for us. That all recipes should be free and available on the internet without having to spend an extra 2 seconds of precious life scrolling past the part where the person who puts hours into developing recipes gets to express themselves for a little bit I think it’s always interesting how people find literally ANYTHING to complain about, including having to do two extra finger scrolls to get down to the recipe they are getting for free. Anyway. That’s what is swimming round in my wee brain!

    I’m coming at you today with a giant dose of autumn. Last year a friend shared her Mum’s Swedish cinnamon roll recipe with me. They are super cute little knots, loaded up with cardamom and cinnamon, and finished with pearl sugar. I’ve been meaning to turn them into a babka for a while now, so finally here we are.

    I took my go-to brioche recipe, laced it with some warming spices, filled it with a similar filling to the Swedish rolls, but scattered some chopped apple over the filling before rolling it up nice and tight. I love how the apple and the spices play together, and I just can’t go past the swirls of a babka. When making babka I generally freeze the dough for an hour or so before rolling out to help the dough stay chilled and keep its shape better when cut, however this time I tried a slightly different method, and rolled out the dough, filled it and rolled it into a sausage, then chilled the rolled sausage for an hour or so to firm it up before cutting. This resulted in a super clean cut when it came to splitting the dough lengthwise, and made the shaping process much easier in my opinion. Definitely going to be my go-to babka method from now on!

    A few wee tips:

    • This dough can be made the night before and proofed in the fridge for the first rise. If you do this you can skip the chilling step!
    • These would also make epic cinnamon rolls. After you have rolled the dough into a log, cut into 10-12 rolls, arrange in a greased baking pan, and follow the rising and baking directions - you may need to reduce baking time slightly so just keep a close eye!
    • The swedish sugar isn't necessary, but if you can get your hands on it, it's hugely worthwhile!
    • If you don’t have an apple on hand, you can omit it if you like!

    ❤️ Made this recipe and love it? ❤️

    I would LOVE for you to leave me a review and star rating below to let me know how you liked it! Also, please make sure to tag me on Instagram!

    Answers to your baking questions

    Over the years, many of you have asked me questions about:

    • baking in grams
    • adjusting oven temperatures
    • what kind of salt to use
    • and many more!

    I've curated and answered them all for your easy reference in this frequently asked questions post!

    Filed Under: Babka and Brioche Knots, Brioche

    Caramelised White Chocolate Macarons

    Toasted Sugar Vanilla Bean Macaron shells are sandwiched with a silky, creamy German buttercream loaded with caramelised white chocolate, Subtle elevated flavours makes this a perfect simple recipe that is sure to wow your friends or make the perfect treat or gift. #frenchmacaron #macaronrecipe
    Toasted Sugar Vanilla Bean Macaron shells are sandwiched with a silky, creamy German buttercream loaded with caramelised white chocolate, Subtle elevated flavours makes this a perfect simple recipe that is sure to wow your friends or make the perfect treat or gift. #frenchmacaron #macaronrecipe
    Toasted Sugar Vanilla Bean Macaron shells are sandwiched with a silky, creamy German buttercream loaded with caramelised white chocolate, Subtle elevated flavours makes this a perfect simple recipe that is sure to wow your friends or make the perfect treat or gift. #frenchmacaron #macaronrecipe
    Toasted Sugar Vanilla Bean Macaron shells are sandwiched with a silky, creamy German buttercream loaded with caramelised white chocolate, Subtle elevated flavours makes this a perfect simple recipe that is sure to wow your friends or make the perfect treat or gift. #frenchmacaron #macaronrecipe
    Toasted Sugar Vanilla Bean Macaron shells are sandwiched with a silky, creamy German buttercream loaded with caramelised white chocolate, Subtle elevated flavours makes this a perfect simple recipe that is sure to wow your friends or make the perfect treat or gift. #frenchmacaron #macaronrecipe
    Toasted Sugar Vanilla Bean Macaron shells are sandwiched with a silky, creamy German buttercream loaded with caramelised white chocolate, Subtle elevated flavours makes this a perfect simple recipe that is sure to wow your friends or make the perfect treat or gift. #frenchmacaron #macaronrecipe
    Toasted Sugar Vanilla Bean Macaron shells are sandwiched with a silky, creamy German buttercream loaded with caramelised white chocolate, Subtle elevated flavours makes this a perfect simple recipe that is sure to wow your friends or make the perfect treat or gift. #frenchmacaron #macaronrecipe

    Ok, so I’m not sure how it is nearly December, but it is. Like, on Saturday it’s here. This year has simultaneously dragged by and flown past, but for the most part, it’s been a good one. I’ve been working my wee butt off prepping a bunch of Christmas posts for you (last year I left it all till the week before Christmas and it was NOT a wise move), so this year I’m hoping to be a little more prepared. Check back in about two weeks where I probs would have left it till the end and will be scrambling to post everything I’ve been planning for a whole year. Lol.

    We had a bunch of toasted sugar using Stella’s method, so we subbed the sugar in the shells for toasted sugar, and upped the Vanilla bean content. The toastyness of the sugar in the shells is subtle, but gives a light caramel flavour. We then filled them with a caramelised white chocolate German buttercream, which complimented the toasted sugar perfectly. Someone recently described German buttercream as “room temperature ice cream” which I think is the perfect description. I love how silky it is, how easily it can be infused, and how well it lends itself to additions such as melted chocolate. It’s by far my fave buttercream - if you haven’t tried it before, you should definitely get onto it. The flavouring in these is definitely a little more subtle than other macs we have done, but I think they are super delicious, and I hope you do too!

    A few wee tips:

    • The recipe for toasted sugar is here. There’s no point re-writing it when Stella does a Stellar (lol, sorry) job of it.
    • The sugar may clump up a little when stored, so sieve it if needed.
    • When adding the melted caramelised white chocolate to the german buttercream, you need to make sure that it is cooled, otherwise your buttercream becomes soup very very quickly.
    • We used Valrhona’s Dulcey Caramelised white chocolate (it comes in both a bar and feves), but you can also make your own! Edd has a great tutorial here.
    • As per, the post with all of my macaron tips and tricks is here - I add to it as we work things out!

    ❤️ Made this recipe and love it? ❤️

    I would LOVE for you to leave me a review and star rating below to let me know how you liked it! Also, please make sure to tag me on Instagram!

    Answers to your baking questions

    Over the years, many of you have asked me questions about:

    • baking in grams
    • adjusting oven temperatures
    • what kind of salt to use
    • and many more!

    I've curated and answered them all for your easy reference in this frequently asked questions post!

    Filed Under: Macarons

    Sage Salted Caramel Apple Pie with Fresh Sage Crust


    Sage Salted Caramel Apple Pie with Fresh Sage Crust - Flaky pie dough flecked with fresh sage holds an apple filling, topped with a sage salted caramel. A perfect twist on the classic salted caramel apple pie.
    Sage Salted Caramel Apple Pie with Fresh Sage Crust - Flaky pie dough flecked with fresh sage holds an apple filling, topped with a sage salted caramel. A perfect twist on the classic salted caramel apple pie.
    Sage Salted Caramel Apple Pie with Fresh Sage Crust - Flaky pie dough flecked with fresh sage holds an apple filling, topped with a sage salted caramel. A perfect twist on the classic salted caramel apple pie.
    Sage Salted Caramel Apple Pie with Fresh Sage Crust - Flaky pie dough flecked with fresh sage holds an apple filling, topped with a sage salted caramel. A perfect twist on the classic salted caramel apple pie.
    Sage Salted Caramel Apple Pie with Fresh Sage Crust - Flaky pie dough flecked with fresh sage holds an apple filling, topped with a sage salted caramel. A perfect twist on the classic salted caramel apple pie.
    Sage Salted Caramel Apple Pie with Fresh Sage Crust - Flaky pie dough flecked with fresh sage holds an apple filling, topped with a sage salted caramel. A perfect twist on the classic salted caramel apple pie.
    Sage Salted Caramel Apple Pie with Fresh Sage Crust - Flaky pie dough flecked with fresh sage holds an apple filling, topped with a sage salted caramel. A perfect twist on the classic salted caramel apple pie.
    Sage Salted Caramel Apple Pie with Fresh Sage Crust - Flaky pie dough flecked with fresh sage holds an apple filling, topped with a sage salted caramel. A perfect twist on the classic salted caramel apple pie.

    I know I am definitely late to the thanksgiving planning party with this one - I am currently par-baking pie crusts as I speak, but if I didn’t stop fluffing around I was never going to get the recipe up here, so here it is! This is a Sage salted caramel apple pie. I wanted to go with a wee twist on the old fave salted caramel apple pie, so I hit it with a sage infused caramel, and added some fresh sage to the pie crust. The toasty caramel balanced out the sage enough (if you go too overboard it can taste a lot like you’re eating a candle), but still allowed the flavour to come through and compliment the apple perfectly.

    I first had a sage salted caramel when I made the ice cream pops from Lily’s book, and I have been looking for an excuse to make something similar ever since. The thing I love about caramel is that it can easily be infused with flavour - chai, sage, miso etc. The best. I hope you give this pie a try, even though I’m super late to the party. Thanksgiving aside, this would make a great any time pie.

    A few wee tips:

    • The pie dough I have included here is 1 ½ times by regular crust recipe. The reason I have done this is to ensure that you have enough to do the detailed top if you prefer. If you are doing a more plain top crust, you can make the recipe with 2 ½ cups flour, 2 tablespoon chopped sage, a pinch of salt, 2 teaspoon sugar, and 2 sticks (225g) of butter, then water to mix (8-10 tablespoon is usually enough). Or you can make the full amount and then make hand pies with the excess. Damn I love hand pies.
    • Ideally if you can make the pie dough ahead of time, it can do with an overnight rest. It takes a while for the caramel to cool too, so ensure you allow time for this.
    • I used pie stamps to decorate the border - It is a quick way to look fancy, and extra pie crust is always a bonus. I have this set and this set from Williams Sonoma, and this set from Amazon.

    ❤️ Made this recipe and love it? ❤️

    I would LOVE for you to leave me a review and star rating below to let me know how you liked it! Also, please make sure to tag me on Instagram!

    Answers to your baking questions

    Over the years, many of you have asked me questions about:

    • baking in grams
    • adjusting oven temperatures
    • what kind of salt to use
    • and many more!

    I've curated and answered them all for your easy reference in this frequently asked questions post!

    Filed Under: Fruit Pies

    Chocolate Choux Ice Cream Sandwiches with Double Chocolate Ice Cream


    Chocolate Choux Ice Cream Sandwiches with Double Chocolate Ice Cream. The ultimate ice cream sandwich - homemade, rich chocolate ice cream is sandwiched by two light and crispy chocolate choux doughnuts. A simple but indulgent treat. #cruller #icecreamsandwich #choux
    Chocolate Choux Ice Cream Sandwiches with Double Chocolate Ice Cream. The ultimate ice cream sandwich - homemade, rich chocolate ice cream is sandwiched by two light and crispy chocolate choux doughnuts. A simple but indulgent treat. #cruller #icecreamsandwich #choux
    Chocolate Choux Ice Cream Sandwiches with Double Chocolate Ice Cream. The ultimate ice cream sandwich - homemade, rich chocolate ice cream is sandwiched by two light and crispy chocolate choux doughnuts. A simple but indulgent treat. #cruller #icecreamsandwich #choux
    Chocolate Choux Ice Cream Sandwiches with Double Chocolate Ice Cream. The ultimate ice cream sandwich - homemade, rich chocolate ice cream is sandwiched by two light and crispy chocolate choux doughnuts. A simple but indulgent treat. #cruller #icecreamsandwich #choux
    Chocolate Choux Ice Cream Sandwiches with Double Chocolate Ice Cream. The ultimate ice cream sandwich - homemade, rich chocolate ice cream is sandwiched by two light and crispy chocolate choux doughnuts. A simple but indulgent treat. #cruller #icecreamsandwich #choux
    Chocolate Choux Ice Cream Sandwiches with Double Chocolate Ice Cream. The ultimate ice cream sandwich - homemade, rich chocolate ice cream is sandwiched by two light and crispy chocolate choux doughnuts. A simple but indulgent treat. #cruller #icecreamsandwich #choux
    Chocolate Choux Ice Cream Sandwiches with Double Chocolate Ice Cream. The ultimate ice cream sandwich - homemade, rich chocolate ice cream is sandwiched by two light and crispy chocolate choux doughnuts. A simple but indulgent treat. #cruller #icecreamsandwich #choux
    Chocolate Choux Ice Cream Sandwiches with Double Chocolate Ice Cream. The ultimate ice cream sandwich - homemade, rich chocolate ice cream is sandwiched by two light and crispy chocolate choux doughnuts. A simple but indulgent treat. #cruller #icecreamsandwich #choux
    Chocolate Choux Ice Cream Sandwiches with Double Chocolate Ice Cream. The ultimate ice cream sandwich - homemade, rich chocolate ice cream is sandwiched by two light and crispy chocolate choux doughnuts. A simple but indulgent treat. #cruller #icecreamsandwich #choux

    As someone who is a huge fan of both ice cream sandwiches and doughnuts, I figured that they were going to have to be combined at some point along the line. I had some leftover ice cream base after deciding I wanted to make philadelphia style for the project I was working on, so figured it was the perfect time to give them a spin. And ohhh my. The result was these chocolate choux ice cream sandwiches with double chocolate ice cream - a ridiculously indulgent treat, but a total crowd pleaser and an amazing end to a dinner party or a gathering with friends.

    I started with a cruller type doughnut - chocolate choux pastry (same as used for eclairs), which I piped into circles with a star tip onto parchment, then froze solid before frying off. Freezing the dough helps it keep a perfect shape whilst being fried. The freshly fried doughnuts are then rolled in sugar, and once cool, sandwiched with a homemade dark chocolate ice cream, which is flecked with shards of dark chocolate. You can absolutely use a store bought ice cream here if you like - the creamy ice cream compliments the light doughnut perfectly.

    A few wee tips:

    • The Chocolate choux dough can be made ahead, frozen solid on the parchment, then transferred to a ziploc bag until you are ready to fry.
    • A candy thermometer is super important to keep the oil for the frying at the right temperature. I prefer to fry in cast iron because of how consistent it is.
    • I made the ice cream for these because I had some base on hand, but using store bought ice cream would be just as good!
    • I found that frying these on one side and then turning half way through caused them to puff up unevenly. Flipping them every minute throughout the frying process helps to keep them nice and flat while they are cooking.
    • Because these have cocoa in them it is hard to tell when they are done - this is why a thermometer is important. I also recommend frying one off at the start just to double check your frying time.
    • If you don’t want to make these as ice cream sandwiches, you can pipe circles such as in this cruller recipe, or bake them up as chocolate cream puffs
    • If you aren’t planning on eating all of these on the day they are made, I suggest storing the frozen dough and frying off as you want them. You can cool the oil and store back in the oil bottle and re-use - because it gets so hot, it is safe to re-use, just don’t use oil that you have used to fry things such as fish as the flavour will transfer.
    • I included the recipe in grams, as even the slightest amount of differentiation in flour will change the consistency of your mixture.
    • I have included an extra 'just in case' egg in the ingredients. The reason that this is in there, is that sometimes you need to add extra egg to the pastry if necessary. You want the mixture to be at a consistency where if you dip in the beater of the mixer, the batter will form a 'v' shape and eventually break off. If it is too stiff, and breaks off very quickly, you may need to add another beaten egg, and mix again, before performing the test.

    ❤️ Made this recipe and love it? ❤️

    I would LOVE for you to leave me a review and star rating below to let me know how you liked it! Also, please make sure to tag me on Instagram!

    Answers to your baking questions

    Over the years, many of you have asked me questions about:

    • baking in grams
    • adjusting oven temperatures
    • what kind of salt to use
    • and many more!

    I've curated and answered them all for your easy reference in this frequently asked questions post!

    Filed Under: Choux, Doughnuts, Ice Cream & Ice Cream Sandwiches

    Brown Butter Salted Caramel Chocolate Chunk Cookies

    Brown Butter Salted Caramel Chocolate Chunk Cookies. Regular pantry staples are elevated to another level to give this cookie a 'fancy with only a little more effort' vibe. Brown butter is stirred in with toasty muscovado sugar to form a perfect cookie dough, and then hard caramel shards and chocolate chunks are folded in to give the perfect amount of chocolate and caramel per bite. Finished with flaky sea salt, this is a super easy yet satisfying baking recipe.

    Brown Butter Salted Caramel Chocolate Chunk Cookies. Regular pantry staples are elevated to another level to give this cookie a 'fancy with only a little more effort' vibe. Brown butter is stirred in with toasty muscovado sugar to form a perfect cookie dough, and then hard caramel shards and chocolate chunks are folded in to give the perfect amount of chocolate and caramel per bite. Finished with flaky sea salt, this is a super easy yet satisfying baking recipe. #saltedcaramelcookie #chocolatechunkcookie #brownbutter

    Brown Butter Salted Caramel Cookies

    Earlier this year, I spent a long time recipe testing to come up with what I consider to be my perfect chocolate chip cookie. I took a couple of different ‘fomocookie’ recipes, took what I liked from each, then tweaked and tweaked and tweaked until I found something that I considered to be perfect.

    I have since learnt, that while that one recipe IS perfect (to me, anyway), there are a whole bunch of iterations of chocolate chip cookie recipes that are also perfect. Changing up the fats used (such as subbing olive oil for olive oil chocolate chip cookies), adding mix-ins such as peanut butter cups, Nutella chunks, or mini eggs, and browning the butter, along with playing around with the egg, sugar, flour and leavening agent ratios, all can give you variations on a perfect cookie.

    And today, I learnt that browning the butter, and stirring in chunks of salted caramel into a chocolate chunk filled cookie mixture, also yield a very, very perfect cookie.

    • Brown Butter Salted Caramel Cookies
    • Salted Caramel Chocolate Chip Cookies
    • A few wee tips for Brown Butter Salted Caramel Cookies
    Brown Butter Salted Caramel Chocolate Chunk Cookies. Regular pantry staples are elevated to another level to give this cookie a 'fancy with only a little more effort' vibe. Brown butter is stirred in with toasty muscovado sugar to form a perfect cookie dough, and then hard caramel shards and chocolate chunks are folded in to give the perfect amount of chocolate and caramel per bite. Finished with flaky sea salt, this is a super easy yet satisfying baking recipe. #saltedcaramelcookie #chocolatechunkcookie #brownbutter

    Salted Caramel Chocolate Chip Cookies

    When I was making this cookie, I wanted something elevated, and a little fancy, but not something that required crazy ingredients that would leave you with a nearly full bag of something obscure in your cupboard for the next year - the kind of fancy you could achieve with pantry staples. Like when you wear jeans around the house instead of yoga pants kind of fancy. You’ve made a little effort, but didn’t have to go out of your way to achieve it. Just me? Thought so.

    I achieved this little bit of fancy by taking ingredients that are already in cookies, and elevating them slightly. I browned the butter, which adds a beautiful toasty note to the cookies, and complimented it with muscovado sugar in the dough. I then made a quick hard caramel, let it set, then bashed it up into chunks.

    The caramel chunks were stirred through the mixture, along with some dark chocolate chunks. The caramel is the ultimate bestie for the chocolate chunks - it is chewy and crunchy, adding texture alongside the smooth taste of the chocolate.

    These cookies really don’t take a huge amount of extra work, but the few extra steps really do make a huge difference. I also did a bunch of tests and found that the dough can be baked off without a resting period, which means cookies in an instant. The best.

    Brown Butter Salted Caramel Chocolate Chunk Cookies. Regular pantry staples are elevated to another level to give this cookie a 'fancy with only a little more effort' vibe. Brown butter is stirred in with toasty muscovado sugar to form a perfect cookie dough, and then hard caramel shards and chocolate chunks are folded in to give the perfect amount of chocolate and caramel per bite. Finished with flaky sea salt, this is a super easy yet satisfying baking recipe. #saltedcaramelcookie #chocolatechunkcookie #brownbutter

    A few wee tips for Brown Butter Salted Caramel Cookies

    • I have posted the recipe here in grams because that is how I tested it - lots of people don’t realise, but as little as 50g of flour makes a huge amount of difference when it comes to the texture of your cookie, so weighing your ingredients removes the margin of error that comes with measuring by volume. That, and there are far less dishes to do! I would rather you spend $10 on a scale than on ingredients for a cookie that didn’t work out because you didn’t measure your ingredients properly.
    • Don’t be intimidated by the extra steps of browning the butter and making the caramel. They don’t add a huge amount more time, and you can make the caramel while the brown butter cools!
    • I like to chop my chocolate so that you have both shards and chunks. You can also use a baking bar here and chop it roughly using a sharp knife.
    Brown Butter Salted Caramel Chocolate Chunk Cookies. Regular pantry staples are elevated to another level to give this cookie a 'fancy with only a little more effort' vibe. Brown butter is stirred in with toasty muscovado sugar to form a perfect cookie dough, and then hard caramel shards and chocolate chunks are folded in to give the perfect amount of chocolate and caramel per bite. Finished with flaky sea salt, this is a super easy yet satisfying baking recipe. #saltedcaramelcookie #chocolatechunkcookie #brownbutter

    Why are there two quantities of butter in the recipe?

    You will see that there are two different weights of butter called for in the recipe - the starting weight of 225g, and the 175g of brown butter called for in the recipe. When you brown butter you cook off the water, so the starting weight and ending weight are different. The initial quantity of butter accounts for this moisture loss. Measure out 175g of the brown butter to use for your cookie recipe.

    I know that making brown butter can be intimidating. Don't be scared, I will hold your hand the whole way through in my post and you'll be nailing it in no time: Brown Butter 101: The Ultimate Guide

    Brown Butter Salted Caramel Chocolate Chunk Cookies. Regular pantry staples are elevated to another level to give this cookie a 'fancy with only a little more effort' vibe. Brown butter is stirred in with toasty muscovado sugar to form a perfect cookie dough, and then hard caramel shards and chocolate chunks are folded in to give the perfect amount of chocolate and caramel per bite. Finished with flaky sea salt, this is a super easy yet satisfying baking recipe. #saltedcaramelcookie #chocolatechunkcookie #brownbutter

    How do you store salted caramel cookies?

    Store these cookies in an airtight container at room temperature for up to five days. I like to re warm mine slightly before serving or serve with a scoop of ice cream!

    Can this cookie dough be frozen?

    Because of the caramel in the recipe, this cookie dough does not freeze well. The caramel will go super weird and weepy. You are better off baking them all at once. Alternatively, my egg yolk chocolate chip cookie recipe is smaller batch and also has the caramel!

    Brown Butter Salted Caramel Chocolate Chunk Cookies. Regular pantry staples are elevated to another level to give this cookie a 'fancy with only a little more effort' vibe. Brown butter is stirred in with toasty muscovado sugar to form a perfect cookie dough, and then hard caramel shards and chocolate chunks are folded in to give the perfect amount of chocolate and caramel per bite. Finished with flaky sea salt, this is a super easy yet satisfying baking recipe. #saltedcaramelcookie #chocolatechunkcookie #brownbutter
    Brown Butter Salted Caramel Chocolate Chunk Cookies. Regular pantry staples are elevated to another level to give this cookie a 'fancy with only a little more effort' vibe. Brown butter is stirred in with toasty muscovado sugar to form a perfect cookie dough, and then hard caramel shards and chocolate chunks are folded in to give the perfect amount of chocolate and caramel per bite. Finished with flaky sea salt, this is a super easy yet satisfying baking recipe. #saltedcaramelcookie #chocolatechunkcookie #brownbutter

    For more cookie recipes, check out:

    • My Perfect Chocolate Chip Cookie
    • Brown Butter Salted Caramel Chocolate Ganache Tart
    • Small Batch Double Chocolate, Olive Oil and Rye Cookies
    • Brown Butter Spelt Chocolate Chip Cookies

    ❤️ Made this recipe and love it? ❤️

    I would LOVE for you to leave me a review and star rating below to let me know how you liked it! Also, please make sure to tag me on Instagram!

    Answers to your baking questions

    Over the years, many of you have asked me questions about:

    • baking in grams
    • adjusting oven temperatures
    • what kind of salt to use
    • and many more!

    I've curated and answered them all for your easy reference in this frequently asked questions post!

    Filed Under: Chocolate Chip Cookies, Most Popular

    Nine of the Best Thanksgiving Pie Recipes

    Nine of the Best Thanksgiving Pies: the Ultimate Pie Roundup Post! This roundup post lists some of the best thanksgiving pie recipes - there is literally something for everyone. Make just one or mix and match for the ultimate thanksgiving pie spread


    Nine of the Best Thanksgiving Pie Recipes: the Ultimate Pie Roundup Post! This roundup post lists some of the best thanksgiving pie recipes - there is literally something for everyone. Make just one or mix and match for the ultimate thanksgiving pie spread. #thanksgiving #pierecipes #roundup

    Nine of the Best Thanksgiving Pies

    A couple of weeks ago I packed an overnight bag and headed to Jersey for the night for something I’ve never done before, but will hopefully be doing again - a pie sleepover! I went to stay with my good friend Erin, and we put together a one-stop Thanksgiving Pie (or any time pie) post for you! We chose nine of our favourite recipes for this roundup of the best Thanksgiving Pies - some traditional, and some less traditional (I think? I know nothing about Thanksgiving lol), and I think that we managed to come up with something for everyone. Erin is the queen of the pie (She just did an incredible feature in the NEW YORK TIMES!), and we had the best time spending two days together to have a proper catch up rather than just a quick dinner or drink every now and then like we usually manage. I learnt LOADS, ate loads, and if I may say so myself, we put together a fairly epic pie roundup for you - in our opinions, nine of the best pies to make for Thanksgiving!

    We have used existing recipes here - either from Erin’s book (which you should get right now if you don’t already own), one of the many recipes she has developed, or recipes from here on my blog, so underneath each photo you will find a link to the recipe, along with any notes we have or changes that we have made. The pies are perfect as singles, but we also wanted to give you recipes that compliment each other, so if you’re hoping to make a pie spread for Thanksgiving, we got you.

    Here’s what we ended up with (in the order listed):

    • Pumpkin Sugar Pie
    • Nutella French Silk Pie
    • Chocolate Pecan Pie
    • Bourbon Apple Galette
    • Chocolate Cream pie with Peanut Butter Cream
    • Blood Orange Meringue Pie
    • Miso Caramel Apple Pie
    • Concord Grape Pie
    • Apple Butterscotch Pie
    Nine of the Best Thanksgiving Pie Recipes: the Ultimate Pie Roundup Post! This roundup post lists some of the best thanksgiving pie recipes - there is literally something for everyone. Make just one or mix and match for the ultimate thanksgiving pie spread. #thanksgiving #pierecipes #roundup

    A few wee notes on pie making:

    • You can read all my tips and tricks on how to make pie crust in my post - foolproof homemade pie crust. I also have a post on how to blind bake pie crust!
    • Erin taught me an amazing way to make your pie dough smooth and easy to work with, while still being flaky AF: Make the dough as usual (you can keep the butter chunks quite big), wrap it up, rest in the fridge for 30 minutes to an hour, then roll it out into a rectangle, fold it like a letter, then repeat the process. You then fold all four corners inward to form the rectangle into a disc, then re-wrap and rest in the fridge until you are ready to roll out! This process is similar to how rough puff is made, and really helps develop layers in the dough, while keeping it smooth and pretty! This technique was an absolute game changer for me, and I’m going to be using it every time I make dough now!
    • An overnight rest is best if possible for the dough, but if not, a couple of hours will work if you are in a pinch.
    • If you have a fave dough recipe, go ahead and use that! Otherwise ours are in the recipes!
    • Take things slow, and keep things cold. The best pies are the ones made where you aren’t in a rush! If you find your dough is warming up, pop it back into the fridge for a bit so that it firms up again slightly. Give your pie a good amount of time to rest in the fridge before you bake it to allow the crust to chill properly.
    • Some of the pies require a par-bake. We did this the night before, then filled and baked off the day of. This is an easy way to get some of the prep work done ahead of time.
    • Fruit pies can be made ahead of time - I like to make the filled pie, then freeze it unbaked until it is pie time! I usually freeze it until the crust is solid, then wrap tightly in foil to store in the freezer. It may need a little longer in the oven to account for the freezing.
    • Some of these pies need time to set - like the Nutella French Silk and Chocolate Cream Pie, so make sure you account for this!
    • If you want a clean cut on your pie, make sure that it is totally cool before cutting into it.
    • Erin has about 12 zillion more amazing pie tips in her book, including different ways to crimp your crust! (I also saved all the videos to my highlights on IG if you want a little relaxing video watching session)
    • If you have any questions, please leave them down below, and I will do my very best to answer everything!

    Pumpkin Sugar Pie: The Pumpkin Pie for people who don’t like Pumpkin Pie

    Nine of the Best Thanksgiving Pie Recipes: the Ultimate Pie Roundup Post! This roundup post lists some of the best thanksgiving pie recipes - there is literally something for everyone. Make just one or mix and match for the ultimate thanksgiving pie spread. #thanksgiving #pierecipes #roundup

    Both Erin and I aren’t giant fans of Pumpkin Pie - for me, I would just rather eat something else. I grew up eating savoury pumpkin dishes (we don’t have pumpkin pie / thanksgiving in New Zealand), so I’ve never been super into it. I also find it a little stressful to make, as I worry about it overcooking and cracking, which is caused by the protein in the eggs tightening up too much, causing cracks. This Pumpkin Sugar Pie, however is a bit of a game changer. It is set with flour as opposed to eggs, so you don’t have to worry about it cracking, and has a beautiful silky texture. It’s the best, and I will definitely be making it this year! Plus, drowning things in icing sugar is far too much fun. If you are looking for other sugar pie recipes, Erin just posted two in her NYT feature, and there’s the OG in her book!

    • Get the recipe: Homemade Pumpkin Pie

    Nutella French Silk Pie: A twist on the classic French Silk Pie

    Nine of the Best Thanksgiving Pie Recipes: the Ultimate Pie Roundup Post! This roundup post lists some of the best thanksgiving pie recipes - there is literally something for everyone. Make just one or mix and match for the ultimate thanksgiving pie spread. #thanksgiving #pierecipes #roundup

    I developed this one not too long ago, and it might possibly be a top contender for best pie ever in my books. I know Chocolate pie isn’t a traditional thanksgiving staple, but can we make it one? Haha. I think having a chocolate pie to balance out all the fruit pies is essential. This one, unlike most french silk pies, doesn’t use any raw eggs, and it is silky smooth with a good Nutella hit. It’s finished with swirls of whipped cream and chopped hazelnuts. You can’t really go wrong.

    • Get the recipe: French Silk Pie

    Chocolate Pecan Pie: A classic Thanksgiving Staple

    Nine of the Best Thanksgiving Pie Recipes: the Ultimate Pie Roundup Post! This roundup post lists some of the best thanksgiving pie recipes - there is literally something for everyone. Make just one or mix and match for the ultimate thanksgiving pie spread. #thanksgiving #pierecipes #roundup

    I don’t know a whole lot about pecan pie, but I do know that 1. It is a Thanksgiving classic, and 2. Erin’s version is epic. She doubled the filling for the recipe linked below, then baked it in a par baked crust, the same way you would do a sugar pie. Erin doubled the recipe for this chocolate pecan galette, and baked it in a par-baked crust (with a fork crimp! So cute!), until the pecans were toasty and the filling was set. Update: I now have a recipe for this on Cloudy Kitchen, the link is below!

    • Get the recipe: Brown Butter, Black Bottom Pecan Pie


    Bourbon apple galette: The apple pie that doesn’t require a lattice

    Nine of the Best Thanksgiving Pie Recipes: the Ultimate Pie Roundup Post! This roundup post lists some of the best thanksgiving pie recipes - there is literally something for everyone. Make just one or mix and match for the ultimate thanksgiving pie spread. #thanksgiving #pierecipes #roundup

    Galettes are the perfect option for those who still want pie, but find making a double crust or crimping dough intimidating. You basically roll out the dough, dump the filling in, and then fold up the sides however you like. This Bourbon Apple Galette is super easy and crazy delicious - you make a lightly spiced bourbon sugar mixture, which is drizzled over the apples before baking, and turns the filling into this amazing caramelised apple situation. We used this recipe, but made it round rather than square. I also have a rectangle apple galette if you're after one!

    • Get the recipe: https://food52.com/recipes/65346-bourbon-apple-galette

    Chocolate cream pie with peanut butter cream: For the peanut butter lover

    Nine of the Best Thanksgiving Pie Recipes: the Ultimate Pie Roundup Post! This roundup post lists some of the best thanksgiving pie recipes - there is literally something for everyone. Make just one or mix and match for the ultimate thanksgiving pie spread. #thanksgiving #pierecipes #roundup

    This pie was the very first thing I made from Erin’s book, and I quickly got hooked on the peanut butter whipped cream on top, and proceeded to put it on everything I made. To make this pie, you fully blind bake a crust, then pour pudding into it and allow it to set, before finishing with peanut butter whipped cream. The cream really finishes it off, so don’t skip it!

    • Get the recipe: Chocolate Cream Pie

    Blood Orange Meringue Pie: The Perfect citrus meringue pie

    Nine of the Best Thanksgiving Pie Recipes: the Ultimate Pie Roundup Post! This roundup post lists some of the best thanksgiving pie recipes - there is literally something for everyone. Make just one or mix and match for the ultimate thanksgiving pie spread. #thanksgiving #pierecipes #roundup

    I love a good lemon meringue pie (I mainly just love burning things with my blow torch), so was super excited when Erin suggested a rework of the grapefruit meringue pie from her book! I love how this one turned out so much - the best part about meringue pies is not having to worry about what the surface of the pie looks like, because you know you’re just going to load it up with meringue anyway. The curd was a beautiful pink colour, and it was an epic twist on the traditional. The recipe for this is the grapefruit meringue pie in Erin’s book - we just subbed blood orange juice for the grapefruit.

    • Get the recipe: You can buy Erin’s book here , or use my recipe for Lemon Meringue Pie!


    Miso Caramel Apple pie: a variation on the traditional caramel apple pie

    Nine of the Best Thanksgiving Pie Recipes: the Ultimate Pie Roundup Post! This roundup post lists some of the best thanksgiving pie recipes - there is literally something for everyone. Make just one or mix and match for the ultimate thanksgiving pie spread. #thanksgiving #pierecipes #roundup

    This pie has been a very firm favourite in our house for a while now - I love caramel apple pie, but there is something about the umami, savoury flavour that the miso caramel gives to this pie that I just can’t go past. The miso caramel recipe makes a little more than you need, which means some very epic ice cream sundaes are going to be in your future. It’s perfect if you are looking for a wee twist on apple pie!

    • Get the recipe: Miso Caramel Apple Pie


    Concord grape pie: for a wee taste of summer

    Nine of the Best Thanksgiving Pie Recipes: the Ultimate Pie Roundup Post! This roundup post lists some of the best thanksgiving pie recipes - there is literally something for everyone. Make just one or mix and match for the ultimate thanksgiving pie spread. #thanksgiving #pierecipes #roundup

    I had Concord Grape pie for the first time a couple of weeks ago at Gramercy Tavern, and was instantly obsessed. Concord grapes are a variety of grape grown here in the USA - if you’re from New Zealand, I would describe them as the same kind of grapes people grow on vines in their garden - the dark purple ones with the kind of waxy finish and the skins that pull away super easily. You know the ones? Good. Erin’s filling is perfect - she had some frozen grapes she used for the filling. I’ve seen them still in season here in NYC, so if you see some, grab them and stash them and make this pie! This recipe is also from Erin’s book, and she did a simple ‘fattice’ on the top (using fat strips), which is a great lattice to use if you’re unsure about weaving pie dough, because it’s super simple, but still so, so pretty! Even though this was my first time trying it, this guy absolutely makes the list of best Thanksgiving Pies.

    • Get the recipe: You can buy Erin’s book here

    Apple butterscotch pie: for when you can’t decide between a cream pie and a fruit pie

    Nine of the Best Thanksgiving Pie Recipes: the Ultimate Pie Roundup Post! This roundup post lists some of the best thanksgiving pie recipes - there is literally something for everyone. Make just one or mix and match for the ultimate thanksgiving pie spread. #thanksgiving #pierecipes #roundup

    This pie was my very very favourite of them all. It’s a cooked apple filling, which is baked in a par baked crust, and then covered with a butterscotch pudding, then set in the fridge and topped with a layer of whipped cream. There’s so many flavours going on - the spiced fruit, the sweet pudding and the whipped cream. It’s like all the best parts about different types of pies had a baby, and this is it. The recipe for this one is in an ebook that Erin is releasing super super soon, so as soon as the link is live I will pop it here for you and update the post! Update: Erin wrote a whole BOOK about pie and it is so magical. I made this pie for my site, the link is below!

    • Get the recipe: Butterscotch Apple Pie

    Happy Happy Thanksgiving, or if you don’t celebrate, happy pie making! I would love to know if you make any of the pies from our list of Best Thanksgiving Pies!


    Nine of the Best Thanksgiving Pie Recipes: the Ultimate Pie Roundup Post! This roundup post lists some of the best thanksgiving pie recipes - there is literally something for everyone. Make just one or mix and match for the ultimate thanksgiving pie spread. #thanksgiving #pierecipes #roundup
    Nine of the Best Thanksgiving Pie Recipes: the Ultimate Pie Roundup Post! This roundup post lists some of the best thanksgiving pie recipes - there is literally something for everyone. Make just one or mix and match for the ultimate thanksgiving pie spread. #thanksgiving #pierecipes #roundup
    Nine of the Best Thanksgiving Pie Recipes: the Ultimate Pie Roundup Post! This roundup post lists some of the best thanksgiving pie recipes - there is literally something for everyone. Make just one or mix and match for the ultimate thanksgiving pie spread. #thanksgiving #pierecipes #roundup
    Nine of the Best Thanksgiving Pie Recipes: the Ultimate Pie Roundup Post! This roundup post lists some of the best thanksgiving pie recipes - there is literally something for everyone. Make just one or mix and match for the ultimate thanksgiving pie spread. #thanksgiving #pierecipes #roundup
    Nine of the Best Thanksgiving Pie Recipes: the Ultimate Pie Roundup Post! This roundup post lists some of the best thanksgiving pie recipes - there is literally something for everyone. Make just one or mix and match for the ultimate thanksgiving pie spread. #thanksgiving #pierecipes #roundup

    Filed Under: Single-crust pies

    Apple Butter Macarons

    The perfect Fall French Macaron - Macaron shells are filled with a smooth apple butter and spiced swiss meringue buttercream. #frenchmacaron #applemacaron
    The perfect Fall French Macaron - Macaron shells are filled with a smooth apple butter and spiced swiss meringue buttercream. #frenchmacaron #applemacaron
    The perfect Fall French Macaron - Macaron shells are filled with a smooth apple butter and spiced swiss meringue buttercream. #frenchmacaron #applemacaron
    The perfect Fall French Macaron - Macaron shells are filled with a smooth apple butter and spiced swiss meringue buttercream. #frenchmacaron #applemacaron
    The perfect Fall French Macaron - Macaron shells are filled with a smooth apple butter and spiced swiss meringue buttercream. #frenchmacaron #applemacaron

    For the last couple of years, we have been part of a CSA. CSA stands for “Community Supported Agriculture” - essentially a farm upstate grows all the produce, then each week drives a truck down to drop off shares to a bunch of different CSAs. You pay at the start of the year, and then get to pick up seasonal veggies for 22 weeks! Each week is slightly different. It’s a great way to meet people, and the produce is always amazingly fresh. I became part of the volunteer group that runs it a few years ago - we each take turns running the pick-ups.

    Anyway, where I am going with this is that I ran the pick-up last week, in the middle of a storm. I froze my wee fingers off, but it ended up being incredibly worth it, because due to the storm a bunch of people didn’t pick up, so I came home with a GIANT crate of apples. Like, crate that they use in the orchard. It’s way more apples than I know what to do with, so I’m going to get to it this weekend making some apple butters and pies so that we have them on hand in the freezer.

    So enter these apple macarons. They are filled them with an apple butter, and a swiss meringue buttercream which we spiked with vanilla bean, cinnamon, cloves, nutmeg, allspice and ginger. You can’t really get any more autumn than that. Fall AF.

    A few wee tips:

    • I have included notes to make apple butter (which is really just reduced apple sauce!) in both the instant pot and the slow cooker. You may or may not have to reduce down the mixture using the slow cooker - it depends on your apples. You are looking for a thick apple puree or sauce consistency. Remember that it will thicken in the fridge slightly!
    • Using the instant pot you will have to reduce it more because the water does not evaporate. You can do this on the saute function, however I find this a little inconsistent in heat delivery, so prefer to switch it to the pot.
    • The Apple butter needs to cool down before it can be used - overnight is ideal. You will be left with extra - but it is amazing on toast or baking!

    ❤️ Made this recipe and love it? ❤️

    I would LOVE for you to leave me a review and star rating below to let me know how you liked it! Also, please make sure to tag me on Instagram!

    Answers to your baking questions

    Over the years, many of you have asked me questions about:

    • baking in grams
    • adjusting oven temperatures
    • what kind of salt to use
    • and many more!

    I've curated and answered them all for your easy reference in this frequently asked questions post!

    Filed Under: Macarons Tagged With: Gluten Free

    Spinach, Feta, and Basil Pesto Pull-apart Bread

    Delicious homemade Spinach, Feta, and Basil Pesto Pull-apart Bread. Quick and easy loaf pan recipe that is perfect to share!

    Spinach, Feta and Basil pesto Pull-apart bread. This pull apart loaf is super easy to put together, while being very impressive at the same time! A simple dough is filled with a spinach, feta and basil pesto filling, then cut into rectangles and layered into a loaf tin for the perfect pull apart bread. #pullapartbread #basilpestobread #spinachloaf

    I made this pull-apart bread for the first time a couple of weeks ago, and have been tweaking the rolling and filling directions to make it as easy as possible. Lots of pull-apart breads will have you roll out the bread and cut circles, which you then fold into half-moons and stack into the loaf pan, but I didn’t want to have the leftover waste, so opted for rolling out the dough, spreading the filling, and then cutting into rectangles which are folded and stacked in. This process is super easy, and results in a fancy looking loaf that is fun to eat - you literally pull it apart and eat it layer by layer.

    A few wee tips:

    • I used cooked spinach in this recipe - I just placed the spinach in a microwave safe bowl with a plate on top, then microwaved until it was wilted and reduced down. I then roughly chopped it, and set it over a sieve to drain out until I was ready to use it. Spinach contains loads of moisture, so you want to get most of this out before you use it so it doesn’t make your bread soggy.
    • The first rise for the bread can easily be done overnight.
    • I blended the filling using a stick blender - if you don’t want to do this step you can skip it, or you can use a food processor to do this too. It really helped to break down the spinach and make the filling easy to spread.
    • You may have a wee bit of filling left over depending on how thick you spread it - I stirred it into a pasta sauce and it was perfect!
    • I used a standard 1 pound loaf tin for this recipe - don’t worry if the pieces of dough look like they aren’t filling it up enough, as they rise they will take up the rest of the space.
    • This is best eaten the day it is made, but if you have leftovers, pop them in the microwave just for 30 seconds or so to refresh before eating.

    ❤️ Made this recipe and love it? ❤️

    I would LOVE for you to leave me a review and star rating below to let me know how you liked it! Also, please make sure to tag me on Instagram!

    Answers to your baking questions

    Over the years, many of you have asked me questions about:

    • baking in grams
    • adjusting oven temperatures
    • what kind of salt to use
    • and many more!

    I've curated and answered them all for your easy reference in this frequently asked questions post!

    Filed Under: Brioche, Savoury

    Chocolate Chunk Olive Oil Ricotta Cake with Dark Chocolate Buttercream


    Chocolate Chunk Olive Oil Ricotta cake with Dark Chocolate buttercream - this cake is flavoursome from the olive oil, with a perfect crumb from the ricotta in the batter. It is studded with dark chocolate chunks throughout, and finished with a silky smooth dark chocolate buttercream. The perfect elevated loaf cake. #loafcake #poundcake #ricottacake
    Chocolate Chunk Olive Oil Ricotta cake with Dark Chocolate buttercream - this cake is flavoursome from the olive oil, with a perfect crumb from the ricotta in the batter. It is studded with dark chocolate chunks throughout, and finished with a silky smooth dark chocolate buttercream. The perfect elevated loaf cake. #loafcake #poundcake #ricottacake
    Chocolate Chunk Olive Oil Ricotta cake with Dark Chocolate buttercream - this cake is flavoursome from the olive oil, with a perfect crumb from the ricotta in the batter. It is studded with dark chocolate chunks throughout, and finished with a silky smooth dark chocolate buttercream. The perfect elevated loaf cake. #loafcake #poundcake #ricottacake
    Chocolate Chunk Olive Oil Ricotta cake with Dark Chocolate buttercream - this cake is flavoursome from the olive oil, with a perfect crumb from the ricotta in the batter. It is studded with dark chocolate chunks throughout, and finished with a silky smooth dark chocolate buttercream. The perfect elevated loaf cake. #loafcake #poundcake #ricottacake
    Chocolate Chunk Olive Oil Ricotta cake with Dark Chocolate buttercream - this cake is flavoursome from the olive oil, with a perfect crumb from the ricotta in the batter. It is studded with dark chocolate chunks throughout, and finished with a silky smooth dark chocolate buttercream. The perfect elevated loaf cake. #loafcake #poundcake #ricottacake
    Chocolate Chunk Olive Oil Ricotta cake with Dark Chocolate buttercream - this cake is flavoursome from the olive oil, with a perfect crumb from the ricotta in the batter. It is studded with dark chocolate chunks throughout, and finished with a silky smooth dark chocolate buttercream. The perfect elevated loaf cake. #loafcake #poundcake #ricottacake
    Chocolate Chunk Olive Oil Ricotta cake with Dark Chocolate buttercream - this cake is flavoursome from the olive oil, with a perfect crumb from the ricotta in the batter. It is studded with dark chocolate chunks throughout, and finished with a silky smooth dark chocolate buttercream. The perfect elevated loaf cake. #loafcake #poundcake #ricottacake
    Chocolate Chunk Olive Oil Ricotta cake with Dark Chocolate buttercream - this cake is flavoursome from the olive oil, with a perfect crumb from the ricotta in the batter. It is studded with dark chocolate chunks throughout, and finished with a silky smooth dark chocolate buttercream. The perfect elevated loaf cake. #loafcake #poundcake #ricottacake
    Chocolate Chunk Olive Oil Ricotta cake with Dark Chocolate buttercream - this cake is flavoursome from the olive oil, with a perfect crumb from the ricotta in the batter. It is studded with dark chocolate chunks throughout, and finished with a silky smooth dark chocolate buttercream. The perfect elevated loaf cake. #loafcake #poundcake #ricottacake

    Oye. It’s kind of taking a while to get back into the swing of things since we’ve gotten home from New Zealand. Although I refuse to admit it, the trip back kind of took it out of me this time. Home was amazing, but there was a big to-do list waiting for me, that is kinda looming. But I feel like i’ve finally caught up on sleep, and am getting back into a routine (and we got a new foster cat this week, so all is right with the world!), so enough complaining, and let’s talk loaf cakes. Specifically, this chocolate chunk olive oil ricotta cake with dark chocolate buttercream. Yes it’s a mouthful. Literally. A delicious, chocolate, ricotta olive oil cake mouthful.

    This is the perfect cake for if you want something easy to make, but still a little fancy. Because the cake is olive oil based, there is no need to cream butter and sugar. I added a little almond meal in to help give it that perfect dense texture, and the ricotta plays perfectly with the fruity olive oil. I topped it with a quick dark chocolate buttercream, which comes together super quickly, but utilises melted chocolate to help keep it silky. It’s amazing without the buttercream, but even more amazing with. You do you.

    A few wee tips:

    • There aren’t really too many tips for this one! I made it in a pound sized loaf tin, and tented it just toward the end.
    • A good quality dark chocolate and good quality olive oil really make a difference here, so if you can, get a good quality of both!
    • This does make quite a bit of buttercream, which I like, but feel free to scale it back by a third if you want a little less ( I wouldn’t if I were you, but you choose!)

    ❤️ Made this recipe and love it? ❤️

    I would LOVE for you to leave me a review and star rating below to let me know how you liked it! Also, please make sure to tag me on Instagram!

    Answers to your baking questions

    Over the years, many of you have asked me questions about:

    • baking in grams
    • adjusting oven temperatures
    • what kind of salt to use
    • and many more!

    I've curated and answered them all for your easy reference in this frequently asked questions post!

    Filed Under: Cupcakes and Mini Cakes

    Perfectly Chewy Soft Pretzels with Cheese Dip

    soft pretzels with cheese dip

    Soft pretzels with cheese sauce dip. The pretzels are baked until perfectly golden brown, then served alongside an easy, creamy, cheesy mustard pretzel dipping sauce that comes together extremely quickly. These are the perfect snack for a crowd.

    soft pretzels with cheese dip

    Table of contents

    • Soft Pretzels with Cheese Sauce Dip
    • How to make Homemade Pretzels
    • How to shape a soft pretzel
    • Baking Pretzels on Silpat Vs Parchment
    • Baking Soda Vs Lye in Baked Pretzels
    • Pretzel Cheese Dip
    • FAQ for Homemade Soft Pretzels
    • Recipes related to this soft pretzel recipe:
    • Recipe for Homemade Soft Pretzels with Cheese Dip

    Soft Pretzels with Cheese Sauce Dip

    Hi hi! Just popping in to share this soft pretzel recipe with you! If you haven't made your own homemade pretzels before now is a great time to start - they are a super fun from scratch baking project, and the dough is super versatile. I use this one master dough to make my Pizza Pretzels, Homemade Pretzel Bites, and Chewy Pretzel buns, so you can make one batch and finish these however you like!

    I serve my soft pretzels with a really easy Pretzel cheese dip, which is great to make ahead and warm up as needed, or you can serve these soft pretzels alongside your favourite condiment - you do you here!

    sheet pan of pretzels

    How to make Homemade Pretzels

    This recipe is a pretty stiff dough, so I like to make it in the stand mixer with the dough hook. I haven't tried making it by hand. It would be quite hard to knead it by hand I think. You are welcome to try but please know it has not been tested so I cannot guarantee the results.

    • Make the Pretzel Dough. This can be done either the day before, or the same day. Leave to rise.
    • Divide the dough and shape the pretzels. I did traditional pretzel shapes, but these would work great just as pretzel sticks or twists too.
    • Second rise. I do the second rise for pretzels uncovered, in order to let the pretzels develop a bit of a skin. This helps them stand up to the water bath.
    • Chill. Slightly chilled dough is a little less floppy and easier to work with when putting the pretzels in the water bath. Popping the risen pretzels into the fridge helps with this.
    • Baking Soda bath. This step gives the pretzels their pretzel taste and helps them to get golden brown in the oven. I used baked baking soda for this step.
    • Bake. Bake the pretzels until they are a deep golden brown, then enjoy!
    Authentic pretzels, baked until perfectly soft and golden brown, dipped in a super easy cheesy mustard dipping sauce that comes together extremely quickly. The perfect snack for a crowd. #pretzels #cheesesauce #cheesedip #americancheese #bread #homemadepretzels #bakingsodadip

    How to shape a soft pretzel

    Pretzels are easy to shape once you get the hang of it. I've added a shaping video down below, or you can follow these steps:

    1. Divide the dough into the number of pretzels that you want to make.
    2. Shape each piece of dough into a ball and place under a piece of plastic wrap to rest.
    3. Flatten or roll each ball into a rectangle and then roll into a log. Place back under the plastic wrap.
    4. Working with one piece of dough at a time, roll the log out to a 30" rope. This will seem long but remember that the pretzel will puff up.
    5. Shape the log of dough into a 'U' shape.
    6. Cross the two ends over each other twice, to form a twist.
    7. Bring the ends down and press onto the rounded part of the pretzel.
    8. Carefully transfer to a sheet pan
    9. Repeat with the remaining pretzels

    Baking Pretzels on Silpat Vs Parchment

    I use Silpat mats (silicone mats) when I am making pretzels as it stops them from sticking. I came across this in testing. After the pretzels came out of the water bath, if I put them directly onto the parchment, they were sticking super, super badly.

    There are two ways around this - either drain the pretzels for a few minutes on a wire rack after dipping and then transfer to lightly oiled parchment paper, or line the baking sheets with silpats or silicone baking sheets rather than baking paper.

    I found baking on silicone to be the easiest option - once the pretzels come out of the dip they are a little delicate, so moving them from the rack to the baking sheet can be a little stressful. It works though! A few silpats or silicone baking mats are a great investment!

    pretzel on wire rack
    pretzels on wax paper with cheese sauce

    Baking Soda Vs Lye in Baked Pretzels

    Some pretzel recipes will have you use lye to soak the pretzels in. Giving the pretzels a wee bath in lye (sodium hydroxide) helps to speed up the Maillard reaction, which gives the pretzels that lovely brown colour and chew. However, lye is caustic (alkaline) and scary, so I used something a little less alkaline but still very effective - baked baking soda. Baking soda (sodium bicarbonate) is moderately alkaline, but baking it produces sodium carbonate, which is slightly more alkaline, so therefore perfect for dipping your pretzels without having to worry about the safety risk of using Lye. Yay chemistry!

    To make baked baking soda: Line a sheet pan with foil, and spread 1 cup of baking soda evenly over it. Bake at 250˚f / 121˚c for one hour, then transfer to an airtight container. This will be enough for four batches of pretzels - you use ¼ cup at a time.

    pretzels ready for oven

    Pretzel Cheese Dip

    I often serve this soft pretzel recipe with a super easy Pretzel cheese dip, which is basically a cheese sauce, using american style cheese and cream cheese for smoothness. It is super creamy, and you can use any cheese that you like - just make sure the total cheese weight is the same as in the recipe.

    The cheese dip for the pretzels can be made ahead of time - store in an airtight container in the fridge with a piece of plastic wrap over the surface to ensure it doesn't get a skin. When you are ready to serve, either microwave or warm gently on the stove.

    Authentic pretzels, baked until perfectly soft and golden brown, dipped in a super easy cheesy mustard dipping sauce that comes together extremely quickly. The perfect snack for a crowd. #pretzels #cheesesauce #cheesedip #americancheese #bread #homemadepretzels #bakingsodadip

    FAQ for Homemade Soft Pretzels

    Can I replace instant yeast with active dry?
    Yes. If you only have active dry yeast, it works as a 1:1 sub in the recipe. However you will need to activate it. Bring the milk to a lukewarm temperature, then add the sugar and the yeast. Leave for 10-15 minutes until it gets foamy, then add the rest of the ingredients and continue with the recipe.

    What is Bread flour?
    Bread flour is flour with a higher percentage of protein. If you are in NZ or the UK it is 'high grade flour' or 'strong flour'. These soft pretzels can be made with all-purpose flour if it is all you have on hand.

    What is pretzel salt?
    Pretzel salt is a coarse salt - it is opaque (which I think comes from having some air in it), so it gives a textural crunch. You can use a fine coarse salt too if you can't find pretzel salt

    Can Cheese dip for pretzels be made ahead?
    Yes - you can make it up to a few days ahead and store in the fridge. Re-warm when needed. If you have extra leftover, it is great as the filling for these cheese buns!

    How to do you store pretzels?
    Pretzels are best eaten on the day that they are made, but you can store pretzels lightly covered at room temperature. Re-warm before you eat them. If you are planning on making some to eat later than the day you make them, leave off the salt so that they don't go soggy.

    Authentic pretzels, baked until perfectly soft and golden brown, dipped in a super easy cheesy mustard dipping sauce that comes together extremely quickly. The perfect snack for a crowd. #pretzels #cheesesauce #cheesedip #americancheese #bread #homemadepretzels #bakingsodadip

    Recipes related to this soft pretzel recipe:

    • Pizza Pretzels
    • baked bread roll with ketchup and mustard
      Chewy Pretzel Buns
    • Caramelised Onion, Goat Cheese, and Sundried Tomato Pesto Pretzel Buns
    • close up of pretzel bites with dip
      Pretzel Bites with Feta Pesto Dip

    ❤️ Made this recipe and love it? ❤️

    I would LOVE for you to leave me a review and star rating below to let me know how you liked it! Also, please make sure to tag me on Instagram!

    Answers to your baking questions

    Over the years, many of you have asked me questions about:

    • baking in grams
    • adjusting oven temperatures
    • what kind of salt to use
    • and many more!

    I've curated and answered them all for your easy reference in this frequently asked questions post!

    Recipe for Homemade Soft Pretzels with Cheese Dip

    Filed Under: Savoury Breads

    Mint Chocolate Chip Macarons

    Mint Chocolate Chip Macarons with German buttercream. Delicate French macaron shells are sandwiched together by a mint chocolate chip german buttercream that tastes just like ice cream! #mintchocolatechip #mintchip #frenchmacarons #macarons #recipe #howtomake
    Mint Chocolate Chip Macarons with German buttercream. Delicate French macaron shells are sandwiched together by a mint chocolate chip german buttercream that tastes just like ice cream! #mintchocolatechip #mintchip #frenchmacarons #macarons #recipe #howtomake
    Mint Chocolate Chip Macarons with German buttercream. Delicate French macaron shells are sandwiched together by a mint chocolate chip german buttercream that tastes just like ice cream! #mintchocolatechip #mintchip #frenchmacarons #macarons #recipe #howtomake
    Mint Chocolate Chip Macarons with German buttercream. Delicate French macaron shells are sandwiched together by a mint chocolate chip german buttercream that tastes just like ice cream! #mintchocolatechip #mintchip #frenchmacarons #macarons #recipe #howtomake
    Mint Chocolate Chip Macarons with German buttercream. Delicate French macaron shells are sandwiched together by a mint chocolate chip german buttercream that tastes just like ice cream! #mintchocolatechip #mintchip #frenchmacarons #macarons #recipe #howtomake

    Our time in New Zealand has almost, almost come to an end. And this time more than ever, I am equal parts ‘can’t wait to get back to nyc and get back into a routine’, and ‘OMG I can’t wait until I actually live here for realsies’. The grand plan (!!) is to eventually move back to the motherland (being NZ) - we have thrown round 2020 as being our year to do so. We have spent the last couple of days in Wellington, where Rich and I met (we both went to Uni here), and today we are looking at open homes! We probably won’t buy just yet, but hopefully in the next year or so, so that we have something to move into when we get back. I love NYC with all my heart, but I really can’t wait to have a big kitchen that’s all mine, along with some grass and a lemon tree.

    These Mint Chocolate Chip Macarons with German Buttercream came about when we were making these wee Peach Streusel dudes. We finally worked out that the air con was making them come out all kinds of weird shapes, so these were the batch to prove that we had solved the problem! I love mint chip ice cream more than almost anything in the world, so I was super stoked to make this flavour - and the buttercream came out tasting just just like the ice cream. The thing I love about German Buttercream is that it isn’t super super buttery tasting, because the butter is mellowed out a little by the pastry cream base. We added some peppermint extract and finely chopped chocolate, and ended up with a mint chip german buttercream that I couldn’t stop eating by the spoonful. The best. I can’t wait to put the buttercream on a cake, because it is all kinds of delicious.

    A few wee tips:

    • Everything I ever learnt about Macarons is in this post - I keep it all in one place because the list is getting super super long.
    • The pastry cream needs a wee bit of time to cool before you add the butter, so make sure you account for that! Otherwise you can cool it quicker in an ice bath, or by spreading it in a quarter baking sheet lined with plastic, covering the surface of the pastry cream with another piece of plastic wrap, and chilling it in the freezer until cool. The larger surface area and shallow baking sheet mean that it cools much faster.
    • Because you start with cool pastry cream (as opposed to slightly warm meringue as you would for a SMBC), make sure that your butter is very room temperature. If it isn't quite soft enough and you find your buttercream is seizing, you can remove about ⅓ cup of the buttercream, melt in the microwave, and then add back in and continue whipping. The heat from the melted buttercream is often enough to bring it all back together into the silky niceness you are after.
    • I like to make the pastry cream, then make the macaron shells, arrange them all, then finish up the buttercream before assembly.

    ❤️ Made this recipe and love it? ❤️

    I would LOVE for you to leave me a review and star rating below to let me know how you liked it! Also, please make sure to tag me on Instagram!

    Answers to your baking questions

    Over the years, many of you have asked me questions about:

    • baking in grams
    • adjusting oven temperatures
    • what kind of salt to use
    • and many more!

    I've curated and answered them all for your easy reference in this frequently asked questions post!

    Filed Under: Macarons

    Earl Grey Crullers with Earl Grey Glaze


    Earl Grey Crullers with Earl Grey Glaze. Perfectly flaky earl grey infused choux pastry is fried into golden brown crullers, then glazed with a delicately flavoured Earl Grey Glaze. #earlgrey #cruller #doughnuts #donuts #baking #fried #choux #chouxpastry
    Earl Grey Crullers with Earl Grey Glaze. Perfectly flaky earl grey infused choux pastry is fried into golden brown crullers, then glazed with a delicately flavoured Earl Grey Glaze. #earlgrey #cruller #doughnuts #donuts #baking #fried #choux #chouxpastry
    Earl Grey Crullers with Earl Grey Glaze. Perfectly flaky earl grey infused choux pastry is fried into golden brown crullers, then glazed with a delicately flavoured Earl Grey Glaze. #earlgrey #cruller #doughnuts #donuts #baking #fried #choux #chouxpastry
    Earl Grey Crullers with Earl Grey Glaze. Perfectly flaky earl grey infused choux pastry is fried into golden brown crullers, then glazed with a delicately flavoured Earl Grey Glaze. #earlgrey #cruller #doughnuts #donuts #baking #fried #choux #chouxpastry
    Earl Grey Crullers with Earl Grey Glaze. Perfectly flaky earl grey infused choux pastry is fried into golden brown crullers, then glazed with a delicately flavoured Earl Grey Glaze. #earlgrey #cruller #doughnuts #donuts #baking #fried #choux #chouxpastry
    Earl Grey Crullers with Earl Grey Glaze. Perfectly flaky earl grey infused choux pastry is fried into golden brown crullers, then glazed with a delicately flavoured Earl Grey Glaze. #earlgrey #cruller #doughnuts #donuts #baking #fried #choux #chouxpastry
    Earl Grey Crullers with Earl Grey Glaze. Perfectly flaky earl grey infused choux pastry is fried into golden brown crullers, then glazed with a delicately flavoured Earl Grey Glaze. #earlgrey #cruller #doughnuts #donuts #baking #fried #choux #chouxpastry
    Earl Grey Crullers with Earl Grey Glaze. Perfectly flaky earl grey infused choux pastry is fried into golden brown crullers, then glazed with a delicately flavoured Earl Grey Glaze. #earlgrey #cruller #doughnuts #donuts #baking #fried #choux #chouxpastry

    We are having the best time ever in NZ visiting family, so I will keep this short - but I couldn’t wait any longer to share this recipe for Earl Grey Crullers with you! I hid away at home on my birthday making these and honestly couldn’t think of a better way to spend the day.

    I love a lot of things - my foster kittens, being able to live where we do, my husband, my library card etc (in that order haha), and Earl Grey tea. I love the flavour of it, and how versatile it is. I love how it can easily adapt to fit in a huge number of flavour profiles. And I love how it makes these Earl Grey Crullers with Earl Grey Glaze taste. If you were ever looking for a cup of tea in doughnut form, look no further. Because this recipe is a doozy.

    If you haven’t had a cruller before, it is essentially just fried choux dough. Same thing used to make cream puffs and eclairs, but instead of baking it so that it becomes puffy and crisp, it gets fried. And it is epic. The result is something a little more denser than a cream puff or eclair - it doesn’t have as much of a hollow inside, but just so insanely delicious. It manages to be light and heavy all at the same time, and with loads of texture on the golden brown outside to hold on to loads of tea infused glaze. Crullers or choux pastry are perfect for infusing flavour - because it doesn’t have to compete with yeast, the flavour is able to shine right through. I injected as much earl grey flavour into these as I could - by infusing the milk used to make the dough, and then infusing the cream used for the glaze. The result was a perfectly delicately flavoured doughnut, drowned in a sweet, strongly flavoured glaze. I couldn’t be happier with how they turned out, and I hope you love them too!

    A few wee tips:

    • I have included an extra 'just in case' egg in the ingredients. The reason that this is in there, is that sometimes you need to add extra egg to the pastry if necessary. You want the mixture to be at a consistency where if you dip in the beater of the mixer, the batter will form a 'v' shape and eventually break off. If it is too stiff, and breaks off very quickly, you may need to add another beaten egg, and mix again, before performing the test. 
    • These can be made ahead and frozen until you are ready to fry - just freeze solid then transfer to a piping bag.
    • If you would like to make these just a plain flavour (rather than earl grey), just skip the step where you infuse with tea.
    • I prefer to deep fry in cast iron because it helps to keep the temperature constant, but a heavy bottomed pot will work well too.
    • If you don’t want to make all of these as doughnuts, you can pipe some as either rings or mounds onto parchment paper, and follow these instructions for baking them as cream puffs.

    ❤️ Made this recipe and love it? ❤️

    I would LOVE for you to leave me a review and star rating below to let me know how you liked it! Also, please make sure to tag me on Instagram!

    Answers to your baking questions

    Over the years, many of you have asked me questions about:

    • baking in grams
    • adjusting oven temperatures
    • what kind of salt to use
    • and many more!

    I've curated and answered them all for your easy reference in this frequently asked questions post!

    Filed Under: Choux, Doughnuts

    No Bake Mixed Berry Cheesecake Bars

    No Bake Mixed Berry Cheesecake Bars are super easy to make. They have a graham cracker crust, topped with a silky vanilla bean no bake filling, and finished with a beautiful marbled swirl of mixed berry coulis. perfect No bake, low effort dessert for any time of the year.

    No Bake Mixed Berry Cheesecake Bars - delicious graham cracker crust, topped with a silky vanilla bean no bake filling, and finished with a beautiful marbled swirl of mixed berry coulis. perfect No bake, low effort dessert for any time of the year. #nobake #cheesecake #cheesecakebars #mixedberry #coulis
    No Bake Mixed Berry Cheesecake Bars - delicious graham cracker crust, topped with a silky vanilla bean no bake filling, and finished with a beautiful marbled swirl of mixed berry coulis. perfect No bake, low effort dessert for any time of the year. #nobake #cheesecake #cheesecakebars #mixedberry #coulis
    No Bake Mixed Berry Cheesecake Bars - delicious graham cracker crust, topped with a silky vanilla bean no bake filling, and finished with a beautiful marbled swirl of mixed berry coulis. perfect No bake, low effort dessert for any time of the year. #nobake #cheesecake #cheesecakebars #mixedberry #coulis
    No Bake Mixed Berry Cheesecake Bars - delicious graham cracker crust, topped with a silky vanilla bean no bake filling, and finished with a beautiful marbled swirl of mixed berry coulis. perfect No bake, low effort dessert for any time of the year. #nobake #cheesecake #cheesecakebars #mixedberry #coulis
    No Bake Mixed Berry Cheesecake Bars - delicious graham cracker crust, topped with a silky vanilla bean no bake filling, and finished with a beautiful marbled swirl of mixed berry coulis. perfect No bake, low effort dessert for any time of the year. #nobake #cheesecake #cheesecakebars #mixedberry #coulis
    No Bake Mixed Berry Cheesecake Bars - delicious graham cracker crust, topped with a silky vanilla bean no bake filling, and finished with a beautiful marbled swirl of mixed berry coulis. perfect No bake, low effort dessert for any time of the year. #nobake #cheesecake #cheesecakebars #mixedberry #coulis

    No Bake Mixed Berry Cheesecake Bars

    I know that I post a fair bit of fancy shit. Intricate pie lattices, multi layer cakes, things with more components than they probably need to have just because I’m being extra. But this time, I am here to save your life (not really haha) with a crazy easy dessert that is super simple to put together, but still tastes amazing and makes you look super, super fancy. I made these no bake mixed berry cheesecake bars a few weeks back, and haven’t stopped thinking about them or possible variations of them since.

    I grew up on no-bake cheesecake - to me, it is the first thing that comes to mind when I think of cheesecake. I haven’t quite been able to get behind baked cheesecake yet, because I’m not sure that anything will ever stand up to a really well done no-bake version. That, and I always hear people worry about cracking their cheesecake. This isn’t even a slight issue here. I got you. The thing that I really love about this recipe is how versatile it is - you could swirl literally anything you like through the top of it. I went with a mixed berry coulis swirl, but it would be epic with fudge, or nutella, or a quick lemon or passionfruit curd.

    I started with a simple graham cracker crust, then topped it with a silky vanilla bean cheesecake filling, which is super easy and comes together quickly in the mixer. This alone would be the perfect dessert, but I had some berries that needed using up in the freezer, so popped together a quick coulis to swirl on the top, which turned out to be a very, very good idea.

    I was initally aiming for a white top with just a small swirl of the berry, but I used too much the first time around, so just mixed it in and tried again and it worked out for the better - the berry flavour was much more prominent, and the top came out so marbled and beautiful. Give this dude a try if you can - I promise you will look super fancy with hardly any effort.

    A few wee tips for Mixed Berry Cheesecake Bars:

    • Make the berry coulis topping first, and allow to cool slightly before you make the cheesecake.
    • This is a great base cheesecake recipe - you could do a passionfruit top, or a lemon curd, peanut butter, etc etc.
    • Make sure that your cream cheese is at room temperature to allow you to beat it very smooth.
    • If you can’t get graham crackers, digestive biscuits work perfectly!

    Other No Bake Cheesecake Recipes

    • No Bake Chocolate Cheesecake with Raspberry Balsamic Glaze 
    • Lemon and Lime No Bake Cheesecake
    • Doughnuts with Balsamic Blueberry and Cheesecake Filling

    ❤️ Made this recipe and love it? ❤️

    I would LOVE for you to leave me a review and star rating below to let me know how you liked it! Also, please make sure to tag me on Instagram!

    Answers to your baking questions

    Over the years, many of you have asked me questions about:

    • baking in grams
    • adjusting oven temperatures
    • what kind of salt to use
    • and many more!

    I've curated and answered them all for your easy reference in this frequently asked questions post!

    Filed Under: Cheesecakes, Fruit Bars, No-bake Bars

    Basil Pesto and Feta Stuffed Savoury Brioche Doughnuts

    Basil Pesto and Feta Stuffed Savoury Brioche Doughnuts - Brioche dough is wrapped around a basil pesto and feta filling, then fried to golden brown perfection #savoury #savory #briochedoughnut #pestoandfeta #donut #brioche
    Basil Pesto and Feta Stuffed Savoury Brioche Doughnuts - Brioche dough is wrapped around a basil pesto and feta filling, then fried to golden brown perfection #savoury #savory #briochedoughnut #pestoandfeta #donut #brioche
    Basil Pesto and Feta Stuffed Savoury Brioche Doughnuts - Brioche dough is wrapped around a basil pesto and feta filling, then fried to golden brown perfection #savoury #savory #briochedoughnut #pestoandfeta #donut #brioche
    Basil Pesto and Feta Stuffed Savoury Brioche Doughnuts - Brioche dough is wrapped around a basil pesto and feta filling, then fried to golden brown perfection #savoury #savory #briochedoughnut #pestoandfeta #donut #brioche

    Doughnuts are such a fun thing to make for a morning or afternoon tea - still nice and simple, but different enough that everyone is always super excited by them. Up until now I have only really made sweet doughnuts before (I actually have three doughnut recipes up and coming for you!), but wanted to try a savoury version this time, so turned to the classic combination of Pesto and Feta. And let me tell you right now - I'm hooked. 

    I used my go-to brioche dough, which is insanely versatile and can be used for knots, babkas, twists, doughnuts, hamburger buns, you name it, it probably works. I developed it maybe a year or so ago, and I love how reliable and adaptable it is. I added a little lemon zest and cracked pepper to the dough, then once it had done its first rise, I divided it into 12 balls, then stuffed each one with some feta, and pesto. The combination of Pesto and feta is a well-loved one, but it never gets old. The salty feta compliments the herby pesto, making the perfect filling for so many things, including savoury doughnuts. It is such a nice change to have a doughnut that isn't sweet or fruit filled - these will be making their way into my recipe rotation, and I do hope that you give them a try!

    A few wee tips:

    • If you want to make these early in the day, you can do the first rise in the fridge - the dough may just need to sit out slightly before you start working with it.
    • When you roll these, you kind of cup your hand over the roll and move it in a circle so that the friction between the dough and the surface seals off the filling. Make sure to give it a good pinch too. Because you need the friction, don't heavily flour your surface.
    • I use a dutch oven to fry doughnuts in and love it because of how well and evenly it retains the heat. A digital or candy thermometer that clips onto the side is also very helpful - make sure your oil is deep enough and that the tip of the thermometer is in the middle of the oil in order to get an accurate reading.

    ❤️ Made this recipe and love it? ❤️

    I would LOVE for you to leave me a review and star rating below to let me know how you liked it! Also, please make sure to tag me on Instagram!

    Answers to your baking questions

    Over the years, many of you have asked me questions about:

    • baking in grams
    • adjusting oven temperatures
    • what kind of salt to use
    • and many more!

    I've curated and answered them all for your easy reference in this frequently asked questions post!

    Filed Under: Doughnuts

    S'mores Philadelphia style Ice Cream


    S'mores Philadelphia Style Ice cream - creamy vanilla philadelphia style ice cream is layered with toasted marshmallow pieces, chocolate shards and crushed graham crackers. Philadelphia ice cream is incredibly easy to make and the perfect base for this s'mores ice cream #smores #s'mores #icecream #philadelphiastyle #vanillaicecream
    S'mores Philadelphia Style Ice cream - creamy vanilla philadelphia style ice cream is layered with toasted marshmallow pieces, chocolate shards and crushed graham crackers. Philadelphia ice cream is incredibly easy to make and the perfect base for this s'mores ice cream #smores #s'mores #icecream #philadelphiastyle #vanillaicecream
    S'mores Philadelphia Style Ice cream - creamy vanilla philadelphia style ice cream is layered with toasted marshmallow pieces, chocolate shards and crushed graham crackers. Philadelphia ice cream is incredibly easy to make and the perfect base for this s'mores ice cream #smores #s'mores #icecream #philadelphiastyle #vanillaicecream
    S'mores Philadelphia Style Ice cream - creamy vanilla philadelphia style ice cream is layered with toasted marshmallow pieces, chocolate shards and crushed graham crackers. Philadelphia ice cream is incredibly easy to make and the perfect base for this s'mores ice cream #smores #s'mores #icecream #philadelphiastyle #vanillaicecream
    S'mores Philadelphia Style Ice cream - creamy vanilla philadelphia style ice cream is layered with toasted marshmallow pieces, chocolate shards and crushed graham crackers. Philadelphia ice cream is incredibly easy to make and the perfect base for this s'mores ice cream #smores #s'mores #icecream #philadelphiastyle #vanillaicecream
    S'mores Philadelphia Style Ice cream - creamy vanilla philadelphia style ice cream is layered with toasted marshmallow pieces, chocolate shards and crushed graham crackers. Philadelphia ice cream is incredibly easy to make and the perfect base for this s'mores ice cream #smores #s'mores #icecream #philadelphiastyle #vanillaicecream

    Making your own ice cream is super fun for a few reasons. One, you feel like a total badass. Two, you can make it whatever flavour you like. And Three (or maybe two and a half), it's great for using up little extras you may have leftover from baking projects. It is a great way to use up cream. Extra chocolate can get stirred in, or maybe a handful of nuts. You can swirl in the little bit of peanut butter leftover, or add some fruit that is on it's last legs. Or, of course, you can make S'mores Ice Cream. S'mores Philadelphia Ice Cream, to be specific. (More on the Philadelphia part in a second). 

    This S'mores Philadelphia Style Ice cream came about after a day of making these S'mores Macarons. We were left with a bunch of weird shaped marshmallow pieces, and a couple of graham crackers, and S'mores on the mind. I had been meaning to try out a Philadelphia style ice cream for a while. Philadelphia style differs from 'traditional' ice cream base,  in that it doesn't use any egg yolks. This means that it is much easier to prepare, and gives you a lighter ice cream both in colour and in taste - anglaise ice cream is amazing too, but it can get kind of intense, and is often a creamy colour, as opposed to this Philadelphia Style, which is white due to the absence of the egg yolks. Both types of ice cream have their place, but I have a feeling Philadelphia Style is going to definitely become a part of the repertoire from here on out. I loved how easy it was to prepare, it didn't leave you with any extra whites (although an anglaise is my fave way to use up eggs), and I loved the taste it produced. It's as easy as no churn ice cream to prepare (although does require the use of an ice cream machine), but in my opinion, tastes far far better. Philadelphia Style is the new no churn. I'm calling it. 

    Because the ice cream base was so easy to make, putting together this ice cream was stupid simple. All I did was churn the ice cream, then layer with the marshmallow pieces, which I lightly toasted, some graham cracker chunks, and some chopped chocolate. All you have to do is layer it lasagna style, freeze until solid, and you are good to go. I used homemade marshies but store bought would 100% work perfectly here too, and make the process even easier. If you haven't ventured into homemade ice cream before, this would be a great place to start. 

    A few wee tips:

    • There aren't many ingredients in this, so for the base, if possible, use the best quality ingredients that you can.
    • This is 100% customisable - add whatever you like to it!
    • Ice Cream makers seem like a weird investment but I promise you, once you make your first batch you're going to be hooked! I just have the one which connects to my Kitchenaid, but the counter top ones work great too.
    • Don't forget to freeze your ice cream bowl ahead of time

    ❤️ Made this recipe and love it? ❤️

    I would LOVE for you to leave me a review and star rating below to let me know how you liked it! Also, please make sure to tag me on Instagram!

    Answers to your baking questions

    Over the years, many of you have asked me questions about:

    • baking in grams
    • adjusting oven temperatures
    • what kind of salt to use
    • and many more!

    I've curated and answered them all for your easy reference in this frequently asked questions post!

    Filed Under: Ice Cream & Ice Cream Sandwiches Tagged With: Egg Free

    S'mores Macarons with Toasted Marshmallow

    I love developing new French macaron flavor ideas! These super-fun
    s’mores macarons bring together the flavors of toasted marshmallow, graham crackers, and a creamy dark chocolate ganache. This macaron recipe looks impressive, and is absolutely delicious.

    macarons with chocolate ganache and toasted marshmallow on a white background

    Table of contents

    • S'mores Macarons
    • Components of S'mores Macarons
    • How to toast marshmallows at home
    • Can French Macarons be made ahead of time?
    macarons on a skewer being held by a hand

    S'mores Macarons

    Hi hi! I am just popping in to share the recipe for these S'mores French Macarons! These are a super fun twist on a classic homemade macaron - it is made up of a vanilla bean french macaron shell dusted with graham cracker crumbs, a disc of toasted marshmallow, and a silky chocolate ganache.

    Once you have learnt how to make French Macarons, the flavour and filling options are endless. There are some really fun French macaron flavour ideas, and you can make a big batch of shells then fill them with whatever you like.

    Some other fun variations on French macarons I have made include Cereal Milk Macarons, Raspberry and Dark Chocolate Macarons, and Strawberry Macarons. Mix and match as you like!

    macarons on a white background
    macaron shells on a brown background with graham cracker crumbs

    Components of S'mores Macarons

    These S'mores French macarons have a few components to them, but you can make them ahead and assemble when you are ready.

    • Graham Cracker Macaron Shells. I used my go-to french macaron shell, and dusted it with crushed graham crackers before baking.
    • Chocolate Ganache. This is a super easy chocolate ganache recipe, made by melting together cream, chocolate and butter for a super smooth ganache that is easy to pipe.
    • Toasted Marshmallow. I love making recipes using marshmallow, and it is super easy to make your own homemade version. This S'mores macaron recipe uses discs of marshmallow - you make it in a flat pan and then cut out the circles of marshmallow to toast. If you don't want to make your own marshmallow you could use store bought marshmallows and toast them, or pipe on some marshmallow fluff or marshmallow frosting (this will get sticky so be careful)
    skewered macarons on a white background

    How to toast marshmallows at home

    If you haven't made your own toasted marshmallow before, I highly recommend you give it a try, as it is so fun and easy. Toasting homemade marshmallow is particularly delicious - the toasty flavour is just so, so good.

    I toast my marshmallow using a torch - I prefer one from the hardware store rather than a kitchen torch, but if you need to you can pop the marshmallow onto a skewer and toast over the stove top.

    Can French Macarons be made ahead of time?

    These macarons can be made ahead of time, but I suggest making the components separately and assembling when you are ready to serve. The marshmallow needs time to cure, and the shells need time to bake, so you could make both the shells and marshmallow the day before you serve and then assemble the day of.

    These macarons are best eaten on the day that they are made - I suggest storing components separately and assembling when ready to eat.

    skewers with macarons on a sheet pan with parchment paper

    Tips for making S'mores Macarons

    • Check out my ultimate How-to guide for macarons for more detail.
    • Start with making the marshmallow first, so it has time to cure while you make the shells. If you like, the shells and mallow can be made ahead of time and stored separately.
    • Have everything ready to go before you start the marshmallow - grease and dust your pan, have your utensils nearby etc. Things go quickly, and can get very very sticky if you aren't prepared.
    • You're going to be left with a bit of marshmallow leftover but it keeps for a really long time in an airtight container.
    • If you don't yet have a blow torch, don't waste your money on a 'kitchen torch' just get a propane torch with an adjustable flame from the hardware store. They are way cheaper and way better.
    • We torched the marshmallow on a cake turntable to help keep it even! Only do this if your turntable is metal, otherwise prop up a heatproof surface on something like an upside down bowl so you don't melt your turntable.

    If you find your shells are sticking to the parchment paper when you remove the macarons from the oven even though they are baked, transfer the pan to the freezer for 10-15 minutes. This should help the shells release cleanly.

    Toasted macarons with ganache and toasted marshmallow

    ❤️ Made this recipe and love it? ❤️

    I would LOVE for you to leave me a review and star rating below to let me know how you liked it! Also, please make sure to tag me on Instagram!

    Answers to your baking questions

    Over the years, many of you have asked me questions about:

    • baking in grams
    • adjusting oven temperatures
    • what kind of salt to use
    • and many more!

    I've curated and answered them all for your easy reference in this frequently asked questions post!

    Filed Under: Macarons

    Toasted Coconut Ice Cream Pops with Passionfruit Magic Shell


    Toasted Coconut Ice Cream Pops with Passionfruit magic shell - a creamy toasted coconut ice cream is dipped in a punchy passionfruit magic shell. Quite possibly the most perfect ice cream combination you will ever come across. #passionfruit #toastedcoconut #icecreampop #icecream #magicshell
    Toasted Coconut Ice Cream Pops with Passionfruit magic shell - a creamy toasted coconut ice cream is dipped in a punchy passionfruit magic shell. Quite possibly the most perfect ice cream combination you will ever come across. #passionfruit #toastedcoconut #icecreampop #icecream #magicshell
    Toasted Coconut Ice Cream Pops with Passionfruit magic shell - a creamy toasted coconut ice cream is dipped in a punchy passionfruit magic shell. Quite possibly the most perfect ice cream combination you will ever come across. #passionfruit #toastedcoconut #icecreampop #icecream #magicshell
    Toasted Coconut Ice Cream Pops with Passionfruit magic shell - a creamy toasted coconut ice cream is dipped in a punchy passionfruit magic shell. Quite possibly the most perfect ice cream combination you will ever come across. #passionfruit #toastedcoconut #icecreampop #icecream #magicshell
    Toasted Coconut Ice Cream Pops with Passionfruit magic shell - a creamy toasted coconut ice cream is dipped in a punchy passionfruit magic shell. Quite possibly the most perfect ice cream combination you will ever come across. #passionfruit #toastedcoconut #icecreampop #icecream #magicshell
    Toasted Coconut Ice Cream Pops with Passionfruit magic shell - a creamy toasted coconut ice cream is dipped in a punchy passionfruit magic shell. Quite possibly the most perfect ice cream combination you will ever come across. #passionfruit #toastedcoconut #icecreampop #icecream #magicshell
    Toasted Coconut Ice Cream Pops with Passionfruit magic shell - a creamy toasted coconut ice cream is dipped in a punchy passionfruit magic shell. Quite possibly the most perfect ice cream combination you will ever come across. #passionfruit #toastedcoconut #icecreampop #icecream #magicshell

    Friday marked 3 months we haven't had gas to our apartment. And ohhhhh boy I am pissed off about it. Cooking on a wee camping style element is ok, until you have to make two things at once. Or, say, you would like all the components of dinner ready at the same time. A lady in my building told me she's just been eating tacos for three months. While we aren't that extreme, it's definitely annoying. But instead of coming here to complain more (lol, too late), I'm gonna pop this recipe here that still requires the use of a burner, but only one at a time and just for a wee bit - these toasted coconut ice cream pops with a passionfruit magic shell.

    A couple of months ago I was invited along to the Valrhona USA headquarters to have a play with their new inspiration line! Turns out it's just in Brooklyn, same as me! This is what happens when you don't get out much - you don't realise things are just under your nose. Anyways, it was a super fun night, we got to meet their amazing pastry chef who showed us all sorts of fancy things, and we learnt all about their new line of fruit and nut couvertures (which is a fancy name for chocolate with a high cocoa butter content). They have recently released an almond and a passionfruit (!!) flavour, both of which taste insanely good, and also happen to be vegan if that sort of thing floats your boat. The release of these is going to be an exciting new development for vegan desserts, but also super exciting for people like me who are addicted to passionfruit, but also equally sad that they are almost impossible to get hold of here in NYC. So this is the next best option. The Passionfruit couverture is made with cocoa butter and passionfruit juice, meaning that it has an insanely punchy passionfruit taste, with the flavour not being drowned out by sugar as it would be in a nectar or juice. 

    One of the things that we were shown while we were there was a passionfruit magic shell. Magic shell is essentially chocolate warmed with a neutral oil, which means that when it comes into contact with something cold (like ice cream), it solidifies into an amazing, crunchy crackly shell. The pastry chef had made a passionfruit magic shell, which we dipped teeny little perfect bars of coconut sorbet into. My mind was blown, and I knew it had to be replicated at home, and so here we are! 

    I wanted to kind of keep the same flavour profile going as we tasted at Valrhona, but wanted to make it an ice cream base rather than a sorbet (because I like to think I'm fancy, but I'm not that fancy). So, I went with a toasted coconut ice cream - essentially an anglaise (custard), which you infuse overnight with toasted coconut before churning in your ice cream maker and freezing into popsicle moulds. Once they have frozen down, I took them out of the moulds, let them chill out in the freezer for a bit, and then melted down some grapeseed oil and the passionfruit chocolate, let it cool, then dunked the pops in. It's kind of stressful to dunk but also super fun to watch the shell set almost immediately into a perfectly smooth form. I then drizzled them with some white chocolate (totally optional but another step to make you look fancy), and we were all done! The toastyness of the coconut ice cream paired so perfectly with the punchy chocolate shell - these are going to be firmly on repeat whenever I feel the need to impress someone. 

    A few wee tips:

    • The toasted coconut ice cream base ideally needs overnight to infuse the coconut flavour, so you will need to account for this. If you are in a pinch you can just chill it down with the coconut, and once chilled, strain it out.
    • I made the magic shell using Valrhona Passionfruit Couverture, but if you aren't able to get that, a white chocolate, or milk / dark chocolate would also make an amazing magic shell coating to pair with the toasted coconut. The ratio for the magic shell is approximately 1 part neutral oil to 5 parts chocolate, by weight.
    • These are the pop moulds that I used. I love how fancy they look, and they are the perfect size! This recipe will work in any pop mould though!

    ❤️ Made this recipe and love it? ❤️

    I would LOVE for you to leave me a review and star rating below to let me know how you liked it! Also, please make sure to tag me on Instagram!

    Answers to your baking questions

    Over the years, many of you have asked me questions about:

    • baking in grams
    • adjusting oven temperatures
    • what kind of salt to use
    • and many more!

    I've curated and answered them all for your easy reference in this frequently asked questions post!

    Filed Under: Ice Cream Pops

    Halloumi Tarts with Homemade Puff Pastry

    Chili Pesto, Mushroom, Roasted Red Pepper and Halloumi Tarts with Homemade Puff Pastry. The perfect appetizer or summer dinner - make these whatever size you want, they are bound to be a crowd pleaser! #mushroomtart #halloumi #chili #chilli #pesto #puffpastry #tart
    Chili Pesto, Mushroom, Roasted Red Pepper and Halloumi Tarts with Homemade Puff Pastry. The perfect appetizer or summer dinner - make these whatever size you want, they are bound to be a crowd pleaser! #mushroomtart #halloumi #chili #chilli #pesto #puffpastry #tart

    For these tarts I started with some homemade puff pastry, which, if you are up for it, is a super fun wee project, and actually not as hard as most people think. If you like, you can absolutely use store bought puff here too. I then rolled it out, cut it into rectangles, then spread with a thin layer of hot chili pesto, before topping it with a mushroom and garlic mixture, and some roasted red pepper strips. Once baked, it was topped with some fried halloumi cubes, and finished with a wee sprig of thyme. 

    Chili Pesto, Mushroom, Roasted Red Pepper and Halloumi Tarts with Homemade Puff Pastry. The perfect appetizer or summer dinner - make these whatever size you want, they are bound to be a crowd pleaser! #mushroomtart #halloumi #chili #chilli #pesto #puffpastry #tart

    A few wee tips:

    • If you aren't keen on making your own puff pastry, you can definitely use store bought! I used 700g for this recipe. I have added a link to the recipe here
    • Most of the components for this can be made ahead - the peppers can be roasted ahead, and the mushroom mixture can also be done ahead.
    • You can add the halloumi on before you bake if you like, but I prefer it fried so added it once it was already baked. Feta would work great too.
    • Feel free to customise these to your liking! They could be done with any type of filling that you like!

    ❤️ Made this recipe and love it? ❤️

    I would LOVE for you to leave me a review and star rating below to let me know how you liked it! Also, please make sure to tag me on Instagram!

    Answers to your baking questions

    Over the years, many of you have asked me questions about:

    • baking in grams
    • adjusting oven temperatures
    • what kind of salt to use
    • and many more!

    I've curated and answered them all for your easy reference in this frequently asked questions post!

    Chili Pesto, Mushroom, Roasted Red Pepper and Halloumi Tarts with Homemade Puff Pastry. The perfect appetizer or summer dinner - make these whatever size you want, they are bound to be a crowd pleaser! #mushroomtart #halloumi #chili #chilli #pesto #puffpastry #tart

    Filed Under: Savoury

    Roasted Peach Streusel Macarons

    Roasted Peach Streusel Macarons - inspired by the peach cobbler, these french macarons have a roasted peach german buttercream, and a brown butter streusel crunch #macarons #peachcobbler #frenchmacaron #roastedpeach #germanbuttercream
    Roasted Peach Streusel Macarons - inspired by the peach cobbler, these french macarons have a roasted peach german buttercream, and a brown butter streusel crunch #macarons #peachcobbler #frenchmacaron #roastedpeach #germanbuttercream
    Roasted Peach Streusel Macarons - inspired by the peach cobbler, these french macarons have a roasted peach german buttercream, and a brown butter streusel crunch #macarons #peachcobbler #frenchmacaron #roastedpeach #germanbuttercream
    Roasted Peach Streusel Macarons - inspired by the peach cobbler, these french macarons have a roasted peach german buttercream, and a brown butter streusel crunch #macarons #peachcobbler #frenchmacaron #roastedpeach #germanbuttercream
    Roasted Peach Streusel Macarons - inspired by the peach cobbler, these french macarons have a roasted peach german buttercream, and a brown butter streusel crunch #macarons #peachcobbler #frenchmacaron #roastedpeach #germanbuttercream
    Roasted Peach Streusel Macarons - inspired by the peach cobbler, these french macarons have a roasted peach german buttercream, and a brown butter streusel crunch #macarons #peachcobbler #frenchmacaron #roastedpeach #germanbuttercream
    Roasted Peach Streusel Macarons - inspired by the peach cobbler, these french macarons have a roasted peach german buttercream, and a brown butter streusel crunch #macarons #peachcobbler #frenchmacaron #roastedpeach #germanbuttercream

    Back here with another peach recipe! They really are so good at the moment that it would be a shame not to make the most of them. Also back here with another Macaron recipe - once again, on the last day of the month. Whoops. But also - Roasted Peach Streusel Macarons. These Peach cobbler inspired treats are the perfect wee summer treat!

    We wanted to really jam a strong peach flavour into these wee babes, so we went with my fave - a vanilla bean german buttercream, which we then added a whole load of roasted peaches to. The key to adding fruit to a buttercream and avoiding the separation due to the liquid is removing as much of that liquid as you can first. You can do this by using freeze dried fruit, or cooking the fruit down into a puree or compote. We roasted the peaches with a little vanilla bean, sugar, and a pinch of salt, until they were delicious and soft, and then added that to the buttercream. I love roasted peaches as is, but added to a buttery, custardy german buttercream - the best.

    We wanted to go for a bit of a peach cobbler vibe, so toped the shells of the macs with a brown butter streusel. The toasty streusel paired perfectly with the chewy shell and the fruity buttercream, to create the most delicious little bite! I do hope you give these a try - they are so, so good! I can't wait to add the streusel / roasted peach german buttercream to a whole lot of things this summer!

    A few wee tips:

    • Everything I can think of that will make macaron making easier has been added to this post - I update it as I go!
    • The ideal order for making these is: Make the pastry cream, roasted peaches and streusel the night before, then make the mac shells and mix up the buttercream the day of! Everything can definitely be done the day of, but it is a couple of different components so may take some time. If you do it day of, make pastry cream first, then prep the streusel while the peaches are roasting, and then get that on once the peaches are done. Then make your mac shells, and whip up the buttercream while they are baking!
    • I was originally grinding the almond meal and powdered sugar together, but then realised it really only needed sifting, I just had the wrong sized sieve! You want one with a medium sized mesh (I ordered this one), and make sure you sift twice to remove any big lumps and aerate the mixture.
    • We also discovered an amazing parchment - and haven't had a single mac stick since we started using it. It's a non-stick parchment paper - we used this one.
    • The pastry cream for the buttercream ideally needs overnight so ensure you plan for this, otherwise you can cool it quicker in an ice bath, or by spreading it in a quarter baking sheet lined with plastic, covering the surface of the pastry cream with another piece of plastic wrap, and chilling it in the freezer until cool. The larger surface area and shallow baking sheet mean that it cools much faster.
    • Adjust the sugar depending on the sweetness / juiciness of your peaches!
    • Because you start with cool pastry cream (as opposed to slightly warm meringue as you would for a SMBC), make sure that your butter is very room temperature. If it isn't quite soft enough and you find your buttercream is seizing, you can remove about ⅓ cup of the buttercream, melt in the microwave, and then add back in and continue whipping. The heat from the melted buttercream is often enough to bring it all back together into the silky niceness you are after.
    • You will have some streusel leftover - store in an airtight container. It's amazing on ice cream!
    • If you need a template, print two of these and stick them together to use as a guide.

    ❤️ Made this recipe and love it? ❤️

    I would LOVE for you to leave me a review and star rating below to let me know how you liked it! Also, please make sure to tag me on Instagram!

    Answers to your baking questions

    Over the years, many of you have asked me questions about:

    • baking in grams
    • adjusting oven temperatures
    • what kind of salt to use
    • and many more!

    I've curated and answered them all for your easy reference in this frequently asked questions post!

    Filed Under: Macarons

    Peach and Thyme Hand Pies


    Peach and Thyme Hand pies - sweet, ripe peaches are enveloped in a tender flaky pie crust, and enhanced with the delicate flavour of thyme. #handpies #peachpies #pie #baking #peach #thyme
    Peach and Thyme Hand pies - sweet, ripe peaches are enveloped in a tender flaky pie crust, and enhanced with the delicate flavour of thyme. #handpies #peachpies #pie #baking #peach #thyme
    Peach and Thyme Hand pies - sweet, ripe peaches are enveloped in a tender flaky pie crust, and enhanced with the delicate flavour of thyme. #handpies #peachpies #pie #baking #peach #thyme
    Peach and Thyme Hand pies - sweet, ripe peaches are enveloped in a tender flaky pie crust, and enhanced with the delicate flavour of thyme. #handpies #peachpies #pie #baking #peach #thyme
    Peach and Thyme Hand pies - sweet, ripe peaches are enveloped in a tender flaky pie crust, and enhanced with the delicate flavour of thyme. #handpies #peachpies #pie #baking #peach #thyme
    Peach and Thyme Hand pies - sweet, ripe peaches are enveloped in a tender flaky pie crust, and enhanced with the delicate flavour of thyme. #handpies #peachpies #pie #baking #peach #thyme
    Peach and Thyme Hand pies - sweet, ripe peaches are enveloped in a tender flaky pie crust, and enhanced with the delicate flavour of thyme. #handpies #peachpies #pie #baking #peach #thyme

    Ok so I just checked, and I have 21 pie recipes on this blog. TWENTY ONE. There's like, 150 something recipes total, 21 of which are pies. Whoopsies. And it's probably only going to get worse sorry - I promise not to double up on you, but there's just something that really gets me going about spending an afternoon pottering round in the kitchen rolling out dough, or working out a lattice, or cutting out shapes. Pie is the best way (in my opinion) to quickly turn an in season fruit into a beautiful dessert, while still maintaining the integrity of the fruit itself - adding starch and sugar, and wrapping it up in a flaky pie crust is only going to make something more delicious. You're not tucking it into a cake or hiding it in a muffin - pie really lets you hero what you are working with. Plus I will never get sick of pretty intricate lattices. So as long as you guys are ok with it, there's going to be more pie. Actually, even if you're not ok with it, it's going to be here anyway. 

    I can't help myself when peaches are in season, and so when I found myself, yet again, with a good few kilos of super ripe peaches, some pie dough in the freezer, and a brand spanking new thyme plant / balcony garden, I really didn't have a choice but to make pie. I love a regular sized pie, but I love pie dough more, so hand pies are one of my favourite ways to really exploit the filling to crust ratio. The addition of thyme was a great move on my part - the thyme is super delicate, and gives the filling a little something extra. 

    I kept these ones super simple - no pastry stamps in sight, just two circles of dough, filled, and pressed together. Crazy easy, and can be done well ahead of time - they actually freeze super well so if you wanted to make a bunch, you could freeze them then bake on demand. 

    A few wee tips:

    • I peeled my peaches by boiling a large pot of water, and preparing an ice bath. I then scored a cross in the bottom of each peach, placed them in the boiling water for 30 seconds, then transferred immediately to the ice bath. The skins should slide right off. If you want to keep the skins on, that works too!
    • I have also made these with frozen peaches - I just thawed them and then chopped them up and it worked just fine!
    • If you can, make your pie dough overnight. I actually took this dough from the freezer and thawed it overnight before using.
    • I like to layer up the circles as I cut them out on a baking sheet lined with parchment paper - to make a second layer, make sure you place another piece of baking paper between the circles.
    • Work with one hand pie at a time - so fill it and seal it up, and then move onto the next one rather than making a production line. That way you reduce your chances of the juice going everywhere.
    • If your peaches are super ripe or crazy juicy you may need to add a little more starch - add an extra tablespoon or so and see how you go if it is looking kinda soupy.
    • I have a little tip to help make the dough easier to work with - it is optional but especially helpful for wee pies like this where you want the dough to be flaky but still really easy to work with. I make the dough, rest it in the fridge wrapped for about an hour, then remove it and roll it out into a rectangle on a lightly floured surface. I then give it a letter fold (as you would a letter), roll out to a rectangle, letter fold again, then roll out once more and shape into a rectangle. I then re-wrap it, and leave it to rest overnight. This makes the dough more homogenous without compromising the flaky texture that you want in the pie dough, and it makes it a total dream to work with, and shaping it into a rectangle gives you a head start when you go to roll out your dough for assembling the pies.

    ❤️ Made this recipe and love it? ❤️

    I would LOVE for you to leave me a review and star rating below to let me know how you liked it! Also, please make sure to tag me on Instagram!

    Answers to your baking questions

    Over the years, many of you have asked me questions about:

    • baking in grams
    • adjusting oven temperatures
    • what kind of salt to use
    • and many more!

    I've curated and answered them all for your easy reference in this frequently asked questions post!

    Filed Under: Hand Pies

    Roasted Garlic, Tomato and Ricotta Pesto Brioche Knot

    Fluffy Brioche filled with Roasted Garlic, Tomato and Ricotta Pesto. Rolled up and twisted into a knot, and baked to golden, puffy perfection. Perfect on it's own or as an addition to a lunch or alongside a bowl of soup.

    Fluffy Brioche filled with Roasted Garlic, Tomato and Ricotta Pesto. Rolled up and twisted into a knot, and baked to golden, puffy perfection. Perfect on it's own or as an addition to a lunch or alongside a bowl of soup. #brioche #briocheknot #pestobrioche
    Fluffy Brioche knots filled with Roasted Garlic, Tomato and Ricotta Pesto. Rolled up and twisted into knots, and baked to golden, puffy perfection. Perfect on their own or as an addition to a lunch or alongside a bowl of soup. #brioche #briocheknot #pestobrioche

    Roasted Garlic, Tomato and Ricotta Pesto Brioche Knot

    I've always had a thing with bread. Mum and Dad have a bread maker, and for as long as I remember, have been making this epic focaccia that gets served alongside almost every meal when we have visitors around. I went through a sourdough phase for a while (which I can't wait to get back into once our oven is fixed!), and a year or so ago I discovered the magic of babka - a fluffy brioche dough, filled with whatever magic you fancy, and twirled up into swirly shapes before being baked off. I am always amazed at how pretty the sliced dough is, and I love how versatile it can be. Can't stop, won't stop babkaing. I went down the savoury road this time, and made this roasted garlic, tomato and ricotta pesto brioche knot, and some little baby ones to go alongside it, just in case mini bread is your kind of thing.

    I was a little nervous at first about notting this but quickly realised it's really just as simple as crossing one end over the other, and tucking the ends in nicely. Easy easy! I also made it into some wee knots - same recipe and process, just in mini. I've included both versions in the instructions. The bread is fluffy and the filling is super yum - this would be perfect for a lunch, or alongside a meal. We had ours with some homemade tomato soup, and it was crazy delicious.

    Fluffy Brioche filled with Roasted Garlic, Tomato and Ricotta Pesto. Rolled up and twisted into a knot, and baked to golden, puffy perfection. Perfect on it's own or as an addition to a lunch or alongside a bowl of soup. #brioche #briocheknot #pestobrioche

    A few wee tips for this Pesto Brioche Knot:

    • This is easier to braid than you think! All you do is cross one end over the other, and then tuck the ends under. You look super fancy, but it's super easy.
    • I have included an hour rest in the freezer with this. This makes the dough firm and much easier to roll out thin. If you don't want to do this step, you can make the dough the night before, and give it its first rise overnight in the fridge. Then the next day all you need to do is roll it out, fill it, then roll it up and shape, before giving it its second proof before baking.
    • Depending on the weather the dough may need a teeny bit more liquid - add this a teaspoon at a time in the first kneading stage if it is having a hard time forming a soft dough.
    • This recipe includes roasted garlic, which is super delicious - I love how mellow it is. This needs some time to cool before going into the filling so either prep it ahead or pop it in when you start the dough - you can make a whole bunch all at once and use them for all sorts of things! If you don't want to roast the garlic you can leave it out.
    • I finished this off with pretzel salt because I love it, but a flaky sea salt will work perfectly.
    Fluffy Brioche filled with Roasted Garlic, Tomato and Ricotta Pesto. Rolled up and twisted into a knot, and baked to golden, puffy perfection. Perfect on it's own or as an addition to a lunch or alongside a bowl of soup. #brioche #briocheknot #pestobrioche

    ❤️ Made this recipe and love it? ❤️

    I would LOVE for you to leave me a review and star rating below to let me know how you liked it! Also, please make sure to tag me on Instagram!

    Answers to your baking questions

    Over the years, many of you have asked me questions about:

    • baking in grams
    • adjusting oven temperatures
    • what kind of salt to use
    • and many more!

    I've curated and answered them all for your easy reference in this frequently asked questions post!

    Fluffy Brioche knots filled with Roasted Garlic, Tomato and Ricotta Pesto. Rolled up and twisted into knots, and baked to golden, puffy perfection. Perfect on their own or as an addition to a lunch or alongside a bowl of soup. #brioche #briocheknot #pestobrioche

    Filed Under: Babka and Brioche Knots

    Dark Chocolate Peanut Butter Tart with Peanut Butter Whipped Cream


    Dark Chocolate Peanut Butter Tart with Peanut Butter Whipped Cream - a chocolate graham cracker crust is topped with a silky dark chocolate peanut butter filling and finished with a creamy peanut butter whipped cream. Everyone needs a recipe like this up their sleeve to wow their friends. Easy to make ahead, and always a crowd pleaser. #chocolatetart #peanutbuttertart #chocolate #peanutbutter
    Dark Chocolate Peanut Butter Tart with Peanut Butter Whipped Cream - a chocolate graham cracker crust is topped with a silky dark chocolate peanut butter filling and finished with a creamy peanut butter whipped cream. Everyone needs a recipe like this up their sleeve to wow their friends. Easy to make ahead, and always a crowd pleaser. #chocolatetart #peanutbuttertart #chocolate #peanutbutter
    Dark Chocolate Peanut Butter Tart with Peanut Butter Whipped Cream - a chocolate graham cracker crust is topped with a silky dark chocolate peanut butter filling and finished with a creamy peanut butter whipped cream. Everyone needs a recipe like this up their sleeve to wow their friends. Easy to make ahead, and always a crowd pleaser. #chocolatetart #peanutbuttertart #chocolate #peanutbutter
    Dark Chocolate Peanut Butter Tart with Peanut Butter Whipped Cream - a chocolate graham cracker crust is topped with a silky dark chocolate peanut butter filling and finished with a creamy peanut butter whipped cream. Everyone needs a recipe like this up their sleeve to wow their friends. Easy to make ahead, and always a crowd pleaser. #chocolatetart #peanutbuttertart #chocolate #peanutbutter
    Dark Chocolate Peanut Butter Tart with Peanut Butter Whipped Cream - a chocolate graham cracker crust is topped with a silky dark chocolate peanut butter filling and finished with a creamy peanut butter whipped cream. Everyone needs a recipe like this up their sleeve to wow their friends. Easy to make ahead, and always a crowd pleaser. #chocolatetart #peanutbuttertart #chocolate #peanutbutter
    Dark Chocolate Peanut Butter Tart with Peanut Butter Whipped Cream - a chocolate graham cracker crust is topped with a silky dark chocolate peanut butter filling and finished with a creamy peanut butter whipped cream. Everyone needs a recipe like this up their sleeve to wow their friends. Easy to make ahead, and always a crowd pleaser. #chocolatetart #peanutbuttertart #chocolate #peanutbutter
    Dark Chocolate Peanut Butter Tart with Peanut Butter Whipped Cream - a chocolate graham cracker crust is topped with a silky dark chocolate peanut butter filling and finished with a creamy peanut butter whipped cream. Everyone needs a recipe like this up their sleeve to wow their friends. Easy to make ahead, and always a crowd pleaser. #chocolatetart #peanutbuttertart #chocolate #peanutbutter
    Dark Chocolate Peanut Butter Tart with Peanut Butter Whipped Cream - a chocolate graham cracker crust is topped with a silky dark chocolate peanut butter filling and finished with a creamy peanut butter whipped cream. Everyone needs a recipe like this up their sleeve to wow their friends. Easy to make ahead, and always a crowd pleaser. #chocolatetart #peanutbuttertart #chocolate #peanutbutter

    I'm gonna start this post off by apologising. I've been sitting on this recipe for far longer than is fair. You need this recipe in your life. It's a Dark Chocolate Peanut Butter Tart, which is topped with a Peanut Butter Whipped Cream. Sounds like a mouthful? Wait until you have the actual thing in your mouth. 

    I made this a month or so ago to take to a friend's house. I always get excited when we go places for dinner, not because we have no friends (maybe that too? It's the little things, lol), but because it gives me an excuse to make something super elaborate and actually have people there to eat it! As per usual I was put on dessert duty, and i've been wanting to try a chocolate peanut butter tart for a long time, so here we are. 

    This was insanely easy to make, everyone went back for thirds, and it was just as amazing the next day. A chocolate tart like this is a great wee recipe to have up your sleeve - it is super easy to prepare in advance, and always, always a crowd pleaser. You could leave out the peanut butter and hit it with a big dollop of whipped cream, or just leave it as is, and sprinkle a little salt over the top to have a plain chocolate tart. The possibilities are endless. You should make it. It's crazy easy, but you're going to look super fancy. Promise. 

    A few wee tips:

    • The crust for this is a graham cracker crust, made into a 'chocolate' crust by adding some cocoa. I have a brown butter graham cracker situation here too if that's more your jam.
    • This can absolutely be made ahead by at least a day - but add the peanut butter whipped cream on the day that you serve.
    • Good quality chocolate really makes a difference here. I usually go for something about 70% cocoa solids, but if you wanted a slightly more mellow chocolate taste, milk chocolate would work great too.
    • Good quality peanut butter also makes this taste extra yum - go for something that is just peanuts and salt. I used Pic's in this - a brand from my hometown in NZ! You can get it on Amazon too.
    • If you're in a place where Graham Crackers aren't easy to find, digestive biscuits work great.
    • I used an ateco #866 tip on the top of this. French star tips are my secret weapon - I have a bunch of them and highly recommend!

    ❤️ Made this recipe and love it? ❤️

    I would LOVE for you to leave me a review and star rating below to let me know how you liked it! Also, please make sure to tag me on Instagram!

    Answers to your baking questions

    Over the years, many of you have asked me questions about:

    • baking in grams
    • adjusting oven temperatures
    • what kind of salt to use
    • and many more!

    I've curated and answered them all for your easy reference in this frequently asked questions post!

    Filed Under: Tarts

    Banana Sheet Cake with Whipped Dark Chocolate Ganache


    Banana Sheet Cake with Whipped Dark Chocolate Ganache. A little bit fancy but perfect for a crowd, this banana sheet cake will be your secret dessert weapon! #bananacake #sheetcake #chocolateganache #chocolatefrosting
    Banana Sheet Cake with Whipped Dark Chocolate Ganache. A little bit fancy but perfect for a crowd, this banana sheet cake will be your secret dessert weapon! #bananacake #sheetcake #chocolateganache #chocolatefrosting
    Banana Sheet Cake with Whipped Dark Chocolate Ganache. A little bit fancy but perfect for a crowd, this banana sheet cake will be your secret dessert weapon! #bananacake #sheetcake #chocolateganache #chocolatefrosting
    Banana Sheet Cake with Whipped Dark Chocolate Ganache. A little bit fancy but perfect for a crowd, this banana sheet cake will be your secret dessert weapon! #bananacake #sheetcake #chocolateganache #chocolatefrosting
    Banana Sheet Cake with Whipped Dark Chocolate Ganache. A little bit fancy but perfect for a crowd, this banana sheet cake will be your secret dessert weapon! #bananacake #sheetcake #chocolateganache #chocolatefrosting
    Banana Sheet Cake with Whipped Dark Chocolate Ganache. A little bit fancy but perfect for a crowd, this banana sheet cake will be your secret dessert weapon! #bananacake #sheetcake #chocolateganache #chocolatefrosting
    Banana Sheet Cake with Whipped Dark Chocolate Ganache. A little bit fancy but perfect for a crowd, this banana sheet cake will be your secret dessert weapon! #bananacake #sheetcake #chocolateganache #chocolatefrosting
    Banana Sheet Cake with Whipped Dark Chocolate Ganache. A little bit fancy but perfect for a crowd, this banana sheet cake will be your secret dessert weapon! #bananacake #sheetcake #chocolateganache #chocolatefrosting

    There are very few things I would change about my Husband Rich. He's the consistent to my rollercoaster moods, the calm to my crazy. But he has horrific taste in frosting. Unless it's what we call "shitty chocolate icing" (I've since managed to at least get him to agree to a chocolate american buttercream), he doesn't want anything to do with it. He will scrape the buttercream off cakes, chop it off the top of cupcakes, or just flat out refuse anything involving swiss meringue buttercream. Last weekend I was taking a cake for a friends birthday and he asked if he could BRING HIS OWN FROSTING. And as much as I try to not let it bug me, I always get a little bummed out when he scrapes frosting off or eats around it. My theory is that the fancier it is, the longer it took me, or the more components it has, the higher the chances are of him not liking it. Banana bread? He will eat a whole loaf in a day. Multi component choux buns? He's gonna ask me to leave him some unfilled so he can eat them plain. Luckily I have loads of friends who aren't as basic in baking preferences as Rich, but I always have to remind myself when presenting him with something that's taken me ages or is super intricate, that he's probably not going to like it because he's a monster. Is it just me? Or does this happen to other people too?

    I did however manage to sneak this banana sheet cake with whipped dark chocolate ganache past him the other day. Granted, he did request an american buttercream when I made it for him for his birthday, but at least this one didn't get scraped off (I don't know what's wrong with him, honestly, because the ganache is the best part). Banana cake is a huge favourite around our house, probably because it's just banana bread in a different form.

    The cake itself is super super easy, and all I have done is fancied it up a little with a whipped dark chocolate ganache. The ganache is dark and rich, and balances the sweet, moist cake. Feel free to add a different buttercream to this (Rich recommends a double batch of this one, but a dark chocolate swiss meringue situation would also be amazing), but I do encourage you to give the ganache a go. It's worth it.

    A few wee tips:

    • The Ganache does need some time to firm up in the fridge - you want to give it a little time on the bench first to reduce the condensation when you put on the plastic wrap. I like to let it firm up, stirring occasionally, until it is thick and fudgy, and then whip it - It usually needs about half an hour on the bench and then another 60-90 minutes in the fridge.
    • If you have another mixing bowl that would be great for this, alternatively I like to get the cake in the oven, and then wash out my mixer bowl, and make the ganache directly in it, so when it comes time to whip it, it's already in the right bowl.
    • If you let your ganache sit a little too long and it gets too firm, then as you are whipping it, take a little out, heat up in the microwave until soft and slightly warm, then add to the cold mixture. Mix it in, and repeat if needed to make the ganache the right consistency.

    ❤️ Made this recipe and love it? ❤️

    I would LOVE for you to leave me a review and star rating below to let me know how you liked it! Also, please make sure to tag me on Instagram!

    Answers to your baking questions

    Over the years, many of you have asked me questions about:

    • baking in grams
    • adjusting oven temperatures
    • what kind of salt to use
    • and many more!

    I've curated and answered them all for your easy reference in this frequently asked questions post!

    Filed Under: Sheet and Snack Cakes

    Cherry Chocolate Macarons

    Black Forest inspired Macarons - chocolate macarons with Dark Chocolate Swiss Meringue Buttercream and Cherry Compote Filling. #Chocolate #Macaron #Blackforest #cherry #compote #Frenchmacaron
    Black Forest inspired Macarons - chocolate macarons with Dark Chocolate Swiss Meringue Buttercream and Cherry Compote Filling. #Chocolate #Macaron #Blackforest #cherry #compote #Frenchmacaron
    Black Forest inspired Macarons - chocolate macarons with Dark Chocolate Swiss Meringue Buttercream and Cherry Compote Filling. #Chocolate #Macaron #Blackforest #cherry #compote #Frenchmacaron
    Black Forest inspired Macarons - chocolate macarons with Dark Chocolate Swiss Meringue Buttercream and Cherry Compote Filling. #Chocolate #Macaron #Blackforest #cherry #compote #Frenchmacaron
    Black Forest inspired Macarons - chocolate macarons with Dark Chocolate Swiss Meringue Buttercream and Cherry Compote Filling. #Chocolate #Macaron #Blackforest #cherry #compote #Frenchmacaron
    Black Forest inspired Macarons - chocolate macarons with Dark Chocolate Swiss Meringue Buttercream and Cherry Compote Filling. #Chocolate #Macaron #Blackforest #cherry #compote #Frenchmacaron
    Black Forest inspired Macarons - chocolate macarons with Dark Chocolate Swiss Meringue Buttercream and Cherry Compote Filling. #Chocolate #Macaron #Blackforest #cherry #compote #Frenchmacaron

    Hiiii! How on EARTH is is July tomorrow? I swear it was just Christmas? I have been a little preoccupied around here - shooting christmas content for a magazine, which was super fun but took up a fair whack of time, particularly as I had to do the whole lot in my counter top oven. I'm not the best with pressure (highly strung / just a stresser in general) so I will be stoked once it is all submitted. I can't wait to share when the time come. We also just got new foster kittens! They are super cute, but full of worms. I've dealt with more poop in the last week than I have in a very, very long time. Who knew so much wormy poop could come out of such tiny little babies! It's gross, but all part of the fostering process. Thankfully they seem to be feeling better, so hopefully all the shitty problems clear up and I can snuggle them without having to hold my nose very soon!

    Just popping by to share this month's macaron recipe! I am sure nobody else is invested in this whatsoever, but I love the fun wee challenge of coming up with a new flavour combo each month.

    We kept things pretty simple this time and went for a black forest inspired situation with a dark chocolate macaron with a cherry filling - chocolate shell, silky chocolate swiss meringue buttercream, and a cherry compote. Cherry season is in full swing here now, so it only made sense to incorporate them somehow! I love the combination of cherries and chocolate - we kept the compote simple to really let the flavour shine through. Happy end of June!

    A few wee tips:

    • All my Mac tips are here! The chocolate macaron shells can be a little finicky, particularly in the humidity, but I promise they are worth the effort!
    • Ideally the cherry compote will chill overnight, but if you are in a pinch, you can spread it onto a quarter sheet pan, place a piece of plastic wrap over the surface, and pop it in the freezer until cold.
    • You will have some Swiss Meringue Buttercream left over - you can either half the recipe if you don't want this, or it keeps super well in the fridge if you wanted to use it for another project. I find that making half a batch of buttercream can be a little tricky, depending on your mixer. Plus I think if you're going to go to the effort you might as well make lots to use again!
    • Good quality cocoa powder makes a difference!

    ❤️ Made this recipe and love it? ❤️

    I would LOVE for you to leave me a review and star rating below to let me know how you liked it! Also, please make sure to tag me on Instagram!

    Answers to your baking questions

    Over the years, many of you have asked me questions about:

    • baking in grams
    • adjusting oven temperatures
    • what kind of salt to use
    • and many more!

    I've curated and answered them all for your easy reference in this frequently asked questions post!

    Filed Under: Macarons

    Lemon and Basil Macarons

    Lemon and Basil Macarons - French Macaron shells are filled with a lemon and basil cream, and a tart lemon gel. Delicate an intense flavours meld together to create the perfect bite.
    Lemon and Basil Macarons - French Macaron shells are filled with a lemon and basil cream, and a tart lemon gel. Delicate an intense flavours meld together to create the perfect bite.
    Lemon and Basil Macarons - French Macaron shells are filled with a lemon and basil cream, and a tart lemon gel. Delicate an intense flavours meld together to create the perfect bite.
    Lemon and Basil Macarons - French Macaron shells are filled with a lemon and basil cream, and a tart lemon gel. Delicate an intense flavours meld together to create the perfect bite.
    Lemon and Basil Macarons - French Macaron shells are filled with a lemon and basil cream, and a tart lemon gel. Delicate an intense flavours meld together to create the perfect bite.
    Lemon and Basil Macarons - French Macaron shells are filled with a lemon and basil cream, and a tart lemon gel. Delicate an intense flavours meld together to create the perfect bite.
    Lemon and Basil Macarons - French Macaron shells are filled with a lemon and basil cream, and a tart lemon gel. Delicate an intense flavours meld together to create the perfect bite.

    Just sneaking in on the last day of May to share our May recipe for macs! I know each time I post a macaron recipe I say that it is my favourite so far - but these ones really take the cake. I filled the shells with a lemon and basil cream, and a lemon gel. Lemon gel is something that has been familiar to me for a while, ever since I tasted it at the restaurant my friend worked at, but it was the first time I had made it. It's super simple - you make a simple syrup, combine with lemon juice, and then add agar agar, which is essentially vegan gelatin, made from a type of seaweed (same as petri dishes!). It sets up solid, and after an overnight rest, you blitz it up and it becomes the most amazing tart gel which is perfect to balance out creamy or sweet components. Unlike a curd it is not competing with the butter or the yolks in the recipe, so it gives a super intense lemon flavour which was amazing in the centre of the macs, and stood up amazingly against the lemon and basil cream.

    The lemon and basil cream is essentially just a lemon curd, but made with a slightly different method - You cook everything apart from the butter together into a custard, then emulisify the butter into the mixture using an immersion blender. The result is a super creamy, spreadable cream, perfect for filling tarts or macarons. We popped some basil in there too - safe to say i'm going to be adding basil to a lot more lemon things from here on out.

    A few wee tips:

    • I have put all the tips and tricks I can think of for macarons in this post!
    • Both the lemon basil cream and gel need overnight to set properly, so make sure that you allow time for this. They can be made a few days in advance if needed - and the cream freezes beautifully.
    • In fact, if you can, make the lemon basil cream a few days ahead, as it matures very nicely and the basil comes out more over time.
    • These do tend to go a little soggy after two days because of the gel - so if you have lots leftover, then it may be best to store it all separately then assemble as needed. I often store things such as buttercream or lemon cream in the fridge, in the piping bag I was using, just with a clip to seal.
    • I read something the other day about Bob's red Mill Superfine almond meal not being the best for french macs because of the moisture content - I switched mine up quick smart!
    • You can get agaragar on Amazon, or at health food stores! Read the reviews - the first stuff I got tasted like butts.

    ❤️ Made this recipe and love it? ❤️

    I would LOVE for you to leave me a review and star rating below to let me know how you liked it! Also, please make sure to tag me on Instagram!

    Answers to your baking questions

    Over the years, many of you have asked me questions about:

    • baking in grams
    • adjusting oven temperatures
    • what kind of salt to use
    • and many more!

    I've curated and answered them all for your easy reference in this frequently asked questions post!

    Filed Under: Macarons

    Jelly Tip Ice Cream Pops


    A homemade take on the New Zealand Childhood favourite Jelly Tips - the top of ice cream pops are filled with jelly before being topped up with creamy vanilla bean ice cream, then dipped in a dark chocolate topping.
    A homemade take on the New Zealand Childhood favourite Jelly Tips - the top of ice cream pops are filled with jelly before being topped up with creamy vanilla bean ice cream, then dipped in a dark chocolate topping.
    A homemade take on the New Zealand Childhood favourite Jelly Tips - the top of ice cream pops are filled with jelly before being topped up with creamy vanilla bean ice cream, then dipped in a dark chocolate topping.
    A homemade take on the New Zealand Childhood favourite Jelly Tips - the top of ice cream pops are filled with jelly before being topped up with creamy vanilla bean ice cream, then dipped in a dark chocolate topping.
    A homemade take on the New Zealand Childhood favourite Jelly Tips - the top of ice cream pops are filled with jelly before being topped up with creamy vanilla bean ice cream, then dipped in a dark chocolate topping.
    A homemade take on the New Zealand Childhood favourite Jelly Tips - the top of ice cream pops are filled with jelly before being topped up with creamy vanilla bean ice cream, then dipped in a dark chocolate topping.
    A homemade take on the New Zealand Childhood favourite Jelly Tips - the top of ice cream pops are filled with jelly before being topped up with creamy vanilla bean ice cream, then dipped in a dark chocolate topping.
    A homemade take on the New Zealand Childhood favourite Jelly Tips - the top of ice cream pops are filled with jelly before being topped up with creamy vanilla bean ice cream, then dipped in a dark chocolate topping.

    Confession time. I made these last year. As in, I tested the recipe a few times, made them, styled them, shot them, edited the photos, exported to my computer, drafted the recipe, and then didn't post them because I never got around to it, and suddenly it was cold. And then I totally forgot about them, until yesterday when I was flicking through my computer grabbing some photos for a project and stumbled across a little folder of goodness deep in my hard drive. And i'm not going to lie, I was pretty stoked - a) because the photos look ok ish (i've found old folders of photos before and just deleted on the spot and remade) and b) because it's been an entire week that the gas has been turned off in our building, so neither the stove or the baking part of the oven works, and i'm getting close to cutting someone. I just bought a little hotplate so we can make pasta, and I have a little toaster oven, but I'm not very impressed at all. Here's hoping it gets fixed, and in the mean time you can have last years jelly tip recipe!

    These are based on an ice block (ice cream pop) I grew up on / still eat whenever i'm home - the jelly tip! The concept is very simple - it's literally a jelly tipped ice cream, dipped in chocolate. It's the best thing ever. There have been a bunch of jelly tip inspired ice creams, chocolate, and trashy shots when I was at university, but nothing compares to the real deal.

    These homemade versions are super easy to make, and perfect for this summer! All you have to do is make some jelly (jello for americans) with half the amount of water that you usually would. You then fill up your popsicle moulds (we spell moulds / molds different too haha) a third of the way with this mixture, stick the stick in, and freeze. The jelly is then topped off with a creamy vanilla bean ice cream - you could definitely use store bought here and re-freeze, but making your own ice cream is much easier than it looks, and extra delicious. Once they are nice and frozen, the whole thing is dipped in a chocolate magic shell situation, which hardens into a crispy, thin shell that shatters when you bite into it. The whole thing then goes back into the freezer until you are ready to serve. These would be perfect to bring out of the freezer as a dessert to finish off a summer bbq, or perfect at a party! Secret popsicles in the freezer is one of my favourite things to do if we have people over - all the work is done beforehand, you just have to hand them out when you're ready to serve!

    A few wee tips:

    • I used Raspberry 'jello' for this recipe - I think that most packets of jelly will work, just make sure that you make it with half the amount of water required so it freezes without being too icy. The real jelly tips had a slightly bouncy texture - probably from a specially formulated recipe, but this works just as well!
    • You're going to have some ice cream leftover - store in a covered container in the freezer.
    • I made 6 pops, because that's how many popsicle moulds I had, but you will have some ice cream left over if you only make 6. Either you can make more pops if you have more moulds (you may need another packet of jelly), or you can just transfer the extra ice cream into a container and freeze for another time.
    • The recipe for the chocolate shell makes quite a lot - the reason for this is that you need to have enough of it to dip the ice creams into it completely. I put it in a narrow mason jar (make sure the ice cream pop will fit in), so that when I dipped in the ice cream pop, it displaced the chocolate shell enough to cover the whole pop nicely. You can keep the extra in the jar and re-heat when needed to serve as chocolate shell on your leftover ice cream 😉
    • I made the jelly, poured into the moulds, froze, then made the anglaise and left to cool. A few hours later, once the anglaise was cool and the jelly was frozen, I churned the ice cream and added to the moulds. They were left to freeze overnight, then unmoulded, briefly re-frozen and dipped the next day. You can make the anglaise the day before you start if you like! Just make sure you allow enough time for the different components to freeze.
    • I use this popsicle mold. It's a little expensive, but so worth it when it comes to getting them out of the mold. So much easier to use, and the little lids help suspend the sticks perfectly in the ice cream.

    ❤️ Made this recipe and love it? ❤️

    I would LOVE for you to leave me a review and star rating below to let me know how you liked it! Also, please make sure to tag me on Instagram!

    Answers to your baking questions

    Over the years, many of you have asked me questions about:

    • baking in grams
    • adjusting oven temperatures
    • what kind of salt to use
    • and many more!

    I've curated and answered them all for your easy reference in this frequently asked questions post!

    Filed Under: Ice Cream Pops, New Zealand Recipes

    Kaffir Lime Macarons

    Kaffir Lime Macaron - a shell filled with a delicately infused kaffir lime german buttercream #kaffirlime #macarons #germanbuttercream
    Kaffir Lime Macaron - a shell filled with a delicately infused kaffir lime german buttercream #kaffirlime #macarons #germanbuttercream
    Kaffir Lime Macaron - a shell filled with a delicately infused kaffir lime german buttercream #kaffirlime #macarons #germanbuttercream
    Kaffir Lime Macaron - a shell filled with a delicately infused kaffir lime german buttercream #kaffirlime #macarons #germanbuttercream
    Kaffir Lime Macaron - a shell filled with a delicately infused kaffir lime german buttercream #kaffirlime #macarons #germanbuttercream
    Kaffir Lime Macaron - a shell filled with a delicately infused kaffir lime german buttercream #kaffirlime #macarons #germanbuttercream

    Happy Sunday! We are having a quiet one around here - we just did 12 million loads of laundry, and are making the most of having some quiet before things get busy for us the next few weeks! Gonna sit on my butt for the rest of the day, my friend is coming around and we are going to watch the new episodes of Handmaids tale! I am so excited.

    My Mum left yesterday, after the best two weeks ever of visiting! She's still not home just yet though, despite leaving over 24 hours ago. Lol. The joys of living on the opposite side of the world. She hasn't been here since I first moved to NYC four years ago, so it was so nice to show her all of the things that we have been up to the last four years. Lots has changed since she last visited! We ate at all of the food spots, saw all the broadway shows, and she kicked my ass in the gym. Winner. I had big plans of making her all the yum vegetarian meals we have been eating recently, but in a hilariously ironic turn of events it turned out I was low on iron, so there were a few sneaky steaks in there too. How is it that Mums always know best?

    I always get hugely gutted when my family leaves after visiting - i'm such a huge, huge homebody that saying goodbye really really sucks. I always throw myself into things to hide the homesickness that it dredges up, so after spontaneously getting 5 inches cut off my hair instead of a trim, booking for our couch to be cleaned on Wednesday (v v excited!) and washing everything we own, here I am popping this recipe just here for you! Or for me, because I sure as hell am going to make these again.

    These are the April installment of the Macaron a Month. Sneaking in with one day to spare, although we made these a few weeks ago. I got Rich a Kaffir Lime tree for Christmas a few years ago (I am excellent at giving gifts that I want), and although it sucks at growing fruit, it is a champ at making beautiful leaves, and while they aren't as intense as the fruit, they are perfect for infusing things! I love the flavour the leaves impart in things - it really is hard to describe, so you will have to just try it for yourself! I've made a kaffir lime ice cream before that was totally bomb, so I knew that they would go so well in a buttercream too.

    I used the leaves to infuse a german buttercream, adding them to the pastry cream as I cooked it out, and then we ground some leaves with sugar and added to the final buttercream too, just to add some teeny green flecks. German buttercream will be forever my fave, as it isn't too intensely buttery tasting thanks to the pastry cream base balancing everything out nicely. It is also super easy to infuse, meaning that it is super versatile. We kept the shells simple, coloured with a little gel food colouring, and then really let rip with the kaffir lime buttercream. These are probably some of my fave macarons I have had to date - the flavour is super delicate, almost difficult to put your finger on, but insanely amazing.

    A few wee tips:

    • I have put as many tips as I can possibly think of in this post!
    • Most Macarons taste better after a rest in the fridge overnight, but these in particular especially benefit from a rest - the flavour of the kaffir lime gets stronger and more developed with time.
    • Filled Macarons freeze beautifully, if you don't eat all of them first.
    • You can usually get Kaffir Lime leaves at a thai grocer or spice market. If you by chance happen to get some fruit, add some of the zest to the buttercream for an extra intense flavour.
    • If you need a template, print two of these and stick them together to use as a guide.

    ❤️ Made this recipe and love it? ❤️

    I would LOVE for you to leave me a review and star rating below to let me know how you liked it! Also, please make sure to tag me on Instagram!

    Answers to your baking questions

    Over the years, many of you have asked me questions about:

    • baking in grams
    • adjusting oven temperatures
    • what kind of salt to use
    • and many more!

    I've curated and answered them all for your easy reference in this frequently asked questions post!

    Filed Under: Macarons

    Choux au Craquelin with Caramelised White Chocolate Ganache

    Choux au Craquelin (Cream Puffs) with Caramelised White Chocolate Whipping Ganache, Caramelised Bananas, and Pecan Brittle. This recipe has a few steps but is easy to break up, and these make the perfect dessert!

    Choux au Craquelin (Cream Puffs) with Caramelised White Chocolate Whipping Ganache, Caramelised Bananas, and Pecan Brittle
    Choux au Craquelin (Cream Puffs) with Caramelised White Chocolate Whipping Ganache, Caramelised Bananas, and Pecan Brittle
    Choux au Craquelin (Cream Puffs) with Caramelised White Chocolate Whipping Ganache, Caramelised Bananas, and Pecan Brittle
    Choux au Craquelin (Cream Puffs) with Caramelised White Chocolate Whipping Ganache, Caramelised Bananas, and Pecan Brittle
    Choux au Craquelin (Cream Puffs) with Caramelised White Chocolate Whipping Ganache, Caramelised Bananas, and Pecan Brittle
    Choux au Craquelin (Cream Puffs) with Caramelised White Chocolate Whipping Ganache, Caramelised Bananas, and Pecan Brittle
    Choux au Craquelin (Cream Puffs) with Caramelised White Chocolate Whipping Ganache, Caramelised Bananas, and Pecan Brittle
    Choux au Craquelin (Cream Puffs) with Caramelised White Chocolate Whipping Ganache, Caramelised Bananas, and Pecan Brittle
    Choux au Craquelin (Cream Puffs) with Caramelised White Chocolate Whipping Ganache, Caramelised Bananas, and Pecan Brittle
    Choux au Craquelin (Cream Puffs) with Caramelised White Chocolate Whipping Ganache, Caramelised Bananas, and Pecan Brittle

    Choux au Craquelin

    Confession time. I feel like I've been missing out for a very long time. Missing out on how insanely, amazingly, delicious choux pastry is, and how easy it is to make. For some reason it was filed squarely away in my list of 'things that are difficult to make', and i'm totally bummed out that it was there for so long. Maybe it was the french name. Maybe it's because the last time I tried to make it, I carefully piped out a whole tray of 'eclairs' before Dad pointed out I had accidentally piped out things that were definitely more phallic than originally intended. Or maybe just because I thought it was tricky. But I dunno why it was there for so long. Because not only is it fun, and easy to make, but it is ridiculously versatile. You can fill it with whatever you please, or just eat the buns as they are. Both are amazing. You need to make.

    And seeing as this is the first choux recipe I have posted, it seems only fair and reasonable that I go all out, right? Why would I share a simple cream puff recipe, filled with whipped cream, when I can take a cream puff, add a layer of crunchy delicious cookie dough before it is baked, and then fill it with caramelised bananas, pecan brittle, and caramelised white chocolate whipping ganache? If we are going to have fun with cream puffs round here, we might as well do it properly.

    What is Craquelin?

    My mind was low key blown by a few things here. The first was the addition of the craquelin. I had seen it before, and assumed it was a super fancy technique. I was amazed to learn that it was simply a very thin layer of cookie dough, frozen, and placed in a disc on the piped out choux mound before it is baked. As the choux bun bakes in the oven, and somehow magically puffs up, the craquelin melts and spreads over the surface of the bun, creating the most beautiful crackly finish.

    The second was the whipping ganache. When I was planning out this recipe, I turned to my amazing friend Lisa, who is a pastry chef in London. Not only is she insanely talented, but she puts up with me bombing her with questions about flavour profiles, recipes, and plating on the regular, and still hasn't told me to go away. This time in particular, she sent through a recipe for a whipping ganache, which I hadn't heard of before. It is similar to a regular ganache, except it is stabilised with a little corn syrup (or glucose), and a second measure of cream is added after the chocolate and cream have been melted together. Once it has rested in the fridge, it is whipped up. The result is amazingly light, and almost mousse-like. I'm hooked. Gonna add whipping ganache to everything now.

    Caramelised White Chocolate Whipping Ganache

    When I started planning this, I knew that I wanted to find a way to incorporate my current obsession - Valrhona's Dulcey Chocolate. It is a caramelised white chocolate, which is one of the most amazing things I have ever come across. They describe it as "creamy and toasty", which is the perfect description. I am not typically a white chocolate fan, but I am full-on addicted to this stuff. I used it in the whipping ganache, and it gave it the perfect flavour - not too sweet, and not too overpowering. It was the perfect base to add to, which I did - adding a layer of caramelised banana, and a pecan brittle in the bottom of each choux bun, before topping with a big swirl of the ganache.

    And OH MY. The result was insane. The crispy cream puff, the smooth silky whipping ganache, the delicate banana flavour, and the crunch from the pecan brittle, all combined to make the perfect mouthful. I will definitely be making these again. I know they look ridiculous and intimidating, but I promise that when you break down all the steps, it is 100% worth it and they aren't as scary to make as they look! I hope you give them a try! Let me know if you have any questions at all!

    A few wee tips for Choux au Craquelin

    • I have included an extra 'just in case' egg in the ingredients. The reason that this is in there, is that sometimes you need to add extra egg to the pastry if necessary. You want the mixture to be at a consistency where if you dip in the beater of the mixer, the batter will form a 'v' shape and eventually break off. If it is too stiff, and breaks off very quickly, you may need to add another beaten egg, and mix again, before performing the test.
    • This article from Erin Mcdowell explains everything so well, as per usual!
    • I made the pecan brittle and the ganache the day before, as the brittle needs time to set, and the ganache needs overnight or 12 hours to mature.
    • Leave all the components separate until just before you serve. If you have leftover components, store them all separately, and then assemble as needed.
    • My oven really only takes one tray at a time, so I piped out both trays of choux, then only topped them with the craquelin when I was ready to bake. Store the craquelin in the freezer until you are ready to use.
    • Choux Freezes! Freeze the cream puffs just after they have been piped out, then once solid, place in a ziploc bag in the freezer. Bake off as usual.
    • These can be filled with anything you like! The Choux au Craquelin is the perfect vehicle for any filling you like. I filled some with mascarpone whipped cream, and they were amazing!

    Related Choux au Craquelin (Cream Puff) recipes:

    • Chocolate Choux au Craquelin with Chocolate Hazelnut Whipped Cream Filling
    • Choux au Craquelin - Cream Puffs with Passionfruit Cream and Passionfruit Whipped Cream
    • Golden Sugar Choux au Craquelin - Cream Puffs with Salted Caramel Diplomat Cream

    ❤️ Made this recipe and love it? ❤️

    I would LOVE for you to leave me a review and star rating below to let me know how you liked it! Also, please make sure to tag me on Instagram!

    Answers to your baking questions

    Over the years, many of you have asked me questions about:

    • baking in grams
    • adjusting oven temperatures
    • what kind of salt to use
    • and many more!

    I've curated and answered them all for your easy reference in this frequently asked questions post!

    Filed Under: Choux

    Spinach, Feta, Red Pepper and Fennel Seed Scones


    Spinach, Feta, Red Pepper, and Fennel Seed Scones. Perfect for a quick morning tea, a savory brunch option, or a light casual lunch.
    Spinach, Feta, Red Pepper, and Fennel Seed Scones. Perfect for a quick morning tea, a savory brunch option, or a light casual lunch.
    Spinach, Feta, Red Pepper, and Fennel Seed Scones. Perfect for a quick morning tea, a savory brunch option, or a light casual lunch.
    Spinach, Feta, Red Pepper, and Fennel Seed Scones. Perfect for a quick morning tea, a savory brunch option, or a light casual lunch.
    Spinach, Feta, Red Pepper, and Fennel Seed Scones. Perfect for a quick morning tea, a savory brunch option, or a light casual lunch.
    Spinach, Feta, Red Pepper, and Fennel Seed Scones. Perfect for a quick morning tea, a savory brunch option, or a light casual lunch.
    Spinach, Feta, Red Pepper, and Fennel Seed Scones. Perfect for a quick morning tea, a savory brunch option, or a light casual lunch.
    Spinach, Feta, Red Pepper, and Fennel Seed Scones. Perfect for a quick morning tea, a savory brunch option, or a light casual lunch.
    Spinach, Feta, Red Pepper, and Fennel Seed Scones. Perfect for a quick morning tea, a savory brunch option, or a light casual lunch.

    One of the things that gets super confusing when you move countries is holidays. Christmas and New Year etc are always the same (mind you I got asked the other day if when it's July in America, if it's also July in NZ, so go figure), but things like Father's day etc are often at very different times. This leads to some frantic googling every now and then, just to make sure you haven't missed anything back home. I've found buying my diary from NZ helps with this too, but the internet still catches me out every now and then when I see all the Dad pics and then realise the dates are different. 

    Just to make things more confusing, our Mother's day is the same as in the US. So I figured seeing as it's a worldwide celebration of sorts, I will add my contribution of food ideas to the internet. It seems as if 'Mother's day brunch' is a thing over here - for our Mum it was always just a cup of tea in bed with a piece of badly buttered toast, but brunch is always something that I can get behind. My own Mum is actually here in NYC with me right at this very second! She hasn't been here for close to four years, so I am having the best time showing her all of the things that have changed since she was last here. It's the best.

    Scones for breakfast are one of my fave things! I grew up in a house where emergency scones were whipped up on the regular - our house was somewhat of a community train station with people popping in to say hi or to have a cup of tea all the time. Savoury scones are so under rated - you can add whatever you like to them, they come together fairly quickly, and are perfect to whip up in the morning for a morning tea or a light lunch. That goes for scones in general, but I do think that Savoury scones need a little more loving. 

    I love the combination of Spinach, Feta, Red Pepper and Fennel seed, although it happens less than I would like around here, because I am married to a staunch cheese and bacon dude. However I figured these were too good not to share with you, and so Rich had to suck it up just this one time. The process for making these is very similar to regular scones, except you fry up all the delicious things first, leave them to cool slightly, then incorporate them in just before you add the milk. They are so delicious fresh out of the oven, but will be just as awesome the next day, warmed slightly and served with loads of good quality butter. Happy Scone-ing!

    A few wee tips:

    • These are super versatile - feel free to play around with the fillings, but just be aware that you may have to adjust the amount of milk accordingly - for example if you left out the feta, you would need a little more milk to replace the moisture.
    • With that being said - you may need more or less milk depending on the water content of your feta, the size of your red pepper etc. I like to add most of the milk and give it a mix, then see if I need the rest, just to prevent them being too wet.
    • I find that freezing the butter in little cubes works best for me! Make sure that your scone contents are fairly cool before you add them to the flour and butter mixture, in order to reduce the amount of melting that happens. I either cool the mix in the pan, stirring frequently to release heat, or I spread into a shallow dish.
    • These keep in an airtight container fairly well! They are best eaten fresh, but if you want to have them the next day too, send them for a spin in the microwave first.

    ❤️ Made this recipe and love it? ❤️

    I would LOVE for you to leave me a review and star rating below to let me know how you liked it! Also, please make sure to tag me on Instagram!

    Answers to your baking questions

    Over the years, many of you have asked me questions about:

    • baking in grams
    • adjusting oven temperatures
    • what kind of salt to use
    • and many more!

    I've curated and answered them all for your easy reference in this frequently asked questions post!

    Filed Under: Savoury, Scones

    Creme Egg Macarons

    creme egg macarons

    These Creme Egg French Macarons are filled with a super smooth Creme Egg Ganache and have a speckled Creme Egg French Macaron shell. These are super cute and the perfect Easter recipe!

    Original recipe from 2018, post reformatted April 2021

    creme egg macarons

    Table of contents

    • Creme Egg French Macarons
    • Tips and Tricks for Foolproof French Macarons
    • For more Macaron Recipes, Check out:
    • Recipe For Creme Egg French Macarons

    Creme Egg French Macarons

    These Creme Egg French Macarons are super cute and the perfect Easter project if you are in need of one! The French Macaron Shell is filled with a super delicious Creme Egg Ganache which is balanced out with a little extra chocolate and butter. These taste just like a creme egg but in macaron form! I have a bunch of homemade macaron recipes on my site, which all use the same shell recipe from my How to make French Macarons post. Mix and match as you like, or make some other Easter Macarons to go alongside them!

    Tips and Tricks for Foolproof French Macarons

    I put allll of my tips and tricks into this post about French Macarons - it is the ultimate guide.

    • There is some butter and milk chocolate in the filling of these macarons as the filling of creme eggs alone makes things a little sloppy.
    • You can fill these with anything that you like! The best part about macarons is that you can make just one batch of shells and then mix and match all the fillings.
    • If you want to freeze the shells, that works great - just freeze them in an airtight container Unfilled then bring them back to room temperature when you are ready to fill them.
    • Ideally macs need overnight in the fridge to meld flavour but if you skip that step I won't tell anyone, promise.
    • Add the speckles after the shells have baked and cooled if you like, by just flicking some watered down food colouring over the shells.
    • If you don't want to make creme egg ganache, this buttercream would be yum too!

    Check out my ultimate guide to French Macarons for all the tips and tricks for making your own French Macarons at home!

    creme egg macarons

    For more Macaron Recipes, Check out:

    • Hundreds and Thousands Macarons
    • Vanilla Bean French Macarons with Strawberry Buttercream
    • Cereal Milk Macarons

    ❤️ Made this recipe and love it? ❤️

    I would LOVE for you to leave me a review and star rating below to let me know how you liked it! Also, please make sure to tag me on Instagram!

    Answers to your baking questions

    Over the years, many of you have asked me questions about:

    • baking in grams
    • adjusting oven temperatures
    • what kind of salt to use
    • and many more!

    I've curated and answered them all for your easy reference in this frequently asked questions post!

    Recipe For Creme Egg French Macarons

    Filed Under: Macarons Tagged With: Gluten Free

    Milk Chocolate Mini Egg Cookies


    Milk Chocolate Mini Egg Cookies - the perfect addition to your easter baking schedule. These come together quickly, are super fun to make, and insanely delicious. Fudgy and chewy, chocolately and crispy, and loaded up with mini eggs.
    Milk Chocolate Mini Egg Cookies - the perfect addition to your easter baking schedule. These come together quickly, are super fun to make, and insanely delicious. Fudgy and chewy, chocolately and crispy, and loaded up with mini eggs.
    Milk Chocolate Mini Egg Cookies - the perfect addition to your easter baking schedule. These come together quickly, are super fun to make, and insanely delicious. Fudgy and chewy, chocolately and crispy, and loaded up with mini eggs.
    Milk Chocolate Mini Egg Cookies - the perfect addition to your easter baking schedule. These come together quickly, are super fun to make, and insanely delicious. Fudgy and chewy, chocolately and crispy, and loaded up with mini eggs.
    Milk Chocolate Mini Egg Cookies - the perfect addition to your easter baking schedule. These come together quickly, are super fun to make, and insanely delicious. Fudgy and chewy, chocolately and crispy, and loaded up with mini eggs.
    Milk Chocolate Mini Egg Cookies - the perfect addition to your easter baking schedule. These come together quickly, are super fun to make, and insanely delicious. Fudgy and chewy, chocolately and crispy, and loaded up with mini eggs.
    Milk Chocolate Mini Egg Cookies - the perfect addition to your easter baking schedule. These come together quickly, are super fun to make, and insanely delicious. Fudgy and chewy, chocolately and crispy, and loaded up with mini eggs.
    Milk Chocolate Mini Egg Cookies - the perfect addition to your easter baking schedule. These come together quickly, are super fun to make, and insanely delicious. Fudgy and chewy, chocolately and crispy, and loaded up with mini eggs.
    _DSC9785.jpg

    A couple of months ago, I jokingly renamed Sarah Kieffer's amazing "Pan Banging" cookies, referring to them as FOMO cookies (I just renamed what I called them, they are still called Pan Banging cookies IRL).  FOMO, or 'fear of missing out' seems to be a real thing these days on Instagram. Someone makes a recipe, usually gram worthy and delicious, someone else gets FOMO, also makes the recipe, and from there it is a swift chain reaction of FOMO baking. Alison Roman's Salted Chocolate Chunk shortbread, which is currently taking over the internet (because it's super yum and you should probably make it right after you make these), falls squarely in the FOMO category too.

    My good friend Brian Hart Hoffman jumped on the FOMO bandwagon fairly quickly (this is how it works!), and we started throwing ideas around about cookies to try. The idea is that we essentially give in to peer / internet pressure and make all of the FOMO worthy cookies that we can, and share as many as we can along the way.  I hope that you can join in! Let's all be super lame and use the #fomocookies tag! 

    And now we have a new cookie to add to the FOMO list. Well, at least we think so anyway. When I first made them I immediately texted Brian, saying "Holyshittheseareamazingineedthemall". They are THAT GOOD. These are Milk Chocolate Mini Egg Cookies, from the latest issue of the Bake from Scratch Magazine. These cookies are fudgy and chewy, and loaded up with those candy coated mini eggs that are already addictive enough on their own. These are the type of cookie where you sneak a little bite, then another little bite, and then suddenly you have eaten three. They are amazing with the mini eggs, but I rolled some in chocolate chunks too, in the name of research, and I can confirm that they are also almost just as good. 

    A few wee tips:

    • I have tweaked the method of the recipe just slightly - it calls for an hour to overnight rest in the fridge. I found that an hour was too short, and overnight made them too hard to scoop, so somewhere around the 3 hour mark is great. I then froze them before baking just to help with spreading.
    • Weigh your ingredients for best results.
    • If you are a little pressed for time, you can rest for an hour, roll and scoop and cover in eggs, then bang them in the freezer for 20 mins or so before you bake them - I jammed them all onto one tray, then transferred to the baking sheet I was using them as needed.
    • These do tend to hold hands in the oven a little, so 6 per half baking sheet works best for me
    • The recipe has you smush lots of eggs onto the top of each cookie, and then bake it - they do spread A LOT in the oven, so I jammed a few more chopped eggs onto the top of each one after they came out of the oven. Two 10oz (285g) bags seem to work best for me, once you account for snacking on the eggs as you bake these.
    • The mixture will seem very wet, but it will firm up in the fridge!
    • Because my oven isn't the best, I bake these one tray at a time, but you could probably do two at a time - rotate the trays halfway through.
    • The recipe includes almond extract, but I left it out because I don't like it, and they were still insane, so i'll leave that one up to you whether you want to ruin your cookies by making them taste like almond extract or not. (Juuuuust kidding!)

    ❤️ Made this recipe and love it? ❤️

    I would LOVE for you to leave me a review and star rating below to let me know how you liked it! Also, please make sure to tag me on Instagram!

    Answers to your baking questions

    Over the years, many of you have asked me questions about:

    • baking in grams
    • adjusting oven temperatures
    • what kind of salt to use
    • and many more!

    I've curated and answered them all for your easy reference in this frequently asked questions post!

    Filed Under: Other Cookies

    Chocolate Hazelnut Babka

    Chocolate Hazelnut Babka - fluffy brioche dough is rolled out and spread with a homemade hazelnut chocolate spread, sprinkled with chopped toasted walnuts, and rolled into swirly chocolatey loaves. The result is perfect for a coffee break, or an indulgent wee breakfast.

    Chocolate Hazelnut Babka - fluffy brioche dough is rolled out and spread with a homemade hazelnut chocolate spread, sprinkled with chopped toasted walnuts, and rolled into swirly chocolatey loaves. The result is perfect for a coffee break, or an indulgent wee breakfast.
    Chocolate Hazelnut Babka - fluffy brioche dough is rolled out and spread with a homemade hazelnut chocolate spread, sprinkled with chopped toasted walnuts, and rolled into swirly chocolatey loaves. The result is perfect for a coffee break, or an indulgent wee breakfast.
    Chocolate Hazelnut Babka - fluffy brioche dough is rolled out and spread with a homemade hazelnut chocolate spread, sprinkled with chopped toasted walnuts, and rolled into swirly chocolatey loaves. The result is perfect for a coffee break, or an indulgent wee breakfast.
    Chocolate Hazelnut Babka - fluffy brioche dough is rolled out and spread with a homemade hazelnut chocolate spread, sprinkled with chopped toasted walnuts, and rolled into swirly chocolatey loaves. The result is perfect for a coffee break, or an indulgent wee breakfast.
    Chocolate Hazelnut Babka - fluffy brioche dough is rolled out and spread with a homemade hazelnut chocolate spread, sprinkled with chopped toasted walnuts, and rolled into swirly chocolatey loaves. The result is perfect for a coffee break, or an indulgent wee breakfast.
    Chocolate Hazelnut Babka - fluffy brioche dough is rolled out and spread with a homemade hazelnut chocolate spread, sprinkled with chopped toasted walnuts, and rolled into swirly chocolatey loaves. The result is perfect for a coffee break, or an indulgent wee breakfast.
    Chocolate Hazelnut Babka - fluffy brioche dough is rolled out and spread with a homemade hazelnut chocolate spread, sprinkled with chopped toasted walnuts, and rolled into swirly chocolatey loaves. The result is perfect for a coffee break, or an indulgent wee breakfast.
    Chocolate Hazelnut Babka - fluffy brioche dough is rolled out and spread with a homemade hazelnut chocolate spread, sprinkled with chopped toasted walnuts, and rolled into swirly chocolatey loaves. The result is perfect for a coffee break, or an indulgent wee breakfast.
    Chocolate Hazelnut Babka - fluffy brioche dough is rolled out and spread with a homemade hazelnut chocolate spread, sprinkled with chopped toasted walnuts, and rolled into swirly chocolatey loaves. The result is perfect for a coffee break, or an indulgent wee breakfast.

    Chocolate Hazelnut Babka

    Hiiiiiii! I'm coming to you from the middle of a gross snow day to share this Chocolate Hazelnut Babka recipe. Somehow NYC missed the memo that it's daylight savings this weekend so it should be sorting it's shit out weather wise by now, but as someone who loves to stay inside, I'm not too mad.

    Sorry sorry - I've been meaning to share this for the longest time, and I just haven't gotten around to it. This year has been really kicking us in the butt, in a super busy and stressful but also exciting kind of a way.

    This Chocolate Hazelnut babka was the product of one of my fave ways to spend a day - a baking day with Jill. After both getting tied up in life and not seeing each other for close to a month (some sort of record which i'm more than happy not to ever break), we intended on baking a couple of times but ended up sitting on the couch lying under blankets talking (also a fave way to spend a day), so when we finally managed to bake, we wanted to make something super delicious. And oh man, we sure did.

    I still had some of the chocolate hazelnut spread from these cupcakes leftover, so it only made sense to slather it all over a brioche dough. Babka is one of my favourite things to make - you can fill it with all sorts of things, and it keeps well, not to mention that it makes the best french toast ever. This Chocolate Hazelnut Babka recipe makes two loaves, so enough to make one, and share one, or one to pop into the freezer for later.

    A few wee tips for Chocolate Hazelnut Babka

    • If you would like, you can make this the night before and do the first proof in the fridge overnight. If you do this, you can skip the step where you chill the sausage of dough, as the dough will already be firm enough.
    • We used pre chopped hazelnuts, but coarsely grinding some in the food processor or chopping them will work just as well.
    • The recipe for the chocolate hazelnut spread does make a little extra - but I promise you it's worth having around for very little extra effort

    More Babka Recipes:

    • Apple and Cardamom Babka
    • Dark Chocolate and Espresso Rye Babka
    • Dark Chocolate, Tahini, and Halva Brioche Babka

    ❤️ Made this recipe and love it? ❤️

    I would LOVE for you to leave me a review and star rating below to let me know how you liked it! Also, please make sure to tag me on Instagram!

    Answers to your baking questions

    Over the years, many of you have asked me questions about:

    • baking in grams
    • adjusting oven temperatures
    • what kind of salt to use
    • and many more!

    I've curated and answered them all for your easy reference in this frequently asked questions post!

    Filed Under: Babka and Brioche Knots

    Brioche Doughnuts with Tahini Chocolate Pastry Cream and Halva


    Brioche doughnuts filled with chocolate tahini pastry cream and topped with Halva
    Brioche doughnuts filled with chocolate tahini pastry cream and topped with Halva
    Brioche doughnuts filled with chocolate tahini pastry cream and topped with Halva
    Brioche doughnuts filled with chocolate tahini pastry cream and topped with Halva
    Brioche doughnuts filled with chocolate tahini pastry cream and topped with Halva
    Brioche doughnuts filled with chocolate tahini pastry cream and topped with Halva

    Hoooooly crap. The last few days / weeks / months have been ridic. I feel like I can only every now and then manage to get my head above water to take a big breath. We have been working on some SUPER exciting things at the studio which I can't wait to share with you very soon! I spent the last few days running around town with the team from Bake from scratch and the lovely Edd aka The boy who bakes. They were on a promo tour for the latest issue of the magazine, which is all about British cooking! Seeing as they didn't have a kitchen, I did all the food for the shoots - lots of scones, two 'chocolate biscuit cakes' which were very stressful but thankfully turned out pretty on the inside, and an amazingly delicious chocolate passionfruit bundt cake. I always have the best, best time when they are in town. 

    I made these wee guys a week or so ago. I had breakfast with my lovely friend Rachel of Seed and Mill, and she sent me home with some of their amazing products - the best tahini ever, and a wee package of Halva! If you haven't had halva before, you should try some ASAP - it's made by adding tahini to a sugar syrup and then mixing until it crystalizes. Different flavours are then added. If you are ever in NYC make sure you stop by Seed and Mill at Chelsea Market - their soft serve is one of my fave things ever. 

    I have been meaning to incorporate tahini into a dessert / baked good ever since these cookies, and so here you go! I took my fave brioche recipe, and turned it into doughnuts, then loaded them up with a pastry cream that I gussied up with some dark chocolate and tahini. Tahini and chocolate are great friends - the chocolate really plays on the nuttiness of the tahini, and stirred into a pastry cream is always going to be a good time. I rolled the freshly fried doughnuts in a cocoa sugar mix which tastes like that shitty chocolate icing your mum made as a kid, before filling them with the pastry cream and topping with a chunk of halva. If you're going to do decadent, you might as well do it properly. 

    A few wee tips:

    • If you can, make the pastry cream the night before or a few hours before you start, so that it has time to cool in the fridge. If not, and you're in a time pinch, no worries - just line a shallow baking sheet (I usually use a quarter sheet) with plastic wrap, spread the cream in, then put another piece of plastic wrap on top, and leave it to cool in the fridge, giving it 5 minute blasts in the freezer occasionally if needed. More surface area = quicker cooling time!
    • If you can't find Halva, you can definitely leave it out! I just used it as a wee topping.
    • The first rise for these can be done overnight in the fridge - they may just need a little more time on their second rise once you have shaped them.

    ❤️ Made this recipe and love it? ❤️

    I would LOVE for you to leave me a review and star rating below to let me know how you liked it! Also, please make sure to tag me on Instagram!

    Answers to your baking questions

    Over the years, many of you have asked me questions about:

    • baking in grams
    • adjusting oven temperatures
    • what kind of salt to use
    • and many more!

    I've curated and answered them all for your easy reference in this frequently asked questions post!

    Filed Under: Brioche, Doughnuts

    Custard Square with Homemade Puff Pastry

    The perfect custard square recipe - sheets of crisp homemade puff pastry sandwich a creamy rich vanilla bean custard. The whole thing is then loaded up with a vanilla bean icing. Custard Slice is a delicious take on a classic New Zealand childhood favourite.

    Custard Square with Homemade Puff Pastry

    Hi! Just popping in to share this recipe with you for Custard Square. Often also called Vanilla Slice in Australia, Custard square is two layers of puff pastry, surrounding a creamy, smooth custard. The whole thing is then topped off with a vanilla bean icing. It's a New Zealand Classic, and something I always used to get from the bakery growing up. Making custard slice from scratch takes a little more effort, but it is so, so worth it. Whether to you it's a custard square, a custard slice, or a vanilla slice recipe, it's just the best.

    Components of a Custard Square

    Custard square can be a wee bit labour intensive, but it is always, always worth it, and i'll pop a few shortcut steps along the way to help you out!

    • Puff Pastry - I used a recipe from my friend Erin's book to make puff pastry from scratch, but you can do a rough puff, or you can use storebought pastry too. I'll add in tips in the FAQ section!
    • Custard Filling - The filling of a custard square is a rich, creamy, set vanilla bean custard. I used custard powder for mine which I get online or sometimes can find in grocery stores in the US. I use it quite often in recipes that call for custard!
    • Vanilla Icing - You can either ice these with a simple vanilla icing, or you can skip it and finish these with a bit of powdered sugar if you would like.

    What is Custard Powder?

    Custard Powder is similar to what is used to make instant pudding here in the states. It is corn starch based, then uses other flavours and thickeners. The taste is super nostalgic so I used it in these custard squares. You can grab some online - I use it to make my Nanaimo Bars too! If you can't find you should be able to sub corn starch. I haven't tried it but it should work just fine.

    How to Break Up the Workload for Custard Square

    Homemade Custard Slice is a little labour intensive if you choose to make your own puff pastry, but here is a good way to do it if you would like to break up the workload:

    • Day one - make the puff pastry, wrap tightly and store overnight in the fridge.
    • Day two - Bake the puff pastry sheets, make the custard filling, assemble the custard square, and chill overnight.
    • Day three - Finish off custard square with icing and serve.

    Alternatively you can do day two and three all in one day - the custard square needs about 4 hours to set up and chill down in the fridge.

    Puff Pastry vs Rough Puff Pastry

    I used a homemade puff pastry for these custard squares. It is a little labour intensive but once you get the hang of it, it is super fun and simple to make. The recipe comes from my friend Erin's book (she has a new one out VERY soon and it's amazing), and you can watch a great video here of her making it. The puff pastry recipe here makes enough for two batches of the custard squares, so you can store some pastry wrapped tightly in the freezer for another time.

    I haven't tried this recipe with rough puff, but I am sure that it would work just fine! Rough puff pastry is made by just incorporating the butter into the pastry and then performing folds, rather than locking in a butter block like you do with a traditional puff pastry. Erin also shows that recipe in the same video! (Skip to about 22:30 for it!, and do 1 ½ or double the recipe. You need 700g pastry approx for this recipe)

    Steps for rolling out Puff Pastry.

    There are a few steps for making puff pastry. It does take a little time but the actual hands on time isn't too bad - just lots of chilling time!

    • Make the dough, and make the butter block, and chill both down.
    • Roll out the dough and 'lock in' the butter block
    • Perform four folds (explained in the recipe)
      • #1: 4-fold turn
      • #2: 3-fold turn
      • #3: 4-fold turn
      • #4: 3-fold turn
    • Then the pastry gets rested in the fridge until it is baking time, or stored in the freezer until you are ready!

    How to make small batch custard square

    I tested a small batch custard square with this recipe and it worked just great. I used a 9x5" loaf pan and worked out quantities needed using my pan size calculator. I did 0.56x the recipe needed and just calculated it that way. Instead of scaling the egg I just did one egg and one yolk.

    Filling quantities for a 9x5" loaf pan are:

    • 405g whole milk
    • 265g heavy cream
    • ½ teaspoon vanilla
    • 40g custard powder ( I upped this just a little as it could have been a tiny bit firmer)
    • 112g sugar
    • 1 egg plus 1 yolk
    • 40g unsalted butter

    For the icing:

    • 210g powdered sugar
    • 25g unsalted butter
    • pinch of salt
    • ¼ teaspoon vanilla
    • whole milk to mix

    Please note that those are just the quantities that worked for that exact pan! The custard layer was a teeny bit thicker but worked great. The good thing about this recipe is that you can just pop extra custard into another bowl and have with some of the pastry scraps!

    Custard Square with Store Bought Pastry

    This can absolutely be made with store bought pastry - I tested it recently and it worked just fine. Just ensure that you have rolled out the pastry enough to account for any shrinkage when it bakes. You will need about 700g of pastry for a full batch of custard square. When I tested it with the small batch I used a 500g packet and had a little left over / probably could have rolled it a little thinner. It is much better to have a little too much pastry than not enough! Watch the bake time as it may be different with a different pastry - mine was done in 35 minutes then I gave it a further 5 minutes with the top tray off. To use store bought pastry, follow the steps from 12-16 for the pastry recipe.

    Frequently Asked Questions about Custard Square

    Can Custard Square be made with store bought pastry?
    You can absolutely use store bought puff pastry in this recipe. - you will need about two sheets. Just make sure it is rolled out to a square about 12"x12" so that you have enough to fill the tin - it shrinks a lot when baked. I do encourage you to try making your own - I promise it is much less scary than it looks!Add image

    How long does this take to chill?
    It needs AT LEAST 3-4 hours to chill. You need the custard to be completely set and cold right throughout. If you cut into it before it is properly chilled, you're going to have a bad time.

    How to do you keep the pastry nice and even when making it?
    I found that when making my own pastry, obsessively squaring off the edges helped, along with measuring the temperature of the butter and the dough before I started the folds to ensure that they were a similar temperature.

    What is the best way to neatly cut custard square?
    Use a bread knife. Gently saw the top layer to cut through, then you can cut through the rest of the custard square. It might seem wobbly, but if your bread knife is sharp, you will be fine.

    For more Custard Recipes, Check out:

    • Brioche Custard Buns
    • Chelsea Buns
    • Paris Brest with Spiced Apple
    • Roasted Strawberry and Custard Brioche Doughnuts

    ❤️ Made this recipe and love it? ❤️

    I would LOVE for you to leave me a review and star rating below to let me know how you liked it! Also, please make sure to tag me on Instagram!

    Answers to your baking questions

    Over the years, many of you have asked me questions about:

    • baking in grams
    • adjusting oven temperatures
    • what kind of salt to use
    • and many more!

    I've curated and answered them all for your easy reference in this frequently asked questions post!

    Recipe for Custard Square

    Filed Under: Bars and Slices, New Zealand Recipes

    Milk Chocolate Earl Grey Tart with Ombre Dark Chocolate Swiss Meringue Buttercream


    Milk Chocolate Earl Grey Tart with Ombre Dark Chocolate Swiss Meringue Buttercream. A press in cookie crust is topped with a silky earl grey infused ganache filling, then finished with an ombre swiss meringue buttercream.
    Milk Chocolate Earl Grey Tart with Ombre Dark Chocolate Swiss Meringue Buttercream. A press in cookie crust is topped with a silky earl grey infused ganache filling, then finished with an ombre swiss meringue buttercream.
    Milk Chocolate Earl Grey Tart with Ombre Dark Chocolate Swiss Meringue Buttercream. A press in cookie crust is topped with a silky earl grey infused ganache filling, then finished with an ombre swiss meringue buttercream.
    Milk Chocolate Earl Grey Tart with Ombre Dark Chocolate Swiss Meringue Buttercream. A press in cookie crust is topped with a silky earl grey infused ganache filling, then finished with an ombre swiss meringue buttercream.
    Milk Chocolate Earl Grey Tart with Ombre Dark Chocolate Swiss Meringue Buttercream. A press in cookie crust is topped with a silky earl grey infused ganache filling, then finished with an ombre swiss meringue buttercream.
    Milk Chocolate Earl Grey Tart with Ombre Dark Chocolate Swiss Meringue Buttercream. A press in cookie crust is topped with a silky earl grey infused ganache filling, then finished with an ombre swiss meringue buttercream.
    Milk Chocolate Earl Grey Tart with Ombre Dark Chocolate Swiss Meringue Buttercream. A press in cookie crust is topped with a silky earl grey infused ganache filling, then finished with an ombre swiss meringue buttercream.
    Milk Chocolate Earl Grey Tart with Ombre Dark Chocolate Swiss Meringue Buttercream. A press in cookie crust is topped with a silky earl grey infused ganache filling, then finished with an ombre swiss meringue buttercream.

    My goodness. We made it. Well, I made it anyway. The last couple of months have been totally hectic in the lead up to the silly season. I am so, so happy I finally made it to Friday. I'm going to clean my bombsite of a kitchen tonight, and then tomorrow begins a couple of days off! There is Christmas meal extravaganza Christmas eve at Jill's, then we are heading there for Christmas day too. It's always a time I get a little bummed i'm not home with my family, so I am so grateful we have somewhere to go to spend with our second family! 

    I'm going to keep this short, but I wanted to pop the recipe for this chocolate tart up before the madness kicks in and I forget about it. This is a riff on the chocolate peanut butter situation I made a few weeks ago - I had a zillion messages asking for the recipe so I figured I had better listen and get it up here!

    This is a simple chocolate tart - there is a press-in crust made with home made chocolate sugar cookies. It gets chilled for a hot second, then filled with a silky ganache (seriously, I can, and do eat this stuff with a spoon). You can keep it plain, but I infused it with a little earl grey because I couldn't help myself. The taste of the tea is very subtle, but I love it. You can stop here if you like, and have an epic chocolate tart, or you can keep going and get all fancy with some swiss meringue buttercream ombre blobs, which take it up just a notch. The ombre is made by making one batch of buttercream, then removing some, adding a little dark chocolate, removing a little more, more chocolate, etc etc. It's all piped on using a star tip (my secret weapon), and then we have ourselves a show stopping dessert! It can be made well in advance, and would be perfect for a holiday dinner party or dessert table. Merry Merry from Me and Mine to You and Yours! Stay safe these holidays! xx

    A few wee tips:

    • If you are making a riff of this and not using the tea, you will only need to use 270g (1 cup plus 2 Tbsp) of cream - I account for some of the liquid being absorbed by the tea leaves.
    • The original recipe I made was a peanut butter chocolate tart. You can absolutely make it peanut butter if you want - just sub the milk chocolate for a peanut butter variation! Same goes with dark chocolate etc.
    • I made this in a rectangle tart tin (14" x 4") - if you want to make it in a round, use a 9" removable bottom tart tin and use 1.5 cups cream, (start with 2 cups, infuse, then re-measure and use 1.5 cups), 550g chocolate and 6 tablespoon butter. This recipe is a good guide.
    • I made the base for this using a home made cookie. The cookies themselves are epic, and you should make them. They are also very moist so only needed a tiny bit of butter. If you use a drier cookie, you may find that you need to increase the amount of butter needed - you can always add a little more as you are mixing up the base if you think it needs it. You can use whatever base you like - just tweak the butter amount as needed.
    • I use a french star tip for this - I have a bunch in all different sizes. They are amazing for piping, and make easy blobs look super pro!

    ❤️ Made this recipe and love it? ❤️

    I would LOVE for you to leave me a review and star rating below to let me know how you liked it! Also, please make sure to tag me on Instagram!

    Answers to your baking questions

    Over the years, many of you have asked me questions about:

    • baking in grams
    • adjusting oven temperatures
    • what kind of salt to use
    • and many more!

    I've curated and answered them all for your easy reference in this frequently asked questions post!

    Filed Under: Tarts

    Christmas Cookie Box

    toThe ultimate Christmas cookie box - with something for everyone. Coconut ice, Honey Caramel Corn, sugar cookie marshmallow sandwiches, marshmallow and sugar cookie rocky road, piped roll out sugar cookies, and a DIY S'mores kit. What more could you wish for - this would be the perfect gift this holiday season.

    THE ultimate holiday cookie box - with something for everyone. Coconut ice, Honey Caramel Corn, sugar cookie marshmallow sandwiches, marshmallow and sugar cookie rocky road, piped roll out sugar cookies, and a DIY S'mores kit. What more could you wish for - this would be the perfect gift this holiday season.
    THE ultimate holiday cookie box - with something for everyone. Coconut ice, Honey Caramel Corn, sugar cookie marshmallow sandwiches, marshmallow and sugar cookie rocky road, piped roll out sugar cookies, and a DIY S'mores kit. What more could you wish for - this would be the perfect gift this holiday season.
    THE ultimate holiday cookie box - with something for everyone. Coconut ice, Honey Caramel Corn, sugar cookie marshmallow sandwiches, marshmallow and sugar cookie rocky road, piped roll out sugar cookies, and a DIY S'mores kit. What more could you wish for - this would be the perfect gift this holiday season.
    THE ultimate holiday cookie box - with something for everyone. Coconut ice, Honey Caramel Corn, sugar cookie marshmallow sandwiches, marshmallow and sugar cookie rocky road, piped roll out sugar cookies, and a DIY S'mores kit. What more could you wish for - this would be the perfect gift this holiday season.
    THE ultimate holiday cookie box - with something for everyone. Coconut ice, Honey Caramel Corn, sugar cookie marshmallow sandwiches, marshmallow and sugar cookie rocky road, piped roll out sugar cookies, and a DIY S'mores kit. What more could you wish for - this would be the perfect gift this holiday season.
    THE ultimate holiday cookie box - with something for everyone. Coconut ice, Honey Caramel Corn, sugar cookie marshmallow sandwiches, marshmallow and sugar cookie rocky road, piped roll out sugar cookies, and a DIY S'mores kit. What more could you wish for - this would be the perfect gift this holiday season.
    THE ultimate holiday cookie box - with something for everyone. Coconut ice, Honey Caramel Corn, sugar cookie marshmallow sandwiches, marshmallow and sugar cookie rocky road, piped roll out sugar cookies, and a DIY S'mores kit. What more could you wish for - this would be the perfect gift this holiday season.
    THE ultimate holiday cookie box - with something for everyone. Coconut ice, Honey Caramel Corn, sugar cookie marshmallow sandwiches, marshmallow and sugar cookie rocky road, piped roll out sugar cookies, and a DIY S'mores kit. What more could you wish for - this would be the perfect gift this holiday season.
    THE ultimate holiday cookie box - with something for everyone. Coconut ice, Honey Caramel Corn, sugar cookie marshmallow sandwiches, marshmallow and sugar cookie rocky road, piped roll out sugar cookies, and a DIY S'mores kit. What more could you wish for - this would be the perfect gift this holiday season.
    THE ultimate holiday cookie box - with something for everyone. Coconut ice, Honey Caramel Corn, sugar cookie marshmallow sandwiches, marshmallow and sugar cookie rocky road, piped roll out sugar cookies, and a DIY S'mores kit. What more could you wish for - this would be the perfect gift this holiday season.

    The Ultimate Christmas Cookie Box

    Today I did something I've been looking forward to for LITERALLY an entire year - I made a Christmas Cookie Box! Ever since Amy made hers last year and blew my little mind, I've been wanting to make one of my very own! I have had on my to-do list for a few weeks now, with a little post-it note in my diary with ideas of what I wanted to put inside, but I suddenly realised that Christmas is just around the corner and I was going to have to get a serious wiggle on if I wanted to pull this off in time!

    So the entirety of yesterday was spent baking my little heart out in order to make all the little things I wanted to include in the box! (Plus a bonus batch of chocolate sugar cookies because Rich tried one and couldn't stop eating them). It all went fairly smoothly, I stayed up WAY too late tempering a giant bowl of chocolate, and then today I did a little happy dance in the kitchen when it all came together far better than I ever could have imagined!

    The best box to use for a Christmas Cookie Box

    I bought this box from a craft store, and then drew up a little pattern of how I wanted the dividers to look, and rich cut them all for me on the laser cutter, then etched a little pretty pattern on the top! I kind of wish that I had done this a little earlier, as I would have made loads of them to give as gifts! I made full batches of everything I made, so our coffee table is currently drowning in sweet food, but I am planning to take it all to Jill's where it will hopefully get eaten by the Christmas crowd!

    How to put together a Christmas Cookie Box

    I wanted to do a mixture of cookies and other little treats that I associate with Christmas in New Zealand, so I went with a couple of cookie recipes that I already had, and then added in a couple of my faves - honey caramel corn (aka one of the most addictive things I have ever made), coconut ice, which is a coconut fudge made with condensed milk, and Rocky Road, which is marshmallows and other goodies (I used sugar cookies and cranberries) folded through tempered dark chocolate and set into a bar.

    I haven't made coconut Ice or Rocky Road since I was a kid, so it was so fun to re-live all those excited for christmas memories that making them brings! The Caramel Corn and the Rocky Road recipes were based on recipes from The Cook and Baker, which is one of my fave books to bake from! The treats were the perfect balance of things to go alongside my cookies - I did a DIY S'mores kit, Roll-out sugar cookies, and then sugar cookies with vanilla bean marshmallow. In the end the Christmas Cookie box contained:

    • Coconut Ice
    • Marshmallow and sugar cookie Rocky Road with Cranberries
    • Honey Caramel Corn
    • Chocolate and vanilla sugar cookies, sandwiched with vanilla bean marshmallow
    • Roll-out sugar cookies, some piped, some sandwiched with jam
    • Components to make S'mores - graham crackers, vanilla bean marshmallows and dark chocolate
    • Two sprinkles compartments!

    How to break up the workload for the Christmas Cookie Box

    To make it a little easier on myself, I wanted to make some of the recipes for this cookie box usable in a number of the components. The Marshmallow for the S'mores kit was also piped between some of the sugar cookies, and also used in the Rocky Road. The sugar cookies were used in the marshmallow cookie sandwiches, but I also used them in the Rocky Road too because of how delicious and chewy they were. Little steps like this meant that less components overall were needed. The Christmas Cookie box came out amazingly, and I can't wait to make more! Any aspect of this would make great gifts for the holiday season. Merry Merry!

    Some of the recipes are new, which I will share below, and some are already from this blog. Overall, I made:

    • One Batch of these Sugar cookies
    • One batch of the same sugar cookies, but subbing 50g of flour for 25g black cocoa and 25g regular cocoa to make chocolate sugar cookies
    • One large batch of vanilla bean marshmallow (this, but without the peppermint) for S'mores Kits, and the Rocky Road. I also piped a little between some of the sugar cookies to make sandwiches. Once I had piped out some to make sandwich cookies, I set the rest in a 9" x 13" tin
    • One Smaller batch (these quantities) of vanilla bean marshmallow, which I tinted with pink gel food colouring and set in a 9" x 9" tin
    • A batch of these Graham Crackers for the S'mores Kit
    • One batch of these roll-out sugar cookies. I sandwiched some with jam, and piped some of them with royal icing and a wilton #1 tip
    • Rocky Road (recipe to follow)
    • Coconut Ice (recipe to follow)
    • Honey Caramel Corn (Recipe to follow)

    I hope that you give some of these a try to put together your own Christmas Cookie Box! You can mix and match, or make just one component, or a couple, or add in your own things - it's so much fun to put together! Please let me know if there are any Recipe Questions!

    A few wee tips for Christmas Cookie Box:

    • For the Rocky Road, I tempered the chocolate, which made it stable at room temp, and beautiful and shiny. If you don't want to do this regular chocolate will work just as well, but ensure that you store in the fridge.
    • Rocky Road is often made with turkish delight, but I subbed that this time with 500g of chopped sugar cookie (I used a mix of chocolate and vanilla). They added a nice chewy texture.
    • You can add whatever you like to this - dried fruit, nuts, the options are endless.
    • The Honey Caramel Corn Recipe makes loads - but just watch it disappear quickly.

    Other Treat Box Recipes:

    • The Ultimate Vanilla Bean Christmas Treat Box
    • The Ultimate Easter Treat Box
    • Christmas Macaron Box
    • Easter Macaron Box

    ❤️ Made this recipe and love it? ❤️

    I would LOVE for you to leave me a review and star rating below to let me know how you liked it! Also, please make sure to tag me on Instagram!

    Answers to your baking questions

    Over the years, many of you have asked me questions about:

    • baking in grams
    • adjusting oven temperatures
    • what kind of salt to use
    • and many more!

    I've curated and answered them all for your easy reference in this frequently asked questions post!

    Filed Under: Treat Boxes

    Gingerbread Brioche Doughnuts with Spiced Brown Sugar Diplomat Cream


    Gingerbread doughnuts with a spiced brown sugar diplomat cream. Pillowy brioche dough, spiced lightly with ginger and molasses, are stuffed with a light and creamy filling which is loaded with christmas spice. A perfect little package of holiday cheer
    Gingerbread doughnuts with a spiced brown sugar diplomat cream. Pillowy brioche dough, spiced lightly with ginger and molasses, are stuffed with a light and creamy filling which is loaded with christmas spice. A perfect little package of holiday cheer
    Gingerbread doughnuts with a spiced brown sugar diplomat cream. Pillowy brioche dough, spiced lightly with ginger and molasses, are stuffed with a light and creamy filling which is loaded with christmas spice. A perfect little package of holiday cheer
    Gingerbread doughnuts with a spiced brown sugar diplomat cream. Pillowy brioche dough, spiced lightly with ginger and molasses, are stuffed with a light and creamy filling which is loaded with christmas spice. A perfect little package of holiday cheer
    Gingerbread doughnuts with a spiced brown sugar diplomat cream. Pillowy brioche dough, spiced lightly with ginger and molasses, are stuffed with a light and creamy filling which is loaded with christmas spice. A perfect little package of holiday cheer
    Gingerbread doughnuts with a spiced brown sugar diplomat cream. Pillowy brioche dough, spiced lightly with ginger and molasses, are stuffed with a light and creamy filling which is loaded with christmas spice. A perfect little package of holiday cheer
    Gingerbread doughnuts with a spiced brown sugar diplomat cream. Pillowy brioche dough, spiced lightly with ginger and molasses, are stuffed with a light and creamy filling which is loaded with christmas spice. A perfect little package of holiday cheer
    Gingerbread doughnuts with a spiced brown sugar diplomat cream. Pillowy brioche dough, spiced lightly with ginger and molasses, are stuffed with a light and creamy filling which is loaded with christmas spice. A perfect little package of holiday cheer

    I'm finally feeling semi Christmassy. And if semi Christmassy means very stressed and a little Christmassy, then i'm feeling that too. So I took all the very stressed and semi Christmassy I am feeling, and I jammed it all into these doughnuts. It was a great idea if you ask me - doughnuts are the ultimate comfort food in my book. They sound daunting to make but are really very satisfying - I love watching them puff up in the oil as they fry. I happily spent an afternoon ignoring adulting, and whipping these wee guys up, and they turned out far too good to just keep the recipe to myself.

    I wanted to have some warming christmas spice in there, to keep it extra holiday-ish, so I adapted my favourite brioche dough (it's amazing in scrolls, burger buns, babka, and now turns out it can be fried!), and added a little ground ginger and molasses. I then filled them with a brown sugar spiced diplomat cream - which is really just a fancy name for pastry cream / custard which has been folded through whipped cream. I spiced the pastry cream with the regular suspects - cinnamon, allspice and a little ginger to help carry the flavour through. Once it was folded in with the whipped cream, it made for a beautiful filling - not too sweet, and lovely and light against the fluffy doughnut. (My friend said that she though that it was 'refreshing' which I though was a nice way of putting it!)

    I'm not going to tell you what to do - but I think you should make these for your christmas gathering. The dough can be prepared ahead of time - you can give it its first rise in the fridge overnight, and the filling can be made in advance too. They are the perfect wee twist on a regular filled doughnut - just enough spice to make you think of the holidays, but also a welcome change to all of the cookies and desserts you are likely to encounter. Plus. Doughnuts.

    A few wee tips:

    • A thermometer is going to be your friend here, as it is very important to keep the oil at a specific temperature. Too cold and the doughnuts will soak up oil, too hot and the outsides will cook before the inside does, and you will have a gooey mess. (if you don't have a thermometer and a set of scales, then I suggest you self-gift ASAP this holiday season, both are game changers)
    • Along the same lines of specific oil temperature, cast iron is great to fry in because it maintains heat very well.
    • The Dough can be made the night before you want to make these, and given its first rest in the fridge. Just increase the second rise a little once you have cut them out to allow the dough to warm up.
    • Pastry cream can be made ahead too, but I suggest, if possible, folding through the whipped cream the day you are planning on using it. You may have a little diplomat cream left over, but it is awesome on fruit / desserts / straight out of the piping bag into your mouth.
    • I measure the amount of pastry cream I have, then use ⅔ that amount (multiply the amount of pastry cream by 0.66) of cream, hence the 'approximately' in the method - you will need to do some quick maths to work it out when the time comes.

    ❤️ Made this recipe and love it? ❤️

    I would LOVE for you to leave me a review and star rating below to let me know how you liked it! Also, please make sure to tag me on Instagram!

    Answers to your baking questions

    Over the years, many of you have asked me questions about:

    • baking in grams
    • adjusting oven temperatures
    • what kind of salt to use
    • and many more!

    I've curated and answered them all for your easy reference in this frequently asked questions post!

    Filed Under: Brioche, Doughnuts

    Vanilla Sandwich Cookie with Vanilla bean Marshmallow and Dark Chocolate Ganache


    Vanilla Sandwich Cookie with Vanilla bean Marshmallow and Dark Chocolate Ganache. The perfect Holiday cookie.
    Vanilla Sandwich Cookie with Vanilla bean Marshmallow and Dark Chocolate Ganache. The perfect Holiday cookie.
    Vanilla Sandwich Cookie with Vanilla bean Marshmallow and Dark Chocolate Ganache. The perfect Holiday cookie.
    Vanilla Sandwich Cookie with Vanilla bean Marshmallow and Dark Chocolate Ganache. The perfect Holiday cookie.
    Vanilla Sandwich Cookie with Vanilla bean Marshmallow and Dark Chocolate Ganache. The perfect Holiday cookie.
    Vanilla Sandwich Cookie with Vanilla bean Marshmallow and Dark Chocolate Ganache. The perfect Holiday cookie.
    Vanilla Sandwich Cookie with Vanilla bean Marshmallow and Dark Chocolate Ganache. The perfect Holiday cookie.
    Vanilla Sandwich Cookie with Vanilla bean Marshmallow and Dark Chocolate Ganache. The perfect Holiday cookie.
    Vanilla Sandwich Cookie with Vanilla bean Marshmallow and Dark Chocolate Ganache. The perfect Holiday cookie.

    I have an obsession with marshmallow. And I'm not sure why. Somehow it makes its way into lots of things that I make - on top of tarts, inside s'mores, and of course into hot chocolates. I only made it for the first time a year or so ago, and have been hooked ever since. There's something about adding hot syrup to the mixer, and coming back in five minutes to a pillowy cloud of magic. Just as amazing cured and torched as it is straight off the mixer. Anything I make with Jill also has a high possibility of having marshmallow added to it - not only is it fun to make, but it adds another dimension and texture that you can't get from a buttercream filling. 

    So when Feedfeed and Bob's Red Mill asked us to come up with a holiday cookie, I instantly knew it was going to include a marshmallow component. We started with a chewy sugar cookie - not too sweet, and rolled in sugar to give the outside the perfect crunch. Once they were baked off, we piped a fluffy ring of vanilla bean marshmallow onto the cookies, then added a blob of silky dark chocolate ganache in the centre. We then sandwiched them with a second cookie, drizzled them in white chocolate, and finished off with a heavy dose of snowy sprinkles. The result was the perfect take on a s'more - each component delicious enough to stand alone, but incredible once they were all married together. Quite possibly some of our best work ever - this one is going to be a favourite for a very, very long time Happy Holiday baking! 

    A few wee tips:

    • The recipe here is in grams. The amount of flour used will change the amount that the cookies spread dramatically, and depending on the way you scoop flour your cup measurement can vary but up to 20g, so to ensure accuracy, use a scale to weigh if possible.
    • If you don't want to make the marshmallow or the ganache, the cookies are perfect just on their own. Feel free to make them a little larger, but make sure you leave room for spreading and adjust the cooking time accordingly.
    • I bake the cookies one tray at a time - with 11 on each tray, I get about five trays worth. The cookies will come out of the oven very puffy, but will start to sink down and crackle as they cool.
    • Prepare everything you need for making the marshmallow before you start the process. Pair up the cookies and lay them out, fit a piping bag with a tip, and grease a small pan to have to put the extra marshmallow in (you will likely have a little). Once the marshmallow is done, it's all go to get it into the bag and piped before it sets too much
    • Make the ganache just before you start the marshmallow, and leave to cool a little in the piping bag before you use. It should be thick enough that you can use it soon after making. I like to use a kitchen clip just above the nozzle to help keep everything sealed off until I am ready to go.
    • Get yourself a couple of french star tips - they are my secret weapon!

    ❤️ Made this recipe and love it? ❤️

    I would LOVE for you to leave me a review and star rating below to let me know how you liked it! Also, please make sure to tag me on Instagram!

    Answers to your baking questions

    Over the years, many of you have asked me questions about:

    • baking in grams
    • adjusting oven temperatures
    • what kind of salt to use
    • and many more!

    I've curated and answered them all for your easy reference in this frequently asked questions post!

    Filed Under: Sandwich Cookies

    • « Previous Page
    • 1
    • …
    • 8
    • 9
    • 10
    • 11
    • 12
    • Next Page »
    Erin Clarkson Cloudy Kitchen

    HI, I'M ERIN

    My recipes range from quick & easy all the way to complex & impressive. I love the science and process of recipe development almost as much as baking itself. I specialize in rigorously tested recipes that are fun, reliable, and accurate.

    More about me →

    • https://www.instagram.com/cloudykitchen/
    • Facebook
    • Pinterest
    • TikTok

    Popular

    • Christmas Macaron Box
    • close up of roll with cream cheese frosting
      10 Minute Cream Cheese Frosting for Cinnamon Rolls
    • cookie on sheet pan with parchment paper
      Brown Butter Chocolate Chip Cookies
    • burger bun on wire rack
      Homemade Burger Buns

    Footer

    Cloudy Kitchen Classics

    • Chocolate chip cookies
    • Brownie cookies
    • Chocolate cookies
    • Vanilla cookies
    • Cheesecake brownies
    • Focaccia bread
    • Ciabatta recipe

    Popular Cookie Recipes

    • Oatmeal raisin cookies
    • Peanut butter oatmeal cookies
    • White chocolate chip cookies
    • Gingersnap cookies
    • Shortbread cookies
    • Snickerdoodles cookies
    • Anzac biscuits

    Easy Breads & Buns

    • Hot cross buns
    • Sticky buns
    • Burger buns
    • Dinner rolls
    • Soft pretzels
    • Pretzel buns
    • Garlic knots

    Links

    • About
    • Contact
    • Web Stories

    Newsletter

    • Sign Up! for emails and updates

    Resources

    • FAQ
    • Policies
    • All recipes at once

    Copyright © 2026 Cloudy Kitchen

    Support by Foodie Digital