
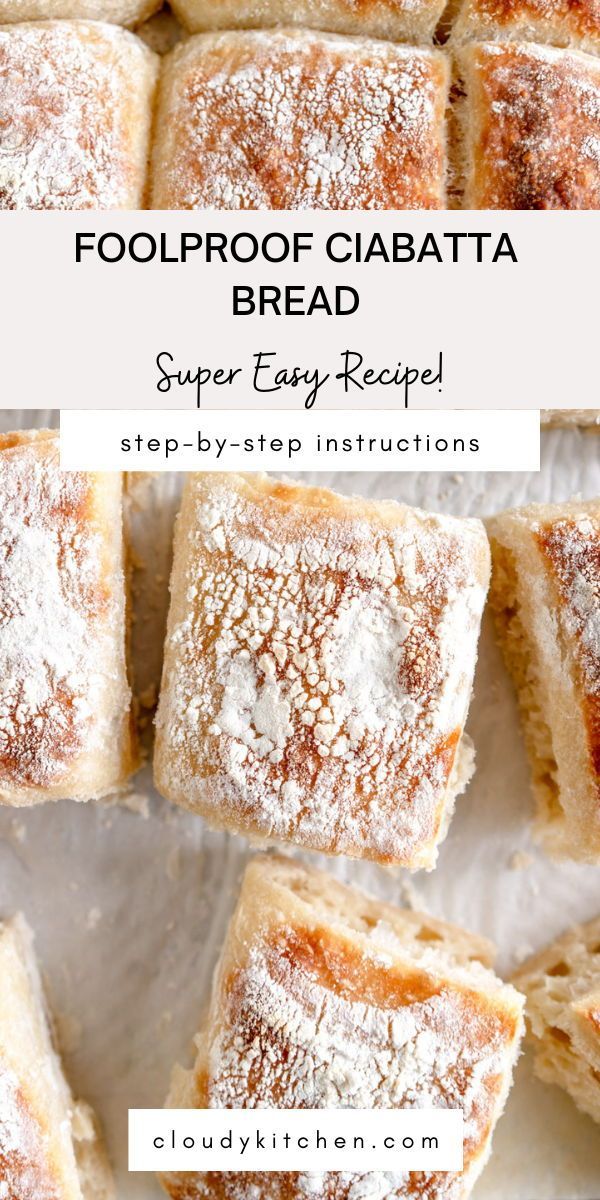
My easy Ciabatta Bread recipe will give you perfect crusty homemade bread with only five ingredients. This ciabatta dough can be made ahead and used to make either two loaves of ciabatta bread, or eight ciabatta rolls.

Hi! I am just popping in to share my easy ciabatta bread recipe with you! This super rustic, Italian style ciabatta bread is very low effort - it is a no knead bread recipe that uses an overnight rise to produce a super chewy, crusty bread. I love making homemade bread, and especially love a super easy no knead recipe that can be made ahead, such as my focaccia recipe. However, I was after something in a slightly different format - enter this easy ciabatta recipe. This recipe is great for serving alongside dinner, but also makes the most amazing sandwiches.
I tested this recipe over and over in different formats during the recipe testing process so that I could give you all the tips and tricks for making easy ciabatta bread - this dough can be used to make ciabatta loaf, ciabatta rolls, and a ciabatta pull-apart bread, or all three if you like, with only a few tweaks.
This is definitely not a super traditional ciabatta recipe, but it is my take on it - a simple, easy to make bread that we love and I really hope that you do too. There are a ton of tips and tricks in this post for you.


Don't be intimidated - here's how to shape ciabatta.
There are a few ways you can shape your ciabatta dough depending on the format that you want it to be in. You can either bake it as two loaves, or it can also be made into eight ciabatta rolls, or baked all together to make more of a pull-apart bread bun or ciabatta slider buns.
It is Very Important that you use enough flour both on your work surface and when handling the dough as it is quite sticky. A bench scraper will be your friend here.
About an hour before you are ready to bake, prepare your dough for baking and line a pan with floured parchment paper. Heavily flour a work surface (this is important to ensure the high hydration dough does not stick), then turn the dough out onto it.
To make loaves, shape the dough into a 24x24cm (9.5") square (It doesn't have to be super even), then cut down the middle to form two pieces of dough. Transfer to the baking sheet, flipping so the floured side is up (this is where the pattern on ciabatta comes from), then gently gently shape into loaves by tucking the edges under.
Leave the loaves to rise, then bake.

Another shaping option: Ciabatta Rolls
The process for making ciabatta rolls is very similar to making ciabatta loaves, except that you will shape the dough into a 28x20cm (8x11") rectangle instead, then cut into 8 rolls. Turn them over as you move them from the floured work surface to the sheet pan, to get the flour pattern from the counter as the top crust.
Arrange the ciabatta buns on your sheet pan so they have some space between them, as they do flatten out slightly as they rest. It is not the end of the world if they touch a little!


And one more for good measure: Ciabatta Slider Buns
Another way to bake this ciabatta bread which is even easier is to flop the dough out directly onto your sheet pan, and shape it into a square, then cut it into rolls and leave them as is. This means when they bake they will form a sort of pull-apart ciabatta bread, with super soft edges and a lovely crusty top.
To make ciabatta slider buns or ciabatta pull-apart bread, shape the dough into a 24x24cm (9.5") square and then cut into however many you want - I usually go for 16, so a 4x4 grid.
The bake time for rolls and a loaf is similar, so if you wanted to divide the dough into one loaf and four rolls, that would work, just space them out on the same baking sheet.


❤️ Made this recipe and love it? ❤️
I would LOVE for you to leave me a review and star rating below to let me know how you liked it! Also, please make sure to tag me on Instagram!
Answers to your baking questions
Over the years, many of you have asked me questions about:
- baking in grams
- adjusting oven temperatures
- what kind of salt to use
- and many more!
I've curated and answered them all for your easy reference in this frequently asked questions post!

How to make Foolproof Ciabatta Bread
- Prep Time: 2 hours
- Cook Time: 30 minutes
- Total Time: 12 hours
- Yield: 2 loaves 1x
- Category: Bread
- Method: Baking
- Cuisine: American
Description
This easy Ciabatta Bread recipe will give you perfect crusty homemade bread with only five ingredients. This ciabatta dough can be made ahead and used to make either two loaves of ciabatta bread, or eight ciabatta rolls.
Ingredients
- 525g Bread flour
- 15g extra virgin olive oil
- 395g water, lukewarm
- 50g water, lukewarm
- 3g instant yeast
- 10g salt
Instructions
- In a large bowl, combine together the flour and the oil mixed with the first measure (395g) of the water. Combine with a spatula or your hands to form a stiff, shaggy dough. Cover with a tea towel and leave to sit for 30 minutes - this step is called the autolyse and allows the flour to hydrate.
- After 30 minutes, combine the second measure of water (50g) with the yeast, and add to the bowl along with the salt. Mix in by pinching and squishing the dough with your fingers, then stretch it up and fold it over on itself until it starts to come together. Mix the dough for five minutes using the stretch and fold technique. To do this, reach under a piece of the dough and bring it up and fold it over onto itself. Rotate the bowl 90° and repeat again. Keep working your way around the bowl.
- Once you have finished mixing, transfer the dough into a lightly oiled bowl or plastic container, ideally with see-through sides. Cover with a lid or tea towel.
- Proof the dough for two hours, with a set of stretch and folds every 30 minutes (so a total of four sets of stretch and folds). To stretch and fold, you repeat the same motion as in the mixing phase - reach under, stretch the dough up and over itself, then turn the container 90° and repeat again until you have done four stretch and folds. Then cover the dough and leave to sit for 30 minutes until you repeat the next set of stretch and folds.
- Once you have finished the stretch and fold process, cover the bowl either with a lid or plastic wrap, and place into the fridge overnight, or for up to 24 hours.
- When you are ready to bake the ciabatta, line a baking pan with baking paper and lightly flour the paper. Heavily flour a work surface. Flour the surface of the dough, then turn out onto the floured surface. The dough is quite sticky, so using enough flour is very important.
- Pat the dough into a square approximately 24x24cm (9.5 inches square), adding extra flour if needed. Cut into two pieces, then, working with one at a time, transfer to the baking sheet, flipping over so that the floured side is facing upward. Tuck the edges of the dough under lightly and shape into a rough rectangle. Repeat with the second piece of dough, leaving space between the loaves for rising and spreading.
- Cover the pan loosely with plastic wrap or a lid, and place in a warm spot for 45 minutes to an hour to let the dough rise, until they have puffed up slightly and when gently poked with a fingertip, and indentation is left that slowly rises back.
- While the dough is rising, preheat the oven to 425°f / 220°c. Give the oven about 20 minutes to preheat to ensure that it heats up properly.
- Once the dough is risen, transfer to the oven, and bake for 18 to 20 minutes until the ciabatta is baked and golden brown and sounds hollow when tapped underneath.
- Remove from the oven and leave to stand on the pan for 5 minutes, then transfer to a cooling rack and leave to cool completely before slicing.
- Store leftovers loosely wrapped at room temperature.
Notes
Notes: This dough can also be shaped into 8 rolls. To shape into rolls, pat the dough into a 28x20cm (11"x8") rectangle and cut into rolls. Flip over onto the floured sheet pan and proof and bake the same way as the loaves. You can also dump the bread onto a tray and shape into a 24x24cm (9.5 inches) square then cut into 16 pieces, leaving them touching while they rise and then bake as a tray bake.
Bread flour is often also called high grade flour or strong flour depending on where you live!
I find the best way to keep track of rising dough is to have two timers - one for the overall time, so in this case 2 hours, and the other measuring the time between stretch and folds that you re set each time you perform a set of stretch and folds.
The best way to tell if a dough is ready to rise is to gently poke the top of the dough with a floured finger. If it springs back straight away, you know it needs more time. If it leaves a small indentation which slowly springs back, you know that it is proofed and ready to go into the oven. If you leave your dough rising for too long, the yeast can use up all its energy, and then have nothing to give when the dough goes in the oven.
You will know if you have over proofed your dough if it collapses when you touch it, or if it doesn't rise in the oven. It is also very important to make sure that your yeast isn't expired - to test this, place a little in some lukewarm water with a pinch of sugar, and check that it bubbles.
Can I add sourdough starter?
Yes, if you want to you can add discard to give flavour while still relying on the yeast to rise the bread, but I do not know the conversions for making a sourdough raised ciabatta - you are better looking for a sourdough specific recipe. To use some starter, replace some of the flour and water with sourdough discard at 100% hydration - so if you were using 100g starter you would remove 50g flour and 50g water from the quantities in the recipe and replace with the 100g of starter.
How far in advance can you make bread dough?
I left dough in the fridge for three days and it still baked up ok - it was definitely lacking a little in spring but it tasted amazing still. This dough is super forgiving as it doesn't really need to be shaped, so it was ok to just flop out and rise.
Can this recipe be made with active dry yeast?
I haven't tried it with active dry yeast, only with instant yeast, but it should be fine to sub the yeast 1:1, you may just need to activate it in the 50g water with a teeny pinch of sugar first then add the yeast mixture to the autolysed dough.
Comments
Ashley says
This was my first time letting bread rest over night. I think this is our new favorite bread recipe! We’re tough critics too!! I did use active yeast and let it bloom in the 50g of water first! Thank you so much! We are loving your recipes.
Adelaide Miller says
Ok, I've tried countless ciabatta recipes before, and they never quite live up to my expectations...until this one. It is SO easy and returns the most gorgeous ciabatta ever! I made the dough exactly as written one night, let it rise, completed the turns, etc., let sit in the fridge overnight, resumed the next morning, baked, and ended up with delicious ciabatta in time for lunch. The dough is very soft and a bit difficult to work with when shaping and getting on the pan, but nothing to be afraid of. The bake time was just right, and it didn't take too long until the loaves were cool and ready to be sliced and eaten... yum:) Moral of the story- make this NOW.
Mary says
Hello! I am very excited to try this recipe. Do you think it would turn out in a dutch oven as one larger loaf instead of 2 loaves? Thank You!
Erin Clarkson says
Hi! No it's too wet for that and the process is different!
Kristina says
I am so happy with my first ever ciabatta! This recipe was certainly fool proof. Beautiful crust on the outside and soft, airy and chewy on the inside. Delicious toasted or dipped in olive oil and balsamic. Yum yum yum!
Paige P says
If you don’t mind putting in the time and effort, this is the perfect ciabatta recipe! This was my first ever successful bread bake! I made the rolls for my morning bacon, egg, and Gouda sandwiches (Starbucks could NEVER!). It came out with a nice crunchy crust and a super soft, moist inside! The only thing I changed in the recipe is added more salt but I like a a pretty salty bread. I used 18g of salt instead of 10g but trust me it’s not over salted by any means. The recipe is super easy to follow, like I said if you don’t mind the flips every 30 min. I will definitely be sing this recipe for future bakes!
Leah says
I agree... On my second loaf I also increased the salt. I guessed and landed in 13g, turned out perfect for our preferences. 10g felt like it needed salty butter, 13g and you can eat it plain (but I still add butter lol). But otherwise such a delicious bread and texture that you described!
Leah Mencer says
I was looking for a bread that was sturdy enough for crusty avocado toast but not as tough as a baguette, and not dry and bready. This is so delicious. I actually missed the part with the overnight rest (twice actually, I made it two days in a row). I popped them right into the oven after the 4th stretch. Still so good! Thank you.
Ei says
This recipe really is foolproof. At first it will feel like you are doing it wrong because the dough doesn’t behave when you try to pick it up for stretch and fold. Just keep following the instructions. The dough will catch up. End product is delightful. This recipe is very economical to make and most of the steps requiring attention are done the day before so you can serve fresh for a party with almost no time/effort the day of.
Erin Clarkson says
Yay I am so so happy to hear! I hope you enjoyed 🙂
Sally says
Am really excited to try this recipe! Question, though - most other types of breads have sugar in it, ostensibly to proof the yeast, yes? But also, to add a little sweetness to the bread. I've researched Ciabatta bread recipes - and none of them add sugar. Do you happen to know why?? [We like a little sweetness in our breads.]
Erin Clarkson says
Hi! Ciabatta isn't a sweet bread. Usually recipes that use a little sugar have it in there to feed the yeast, but because this recipe has a long rise time and only a small amount of yeast, it doesn't need it. The small amount of sugar in some recipes (unless it is a sweetened bread) is usually to feed the yeast and is often when the recipe is enriched with butter, egg, etc.
Liesje says
Super easy and a firm family favourite.
I make this bread at least once a week and it is my husbands absolute favourite. I know it off by heart now I have made it so much.
Chelce says
I've made this a few times now, it's so tasty! Thank you for such an easy and delicious recipe. I've already passed it on to others.
Amy Appleyard says
This really is a superb recipe. Beautifully and thoughtfully written, like all of Erin's posts, but most importantly, the ciabatta is so, so good! I keep coming back to make it again and again. Thanks, Erin!
Chelce says
Such a easy and delicious recipe! Thank you ❤️ it also makes absolutely delicious toast the next day.
Lynzey Webster says
I made this ciabatta bread recipe and it was great! Super easy, and although I thought I had messed it up with too much stretching, it still turned out great. In my taste, it does need a little more salt but aside from that, I will definitely be baking this on a weekly basis!
Keren Nutter says
Absolute perfection on my first attempt! 🤩 Will definitely be making this many times in the future. Thank you for such a well written recipe!
Philippa Parkin says
Hello! I've used this recipe many times and always been super impressed with the outcome!
I've been experimenting with different breads, and made a foccacia with with kimchi and gochujang in it today. I feel like I never see flavoured ciabatta/ciabatta with add-ins.
Can you add mix-ins to ciabatta?
Thanks!
Erin Clarkson says
Hi! I haven't tried it but honestly I don't see why not?
Ellie Kyrke-Smith says
We love this recipe in our house. It’s made multiple times a week and there is outrage when it’s not. It’s easy and delicious. I love making it for friends. I’m not an accomplished bread maker in the slightest but this I can nail!
Thanks for sharing the goods CK!
Erin Clarkson says
Looks so so good! So happy you love!
JENNY says
Hi. I followed your recipe exactly and the bread is good, but it doesn't have the holes, which is so disappointing. How can a fix this? Thanks Jenny
Erin Clarkson says
Hi Jenny, it sounds like the dough maybe wasn't proofed enough before you put it into the oven? The bubbles come from the dough rising
Shannon says
This is not a drill! I can make bread! I feel so accomplished! I've leveled up in life... I could nearly be a real adult!
I adore how in the first 5 minutes of 'stretch & folds' I'm like "this is not going to work, what IS this?" and by the end of the 2 hours I'm like "I CAN'T WAIT UNTIL YOU ARE IN MY BELLY!"
It's not even really that time consuming, I set the two timers and I can get a lot of chores and other baking (or reading on the couch) done in that time. It's the perfect balance of effort and laziness.
Now I'm having ciabatta rolls for lunch during the week and they are 1000% better than boring old sandwiches.
Thank you Erin!
Erin Clarkson says
Yayyyy congrats! Making bread always makes me feel so adult too hahaha nailed it!
Jude says
Such a great recipe. Easy to follow instructions resulting in a delicious ciabatta enjoyed by our whole family. Thank you 😊
Erin Clarkson says
It looks so so good!
Jessica says
Thank you so much for sharing this recipe it was very simple to follow and turned out really well
Erin Clarkson says
Ah you are so welcome!
Chris says
Super easy to make.
Think this will be a regular fixture at our house. Thanks Erin!
Erin Clarkson says
Yay it looks amazing!
Francene Ellis says
I really like this recipe. Making these at least twice a month. They get used for burgers now instead of normal buns as they feel lighter. Big hit with my family too.
Stephanie says
I have made this recipe 5/6 times over the last year. Such an easy recipe to follow and results in the best bread! I made the 2 loaves for Christmas and had none left, everyone commented how great it was. It does take some time, but it’s definitely worth it
Caitlin berkers says
This is the best bread recipe ever. I always make it when we go away because it’s so simple and easy to put in the bach fridge and wow people the next day. On repeat!
Ashima Chawla says
Hi Erin, I have been making this for over two years now and everyone at home really loves this! I had a question though, would I be able to bake it in a loaf tin?
Erin Clarkson says
Hi, I haven't tried sorry! It might be a little too dense
Tara says
Hi Erin,
Can I use surebake yeast with bread improver in it? I bought the wrong thing!
Thanks ☺️
Erin Clarkson says
Hi, yep I would google the conversions!
Tisha P says
I've been meaning to make this recipe for awhile, I finally made it today (started yesterday) and now I'm mad at myself for waiting so long. It's so good, and now I don't have to drive all the way to an Italian bakery just to get my ciabatta fix. Thanks for another great recipe Erin!
Victoria says
This recipe has always turned out great for me! I was wondering if the 5 minutes of stretch and folds in the beginning could be replaced with 5 minutes with a dough hook and a stand mixer. Thanks!
Doc says
While a stand mixer can be substituted for some mixing, I think you will find that the outcome will be different and probably not to your liking. The dough hook does not deliver a "gentle" mix and this dough has an 84% hydration which is wet enough that it will be hard to handle in any case (especially if you make it with AP flour). Erin does a lot of work to make sure that her instructions work. My first assumption would be that if she didn't offer the option to use a stand mixer, then you should do exactly what she said, at least the first time.
Morgan says
Probably not my first review of this recipe because I make it so often! Totally foolproof delicious ciabatta at half the supermarket price, thanks Erin for your fabulous recipes.
Antonietta says
Awesome recipe, these turned out better than expected and so easy to make. This will be my go...thanks so much Erin
Doc says
Erin - you are my favorite recipe developer ever! And as a result I send anybody who is serious about cooking or baking a link to your site with a strong suggestion to get on your email distribution list.
There is one thing I have not seen you do which you may find useful (or not). It is to measure dough volume growth with what we call an “aliquot jar”. It is an evolved technique that started in more than one place and has now pretty much stabilized (at least within the group of bread bakers who collaborated to develop it).
It involves using a 100 ml graduated sample container (thanks to Dr Benny Chang) and loading it with 30 g (30 ml) of dough at the beginning of bulk fermentation. Use a wet finger to seat the dough in the container pressing it down to get the trapped air released - this can also be done with a quick application of suction if you have a vacuum system in your kitchen and an appropriate adapter.
The first issue we had to resolve among ourselves was a definition of when bulk fermentation is complete. The conclusion was that as soon as the dough begins to expand, the “bulk” is saturated with CO2 and that is all you need to begin shaping and proofing the dough. The practical question is how much volume increase is enough to make a definitive statement about having reached that point. Since the top of the dough in the container is as regular (irregular) as you can arrange when you load it, there is no easy way to detect a 1ml volume growth, but we finally decided that any competent baker can tell the difference between no growth and 5 ml of volume expansion. We suggest that people use 35 ml of total volume either as your personal checkpoint. Exactly how you judge that is up to the individual.
The next important point where volume is important is when the dough is ready for the oven, and this will be different for different types of dough. For baguettes I use 70 ml as the end of proof and ready to go to the oven (and if I am delayed and it has reached 80 ml before it gets to the oven the result will be disappointing). {photo attached} For other types of bread/rolls/pizza it can be whatever works for you. I have found this to be a simple, inexpensive, robustly reliable way to compensate for all kinds of process variations (mostly temperature and yeast activity, but also interactions between ingredients that speed up or slow down the yeast, e.g., salt and spices).
Monique says
New favorite recipe. I've made it 3 times in the last 2 weeks.
The small amount of yeast and (comparatively) large amount of salt was intimidating but trust the recipe - it's delicious!
Very clear instructions and an easy method to make great bread.
Ben says
This has become my go to Ciabatta recipe! It always tastes amazing and comes out as you'd expect.
***try a sprinkle of cumin seeds on top if your game!
Shannon says
Making this for the third time today! After adding the second measure I always think 'this is going to be a disaster' and after 5 minutes I always think 'THIS IS MAGIC!'. I always make into 8 rolls for delicious sandwiches for the week. SOOO EASY, SO YUM.
Cushla says
Do you have to leave this in the fridge overnight? Or can you bake it the same day please? Thanks.
Erin Clarkson says
Hi, no it needs the overnight rise 🙂
Victoria Z says
Came out really good! Surprisingly easy. Will 100% make again
Heleen says
Delicious! My son made a couple of loaves and added chopped olives and tomatoes; I was a bit worried it might affect the moisture level but it turned out perfectly.
Carolin says
I love this recipe so much! Always perfect and delicious, hast been part of my monthly rotation for years! We especially enjoy it with hummus and spicy carrot salad.
Caitlin says
I bake these buns / rolls all the time and can’t recommend the recipe enough. So easy to follow and such good bread! For the past few years I’ve prepped them on Christmas Eve, baked them on Christmas morning and we’ve had hot bread for lunch!
Sus J says
What a fantastic recipe, sure it requires some time but I combined it with chores to do in the 30 min breaks between stretch & folds.
This was my second time making ciabatta, but my first time with Erin's recipe, & they turned out fab. Foccacia will always be my # 1, but I'll definitely be making this on repeat.
Selina says
Hi! How long should the dough rest before baking after taking out of the fridge?
Erin Clarkson says
Hi! This is in step 8 of the recipe where you rise it before you bake it 🙂 Hope this helps!
Glen says
Great results the two times I have made it! Many thanks.
Bruce Jamieson says
Awful bread. Followed the recipe accurately and it's just awful, looks nothing like ciabatta when you cut into it. Not good bread.
Erin Clarkson says
Hi Bruce, Something must have gone wrong as the recipe definitely works!
Sara says
Made these as a 4th of July baking project for steak sandwiches and the bread turned out great! Ive been wanting to try this recipe for a long time and the bread was just as easy to make and tasty as I was hoping! Thanks for another great recipe!