
This ultimate guide on how to blind bake or par-bake pie crust will give you the perfect base for your pies. Filled with par-baking tips and troubleshooting, this blind baked pie crust works great for a wide range of pies. Don't be intimidated - I will hold your hand every step of the way!

Hi hi! Just popping in to share with you this post on all things blind baking! I love making homemade pies, but was quite intimidated by single crust pies for a long time (even as someone who bakes for their job!) because I was unsure on the blind baking process.
This ultimate guide on how to blind bake pie crust walks you through the process step by step, hopefully covering all my tips and tricks when it comes to blind baking or par-baking a pie crust. I use my homemade pie crust recipe for blind baking - I always have some in the freezer ready to go when needed!
I know that Blind Baking Pie Crust can be intimidating - don't let it be, I will hold your hand every step of the way and you'll be a blind baking pro in no time!


Blind Baking vs Par Baking
Blind baking a pie crust involves either partially baking or fully baking a pie crust before you use it. They use the exact same technique, the only thing that differs is the amount of baking time. This depends on what the pie crust is going to be used for:
- Par-baked pie crusts: A partially baked crust is called for in recipes which you are going to bake the pie again, often with a wet pie filling. Par-baking gives the crust a head start on the baking process, so that when the filling is added, the crust is already partially baked. Par-baking is used for pies such as my brownie pie, pumpkin pie, pecan pie, oatmeal pie, rhubarb custard pie, apple butterscotch pie, and strawberry rhubarb pie, along with other custard pies.
- Blind Baked pie crusts: Blind baked pie crusts are a fully baked crust and are used for recipes which have a no-bake pie filling, such as a lemon meringue pie, chocolate cream pie, banoffee pie, or a french silk pie. You want to fully bake the crust, as it will not get another chance to crisp up. The recipe that you are using will specify whether the pie crust needs to be blind baked or par-baked!
Why do fruit pies not get blind baked?
I do not usually par-bake my fruit pie crusts - this is because with a fresh fruit filling (or even with a cooked fruit filling such as my apple pie or my blueberry crostata), the pie has long enough in the oven that it gives the crust enough time to crisp up properly, removing the need for blind baking.

How to tell when a pie crust is fully baked
This can be tricky - if you are fully blind baking the pie crust, you need to remember that this is your only shot to bake it, so make sure that you take it far enough so that it is not soggy. The crust is fully baked when it is evenly golden brown, and the surface is nice and dry. Some recipes will have you add a layer of egg wash to help protect the pie crust from the filling.
For a Par-baked crust, it is important to remember not to over bake the crust too much. I give my par-baked crusts about 15-18 minutes in the oven with the weights on, then only 3-5 more minutes with the weights out, just to dry out the bottom crust of the pie. You want to look for no dry or shiny patches on the crust. It will get plenty more baking in the oven, so you only want a little bit of golden brown around the edges of the pie, as the exposed crimps will be directly exposed to the heat of the oven again when you return the pie to the oven. I do my pie crusts directly on a baking sheet, but you can also add in a baking steel or baking stone if you are worried about the pie crust.

Pie Crust Troubleshooting and how to fix it!
Here are all my tips and tricks on the actual baking of the pie crust - if you are having dough problems, check out my guide on how to make pie crust.
How do I stop my pie crust from shrinking?
There are a few reasons why a pie crust shrinks, the most common one being that the pie dough was over worked and not left to rest enough. Resting the pie dough is super important as it means that the gluten strands have a chance to relax, and don't contract in the oven, leading to shrinkage. Make sure the crust is super settled in the pie pan, and give it some time to relax after you line the pan - I like tucking under my crust, then leaving it for 10-15 minutes in the pan to relax before crimping and docking.
How do I stop my crust from losing the crimp in the oven?
This is often due to your dough not being well rested, or it being too wet - make sure that it is not over hydrated when you make it, and give it adequate time to rest and chill after you crimp the crust. I like to pop it into the freezer for 10 minutes before baking just to set the very outside of the crimped edges.
How to stop pie crust from slipping
Pie crust can sometimes slip down the sides of the pan when baked. To avoid this, make sure you fill the crust with pie weights or beans right to the top edge, to help hold the crust in place.
My pie crust puffed up when I took the weights out. What should I do?
This happens to me almost every time - just poke it with a fork and any big bubbles should sink back down!

❤️ Made this recipe and love it? ❤️
I would LOVE for you to leave me a review and star rating below to let me know how you liked it! Also, please make sure to tag me on Instagram!
Answers to your baking questions
Over the years, many of you have asked me questions about:
- baking in grams
- adjusting oven temperatures
- what kind of salt to use
- and many more!
I've curated and answered them all for your easy reference in this frequently asked questions post!

How To Blind Bake Pie Crust
- Prep Time: 20 minutes
- Cook Time: 30 minutes
- Total Time: 1 hour
- Yield: 1 pie crust 1x
- Category: Pie
- Method: Baking
- Cuisine: American
Description
This ultimate guide on how to blind bake pie crust will give you the perfect base for your pies. Filled with pre-baking tips and troubleshooting, this blind baked pie crust works great for a wide range of pies.
Ingredients
- Pie crust, prepared and chilled at least two hours (my homemade pie crust recipe makes enough for 2 crusts)
- Flour for rolling
Instructions
- Make and chill the pie crust as directed.
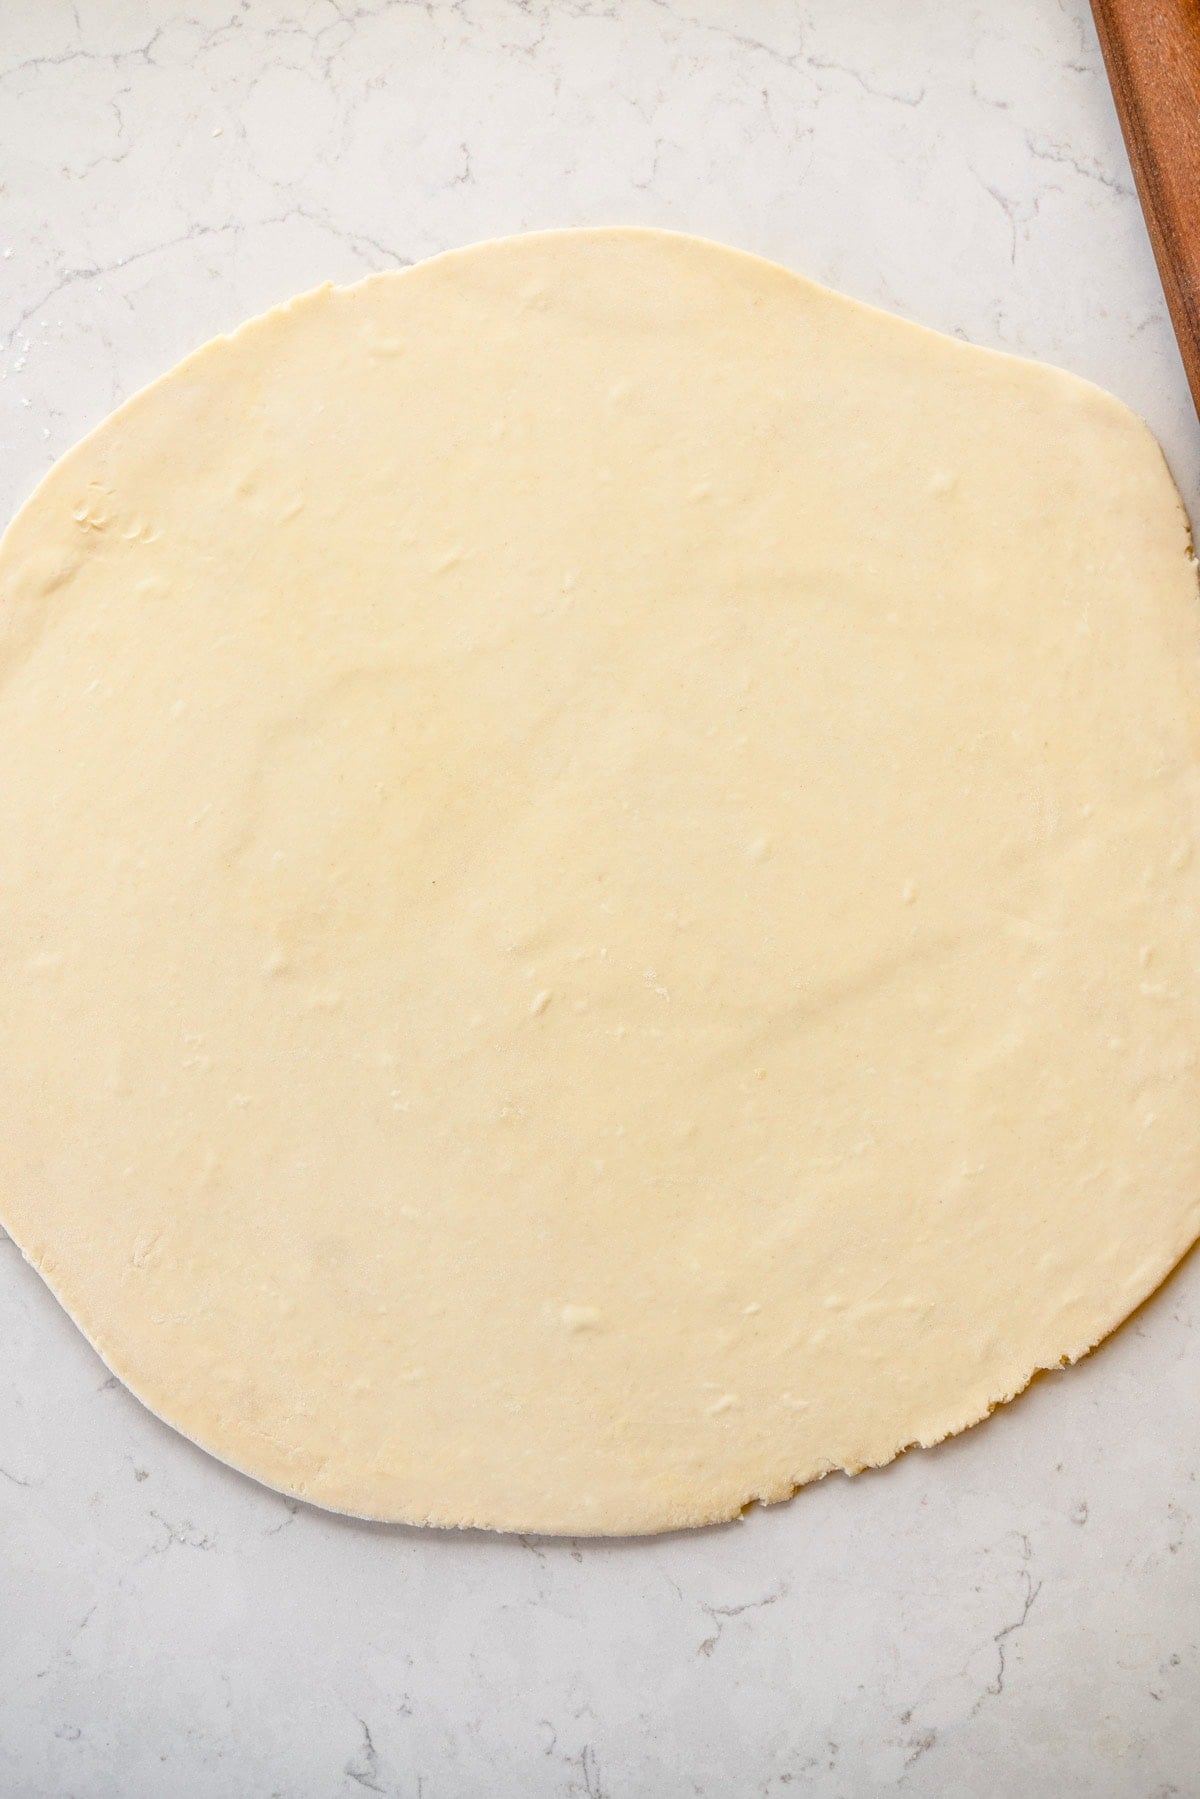
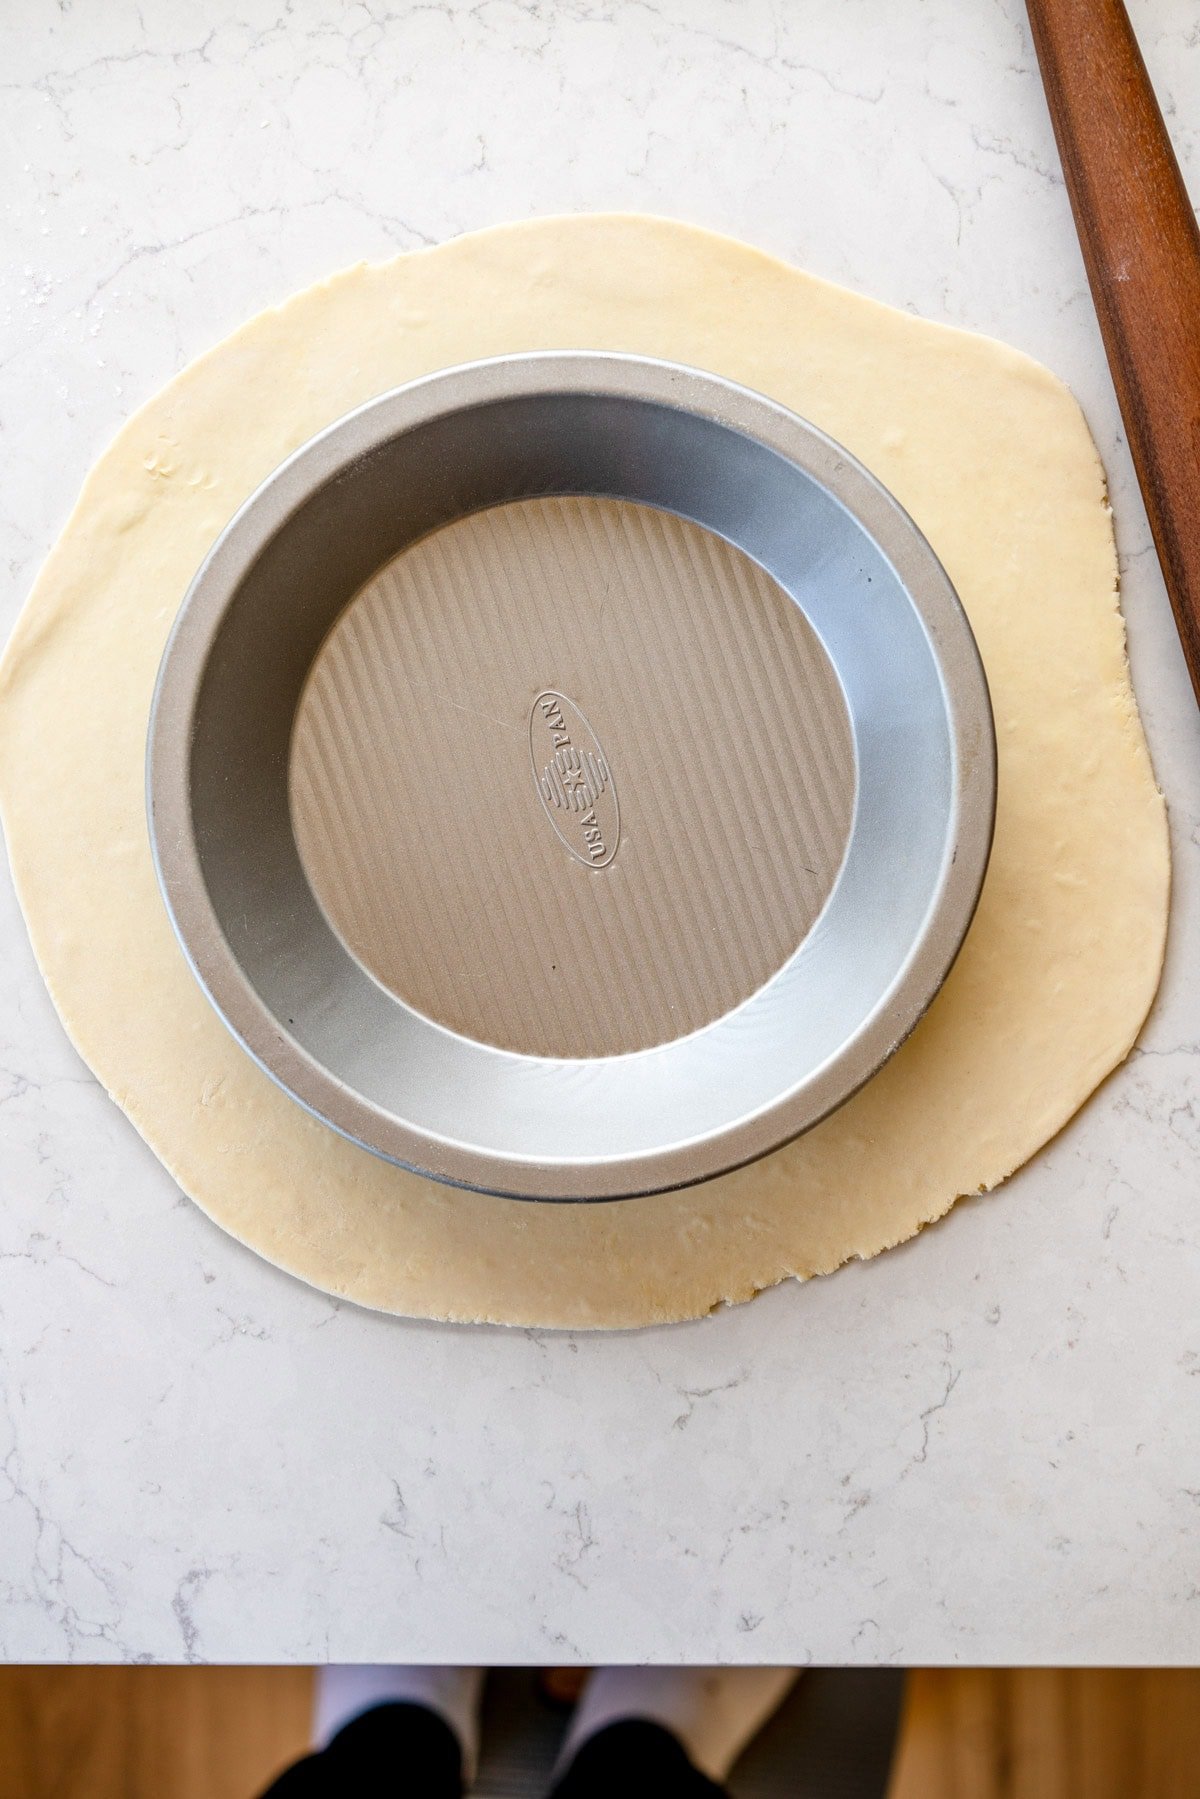
- Once the dough has rested, unwrap one disc and place on a lightly floured surface. Roll out to ¼” (6mm) in thickness, turning the dough 45˚ often as you are rolling to keep it even. You want the circle to be slightly larger than your pie tin. Transfer to a 9” pie tin, and arrange to ensure that the dough is well settled.
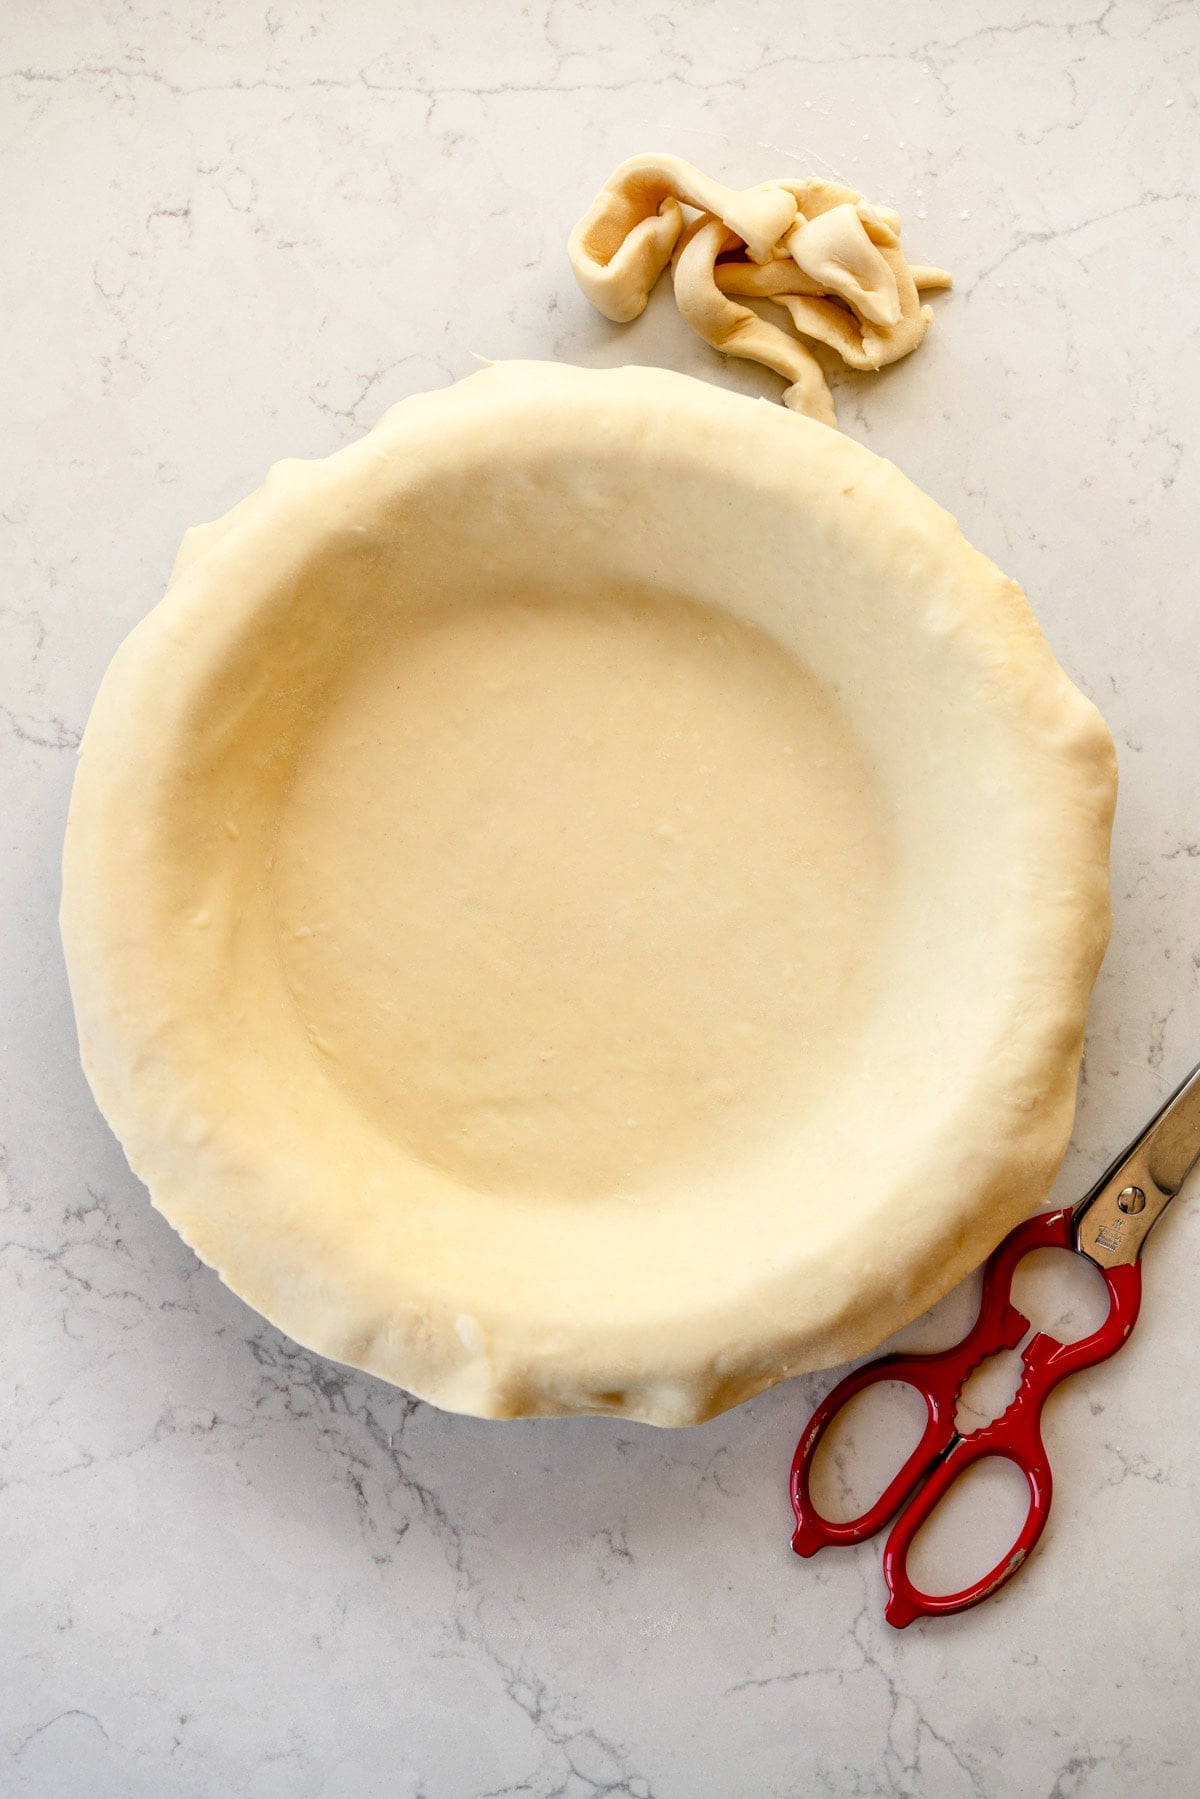
- Trim the dough using scissors or a sharp knife, leaving about one inch excess around the edges. Gently tuck the dough under and onto itself, to give you a neat folded edge. Chill in the fridge for 15-20 minutes, then remove from the fridge and crimp as desired. Dock all over with the tines of a fork, then chill for a further 30 minutes. If you would like, place into the freezer for 10 minutes before baking.
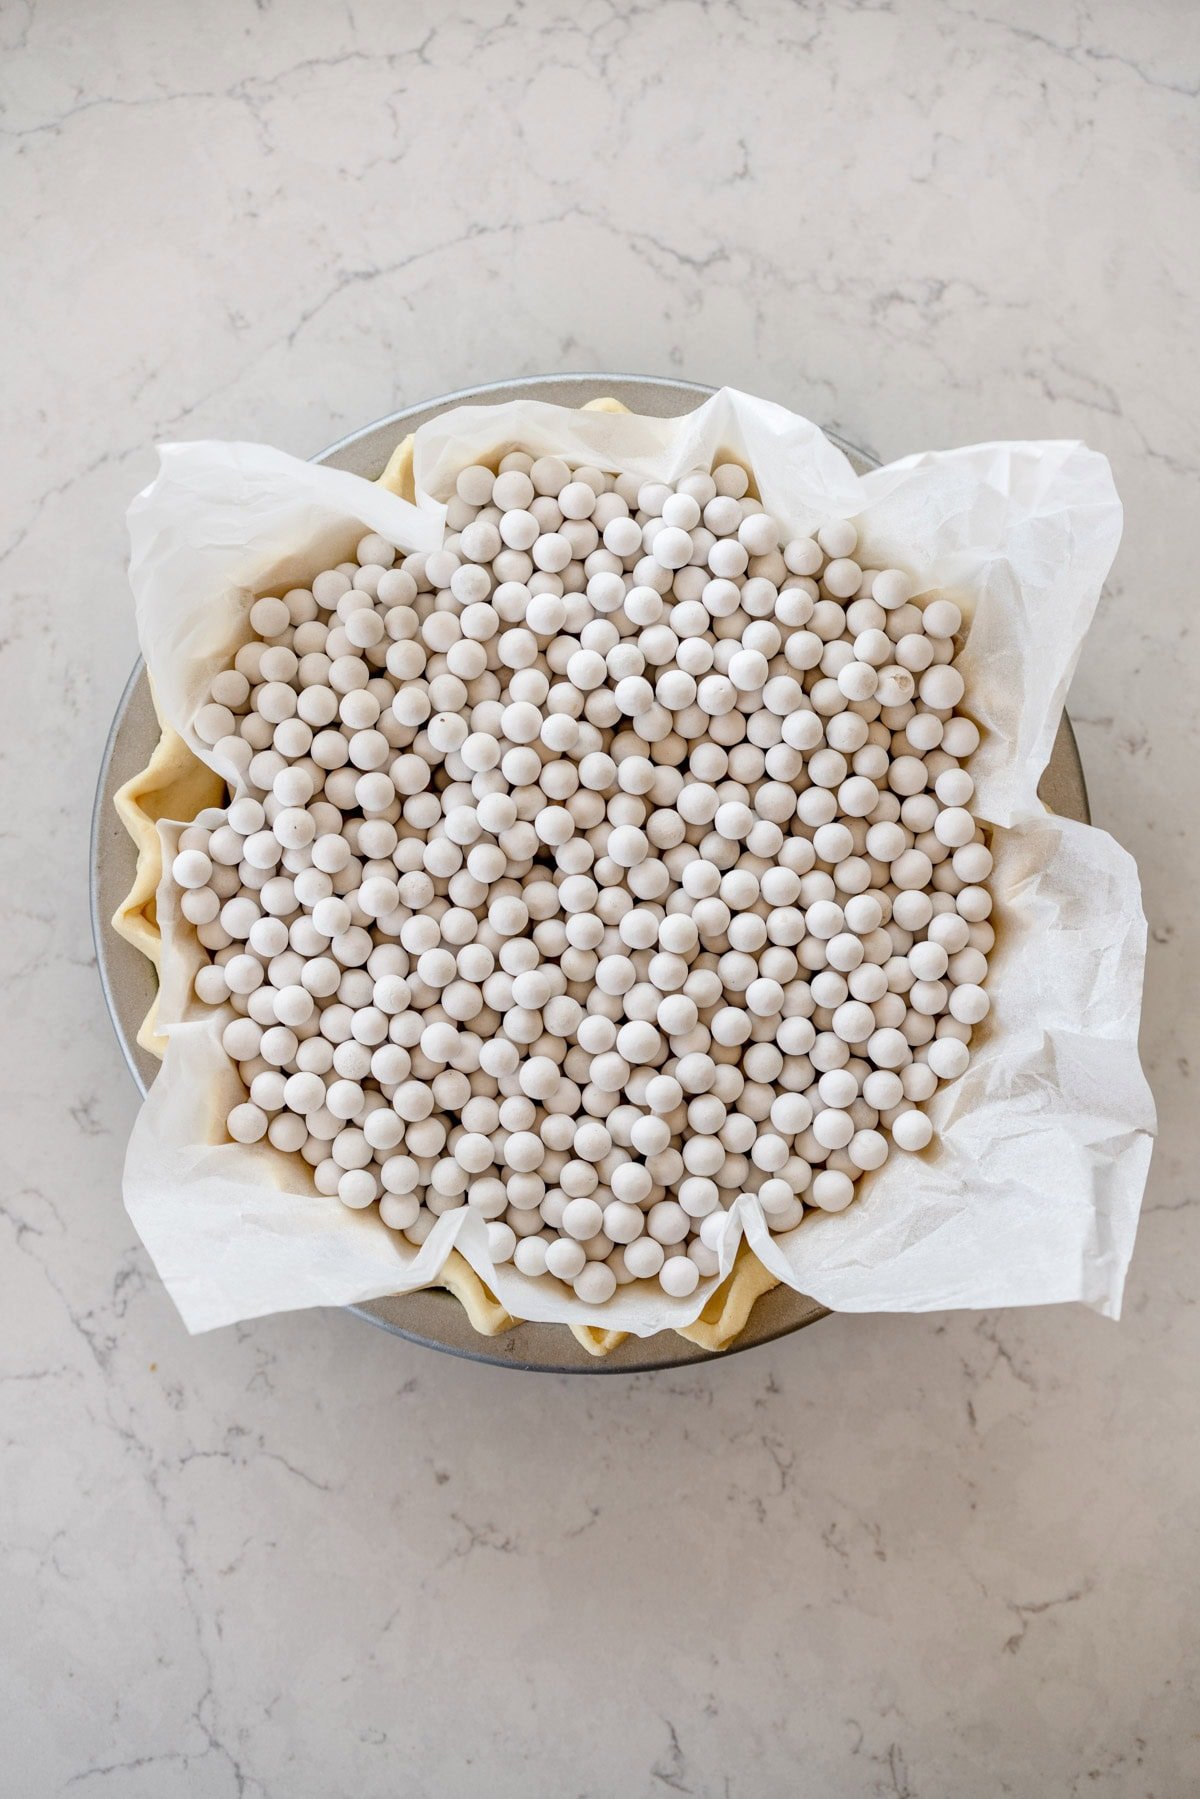
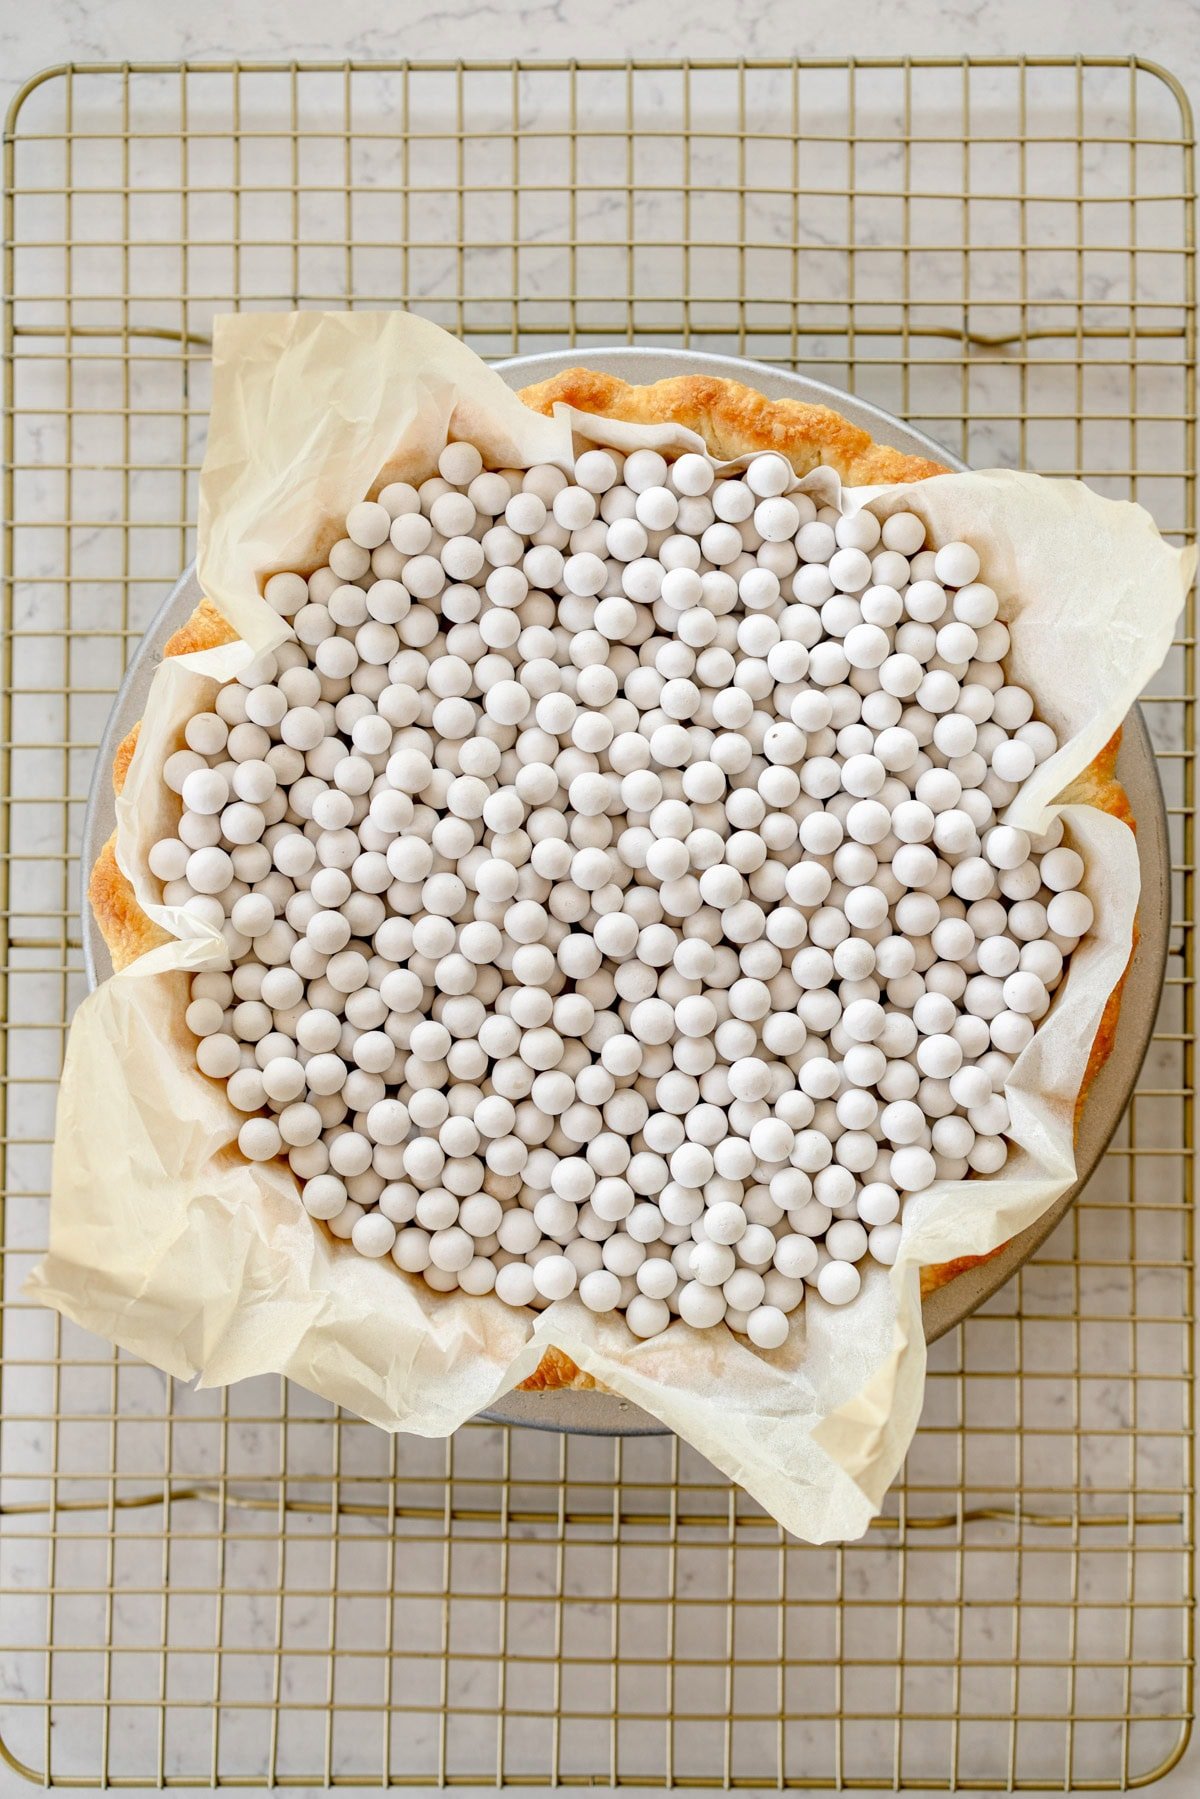
- While the crust is in the fridge, preheat the oven to 425˚f / 220˚c. Cut a piece of parchment slightly larger than the pie dish. Line with the parchment paper and fill with pie weights or dried beans, filling right to the bottom of the crimps.
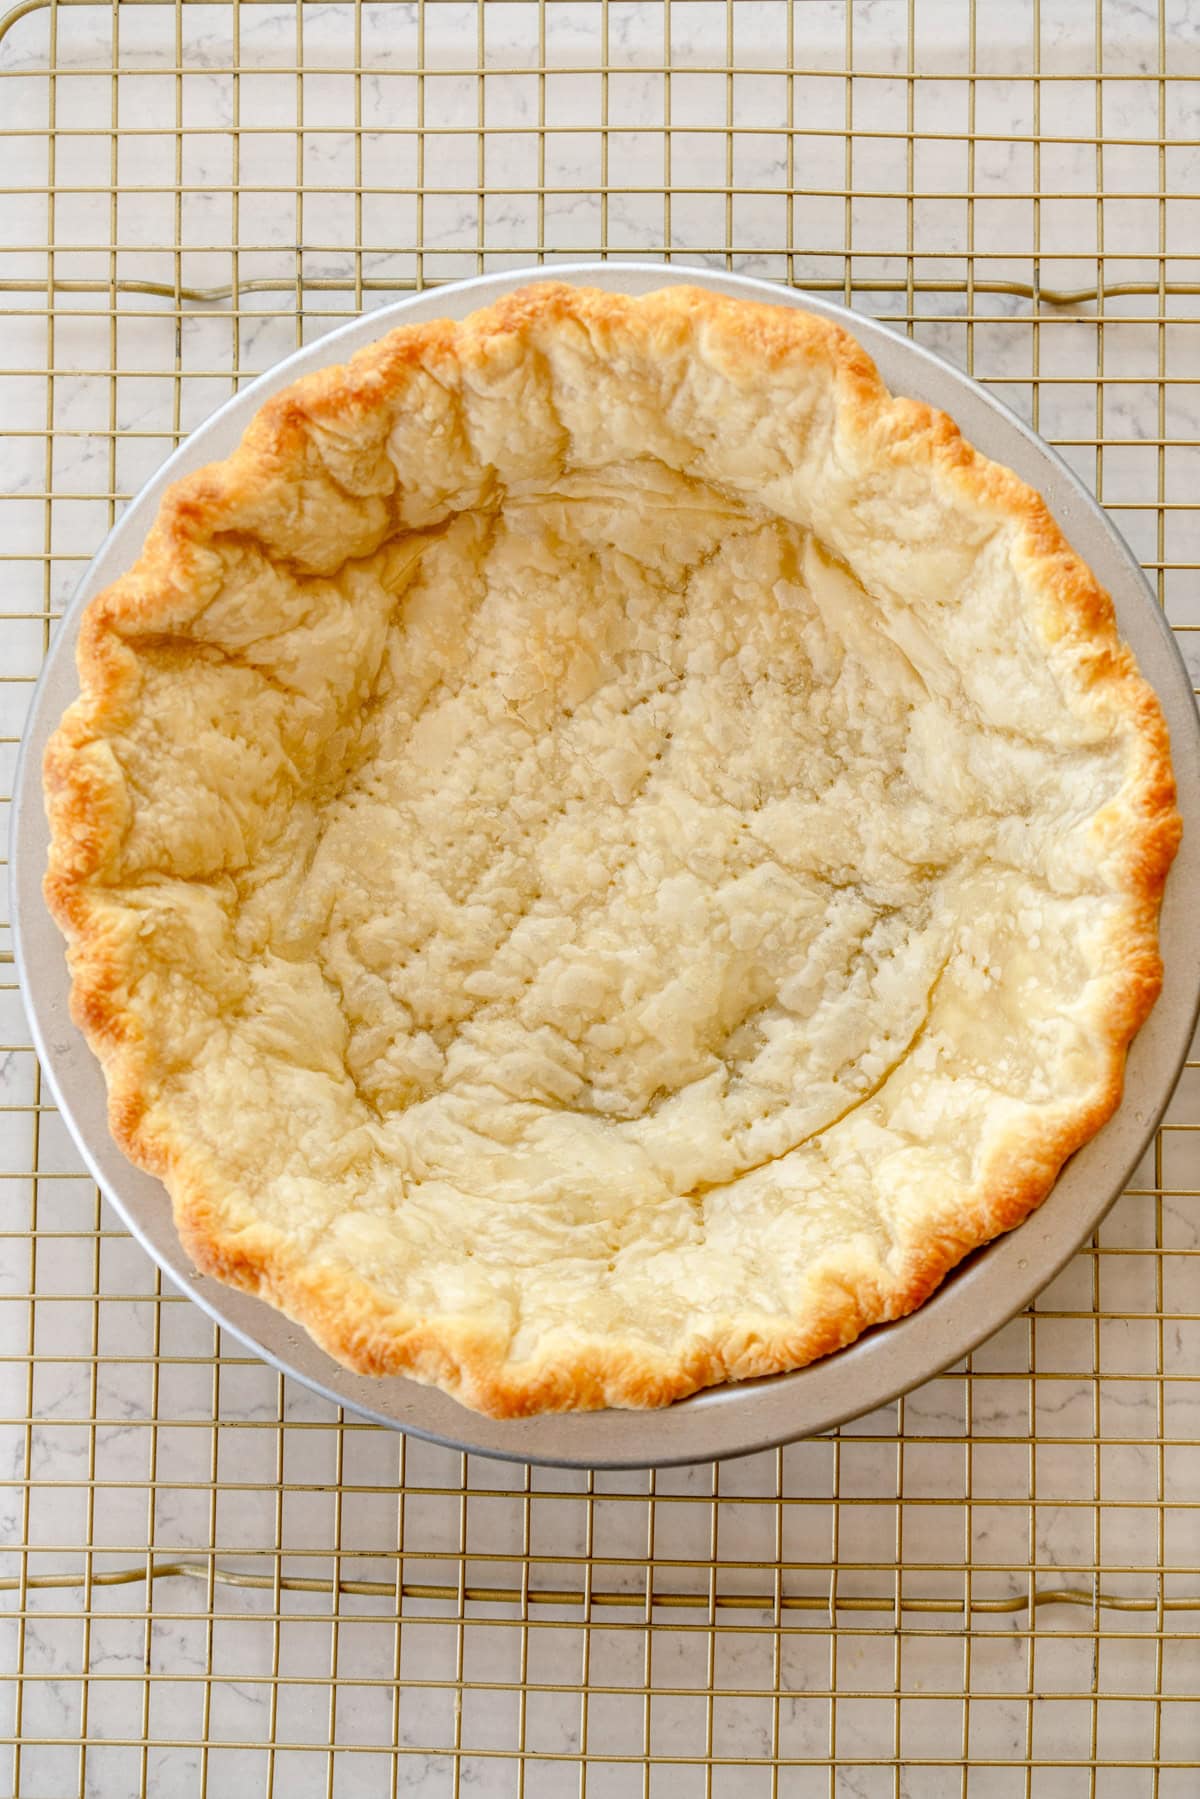
- Place the pie tin on a baking sheet, and place in the oven. Bake for 15 to 18 minutes, or until the edges are slightly golden brown. Remove from the oven, remove the parchment paper and beans.
- Return the pie to the oven. Reduce the oven temperature to 375°f / 190°c.
- For a Par-baked pie crust, bake for a further 2-3 minutes, until the inside of the pie crust is set and barely golden.
- For a Blind baked pie crust, bake the pie crust for a further 5-10 minutes, until the crust is evenly golden brown.
- Remove from the oven and allow to cool completely.
Notes
There are two options within this post - blind baked and par-baked, please choose the one your recipe specifies!
I learnt to make pie crust in a gas US oven, which is bottom heated. I have found that the best setting, if you have an electric oven, is a bottom heat only, which prevents the top of the pie burning. You can always tent it with foil if you find it getting too brown too quickly!
Can I blind bake pie crust ahead of time?
Yes - I often do this! You can blind or par-bake pie crust ahead of time. Store it either in an airtight container, or wrapped in plastic wrap on a sheet pan for up to a day.
Glass vs Metal Vs Ceramic - what is the best material for a pie pan?
I want to preface this by saying that the kind of pie pan you use is absolutely up to you - this is just my personal preference! I much prefer a metal pie pan - my favourite is made by USA pan. I much prefer a metal pan - I find that I get a more even bake, and that it is easier to avoid a soggy bottom of the crust. A ceramic pie dish works ok too, but I would avoid using glass - it is a very poor conductor of heat, so can often lead to a soggy bottomed pie.
Pie Weights: I have a few sets of ceramic pie weights (they never sell enough in one pack so I had to get a bunch to make sure I have enough), but you do not need to buy weights! Dried beans or rice works great, or you can use sugar to weigh down the parchment paper. If you use beans or rice, you can use them over and over again for blind baking - just store them in an airtight container. You cannot use them to cook with for regular recipes once you have used them to bind bake.
Comments
Ashley says
Obsessed with these tips! Legit so many good troubleshooting tips that are so helpful especially during holiday season! Thanks so much! My chocolate cream pie crust was phenomenal
Lily Diamond says
Perfect tutorial, made for perfect pumpkin and pecan pies. THANK YOU.
Julie says
Thanksgiving pie crust came out perfectly for the first time, thanks to your step by step pastry recipe and blind baking tips. Pastry came out beautiful and crisp, flaky, delicious.
Hayley says
Thank you for this recipe. So helpful - amazing amount of tips and the videos were really appreciated too. Thanks for the examples of how far to bake depending on the filling as well - makes a lot of sense! It worked a treat and I can legit just move my pie around without fear of it breaking up and it is definitely not soggy in the middle. Super flaky layers too.
Mette says
I made your pie crust recipe for Thanksgiving and totally forgot that I put one portion in the freezer. Pulled it out yesterday and let it defrost, and rolled it out this morning to make quiche. It rolled out so beautifully and easily that I think I might make a batch and just stash in the freezer. Used your instructions to parbake and it came out perfectly with no sliding down the sides which always seems to happen. Thanks for a GREAT recipe and clear instructions 🩵
Shana Levi-Nielsen says
First time using a vinegar recipe, and I may have over hydrated the dough. It came out more like puff pastry than pie crust. After 18 min at 425F, I turned down the heat and took the weights out. It puffed up so big! I’m glad I caught it before it was too late, I docked it some more and put the weights back in. I wasn’t really able to get it all the way baked, but it will get baked for an hour again when I bake the pie, so I’m not that concerned.
Erin Clarkson says
Haha whoops it happens to the best of us! I just poke it down with a fork when that happens.
Linda Lindsay says
wow, who and known this can make a break a pie. I’m so used to soggy piecrust on the bottom of my apple pie. I didn’t know what a good apple pie tasted like. Thank you, Erin for another great tip.
Stephanie Rufo says
Emma says
This is my go-to method whenever I need to blind bake a pie crust - it never fails. The extra ten minutes in the freezer is a game changer!
Sheila says
Nowhere do I find a recommended temperature for blind baking a pie shell. “Reduce heat to 375” is all I’ve found so I’m guessing 400?
(Can’t rate, haven’t made it yet!)
Erin Clarkson says
Hi, it's in step 4 of the recipe 🙂
Hannah says
I’ve never blind baked a crust before and was using another pie recipe but was so thankful to see Erin had one here specifically for this because I trust her clear/thorough instructions more than any other baking blog.
Harriet says
Brilliant recipe - thank you. Excellent clear instructions and the results are outstanding; the pastry is easy to handle and tastes wonderful. Highly recommended.