


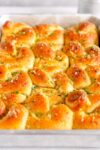

Super soft homemade Garlic Knots have a garlic butter topping that is brushed on both before and after baking. These easy garlic knots can be made in a variety of shapes and sizes and are perfect for your next dinner or gathering!

Table of contents
Super Soft Garlic Knots
Hi hi! Just popping in here to share the recipe for these homemade Garlic Knots with you! These Garlic Knots are super easy to make - the dough is based off of my burger bun recipe which I developed a while back and have been using in everything. The dough comes together really easily (the mixer does all of the work), and they are fun to shape.
These easy homemade garlic knots are brushed with a garlic butter before being baked. They are then finished with garlic butter and fresh herbs once they come out of the oven for the perfect garlicky buttery bread!


What makes these Garlic Knots super soft?
These Garlic Knots are super soft thanks to the Tangzhong method, and is super stretchy from the bread flour in the recipe which gives an incredibly soft dough which can withstand being shaped into knots. Homemade Garlic Knots are often made from pizza dough, but I wanted to level it up with this soft and fluffy dough.
The Tangzhong method is an Asian Technique, and involves cooking part of the flour and water in a bread recipe to form a thick paste, or a roux. The process of making the Tangzhong gelatanises some of the starch in the flour. This means the flour is able to absorb a lot more water, and also holds onto it throughout the dough making process. This gives an incredibly soft bread which stays soft a lot longer than other bread does.
Tangzhong (which is a Chinese word) is made by cooking the liquid and flour together, while the Yudane method (which is Japanese) involves adding boiling liquid to the flour and leaving it to set overnight. The benefit of using a roux means that the bread dough can stay 'lean' - so very little added fat etc but still stay extremely tender and soft.

How to make homemade Garlic Knots
This homemade Garlic Knot recipe is pretty easy to make - there are two components, the dough and the garlic butter. Easy easy!
- Make the Tangzhong - The Tangzhong acts as the base of the dough, providing strength and moisture. I add cold milk directly to it rather than waiting for it to cool down.
- Mix the dough - All the other dough ingredients except for the butter go in. I use bread flour for strength, along with some milk powder for softness. The mixer does all the work for you here to make a super soft and stretchy dough.
- Add the butter - When the dough is developed strength, the butter is incorporated. The reason for this is to allow the gluten to develop before adding in the fat to the recipe, although it is not as important with a recipe that has a strong dough base, it is good practice!
- Rise the dough - I just pop the dough in a warm spot to rise. This usually takes about 90 minutes for me but just keep an eye on it. Go by the dough not the time.
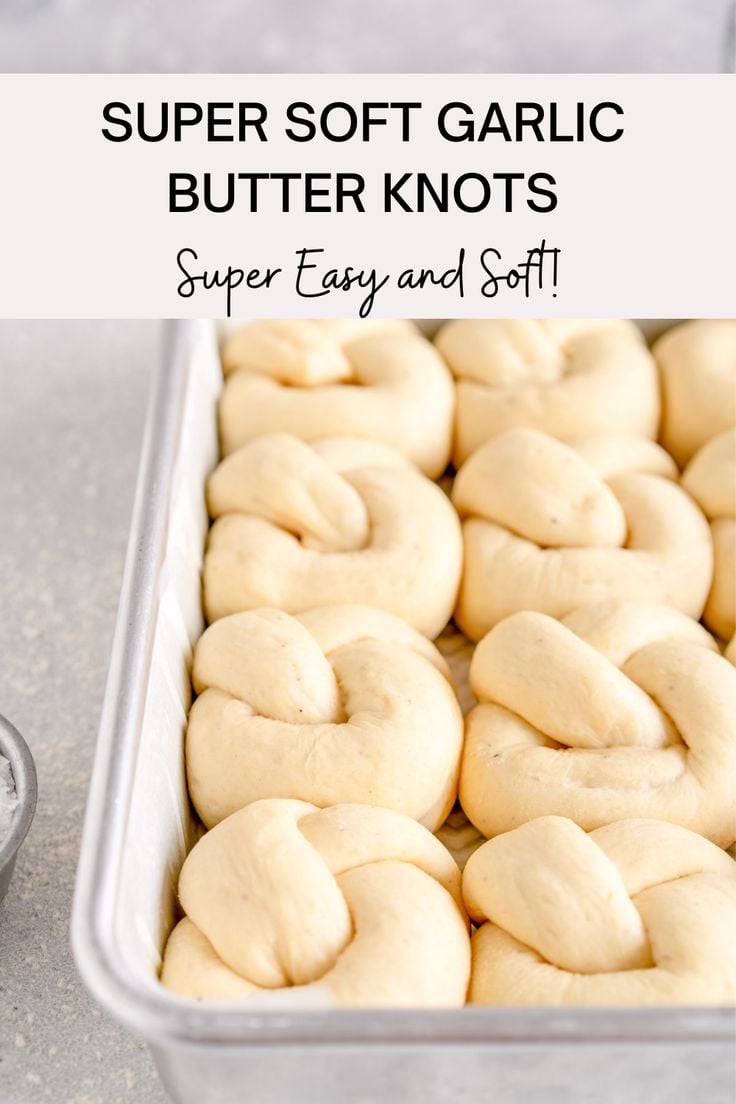
- Form the knots - These knots use a super fun shaping method that I learnt from my friend Sarah's blog!
- Leave them to rise - Arrange the garlic knots in the pan and leave to rise until puffy. While they are rising, you can make the garlic butter so it is ready to go at baking time. Again, keep an eye on your dough here rather than the clock.
- Bake the Garlic Knots - The knots get brushed with garlic butter and then popped into the oven to bake. Once they are golden brown they come out and get drowned in a second round of garlic butter for a double dose of garlic! If you like, finish with a sprinkle of chopped fresh herbs such as parsley or chives, and a grating of parmesan cheese. Serve alongside some marinara sauce for dipping if desired.


Garlic Knots with Garlic Butter
I have a 'go hard or go home' mentality when it comes to making garlic bread, and these garlic knots definitely fall within the 'go hard' category.
I found that the best way to get as much garlic into them as possible was to do two rounds of garlic butter, made with melted butter. The first goes on just before they go into the oven, then the second lot of garlic butter gets brushed on when they are hot from the oven. I love this garlic butter, and use it on focaccia, garlic butter dinner rolls, and cheesy garlic bread.
The best way to get as much garlic flavour in without a super raw bit of garlic is to pre cook the garlic butter. What this does is infuse the butter with the garlic flavour. It also cooks down the minced garlic a little so that it doesn't have a super raw strong taste. This means you can and can load it onto the knots as soon as they come out of the oven.
The garlic butter goes onto the warm rolls, so if you are planning on making these ahead you can make the butter, do the first round before baking, then leave the second round off if you like. Then you can re-warm the garlic knots in the oven and add the garlic butter just before serving. They will be super good either way but this is just one way of going about it!

How to shape garlic knots
I borrowed my friend Sarah's method for these homemade garlic knots - instead of tying the dough into a full knot, you make a sort of twisted shape. I will try my best to explain, but you are best to watch the accompanying video to get a good idea.
- Divide the dough into 12 pieces.
- Working with one piece at a time, press the dough into a rectangle and then roll it up into a sausage. Making the rectangle first evens it out a little to help give you a nice even sausage.
- Roll the dough into a sausage 13" (33cm) long.
- Form the dough into a "u" shape
- Cross one end over the other. You will now have a top piece of dough and a bottom piece of dough.
- Take the bottom piece of dough, and bring it up and tuck it through the hole. Loop the top piece around to meet the bottom piece, and press the ends together.
- Tuck everything in and round off the garlic knot.
- Repeat with the remaining pieces. Transfer into your parchment paper lined baking pan.
This can take a little practice so you are best to practice with one piece until you get the hang of it, but I promise once you get the hang of it it is very easy!


How to make Garlic Knots ahead of time
You can make these garlic knots ahead of time. There are a few ways to do this:
- Make the dough ahead of time - Mix up the dough, then leave to stand on the counter for 20 to 30 minutes to kick start the rising process. Then pop the dough into the fridge to do the first rise! You can either do this on the same day (so make the dough in the morning and rise in the fridge), or make the dough the evening before.
- Make and assemble the knots and then do the second proof in the fridge - These only rise for 45 minutes at room temperature so you should be able to do the second rise in the fridge. I would leave them on the counter for about 10-15 minutes before putting them into the fridge. Remember to go by how the dough looks not the timing. I would not do this overnight, but would instead just use it as a way to delay the second rise.
- Make the garlic knots ahead of time and finish them later - make the knots and bake them, but don't add the second lot of garlic butter. Then, when you are ready to serve them, pop the pan into the oven for 10-15 min (at about 350°f / 180°c) covered with some foil. Then re-warm the butter and add it on top of the rolls just before serving.
Remember with yeast dough that the fridge is your friend. If something pops up and you're worried about over-proofing, just pop the dough into the fridge. I do this all the time if I find it is rising too fast and i'm not ready, or I need a little more time etc.


FAQ for Garlic Knots
Can Garlic powder be added to the dough?
Garlic does weird weird stuff when added to the dough and it makes it lose strength. I have had this happen to me in the past and it's very odd. So I just went for a double dose of garlic butter!
How do you store Garlic Knots?
I just keep them lightly covered or in an airtight container at room temperature. Because of the Tangzhong they should stay quite soft but you can refresh in the microwave if you want.
Can I substitute Bread Flour?
No. I tried it with all purpose flour once and it was like edible slime. It didn't go well. Bread flour is often called 'strong' or 'high grade' in other places! If you can't find it you could try adding some vital wheat gluten to the dough to help add strength.
Can Garlic Knots be made without a mixer?
This dough really needs a mixer! It needs to develop the strength for the knots to hold.
Do you have to use that much garlic?
Nope. You can use less if you want! Make sure it is finely grated - either mince it or cut super fine. I haven't tried this with pre-minced garlic but it should work fine.
How to substitute active dry yeast for Instant
If you only have active dry yeast, this recipe will still work fine, but you will have to change your method. Make the tangzong and cool to room temperature in a bowl with plastic wrap pressed against the surface. Then bloom your yeast in the lukewarm milk with the sugar. You can't use the cold milk to cool down the tangzhong as it needs to be warm to activate the yeast.
Can you freeze Garlic Knots?
I haven't tried it but I have frozen my burger buns and it was fine. Don't add the second round of butter to them (it will go weird in the freezer), then freeze the baked knots in a ziplock bag or airtight container. To refresh, thaw out then warm in an oven covered in foil, and then finish with the garlic butter.
How do I know if I have over proofed the dough?
If you have over proofed your knots, they will probably deflate while adding the garlic butter before baking. Then, over proofed dough doesn't do much in the oven as there is no gas to rise the bread. They should still taste fine they might just be a bit saggy. Make sure to keep a close eye on them when they are rising and give them the poke test!

For more recipes using the Tangzhong method, check out:
❤️ Made this recipe and love it? ❤️
I would LOVE for you to leave me a review and star rating below to let me know how you liked it! Also, please make sure to tag me on Instagram!
Answers to your baking questions
Over the years, many of you have asked me questions about:
- baking in grams
- adjusting oven temperatures
- what kind of salt to use
- and many more!
I've curated and answered them all for your easy reference in this frequently asked questions post!
Recipe for Homemade Garlic Knots
Print
Homemade Garlic Knots (+ Video Tutorial!)
- Prep Time: 1 hour
- Cook Time: 30 minutes
- Total Time: 3 hours
- Yield: 12 garlic knots 1x
- Category: Bread
- Method: Baking
- Cuisine: American
Description
Super soft homemade Garlic Knots have a garlic butter topping that is brushed on both before and after baking. These easy garlic knots can be made in a variety of shapes and sizes and are perfect for your next dinner or gathering!
Ingredients
Tangzhong
- 25g bread flour
- 120g whole milk
Garlic Knot Dough
- All of the Tangzhong
- 200g cold milk
- 20g granulated sugar
- 2 tsp (6g) instant yeast
- 30g milk powder
- 2 tsp (8g) kosher salt
- A few turns of black pepper
- 1 egg, at room temperature
- 360g bread flour
- 45g unsalted butter, at room temperature
Garlic Butter
- 120g unsalted butter, cold from the fridge is fine
- 5-6 cloves garlic, finely minced or grated on a microplane
- Big pinch of Flaky Sea Salt such as Maldon
- Finely chopped chives to finish
- Flaky Sea Salt such as Maldon to finish
Instructions
TANGZHONG
- Make the Tangzhong. Combine the milk and bread flour in a medium saucepan. Place over medium heat and cook, stirring continuously, until the mixture thickens into a paste. Remove from heat and transfer to the bowl of a stand mixer.
GARLIC KNOTS
- Add dough ingredients. Add the cold milk and mix to combine, checking with your finger that it is not hotter than lukewarm (the cold milk should cool the hot tangzhong enough). Add the sugar, yeast, milk powder, salt, pepper, egg, and flour. Transfer to the mixer and fit with the dough hook.
- Mix the dough. Mix the dough on medium speed until it is smooth and elastic and clears the sides of the bowl, about 12-15 minutes. Don’t freak out, as it is sticky - if you have made it by weight you will be fine. Set a timer and walk away from the mixer if you need. If after that time it really isn’t coming together and you’re worried, add flour a teaspoon at a time just until the dough just comes together. Add the butter and mix for a further 5 minutes until incorporated. The dough should be smooth and elastic, and pass the windowpane test.
- Rise the dough. Turn the dough out onto a surface and either flour very lightly or grease your hands if needed to bring into a tight ball with a bench scraper. Transfer to a greased bowl and cover the bowl with plastic wrap. Place the dough in a warm spot and rise until doubled in size, approximately 1 ½ hours.
- Divide the dough. Grease and line a 9”x13” (20cmx30cm) baking pan. Turn the dough out onto a very lightly floured surface. Divide the dough into 12 equal portions, each weighing about 68g. Working with one piece of dough at a time, press it out and shape it into a rough rectangle, then roll up to form a sausage. Roll the dough into a log that is about 13” (33cm) long.
- Shape the garlic knots. To form the knot, shape the dough into a “U” shape. Cross one end over the other - you will have a piece that is on the top and a piece that is on the bottom. Bring the bottom piece of dough up and tuck it through the hole (the bend of the U). Then, take the top piece and wrap it underneath to meet the other piece of dough. Press them together lightly and shape the dough into a knot. (See video for instructions on how to do this). I suggest practicing with one first until you have the hang of it!
- Rise the garlic knots. Arrange the buns evenly spaced in the pan - I like to arrange them all in the same orientation within the pan. Cover the buns either with a lid, or some lightly greased plastic wrap. Leave the buns to rise again for about 45 to 55 minutes. You want them to puff up and double in size, and when you press lightly on one, it should leave a small indentation that doesn’t quite spring back. See images for how they look just after rolling and then risen. Remember that rising time depends on your environment so go by how the dough is looking, rather than a rising time.
- Make the garlic butter. While the buns are rising, make the garlic butter - place the butter and garlic in a small saucepan. Place over medium low heat. Heat until the butter is melted, and then continue to heat for a further 1-2 minutes, stirring often, to help infuse the butter with the garlic and take the raw bite out of the garlic. Remove from the heat and add a big pinch of flaky sea salt (or kosher salt) and set aside - you want it to cool slightly so it is not too warm when you brush it onto the rolls before baking.
- Add the garlic butter. When there is about 20 minutes to go in the rise, preheat the oven to 360°f / 185°c. Brush the buns with about ⅓ of the garlic butter - I like to dig the pastry brush in a little and get a little of the garlic from the bottom of the pan. You will brush more onto them once they are baked, which is the time to really get all the chunky pieces of garlic on there, so you can use more of the liquid butter for this initial brush if you like.
- Bake the garlic knots. Bake the garlic knots for 20 to 25 minutes, until they are golden brown. If you want to further check them you can take their internal temperature - they should be registering at about 195°f / 90°c for a baked dough - this isn’t a super important step but a nice way to double check if you like. When the rolls are nearly finished baking, re-warm the garlic butter if it has solidified at all. Remove the garlic knots from the oven and brush all over with the garlic butter. Finish with chopped chives. Serve warm or at room temperature. Store leftovers in an airtight container at room temperature - they should stay soft for a few days. If you aren’t planning on eating the buns all in one day, Leave the garlic butter off of them and add before serving.
Notes
Shaping Inspiration from The Vanilla Bean Baking Blog
Comments
Anna says
Wow amazing, a real crowd pleaser! Made it for a potluck and my friends were amazed. So soft and buttery and delish. I was wanting to try make them into cheesy garlic knots as I love me some cheese- what would be your suggestion? Put mozzarella in the middle? Or grate cheese on top?
Anyway, I love your recipes so thankyou!
Erin Clarkson says
Hi! Either would work - you could tuck a little piece of cheese between each, or poke a little piece of cheese in the middle of each knot!
Mitch says
Made this recipe thrice just for this month (Is that too much? 🤣) because they're just soooooo good. Always a hit even with my 2 littles who aren't fans of garlic! Thank you for sharing your recipes! ♥️
Kelsey D says
This bread is unreal. It’s so squishy, springy, soft, and just feels SO satisfying to pull apart and eat. I’ve never made bread. I made these and they are PERFECT. And that, is thanks entirely to Erin and her amazing recipes. Read the tips. Read the FAQs. READ THE TIPS. This recipe was so fun to make, I wasn’t stressed, and the result is just *chef’s kiss*. I’m annoying my friends and family about how good these are and am so proud of myself for making them, but it really is all due to the hard work Erin puts into developing, testing, and writing her recipes, FOR FREE I might add. So I swear to all that is good in this world, if you have some silly, non-sensical, asinine “complaint” to make about nail polish or weighing ingredients, just stuff it and make the damn rolls. I promise you’ll feel better.
Liv says
I won lots of friends with these buns! Took these to a bbq where I didn’t know many people (cue social anxiety). People were raving about these and desperate to find out who made them. I added a sprinkle of cheese on top, cause yum. But the original recipe is absolutely banging all by itself.
Cheryl says
Totàlly delicious. Perfect recipe. Fam loved them
Munira says
The best garlic bread/knot recipe ever. Thank you Erin for the recipe! I used Japanese bread flour, and the dough was a little too sticky so I added a few more teaspoons of flour. Perhaps I should reduce the amount of liquid?
Erin Clarkson says
Hi! Ahh yeah different flour can be different levels of thirsty! I would just add more flour as you did, or yep you can cut back on the second measure of milk if you wanted 🙂
Jessica says
These were SO GOOD. I will be making them again pronto!
Laura says
The best, as always!! These turn out SO wonderfully.
Kristena Soejoto says
I know we all hate those ‘I changed this and that and it was terrible - 1 ⭐️’. BUT!!! I had already made the base before I realized that the recipe called for milk powder and said what the heck, if it doesn’t turn out all will be fine. But they did and it was ALLL FINNEEE! So fine that my teenage son had one for breakfast this morning. Lol.
Lisa says
I absolutely love these garlic knots! I often get asked when I'm next going to make them by work colleagues and are my go to for an easy BBQ side. I have also started making the base recipe, shaping into buns and adding cheese, so so good!
Amy says
These are soooo good! Better than any restaurant’s garlic knots! I like to add Parmesan to the butter I brush on top!! Thank you for sharing such an amazing recipe!
Emy says
Made during summer in NYC area, so might've been the humidity but these needed some more flour than the recipe called for. But this is my 3rd time making these. I love them. They're our go to garlic bread recipe. Soft, squishy and garlicky!! I liked them so much that after getting a whiff of the smell and seeing their perfect beauty I uninvited my friends from dinner so I could eat these by myself. They still came over and I had to share 🙄
Erin Clarkson says
Hahahah rude from your friends! Yeah if it's super humid your dough might need a teeny bit more flour to offset that as it's a wet dough
Emy says
Dec 26 2024 update. These are still our go to. Made them for Christmas dinner and my friend's toddler woke up the next morning asking for "Emy's bread"
This recipe is still perfect.
TW says
Located Northeast US, any tips on how to make the dough more workable. Often times its too sticky/wet to shape even with floured surface. Wasn't sure if there's a point where too much flour can be added or if that's something to experiment with adding more of before the rise? Usually its wet before the rise when following the recipe and comes together enough to shape but last time I attempted the dough was too sticky to handle to form into knots. I'm assuming it has something to do with humidity here!
Erin Clarkson says
Hi! It could just be your brand of flour or the humidity! You can always add a teeny bit extra if you need and just know that you need to adjust that for your climate 🙂
Rose Goldberg says
Can you make these ahead of time and place them in the refrigerator?
Erin Clarkson says
Hi! Yes you can do the first rise overnight in the fridge 🙂
Tori says
Love this recipe. I will be making on repeat. Extremely easy to follow instructions. The dough is amazing to work with.
Thanks again for another win, Tori
Cassie says
These are beautiful! Pretty easy to make the dough and shape, so worth the effort!!
Christy L Brinkley says
Rolls were amazing! Recipe easy to follow - basically, you foolproofed it! Thanks for being my go-to website whenever I need a tried-and-true recipe.
Tresa Cerne says
To die for! These are a real show stopper.
Sophie says
incredible recipe! The bread turned out so soft and pillowy, and the garlic taste was amazing. It's been 3 weeks since I baked them for a party, and I still have people telling me how good they were!
Quite probably the best bread you'll ever eat says
Ohhhh my word, Erin! These are insanely good! With our lovely warm house, I started these at 4 and had them on the table for dinner at 6.30.
Everyone is absolutely frothing over them (except for my poor coeliac hubby whom I felt guilty for haha). I've been eyeing these up on your feed for a few years, and so so glad I finally made them.
They're actually the bread of dreams.
Emily says
Hi there, I would love to try this recipe but I only have fresh yeast on hand. Would this work with your recipe? Thank you for your response!
Erin Clarkson says
I'm not sure sorry, I've only tested it as written
Francesca says
Hi! I’ve made these successfully in the US but now I’m in Italy and can’t find milk powder here ugh can I sub it with milk or just omit it altogether? Thank you in advance!
Maggie says
Made these for Christmas last year and they have been requested BY NAME this year! Thanks for a great recipe.
Erin Clarkson says
Yayyyy I love that so much!
Kylie says
Garlicy, buttery perfection. My family keeps asking for them so that's always a good sign.
T Lowe says
Insanely good! Thanks for sharing. Having the ingredients in grams is super helpful. Will definitely be making again.
CT says
My new favorite
Erin Clarkson says
Yay these look amazing!
Madeline says
If I am having dinner guests and want to impress, this is what I make on the side. Its actually the best bread I've made. When coeliac husband had to eat gluten for a few weeks for a procedure, this is the gluten thing he requested to try first 😅
1000016504