Cloudy Kitchen

  • recipes
    • Breads
    • Brownies
    • Cakes
    • Choux
    • Cookies
    • Doughnuts
    • Ice Cream
    • Macarons
    • Pies
    • Quickbreads
    • Small Batch Baking
    • More →
  • about
  • contact
  • products
menu icon
go to homepage
  • recipes
  • about
  • contact
  • products
  • calculators
  • subscribe
    • Facebook
    • Instagram
    • Pinterest
    • TikTok
  • search icon
    Homepage link
    • recipes
    • about
    • contact
    • products
    • calculators
    • subscribe
    • Facebook
    • Instagram
    • Pinterest
    • TikTok
  • ×
    Home

    Dark Chocolate Salted Caramel Ganache Tart with Chocolate Graham Cracker Crust and Earl Grey Mascarpone Whipped Cream


    Dark Chocolate Salted Caramel Ganache Tart with Chocolate Graham Cracker Crust and Earl Grey Mascarpone Whipped Cream - this chocolate tart comes together quickly, and is the perfect easy dessert that easily feeds a crowd. A crunch base is topped with a silky smooth chocolate salted caramel filling, and finished with an earl grey mascarpone whipped cream. #chocolatetart #saltedcaramel #earlgreywhippedcream
    Dark Chocolate Salted Caramel Ganache Tart with Chocolate Graham Cracker Crust and Earl Grey Mascarpone Whipped Cream - this chocolate tart comes together quickly, and is the perfect easy dessert that easily feeds a crowd. A crunch base is topped with a silky smooth chocolate salted caramel filling, and finished with an earl grey mascarpone whipped cream. #chocolatetart #saltedcaramel #earlgreywhippedcream
    Dark Chocolate Salted Caramel Ganache Tart with Chocolate Graham Cracker Crust and Earl Grey Mascarpone Whipped Cream - this chocolate tart comes together quickly, and is the perfect easy dessert that easily feeds a crowd. A crunch base is topped with a silky smooth chocolate salted caramel filling, and finished with an earl grey mascarpone whipped cream. #chocolatetart #saltedcaramel #earlgreywhippedcream
    Dark Chocolate Salted Caramel Ganache Tart with Chocolate Graham Cracker Crust and Earl Grey Mascarpone Whipped Cream - this chocolate tart comes together quickly, and is the perfect easy dessert that easily feeds a crowd. A crunch base is topped with a silky smooth chocolate salted caramel filling, and finished with an earl grey mascarpone whipped cream. #chocolatetart #saltedcaramel #earlgreywhippedcream
    Dark Chocolate Salted Caramel Ganache Tart with Chocolate Graham Cracker Crust and Earl Grey Mascarpone Whipped Cream - this chocolate tart comes together quickly, and is the perfect easy dessert that easily feeds a crowd. A crunch base is topped with a silky smooth chocolate salted caramel filling, and finished with an earl grey mascarpone whipped cream. #chocolatetart #saltedcaramel #earlgreywhippedcream
    Dark Chocolate Salted Caramel Ganache Tart with Chocolate Graham Cracker Crust and Earl Grey Mascarpone Whipped Cream - this chocolate tart comes together quickly, and is the perfect easy dessert that easily feeds a crowd. A crunch base is topped with a silky smooth chocolate salted caramel filling, and finished with an earl grey mascarpone whipped cream. #chocolatetart #saltedcaramel #earlgreywhippedcream
    Dark Chocolate Salted Caramel Ganache Tart with Chocolate Graham Cracker Crust and Earl Grey Mascarpone Whipped Cream - this chocolate tart comes together quickly, and is the perfect easy dessert that easily feeds a crowd. A crunch base is topped with a silky smooth chocolate salted caramel filling, and finished with an earl grey mascarpone whipped cream. #chocolatetart #saltedcaramel #earlgreywhippedcream

    It’s been a hot minute since I posted a chocolate tart, so I figured it was about time I fixed that. They are one of my favourite desserts to make - I’m not sure if that’s because pressing the graham cracker crust into the pan is super satisfying, or if it’s because I love how lovely and smooth they set up, or if it’s because I just love eating them so much. They are super simple to make, and can be customised any way you like to suit whatever flavour profile you are after - I love making a base tart (this but without the marshmallow is my go to) and topping it with fresh berries and cream for an easy summer twist!

    I am a bit of a creature of habit when it comes to recipes - once I get a good base recipe, I tend to stick with it, and it makes its way into a whole bunch of recipes from there. Both the crust and the filling of this tart are snuck from other recipes of mine - the salted caramel dark chocolate ganache filling first made its debut in these doughnuts, then again in macarons, and I really wanted to see if it would work as a tart filling! Spoiler alert - it’s great, a little on the sweet side, but I balanced that nicely with a well salted chocolate crust, and a super creamy earl grey mascarpone whipped cream, which I was going to pipe all fancy, but went with my default french star tip instead.

    I love flavouring whipped cream - you just have to warm it slightly, then add your flavour and let it steep, then strain it out, and chill the cream before whipping it up. I like to add mascarpoone to cream when I need it to be a little more stable - it gives it a lovely extra creamy texture, and holds its form much longer, so is also great if you need to make it ahead a little. The dark chocolate and the salted caramel in the filling go so beautifully with the earl grey in the cream, and it is all complimented perfectly by the slightly salty chocolate crust. This tart is great for feeding a crowd, as you really only need a teeny sliver of it - but I bet you catch yourself coming back for more. I had some for breakfast the other day and so can therefore confirm that it is great at any time of the day!

    A few wee tips:

    • When you are making the ganache and mixing in the cream, make sure that you don’t blend on the surface. This aerates the mixture and will make loads and loads of tiny bubbles, which isn’t ideal. I like to mix the cream into the chocolate in a pyrex jug so that there is a little bit of depth so it’s easier to avoid blending on the surface!
    • You may have a teeny bit of ganache left - pour it into a small jar or something - it makes a lovely fridge treat! You can probably pour a bit more in if you like too - I was being careful!
    • If you don’t want to make the earl grey whipped cream, plain mascarpone whipped cream will do too - just skip the step where you infuse the cream, and use 320g cream.
    • The ganache needs time to set - I like to give it overnight if I can.
    • If you don’t want a chocolate crust on this, I have a great brown butter graham cracker crust here. You can use digestive biscuits too if you can’t find grahams!
    • Ideally, you want to add the whipped cream close ish to the time you are serving!

    ❤️ Made this recipe and love it? ❤️

    I would LOVE for you to leave me a review and star rating below to let me know how you liked it! Also, please make sure to tag me on Instagram!

    Answers to your baking questions

    Over the years, many of you have asked me questions about:

    • baking in grams
    • adjusting oven temperatures
    • what kind of salt to use
    • and many more!

    I've curated and answered them all for your easy reference in this frequently asked questions post!

    Filed Under: Tarts

    Brown Butter Hazelnut Strawberry Rhubarb Crumb Bars


    Brown Butter Hazelnut Strawberry Rhubarb Crumb Bars - a brown butter hazelnut shortbread is used as both the base and the crumble topping for these strawberry rhubarb crumb bars. These are the perfect early summer easy dessert! #crumbbars #strawberryrhubarb #brownbutter
    Brown Butter Hazelnut Strawberry Rhubarb Crumb Bars - a brown butter hazelnut shortbread is used as both the base and the crumble topping for these strawberry rhubarb crumb bars. These are the perfect early summer easy dessert! #crumbbars #strawberryrhubarb #brownbutter
    Brown Butter Hazelnut Strawberry Rhubarb Crumb Bars - a brown butter hazelnut shortbread is used as both the base and the crumble topping for these strawberry rhubarb crumb bars. These are the perfect early summer easy dessert! #crumbbars #strawberryrhubarb #brownbutter
    Brown Butter Hazelnut Strawberry Rhubarb Crumb Bars - a brown butter hazelnut shortbread is used as both the base and the crumble topping for these strawberry rhubarb crumb bars. These are the perfect early summer easy dessert! #crumbbars #strawberryrhubarb #brownbutter
    Brown Butter Hazelnut Strawberry Rhubarb Crumb Bars - a brown butter hazelnut shortbread is used as both the base and the crumble topping for these strawberry rhubarb crumb bars. These are the perfect early summer easy dessert! #crumbbars #strawberryrhubarb #brownbutter
    Brown Butter Hazelnut Strawberry Rhubarb Crumb Bars - a brown butter hazelnut shortbread is used as both the base and the crumble topping for these strawberry rhubarb crumb bars. These are the perfect early summer easy dessert! #crumbbars #strawberryrhubarb #brownbutter
    Brown Butter Hazelnut Strawberry Rhubarb Crumb Bars - a brown butter hazelnut shortbread is used as both the base and the crumble topping for these strawberry rhubarb crumb bars. These are the perfect early summer easy dessert! #crumbbars #strawberryrhubarb #brownbutter

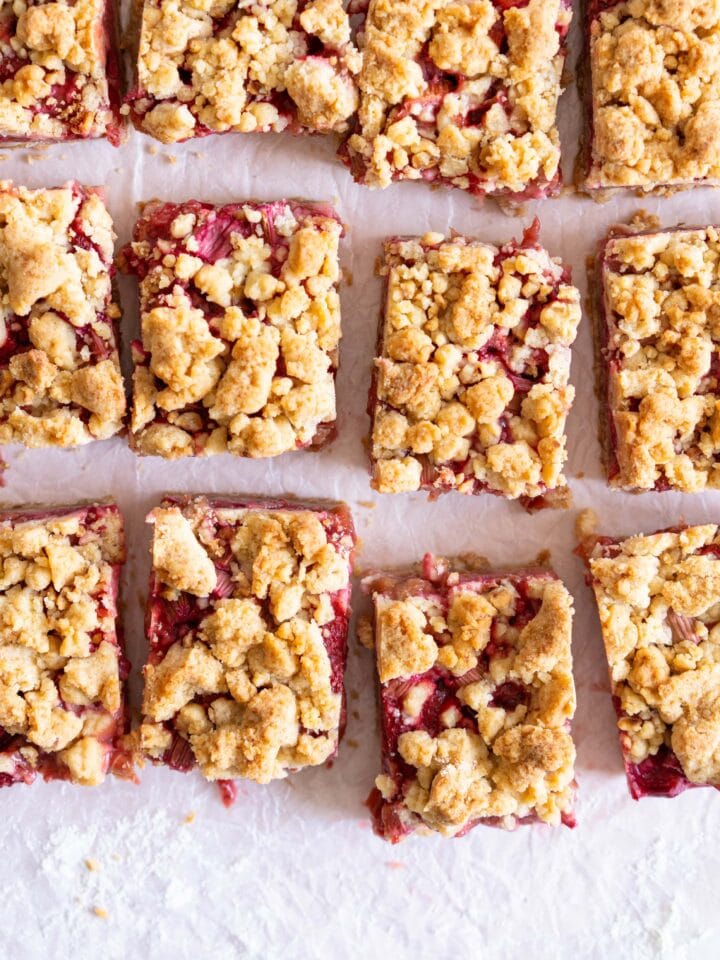
    Are you sick of Rhubarb yet? I am not. I don’t think that I will ever be, in fact. So here we are again with another rhubarb recipe - this time for Brown Butter Hazelnut Strawberry Rhubarb Crumb Bars. That sounds super fancy, but essentially I took my favourite shortbread recipe (which we used in these mini egg bars), jacked it up even more with some brown butter, then used it as both the base and the topping for these strawberry rhubarb bars. The use of the shortbread in both the base and topping gives a double dose of texture either side of the jammy fruit filling, without having to make two separate components.

    The filling for these is super simple - strawberries, rhubarb, a little sugar, and some starch to help bind things. There’s no cooking things down into a jam, it’s just the standard equation for a fruit filling I usually stick by : fruit plus sweetener plus starch. I love how rhubarb cooks down but still holds its shape in these bars - which gives not only that tartness that rhubarb is amazing for, but a little more texture than if you were to cook the fruit down prior to adding to the bars. As long as your base is cooked nicely before adding the fruit, you’re all good to avoid any sogginess.

    I kept the ratio of rhubarb to strawberry a bit higher on the rhubarb side, as I wanted the flavour to really come through. You could absolutely switch it up, but be aware that strawberries are a lot more watery than rhubarb, so you may have to tweak the quantity of starch a bit to account for that.

    I browned the butter in the shortbread, which is slightly more labour intensive than just using regular butter, but in my opinion is so, so worth it - the toasty brown butter plays off the hazelnuts and brown sugar in the shortbread base, which elevates the whole thing in the most amazing way.

    I’ve included directions on how to just use regular butter if you are a little short on time and don’t have time for the butter to cool, or would like to skip that step. These would be perfect for taking to a picnic, or as a simple dessert for a summer dinner - they are so, so good with a scoop of ice cream!

    A few wee tips:

    • This is important - each batch of brown butter will yield a slightly different amount of liquid. I have added milk into the recipe to account for the moisture loss - my brown butter came out at 180g, so I added 45g milk (to make it back up to 225g). You will need to weigh your brown butter and work out how much milk needs to be added (it’s probably around 45g) - to work this out, weigh your brown butter, then subtract the weight from 225 - that is your milk amount! Or if that’s too tricky, 45g milk will work just great too.
    • The brown butter needs a little bit of time (about 45 min) in the fridge to come back to a soft butter consistency so that you can cream it with the sugar
    • If you don’t want to brown the butter, you don’t have to, although I think it is a delicious step! If you don’t want to, you can just use 225g of unsalted butter, at room temperature, and you can leave out the milk (which accounts for the moisture loss while browning the butter)
    • I used pre-chopped hazelnuts, but if you can’t find those, finely chop some toasted hazelnuts. To toast them, place them on a baking sheet and roast for about 10 mins in the oven at 350°f / 180°c.
    • These definitely are easiest to cut once they are properly cool and have time to set - pop them in the fridge to speed this up if you need!
    • I actually shot the first test of these, before I tweaked the base a little - so it looks a little on the uncooked side. The final recipe has you cook it a little more!
    • The measurements for the fruit are taken after they were trimmed - so the ends chopped off the rhubarb, and the tops taken from the strawberries.

    ❤️ Made this recipe and love it? ❤️

    I would LOVE for you to leave me a review and star rating below to let me know how you liked it! Also, please make sure to tag me on Instagram!

    Answers to your baking questions

    Over the years, many of you have asked me questions about:

    • baking in grams
    • adjusting oven temperatures
    • what kind of salt to use
    • and many more!

    I've curated and answered them all for your easy reference in this frequently asked questions post!

    Filed Under: Fruit Bars

    Lavender Blackberry Cake with Cream Cheese Frosting and a Piped Floral Wreath


    Lavender Blackberry Cake with Cream Cheese Frosting and a Piped Floral Wreath. Layers of delicately flavoured lavender cake are filled with a cream cheese frosting and blackberry jam, and topped with a beautiful floral wreath made from piped swiss meringue buttercream flowers. #pipedflowers #lavendercake #swissmeringuebuttercream #icingonthecakebook
    Lavender Blackberry Cake with Cream Cheese Frosting and a Piped Floral Wreath. Layers of delicately flavoured lavender cake are filled with a cream cheese frosting and blackberry jam, and topped with a beautiful floral wreath made from piped swiss meringue buttercream flowers. #pipedflowers #lavendercake #swissmeringuebuttercream #icingonthecakebook
    Lavender Blackberry Cake with Cream Cheese Frosting and a Piped Floral Wreath. Layers of delicately flavoured lavender cake are filled with a cream cheese frosting and blackberry jam, and topped with a beautiful floral wreath made from piped swiss meringue buttercream flowers. #pipedflowers #lavendercake #swissmeringuebuttercream #icingonthecakebook
    Lavender Blackberry Cake with Cream Cheese Frosting and a Piped Floral Wreath. Layers of delicately flavoured lavender cake are filled with a cream cheese frosting and blackberry jam, and topped with a beautiful floral wreath made from piped swiss meringue buttercream flowers. #pipedflowers #lavendercake #swissmeringuebuttercream #icingonthecakebook
    Lavender Blackberry Cake with Cream Cheese Frosting and a Piped Floral Wreath. Layers of delicately flavoured lavender cake are filled with a cream cheese frosting and blackberry jam, and topped with a beautiful floral wreath made from piped swiss meringue buttercream flowers. #pipedflowers #lavendercake #swissmeringuebuttercream #icingonthecakebook
    Lavender Blackberry Cake with Cream Cheese Frosting and a Piped Floral Wreath. Layers of delicately flavoured lavender cake are filled with a cream cheese frosting and blackberry jam, and topped with a beautiful floral wreath made from piped swiss meringue buttercream flowers. #pipedflowers #lavendercake #swissmeringuebuttercream #icingonthecakebook
    Lavender Blackberry Cake with Cream Cheese Frosting and a Piped Floral Wreath. Layers of delicately flavoured lavender cake are filled with a cream cheese frosting and blackberry jam, and topped with a beautiful floral wreath made from piped swiss meringue buttercream flowers. #pipedflowers #lavendercake #swissmeringuebuttercream #icingonthecakebook
    Lavender Blackberry Cake with Cream Cheese Frosting and a Piped Floral Wreath. Layers of delicately flavoured lavender cake are filled with a cream cheese frosting and blackberry jam, and topped with a beautiful floral wreath made from piped swiss meringue buttercream flowers. #pipedflowers #lavendercake #swissmeringuebuttercream #icingonthecakebook
    Lavender Blackberry Cake with Cream Cheese Frosting and a Piped Floral Wreath. Layers of delicately flavoured lavender cake are filled with a cream cheese frosting and blackberry jam, and topped with a beautiful floral wreath made from piped swiss meringue buttercream flowers. #pipedflowers #lavendercake #swissmeringuebuttercream #icingonthecakebook
    Lavender Blackberry Cake with Cream Cheese Frosting and a Piped Floral Wreath. Layers of delicately flavoured lavender cake are filled with a cream cheese frosting and blackberry jam, and topped with a beautiful floral wreath made from piped swiss meringue buttercream flowers. #pipedflowers #lavendercake #swissmeringuebuttercream #icingonthecakebook
    Lavender Blackberry Cake with Cream Cheese Frosting and a Piped Floral Wreath. Layers of delicately flavoured lavender cake are filled with a cream cheese frosting and blackberry jam, and topped with a beautiful floral wreath made from piped swiss meringue buttercream flowers. #pipedflowers #lavendercake #swissmeringuebuttercream #icingonthecakebook

    Hi hi! Happy Friday! I am super excited to share this recipe from my amazing friend Tessa’s book - a Lavender Blackberry Cake with Cream Cheese Frosting and a Piped Floral Wreath. This is Tessa’s second book, and is called “Icing on the Cake”, and is filled with not only a whole lot of incredible layer cakes, but other amazing desserts - there’s macarons, pies, marshies, eclairs, tarts, the whole nine yards. It’s an incredible go-to book if you need a show stopping dessert, whether it needs to be a quickie to whip up, or a more labour intensive recipe such as this cake!

    I taught myself how to make buttercream flowers a while back, and did a quick wee 2 hour course with a friend a few years ago, and they are kind of something that I always forget that I can do, then get excited to make, spend a whole afternoon making them, get mad at myself for not making them more often because they really are learnt by repetition and I need to just sit down and make them more to learn, then do the exact opposite and not make them for ages. However, when I do sit down and take the time to do them, I am reminded how fun they are once you get the hang of them! They can be a teeny bit tricky to start off, but once you get going, they are a really fun and effective way to decorate cakes and cupcakes! I’m definitely going to make them more often if I can! I promise it’s worth all the little piping bags and couplers and tips. Tessa has a whole section in her book about how to make the different flowers, and how to pipe them directly onto cupcakes!

    The flowers are great and pretty, but the cake underneath also deserves some spotlight time - it’s so, so good! It’s a pretty simple vanilla cake, but the milk in the cake is infused with lavender, giving it a super subtle floral taste. The lavender is then emphasised in the lavender syrup which is brushed on the layers, then the whole thing is stacked up with a cream cheese frosting and a blackberry jam filling. Lavender and blackberry go so beautifully together, and cream cheese icing is just the best in literally any occasion. There’s a fine line between not being able to taste lavender in desserts and accidentally adding too much and it tasting like hand cream (I’ve done both before), but when it’s good it’s AMAZING, and Tessa has absolutely nailed this one. Congrats lady - I’m so proud, and I can’t wait to bake my way through this bad boy! x

    A few wee tips:

    • I’m not going to lie, the buttercream flowers on this take bloody ages. But, they are so, so worth it - It’s amazing seeing how you get better with practice, and I think that it’s a really fun thing to know how to do!
    • Tessa has a great tutorial on her instagram of how to make the flowers she used for this cake! I pretty much just followed that.
    • If you don’t want to pipe the flowers, Tessa has another cake topped with buttercream swirls and blobs that I love, that would also be perfect for this!
    • You need the Swiss buttercream to be slightly on the firm side for this - to help with this I kept the whisk attachment on my mixer and the bowl of buttercream in the fridge until I was ready for it, then gave it a quick whip to help smooth it out. I worked with one colour at a time. AC in your house will help too if it’s summer, but our foster cat has her bed on the AC, so we are still kinda working out how to let her know that she’s going to have to move. We aren’t there yet.
    • I made the cake and the lavender syrup the day before, which really helped to break up the process a bit.
    • Buy yourself a copy of Tessa’s book. Just do it - there’s so so many beautiful things in there!

    ❤️ Made this recipe and love it? ❤️

    I would LOVE for you to leave me a review and star rating below to let me know how you liked it! Also, please make sure to tag me on Instagram!

    Answers to your baking questions

    Over the years, many of you have asked me questions about:

    • baking in grams
    • adjusting oven temperatures
    • what kind of salt to use
    • and many more!

    I've curated and answered them all for your easy reference in this frequently asked questions post!

    Filed Under: Layer Cakes

    Mini Banana Bundt Cakes with Coffee Salted Caramel


    Banana mini bundt cakes, made in a mini brilliance pan, finished with a coffee infused salted caramel. The perfect treat to have with your coffee. #bananabundt #bananacake #coffeecaramel
    Banana mini bundt cakes, made in a mini brilliance pan, finished with a coffee infused salted caramel. The perfect treat to have with your coffee. #bananabundt #bananacake #coffeecaramel
    Banana mini bundt cakes, made in a mini brilliance pan, finished with a coffee infused salted caramel. The perfect treat to have with your coffee. #bananabundt #bananacake #coffeecaramel
    Banana mini bundt cakes, made in a mini brilliance pan, finished with a coffee infused salted caramel. The perfect treat to have with your coffee. #bananabundt #bananacake #coffeecaramel
    Banana mini bundt cakes, made in a mini brilliance pan, finished with a coffee infused salted caramel. The perfect treat to have with your coffee. #bananabundt #bananacake #coffeecaramel
    Banana mini bundt cakes, made in a mini brilliance pan, finished with a coffee infused salted caramel. The perfect treat to have with your coffee. #bananabundt #bananacake #coffeecaramel
    Banana mini bundt cakes, made in a mini brilliance pan, finished with a coffee infused salted caramel. The perfect treat to have with your coffee. #bananabundt #bananacake #coffeecaramel

    I am an absolute shocker at buying bananas and then not eating them, which results in more banana baked goods than bananas being eaten in this household. I always have good intentions to make smoothies, or have them as a snack with some nut butter (which I love, I just always forget), so they inevitably end up weird and spotty, and I bake with them. It’s not the worst problem to have, seeing as I am married to someone with a banana bread addiction, so we always have some on hand in the freezer, pre-sliced, so rich can just pop it in the toaster when the need arises.

    I’ve been wanting to work on a banana bundt cake for a while now, and a week or so ago we had an intense backlog of brown bananas, so I started testing. The testing process was actually quite quick, as my go-to banana cake recipe, which I use for a regular layer cake (super old photos, please excuse) and also a sheet cake, bundted like a champ, and I hardly had to make any tweaks. It’s always a little hit and miss when you try baking a recipe you know in a bundt pan - it either is a spectacular fail (like the first test of this cake), or it works first time and all is right with the world (this devil’s food bundt did exactly that and it was just the best day ever).

    I topped these mini banana bundt cakes with a coffee caramel - infusing caramel is super easy as it is cream based, so to inject flavour all you have to do is infuse the cream. This time I steeped it with some coffee, and it came out great. Always remember that the flavour will be diluted once it is made into a caramel - I always get a bit worried for a second when the cream is super strong! The caramel was so lovely against the banana, and the coffee flavour complimented it perfectly. You definitely don’t need a caramel topping, but it looks amazing and is a little something extra!

    I originally tested this in a regular sized bundt pan (I used this one), and it worked great, so if you don’t have these mini babies, then you can double the recipe - I have popped some instructions in the notes.

    A few wee tips:

    • I made a single batch of this recipe twice so that I had 12 little cakes. I found flour settled in the grooves, so I just used some baking spray to help prevent sticking. I used this pan!
    • If you would like, you can double it and put it in a 10 cup bundt pan (I tested it in this), and bake for 55-60 minutes. Leave to stand for 10 min before turning out. Make sure the pan is well greased with baking spray and flour.
    • I like to give the caramel an overnight rest, which means it will likely have to be microwaved to get to the right texture once you are ready to use it, but if you like you can also make it before you make the cakes and leave it to cool while you bake them - if you put it in a shallow container to cool (rather than a jar) it will cool quicker because it has more surface area! I usually just pop it in a jar and leave in the fridge overnight because #lazy.
    • You want your bananas to be waaay on the ripe side for this if possible. Like, if you look at them and are like “ooooh that’s almost rotten” - that’s great. Regular spotty bananas work too!
    • This recipe has a slightly weird step in it - it gets you to dissolve baking soda in milk. This is how I’ve always done it, because this cake is adapted from the banana cake I grew up on. I think it may be to reduce the risk of baking soda bombs in the cake (when you bite into a lump), I guess NZ bakers are bad at sifting their baking soda, or it is to help it disperse? Anyway, it’s there because that’s how I’ve always done it, would love to know if you know the reason! If you don’t want to do this step you can probably just add the baking soda to the dry ingredients, and add the milk along with the vanilla and banana.

    ❤️ Made this recipe and love it? ❤️

    I would LOVE for you to leave me a review and star rating below to let me know how you liked it! Also, please make sure to tag me on Instagram!

    Answers to your baking questions

    Over the years, many of you have asked me questions about:

    • baking in grams
    • adjusting oven temperatures
    • what kind of salt to use
    • and many more!

    I've curated and answered them all for your easy reference in this frequently asked questions post!

    Filed Under: Bundt Cakes, Cupcakes and Mini Cakes

    Strawberry Balsamic Pie

    This homemade strawberry balsamic pie is perfect to take to a summer bbq as an easy dessert, and it is fairly quick to put together thanks to strawberries being fairly no-fuss when it comes to prep. The sweet fruit goes so well with the flaky crust, and then the balsamic vinegar rounds everything out.

    Strawberry Balsamic Pie - sweet strawberries are balanced out by Balsamic Vinegar, then wrapped up in a super flaky pie crust. Strawberry pie is the perfect summer dessert, is easy to make, and is ideal for taking along to an evening bbq or gathering. #strawberrypie #strawberrybalsamic #summerpie
    Strawberry Balsamic Pie - sweet strawberries are balanced out by Balsamic Vinegar, then wrapped up in a super flaky pie crust. Strawberry pie is the perfect summer dessert, is easy to make, and is ideal for taking along to an evening bbq or gathering. #strawberrypie #strawberrybalsamic #summerpie
    Strawberry Balsamic Pie - sweet strawberries are balanced out by Balsamic Vinegar, then wrapped up in a super flaky pie crust. Strawberry pie is the perfect summer dessert, is easy to make, and is ideal for taking along to an evening bbq or gathering. #strawberrypie #strawberrybalsamic #summerpie
    Strawberry Balsamic Pie - sweet strawberries are balanced out by Balsamic Vinegar, then wrapped up in a super flaky pie crust. Strawberry pie is the perfect summer dessert, is easy to make, and is ideal for taking along to an evening bbq or gathering. #strawberrypie #strawberrybalsamic #summerpie
    Strawberry Balsamic Pie - sweet strawberries are balanced out by Balsamic Vinegar, then wrapped up in a super flaky pie crust. Strawberry pie is the perfect summer dessert, is easy to make, and is ideal for taking along to an evening bbq or gathering. #strawberrypie #strawberrybalsamic #summerpie
    Strawberry Balsamic Pie - sweet strawberries are balanced out by Balsamic Vinegar, then wrapped up in a super flaky pie crust. Strawberry pie is the perfect summer dessert, is easy to make, and is ideal for taking along to an evening bbq or gathering. #strawberrypie #strawberrybalsamic #summerpie
    Strawberry Balsamic Pie - sweet strawberries are balanced out by Balsamic Vinegar, then wrapped up in a super flaky pie crust. Strawberry pie is the perfect summer dessert, is easy to make, and is ideal for taking along to an evening bbq or gathering. #strawberrypie #strawberrybalsamic #summerpie

    Strawberries are definitely on the sweet side, so when I bake with them I like to balance them out with something either tart or acidic, which is why you so often see them paired with rhubarb. Instead of using rhubarb, in order to really let the strawberry flavour shine through, I balanced out the sweetness with a little Balsamic Vinegar of Modena. It is the perfect pairing - the balsamic balances out the sweetness of the strawberries just enough, while not taking away from the flavour. The first test I found was a little soggy for my liking - strawberries are about 92% water, similar to that of watermelon, so you either need to remove some of the liquid, or add more starch than you think, or a combination of both, to avoid a sog fest! I went for a wee combo of both - macerating the strawberries to help draw out some moisture (which makes a super yum strawberry syrup), and then using more starch than I would for an apple or stone fruit pie.

    I gave this a pretty easy lattice - using a multi-wheeled cutter (which I think is a pasta cutter), I just cut loads of strips, and used three small strips in the place of one larger strip when making my lattice. This is a super easy way to switch things up a little when it comes to latticing, without having to worry about any fancy weaving techniques or braiding. I think it is going to be my new go to, just like this pie! Happy pie making! x

    A few wee tips:

    • I have included a recipe for a regular double crust pie here, but I sometimes like making a little extra so that I don’t have to worry about running out of crust - so if you like, you can make a 1.5x of the recipe to have some wiggle room.
    • I found that the first time I made this, it was a little on the soggy side, so I included a step of macerating the berries a little in some sugar to help draw out some excess moisture. I found 15 min was enough, but you can leave them up to an hour.
    • Berry pies do tend to be a bit wetter than other fruit pies, so make sure that your bottom crust is nice and thick, and gets nicely cooked - having the pie near the bottom of the oven at the start of the baking process helps this a lot.
    • Ideally, you want to give your dough an overnight rest so that it is easy to work with, but a few hours works in a pinch.
    • I like using a wee tip that my friend Erin taught me to make the pie dough nice and smooth and easy to work with. I make the dough, shape it into two rectangles, rest it in the fridge wrapped for about an hour, then remove it and roll it out into a rectangle on a lightly floured surface. I then give it a letter fold (as you would a letter), roll out to a rectangle, letter fold again, then roll out slightly, and shape into a disc or a rectangle (I usually do a disc for the bottom crust and a rectangle for the piece I will use for a lattice). I then re-wrap it, and leave it to rest overnight. This makes the dough more homogenous without compromising the flaky texture that you want in the pie dough, and it makes it a total dream to work with. For me, it’s a game changer.
    • You want to let this cool completely before slicing, or it’s going to juice everywhere. Trust me on this.
    • Don’t bake this without a sheet pan underneath. Strawberries are juicy, and will very likely leak. A sheet pan helps catch everything nicely and avoid an oven disaster.

    ❤️ Made this recipe and love it? ❤️

    I would LOVE for you to leave me a review and star rating below to let me know how you liked it! Also, please make sure to tag me on Instagram!

    Answers to your baking questions

    Over the years, many of you have asked me questions about:

    • baking in grams
    • adjusting oven temperatures
    • what kind of salt to use
    • and many more!

    I've curated and answered them all for your easy reference in this frequently asked questions post!

    Filed Under: Fruit Pies

    Lemon Crullers with Lemon and Honey Glaze


    Lemon Crullers with Lemon and Honey Glaze - Fluffy, crispy lemon scented crullers are dipped in a lemon and honey glaze and finished with delicate gold leaf. Crullers are made by frying choux dough, and are a must-try if you haven't made them before! #crullers #doughnut #lemoncruller
    Lemon Crullers with Lemon and Honey Glaze - Fluffy, crispy lemon scented crullers are dipped in a lemon and honey glaze and finished with delicate gold leaf. Crullers are made by frying choux dough, and are a must-try if you haven't made them before! #crullers #doughnut #lemoncruller
    Lemon Crullers with Lemon and Honey Glaze - Fluffy, crispy lemon scented crullers are dipped in a lemon and honey glaze and finished with delicate gold leaf. Crullers are made by frying choux dough, and are a must-try if you haven't made them before! #crullers #doughnut #lemoncruller
    Lemon Crullers with Lemon and Honey Glaze - Fluffy, crispy lemon scented crullers are dipped in a lemon and honey glaze and finished with delicate gold leaf. Crullers are made by frying choux dough, and are a must-try if you haven't made them before! #crullers #doughnut #lemoncruller
    Lemon Crullers with Lemon and Honey Glaze - Fluffy, crispy lemon scented crullers are dipped in a lemon and honey glaze and finished with delicate gold leaf. Crullers are made by frying choux dough, and are a must-try if you haven't made them before! #crullers #doughnut #lemoncruller
    Lemon Crullers with Lemon and Honey Glaze - Fluffy, crispy lemon scented crullers are dipped in a lemon and honey glaze and finished with delicate gold leaf. Crullers are made by frying choux dough, and are a must-try if you haven't made them before! #crullers #doughnut #lemoncruller
    Lemon Crullers with Lemon and Honey Glaze - Fluffy, crispy lemon scented crullers are dipped in a lemon and honey glaze and finished with delicate gold leaf. Crullers are made by frying choux dough, and are a must-try if you haven't made them before! #crullers #doughnut #lemoncruller
    Lemon Crullers with Lemon and Honey Glaze - Fluffy, crispy lemon scented crullers are dipped in a lemon and honey glaze and finished with delicate gold leaf. Crullers are made by frying choux dough, and are a must-try if you haven't made them before! #crullers #doughnut #lemoncruller

    Hi hi! Continuing on my ‘must fry everything’ kick from last week, I am super jazzed to share this lemon cruller recipe with a super simple lemon and honey glaze. If you haven’t had a cruller before they are essentially fried choux dough (same as what is used for eclairs, which I still need to make), and they are ridiculously delicious. The great part about making choux dough is that you can make a whole bunch of different things all in one go, and it freezes super well, so if you don’t want 14 crullers all at once (not the worst thing to have happened to me), you can freeze some, or pipe some out into cream puffs or eclairs, and have a whole little choux family!

    I kept things nice and easy this time, adding a little lemon zest to the choux dough, and dipping them in a lemon and honey glaze. My initial batch I was having super intense sog issues with, which I realised was from adding honey to the dough - the sugar was causing them to brown too fast, leaving me with an undercooked inside, soggy crullers, and seriously bummed out. Once I realised that I needed to nix the honey in the dough itself and just keep it in the glaze, and up the oil temp a bit, we were away laughing!

    Like I mentioned earlier, I recently got a new deep fryer, which I am finding super useful to make doughnuts, as it saves a whole lot of fluffing around with oil temperatures. However, until now I had just been using a dutch oven and a thermometer, and it worked great - you just have to make sure that you are checking the oil between each batch. It may help to fry less at a time too to help you control this. Both methods work great!

    A few wee tips:

    • I have included an extra 'just in case' egg in the ingredients. The reason that this is in there, is that sometimes you need to add extra egg to the pastry if necessary. You want the mixture to be at a consistency where if you dip in the beater of the mixer, the batter will form a 'v' shape and eventually break off. If it is too stiff, and breaks off very quickly, you may need to add another beaten egg, and mix again, before performing the test. 
    • I started making these by drawing a circle on each square of parchment paper, which takes way longer than it needs to. I watched a video and had a small mind blowing revelation - instead of drawing on each individual square of parchment, you draw on one, then use that as a template. When you pipe, you place the piece of parchment you are going to use over the master template, then pipe a circle, following the template, then pop it onto the sheet pan, and place the next piece over the master template. This way you only have to draw one circle, which you use over and over! Game changer.
    • Make sure that you do a test cruller when it comes to frying - if the oil is too cool they will go soggy or not cook properly inside, causing them to collapse. Test one, then take it out of the oil and rest for a few minutes to ensure that it does not collapse. If it does, it is not properly cooked inside - either increase your cooking time, or increase your oil temperature.

    ❤️ Made this recipe and love it? ❤️

    I would LOVE for you to leave me a review and star rating below to let me know how you liked it! Also, please make sure to tag me on Instagram!

    Answers to your baking questions

    Over the years, many of you have asked me questions about:

    • baking in grams
    • adjusting oven temperatures
    • what kind of salt to use
    • and many more!

    I've curated and answered them all for your easy reference in this frequently asked questions post!

    Filed Under: Choux, Doughnuts

    Sesame Macarons

    Sesame Macarons Two Ways - Chocolate Macarons with Salted Caramel Tahini Milk Chocolate Ganache and Sesame Brittle, and Vanilla Bean Macarons with Coffee German Buttercream and Halva. These two 'variations on a theme' show off the amazing versatility of tahini - a silky tahini chocolate ganache, and a halva stuffed macaron. #frenchmacarons #glutenfree #macarons
    Sesame Macarons Two Ways - Chocolate Macarons with Salted Caramel Tahini Milk Chocolate Ganache and Sesame Brittle, and Vanilla Bean Macarons with Coffee German Buttercream and Halva. These two 'variations on a theme' show off the amazing versatility of tahini - a silky tahini chocolate ganache, and a halva stuffed macaron. #frenchmacarons #glutenfree #macarons
    Sesame Macarons Two Ways - Chocolate Macarons with Salted Caramel Tahini Milk Chocolate Ganache and Sesame Brittle, and Vanilla Bean Macarons with Coffee German Buttercream and Halva. These two 'variations on a theme' show off the amazing versatility of tahini - a silky tahini chocolate ganache, and a halva stuffed macaron. #frenchmacarons #glutenfree #macarons
    Sesame Macarons Two Ways - Chocolate Macarons with Salted Caramel Tahini Milk Chocolate Ganache and Sesame Brittle, and Vanilla Bean Macarons with Coffee German Buttercream and Halva. These two 'variations on a theme' show off the amazing versatility of tahini - a silky tahini chocolate ganache, and a halva stuffed macaron. #frenchmacarons #glutenfree #macarons
    Sesame Macarons Two Ways - Chocolate Macarons with Salted Caramel Tahini Milk Chocolate Ganache and Sesame Brittle, and Vanilla Bean Macarons with Coffee German Buttercream and Halva. These two 'variations on a theme' show off the amazing versatility of tahini - a silky tahini chocolate ganache, and a halva stuffed macaron. #frenchmacarons #glutenfree #macarons
    Sesame Macarons Two Ways - Chocolate Macarons with Salted Caramel Tahini Milk Chocolate Ganache and Sesame Brittle, and Vanilla Bean Macarons with Coffee German Buttercream and Halva. These two 'variations on a theme' show off the amazing versatility of tahini - a silky tahini chocolate ganache, and a halva stuffed macaron. #frenchmacarons #glutenfree #macarons
    Sesame Macarons Two Ways - Chocolate Macarons with Salted Caramel Tahini Milk Chocolate Ganache and Sesame Brittle, and Vanilla Bean Macarons with Coffee German Buttercream and Halva. These two 'variations on a theme' show off the amazing versatility of tahini - a silky tahini chocolate ganache, and a halva stuffed macaron. #frenchmacarons #glutenfree #macarons
    Sesame Macarons Two Ways - Chocolate Macarons with Salted Caramel Tahini Milk Chocolate Ganache and Sesame Brittle, and Vanilla Bean Macarons with Coffee German Buttercream and Halva. These two 'variations on a theme' show off the amazing versatility of tahini - a silky tahini chocolate ganache, and a halva stuffed macaron. #frenchmacarons #glutenfree #macarons
    Sesame Macarons Two Ways - Chocolate Macarons with Salted Caramel Tahini Milk Chocolate Ganache and Sesame Brittle, and Vanilla Bean Macarons with Coffee German Buttercream and Halva. These two 'variations on a theme' show off the amazing versatility of tahini - a silky tahini chocolate ganache, and a halva stuffed macaron. #frenchmacarons #glutenfree #macarons

    Hi hi! Just popping in to share the recipe for sesame macarons two ways - Tahini and chocolate ganache filled, and a coffee and halva macaron!

    I made a salted caramel milk chocolate ganache a while back and used it to fill doughnuts, and have been thinking about how I can incorporate it into a mac filling. The great thing about a ganache is that it is cream based, so you can very easily add in anything to the cream which will flavour it - tea, miso, etc etc. I stirred a solid amount of tahini into the cream before proceeding with the rest of the ganache, and it added the most incredible depth of flavour. Tahini and chocolate is such an amazing combination, and paired perfectly with a lightly chocolate flavoured mac shell. We finished them off with a sesame brittle Jase happened to have in his pantry, which was the best co-incidence but also the perfect pairing, as the sesame seeds provided an amazing crunchy texture which stood up perfectly against the silky ganache.

    The second mac we dusted with cocoa powder before baking, and filled with one of my fave things ever - coffee German buttercream, which we amped up a little with a piece of coffee halva inside each macaron. I could go on and on about how much I love Coffee German buttercream, but I won’t - just make it. It is SO GOOD, and so delicious against the chewy mac shell.

    I think you’ll be seeing a bunch more of these variation on a theme posts from now - they are super fun to come up with, and extra fun to shoot! Of course you don’t have to make both flavours, but we all love options!

    A few wee tips:

    • All my best mac tips are here!
    • The Sesame brittle on the chocolate macs is totally optional but a lovely crunchy element - we added it to only some to give some visual variation and I loved how it looked!
    • If you wanted to just do a regular salted caramel milk chocolate ganache in the macs, use this recipe - I would drop the cream to 500g
    • The ganache definitely needs some time to set up - overnight is best, and if you can, make the brittle and the pastry cream for the coffee buttercream the day before too.
    • The Chocolate tahini ganache ideally needs to be kept in the fridge, so store your finished macs in the fridge until ready to eat, then let sit at room temp to warm up slightly!

    ❤️ Made this recipe and love it? ❤️

    I would LOVE for you to leave me a review and star rating below to let me know how you liked it! Also, please make sure to tag me on Instagram!

    Answers to your baking questions

    Over the years, many of you have asked me questions about:

    • baking in grams
    • adjusting oven temperatures
    • what kind of salt to use
    • and many more!

    I've curated and answered them all for your easy reference in this frequently asked questions post!

    Filed Under: Macarons Tagged With: Gluten Free

    Five layer cakes, two days, and one tiny NYC apartment


    Five layer cakes, two days, and one tiny NYC apartment  - tips and tricks for making a whole bunch of cakes all at once over the course of two days #weddingcake #layercake #deconstructedweddingcake
    Five layer cakes, two days, and one tiny NYC apartment  - tips and tricks for making a whole bunch of cakes all at once over the course of two days #weddingcake #layercake #deconstructedweddingcake
    Five layer cakes, two days, and one tiny NYC apartment  - tips and tricks for making a whole bunch of cakes all at once over the course of two days #weddingcake #layercake #deconstructedweddingcake
    Five layer cakes, two days, and one tiny NYC apartment  - tips and tricks for making a whole bunch of cakes all at once over the course of two days #weddingcake #layercake #deconstructedweddingcake
    Five layer cakes, two days, and one tiny NYC apartment  - tips and tricks for making a whole bunch of cakes all at once over the course of two days #weddingcake #layercake #deconstructedweddingcake

    I got to do a really special thing last weekend - I made cakes for our friend’s wedding. Our good friends got married, and when we heard that they were engaged, I offered to make cakes for them! It’s such a fun thing to do for friends, and I got a zillion questions about my process, so I decided to pop it all here so I have a place to direct people! Rich said multiple times throughout the process “I can’t believe how chill you are about this” (Usually I’m super stressed and panicky about literally everything I do in my life, ever), which I think came down to the planning I did leading up. I planned a lot throughout the week, but did the majority of the workload across two days.

    We changed things up a little from the traditional tiered wedding cake, and instead went for five individual cakes. There were 100 guests at the wedding, so I did four 8” cakes, and one larger 10” cake to make sure there would be enough. The great part about having a site with loads of recipes on it that you know is that I can direct people here, and get them to choose from the recipes I already have. They chose a whole bunch of different cakes, which was not only super fun to make, but looked amazing all lined up at the venue! I have a good sized collection of Aheirloom cake stands, so I used them to keep some continuity, but I think this would look so pretty with a whole range of different cake stands too. Cake tables for the win. They were such a huge hit, and I am so honoured to be have been included in our friend’s day! Congrats Damon and April! x

    I wanted to leave all my wee tips and tricks I could think of here just in case they are helpful! One thing that REALLY helped is that we have a walk in fridge in our reception of our building (So weird, but SO convenient), so I was able to put two of the cakes down there overnight, which helped loads. Clearing out your fridge would work well too, or borrowing a friend’s fridge space! Just make sure the cakes have time to chill before you transport them. You want them to be nice and cold so that you don’t have to worry about any meltage.

    Here are the cakes that we ended up with (in the order they are pictured)

    • Earl Grey Cake with Marmalade filling and Vanilla Bean German Buttercream
    • This cake, with a double batch of the buttercream, and a store bought marmalade, decorated in the style of this cake.
    • Vanilla Bean Layer Cake with Passionfruit Curd and Vanilla Bean Swiss Meringue buttercream
    • I didn’t make any switches in this recipe - I just used this one from my site.
    • Chocolate Mud Cake with Cherry Filling and Vanilla Bean Swiss Meringue Buttercream
    • This one was twin peaks inspired (I haven’t seen it before!), so I did a 1.5 x of this cake, which I baked into 3 x 8” pans, and then cut each cake into two, giving me six layers. I swapped the gluten free flour called for in the recipe for regular flour as it was not required to be gluten free. I then filled it with a store bought Cherry Jam, and finished it with Vanilla Swiss Meringue Buttercream, which I coloured hot pink. This cake also had a sprinkle twin peaks inspired top and sprinkles on the sides - I used sprinkles from Sprinkle Pop Shop.
    • Dairy Free Lemon Cake with Dairy Free Lemon Curd and Torched Meringue
    • The Bride’s Mum is Dairy Free, so I tweaked this recipe a little - I used vegan butter in the curd, and cashew yoghurt in the cake, and it turned out amazing! I then made a quick powdered sugar based buttercream (american buttercream, half this recipe but with vegan butter and no milk or coconut would work great) to stack the cake, then chilled overnight and then covered the day of with swiss meringue, which I torched.
    • Devil’s Food Cake with Hazelnut Chocolate Frosting and Salted Chocolate German Buttercream
    • This cake, doubled and baked in 3 x 10” layers (make sure you have a massive bowl), filled with one batch of this frosting and layered and stacked with a double batch of this German Buttercream

    My Timeline:

    Monday: Make a list of all the cakes, all the fillings, all the buttercreams, and work out what I am going to need for each.
    Tuesday: Make a shopping list, and either do the shop, or order everything to be delivered via online shopping (I went for online shopping, because NYC life)
    Wednesday: Get shopping delivered, organise all your groceries, clear out space in your fridge, make a game plan, make any fillings that can be done ahead such as your curd fillings
    Thursday: Make alllll the layers. Cool completely, level off, and store in the fridge overnight. Make any buttercream bases (German buttercream you can make the pastry cream the day before as it ideally needs time to cool)
    Friday: Make all of your buttercreams, stack and frost the cakes, chill overnight (The overnight chill makes the transport part much less stressful as you know that all your cakes are well chilled).
    Saturday: Make any last touch ups, cover the lemon cake with meringue and torch (It will weep if left too long so I did it the day of), transport to the venue!

    A few wee tips:

    • You can make your life easier by doing things like making all of the pastry cream for the german buttercream at once, and then portioning it out to whip up individual batches. I think I did a quadruple batch of the buttercream needed to make this cake, cooled it all in one container, and then weighed it, and used as much as I needed for one batch at a time. It means you aren’t making pastry cream a whole bunch of times, just once.
    • I used Acrylic cake discs which I got Rich to cut me on the laser cutter, but cardboard cake boards work great too. I used one that was the size of the cake, and then another which was two inches larger, stuck down with double sided tape, which made moving the cakes around super easy.
    • I popped some milkshake straws through the largest cake just to help give it some stability. Poke them down into the cake, then measure how long they need to be, and snip them off then poke them back into the cake
    • Give yourself a SOLID buffer. Like, a whole day’s worth if you can. I know someone quite well (spoiler alert - it’s me) who has had multiple cake disasters in the back seats of ubers where improperly chilled cakes had total structural blowouts. It’s not cute. Leave time to chill your cakes, and to organise all the last minute bits and bobs. I think this was key to me being a bit chill!

    Please feel free to leave any questions or things I may have missed below - always happy to help! x


    Filed Under: Layer Cakes

    Philadelphia Style Raspberry Ripple Ice Cream Pops with White Chocolate Magic Shell


    A simple stir together raspberry philadelphia style ice-cream base is churned then elevated with a raspberry ripple, before being frozen into ice cream pops and finished with a super easy white chocolate magic shell and loads of sprinkles. The perfect fancy treat for summer just around the corner - these last for a long time in the freezer so are great to have on hand when the ice cream craving strikes! #icecreampop #raspberryicecream #raspberrywhitechocolate
    A simple stir together raspberry philadelphia style ice-cream base is churned then elevated with a raspberry ripple, before being frozen into ice cream pops and finished with a super easy white chocolate magic shell and loads of sprinkles. The perfect fancy treat for summer just around the corner - these last for a long time in the freezer so are great to have on hand when the ice cream craving strikes! #icecreampop #raspberryicecream #raspberrywhitechocolate
    A simple stir together raspberry philadelphia style ice-cream base is churned then elevated with a raspberry ripple, before being frozen into ice cream pops and finished with a super easy white chocolate magic shell and loads of sprinkles. The perfect fancy treat for summer just around the corner - these last for a long time in the freezer so are great to have on hand when the ice cream craving strikes! #icecreampop #raspberryicecream #raspberrywhitechocolate
    A simple stir together raspberry philadelphia style ice-cream base is churned then elevated with a raspberry ripple, before being frozen into ice cream pops and finished with a super easy white chocolate magic shell and loads of sprinkles. The perfect fancy treat for summer just around the corner - these last for a long time in the freezer so are great to have on hand when the ice cream craving strikes! #icecreampop #raspberryicecream #raspberrywhitechocolate
    A simple stir together raspberry philadelphia style ice-cream base is churned then elevated with a raspberry ripple, before being frozen into ice cream pops and finished with a super easy white chocolate magic shell and loads of sprinkles. The perfect fancy treat for summer just around the corner - these last for a long time in the freezer so are great to have on hand when the ice cream craving strikes! #icecreampop #raspberryicecream #raspberrywhitechocolate
    A simple stir together raspberry philadelphia style ice-cream base is churned then elevated with a raspberry ripple, before being frozen into ice cream pops and finished with a super easy white chocolate magic shell and loads of sprinkles. The perfect fancy treat for summer just around the corner - these last for a long time in the freezer so are great to have on hand when the ice cream craving strikes! #icecreampop #raspberryicecream #raspberrywhitechocolate
    A simple stir together raspberry philadelphia style ice-cream base is churned then elevated with a raspberry ripple, before being frozen into ice cream pops and finished with a super easy white chocolate magic shell and loads of sprinkles. The perfect fancy treat for summer just around the corner - these last for a long time in the freezer so are great to have on hand when the ice cream craving strikes! #icecreampop #raspberryicecream #raspberrywhitechocolate

    Hiii! Sorry it’s been a bit more quiet around here than usual - things got a bit busy, and I dropped the ball on my regular posting I was doing so well with! We had a couple of hectic weeks, which meant I burnt through the backlog of posts I like to have as a wee buffer, annnnnd suddenly I had nothing to post! Whoopsies. I spent last week making our good friend’s wedding cakes (there were five layer cakes), and I can’t wait to share them all with you - I shot all of them and will write up a few things I learnt along the way in terms of time management and recipe planning for if you ever also want to make five cakes in two days in a shoebox apartment!

    This recipe is a bit more simple than five layer cakes in two days, and it’s one I have had knocking round in my head for a while now - raspberry and white chocolate ice cream pops! I got a fancy set of ice cream moulds last year (if you get them, be aware that a ‘set of two’ as listed gives you four pops worth, so don’t get 3 sets like me and end up with 12), and I love love love how they look and the shape that they give the ice cream, so I have been itching to use them again!

    I also discovered philadelphia style ice cream last year by way of David Leibovitz’s book and I am low key obsessed with it. It churns up super creamy (and super white), and doesn’t require the making of a custard base. I upped the flavour by adding some freeze dried raspberry powder, then added a raspberry ripple made with frozen raspberries which I turned into a sauce and reduced down. Once they were frozen I dipped them in a white chocolate magic shell, which is super easy to make - you essentially just melt together white chocolate and a neutral oil, and it sets amazingly smoothly and solidly on the pops. I love the flavour of the raspberry ice cream, and the ripple gives a delicious variaton in texture, and you really can’t go past a snappy white chocolate shell to tie everything together.

    A few wee tips:

    • These are great even without the raspberry sauce, but if you want to take the extra time, it’s a super delicious step! You may end up with a bit extra, but it is amazing on ice cream.
    • You need an ice cream maker for this - mine connects to my stand mixer. Make sure that you freeze the bowl overnight first.
    • I found the easiest way to get the ripple into the ice cream was to pop it into a piping bag fitted with a bismarck tip, and kind of inject it in. If you don’t have an open top ice cream pop mould you could also stir some of the raspberry sauce through to make a ripple, then add it to your moulds.
    • If you wanted to make this just as a regular ice cream, you could layer the ice cream base and the raspberry sauce in a loaf pan with some white chocolate chips, and then swirl everything together to have it as a scoopable ice cream.
    • These are the pop moulds that I use! They are silicone, and they release so, so nicely!
    • I loaded these up with sprinkles - I used these ones from Sprinkle Pop!

    ❤️ Made this recipe and love it? ❤️

    I would LOVE for you to leave me a review and star rating below to let me know how you liked it! Also, please make sure to tag me on Instagram!

    Answers to your baking questions

    Over the years, many of you have asked me questions about:

    • baking in grams
    • adjusting oven temperatures
    • what kind of salt to use
    • and many more!

    I've curated and answered them all for your easy reference in this frequently asked questions post!

    Filed Under: Ice Cream Pops

    Nutella Chocolate Bundt Cake


    Nutella Chocolate Bundt Cake - this easy stir together bundt cake would be perfect for Mother's day or for any time that you need a sweet treat. It comes together super quickly, and is the perfect density thanks to the sour cream and nutella in the recipe. No mixer required - this one is a total crowd pleaser. #nutella #chocolatebundt #bundtcake
    Nutella Chocolate Bundt Cake - this easy stir together bundt cake would be perfect for Mother's day or for any time that you need a sweet treat. It comes together super quickly, and is the perfect density thanks to the sour cream and nutella in the recipe. No mixer required - this one is a total crowd pleaser. #nutella #chocolatebundt #bundtcake
    Nutella Chocolate Bundt Cake - this easy stir together bundt cake would be perfect for Mother's day or for any time that you need a sweet treat. It comes together super quickly, and is the perfect density thanks to the sour cream and nutella in the recipe. No mixer required - this one is a total crowd pleaser. #nutella #chocolatebundt #bundtcake
    Nutella Chocolate Bundt Cake - this easy stir together bundt cake would be perfect for Mother's day or for any time that you need a sweet treat. It comes together super quickly, and is the perfect density thanks to the sour cream and nutella in the recipe. No mixer required - this one is a total crowd pleaser. #nutella #chocolatebundt #bundtcake
    Nutella Chocolate Bundt Cake - this easy stir together bundt cake would be perfect for Mother's day or for any time that you need a sweet treat. It comes together super quickly, and is the perfect density thanks to the sour cream and nutella in the recipe. No mixer required - this one is a total crowd pleaser. #nutella #chocolatebundt #bundtcake
    Nutella Chocolate Bundt Cake - this easy stir together bundt cake would be perfect for Mother's day or for any time that you need a sweet treat. It comes together super quickly, and is the perfect density thanks to the sour cream and nutella in the recipe. No mixer required - this one is a total crowd pleaser. #nutella #chocolatebundt #bundtcake

    I think it’s safe to say that bundt cakes and I are friends now. Although they can be a wee bit tricky to get sorted recipe testing wise (the last few have really taken me for a run), they are so satisfying once the recipe is nailed - the pan does all the fancy work for you, and they are often fairly uncomplicated to make (I have a few doozys coming your way though), which makes them a great back pocket recipe if you need to make something in a pinch. They also make a solid amount of cake - a bundt cake usually serves at least 8-10 people, or my full sized husband over the course of a few days, who seems to eat baked goods as if i’ve never baked for him before.

    This is a pretty simple chocolate bundt cake. I took King Arthur’s recipe, which I have made a few times, and made a few tweaks - upping the cocoa a touch and adding in some Nutella. The recipe is the perfect density, and is nice and moist from the sour cream in the recipe, and the chocolate really shines from the addition of strong coffee. The Nutella lent another layer of fudginess, which was the perfect finisher. It’s not overly forward on the Nutella flavour but - this cake doesn’t need a glaze, although Rich would like me to tell you that he made a double of this icing recipe, spread it on thick, then drowned it in sprinkles and it was amazing, even if it does feel like your teeth are going to dissolve from the sugar. I added chocolate chips the first time and definitely don’t recommend it - they all sink and things get super weird.

    I used this pan for this cake - I love the pattern on it, and the cake released easily. Any 10 cup bundt pan will work though! I find that the key to the cake releasing nicely is to grease the pan well (the baking spray with flour in it works a charm), and using a recipe which is dense enough. I’ve had some shockers with testing and the recipe not being dense enough - there’s nothing that bums you out more than half the cake still being in the pan.

    A few wee tips:

    • I used two shots of coffee for the recipe because I wanted the coffee to really help the chocolate shine - I just used a nespresso machine and did two long shots. Make sure that you weigh it to make sure it’s the correct quantity.
    • I used regular nutella in this, but if you have the time, a homemade chocolate hazelnut spread would be so good, or any other nutella alternative! You can also absolutely leave it out if you want!
    • Another key to getting the cake to pop out nicely is the cooling time. 10 minutes is perfect - set the timer when you bring the cake out of the oven, then carefully turn it out onto a rack and let it cool completely.
    • I like to let the batter sit for 5 mins in the bowl to help release any additional bubbles. During this time I grease the pan - you don’t want to grease too early, or the baking spray will settle in the grooves of the pan. I then give the bowl a good rap on the counter a few times to remove any air bubbles, then transfer to the cake pan and give it another good rap.

    ❤️ Made this recipe and love it? ❤️

    I would LOVE for you to leave me a review and star rating below to let me know how you liked it! Also, please make sure to tag me on Instagram!

    Answers to your baking questions

    Over the years, many of you have asked me questions about:

    • baking in grams
    • adjusting oven temperatures
    • what kind of salt to use
    • and many more!

    I've curated and answered them all for your easy reference in this frequently asked questions post!

    Filed Under: Bundt Cakes

    Olive Oil Layer Cake with Lemon Curd and Rosemary Buttercream

    This olive oil layer cake is fruity from the olive oil and lemon zest, it has a beautiful texture and comes together super quickly with no mixer needed. Even if you weren’t going to layer this cake up, you could bake it off just as one 9” cake, finish it with some icing sugar, and you would have the perfect quick dessert!

    Olive Oil Layer Cake with Meyer Lemon Curd and Rosemary German Buttercream. Fruity olive oil cake is filled with a zesty meyer lemon curd, and finished in a semi naked style with a rosemary german buttercream and spring flowers. #nakedcake #oliveoilcake #meyerlemon
    Olive Oil Layer Cake with Meyer Lemon Curd and Rosemary German Buttercream. Fruity olive oil cake is filled with a zesty meyer lemon curd, and finished in a semi naked style with a rosemary german buttercream and spring flowers. #nakedcake #oliveoilcake #meyerlemon
    Olive Oil Layer Cake with Meyer Lemon Curd and Rosemary German Buttercream. Fruity olive oil cake is filled with a zesty meyer lemon curd, and finished in a semi naked style with a rosemary german buttercream and spring flowers. #nakedcake #oliveoilcake #meyerlemon
    Olive Oil Layer Cake with Meyer Lemon Curd and Rosemary German Buttercream. Fruity olive oil cake is filled with a zesty meyer lemon curd, and finished in a semi naked style with a rosemary german buttercream and spring flowers. #nakedcake #oliveoilcake #meyerlemon
    Olive Oil Layer Cake with Meyer Lemon Curd and Rosemary German Buttercream. Fruity olive oil cake is filled with a zesty meyer lemon curd, and finished in a semi naked style with a rosemary german buttercream and spring flowers. #nakedcake #oliveoilcake #meyerlemon
    Olive Oil Layer Cake with Meyer Lemon Curd and Rosemary German Buttercream. Fruity olive oil cake is filled with a zesty meyer lemon curd, and finished in a semi naked style with a rosemary german buttercream and spring flowers. #nakedcake #oliveoilcake #meyerlemon

    Hi! I am super excited to be sharing this recipe today for this super springy Olive Oil Layer Cake with Meyer Lemon Curd and Rosemary German Buttercream! I have a wee list at the front of my diary (planner for anyone in the US), full of all the things that I want to make for the blog. It can be recipe ideas, concepts, or fully written out ideas, depending on how far along in the thought process I am before I write things down. I’ve had “Semi naked cake with flowers” written on it for the longest time, so I am excited to be sharing this with you, and crossing it off the list! Naked cakes came onto the scene a good few years ago now - I love them for how easy they are to decorate, how versatile they are, and how beautiful they look when they are decorated with flowers!

    I paired the soft cake layers with a meyer lemon curd, which is a little more mellow than curd made with regular lemons, and then finished the whole thing off with a German buttercream, which I infused with some fresh rosemary. I was initially a little hesitant about the rosemary buttercream because it’s a delicate line of a nice infusion and something tasting like hand cream, but it is super subtle, and goes perfectly with the zesty curd and olive oil cake.

    A few wee tips:

    • I find it easiest to bake layer cakes in three individual layers. I have three of these pans - they are amazing!
    • I put flowers on this cake - ensure that your flowers are either food safe, or you need to wrap the ends of the stems in floral tape so that they can go on the cake safely.
    • I used bake even strips to help stop my cake from doming. You can either use them, or you can make your own like this! They can be a pain to put on, but it made a huge difference in how much cake needed to be trimmed, giving slightly thicker layers.
    • I used meyer lemons in the curd. You can absolutely just use regular lemons if you can’t get hold of meyer lemons!
    • It will seem like quite a bit of fresh rosemary needed to infuse the milk for the pastry cream. Don’t worry if it seems super strong - remember that it is going to be mellowed out by the pastry cream ingredients, and again by the butter when you whip up the buttercream.
    • If you can, make the cakes, pastry cream for the buttercream, and the lemon curd ahead of time. I like to wrap the cakes tightly in plastic wrap and freeze overnight to make them easy to frost, but if you are making them the same day, just make sure that they are totally cooled. The pastry cream and curd need time to thicken and cool - either overnight, or if you are in a pinch, pop them into a shallow dish, cover the surface with plastic wrap, and place in the fridge or freezer. A larger surface area helps to cool them quicker.

    ❤️ Made this recipe and love it? ❤️

    I would LOVE for you to leave me a review and star rating below to let me know how you liked it! Also, please make sure to tag me on Instagram!

    Answers to your baking questions

    Over the years, many of you have asked me questions about:

    • baking in grams
    • adjusting oven temperatures
    • what kind of salt to use
    • and many more!

    I've curated and answered them all for your easy reference in this frequently asked questions post!

    Filed Under: Cupcakes and Mini Cakes

    Custard Brioche Buns with Bonne Maman Mixed Berry Preserves and Vanilla bean Streusel


    Custard Brioche Buns with Bonne Maman Mixed Berry Preserves and Vanilla bean Streusel. Light and fluffy brioche rounds are filled with a vanilla bean custard, then finished with a swirl of Bonne Maman Mixed berry preserves, and a sprinkle of vanilla bean streusel. These are perfect for a super easy but incredibly delicious brunch, as everything can be prepared the night before, making assembling the next morning super easy. #brioche #custardbun #breakfastpastry
    Custard Brioche Buns with Bonne Maman Mixed Berry Preserves and Vanilla bean Streusel. Light and fluffy brioche rounds are filled with a vanilla bean custard, then finished with a swirl of Bonne Maman Mixed berry preserves, and a sprinkle of vanilla bean streusel. These are perfect for a super easy but incredibly delicious brunch, as everything can be prepared the night before, making assembling the next morning super easy. #brioche #custardbun #breakfastpastry
    Custard Brioche Buns with Bonne Maman Mixed Berry Preserves and Vanilla bean Streusel. Light and fluffy brioche rounds are filled with a vanilla bean custard, then finished with a swirl of Bonne Maman Mixed berry preserves, and a sprinkle of vanilla bean streusel. These are perfect for a super easy but incredibly delicious brunch, as everything can be prepared the night before, making assembling the next morning super easy. #brioche #custardbun #breakfastpastry
    Custard Brioche Buns with Bonne Maman Mixed Berry Preserves and Vanilla bean Streusel. Light and fluffy brioche rounds are filled with a vanilla bean custard, then finished with a swirl of Bonne Maman Mixed berry preserves, and a sprinkle of vanilla bean streusel. These are perfect for a super easy but incredibly delicious brunch, as everything can be prepared the night before, making assembling the next morning super easy. #brioche #custardbun #breakfastpastry
    Custard Brioche Buns with Bonne Maman Mixed Berry Preserves and Vanilla bean Streusel. Light and fluffy brioche rounds are filled with a vanilla bean custard, then finished with a swirl of Bonne Maman Mixed berry preserves, and a sprinkle of vanilla bean streusel. These are perfect for a super easy but incredibly delicious brunch, as everything can be prepared the night before, making assembling the next morning super easy. #brioche #custardbun #breakfastpastry
    Custard Brioche Buns with Bonne Maman Mixed Berry Preserves and Vanilla bean Streusel. Light and fluffy brioche rounds are filled with a vanilla bean custard, then finished with a swirl of Bonne Maman Mixed berry preserves, and a sprinkle of vanilla bean streusel. These are perfect for a super easy but incredibly delicious brunch, as everything can be prepared the night before, making assembling the next morning super easy. #brioche #custardbun #breakfastpastry
    Custard Brioche Buns with Bonne Maman Mixed Berry Preserves and Vanilla bean Streusel. Light and fluffy brioche rounds are filled with a vanilla bean custard, then finished with a swirl of Bonne Maman Mixed berry preserves, and a sprinkle of vanilla bean streusel. These are perfect for a super easy but incredibly delicious brunch, as everything can be prepared the night before, making assembling the next morning super easy. #brioche #custardbun #breakfastpastry

    Hi! I’m coming at you with a super simple but crazy delicious Easter brunch (or anytime really) idea - these custard brioche buns, with Mixed Berries Preserves and vanilla bean streusel. It’s no secret that I love anything to do with brioche, but these are next level. Soft, pillowy brioche is filled with a silky vanilla bean custard, then swirled with a touch of preserves, and finished off with a sprinkle of streusel.

    The inspiration from this recipe comes from a Scandinavian bakery I visited recently in Brooklyn with a friend. We had a Skolbrod, which is essentially a brioche bun, topped with custard, then finished off with coconut. I instantly knew that I had to recreate it, but couldn’t help adding in a few more elements. I replaced the coconut with a vanilla bean streusel which is sprinkled on before baking so goes beautifully toasty, and finished the buns with a big swirl of Mixed Berries Preserves.

    I have partnered with Bonne Maman to bring you this recipe! You have probably seen their gorgeous preserves, jellies and curds in your supermarket - they are super distinctive in their angular jars with the pretty gingham lids. We have been eating their products for years in our house, so I am super excited to be working with them on this post. Their products are everything I look for in a preserve - simple, no fussy ingredients, and a recipe that has stayed the same since they were very first made. They taste just like homemade. I’m a huge fan.

    I used Bonne Maman’s Mixed Berries Preserves in this particular recipe. I love the variation of fruit (raspberries, blackberries, blueberries, and wild strawberries), which goes so well with the custard - it is the perfect finishing touch that brings everything together and takes the buns to the next level. Aside from the Preserves, my other favourite part about this recipe is how easy it is to make ahead. The brioche can be made the day before, doing its first rise in the fridge, which makes the dough super easy to handle. Both the custard and the streusel topping can also be made ahead, and using Bonne Maman Preserves means another component is already done for you too, meaning that the day of baking, all you have to do is shape the buns, give them a rise, egg wash, then sprinkle with streusel, fill with custard, and then finish with the Preserves. They then have a quick spin in the oven and turn into the most perfect buns, which are best eaten straight from the oven. Happy Brunching! x

    A few wee tips:

    • This dough is probably a little wetter than you are used to - but I promise you that it will work out. If it really seems super wet and isn’t eventually pulling away from the bowl, you can add an extra tablespoon of flour. Make sure you knead it until it is really soft and stretchy. The sticky dough leads to beautifully soft buns!
    • The first proof can be done overnight in the fridge - I prefer this because it makes the buns much easier to shape.
    • Ideally the custard also needs overnight in the fridge - but you can cool it in a few hours if you need to - just spread it into a shallow container so you have a thinner layer, meaning it cools a bit quicker.
    • I used Bonne Maman’s Mixed Berries Preserves for this particular recipe, but any of their preserves would be beautiful - I also love the raspberry, the apricot, and the blackberry, and I have been eyeing up the peach. If you wanted you could even pick up a few different flavours of the preserves to give a nice variation in both colour and flavour!

    Thank you so much to Bonne Maman for sponsoring this post! All opinions are my own.

    ❤️ Made this recipe and love it? ❤️

    I would LOVE for you to leave me a review and star rating below to let me know how you liked it! Also, please make sure to tag me on Instagram!

    Answers to your baking questions

    Over the years, many of you have asked me questions about:

    • baking in grams
    • adjusting oven temperatures
    • what kind of salt to use
    • and many more!

    I've curated and answered them all for your easy reference in this frequently asked questions post!

    Filed Under: Brioche, Buns and Rolls

    Dark Chocolate, Tahini, and Halva Brioche Babka


    Dark Chocolate, Tahini, and Halva Brioche Babka. Fluffy brioche dough is spread with a dark chocolate tahini filling and sprinkled with halva, then rolled up and turned into the most perfect twisty bread. Perfect for a delicious breakfast or a snack with a coffee. #babka #brioche #tahini #halva
    Dark Chocolate, Tahini, and Halva Brioche Babka. Fluffy brioche dough is spread with a dark chocolate tahini filling and sprinkled with halva, then rolled up and turned into the most perfect twisty bread. Perfect for a delicious breakfast or a snack with a coffee. #babka #brioche #tahini #halva
    Dark Chocolate, Tahini, and Halva Brioche Babka. Fluffy brioche dough is spread with a dark chocolate tahini filling and sprinkled with halva, then rolled up and turned into the most perfect twisty bread. Perfect for a delicious breakfast or a snack with a coffee. #babka #brioche #tahini #halva
    Dark Chocolate, Tahini, and Halva Brioche Babka. Fluffy brioche dough is spread with a dark chocolate tahini filling and sprinkled with halva, then rolled up and turned into the most perfect twisty bread. Perfect for a delicious breakfast or a snack with a coffee. #babka #brioche #tahini #halva
    Dark Chocolate, Tahini, and Halva Brioche Babka. Fluffy brioche dough is spread with a dark chocolate tahini filling and sprinkled with halva, then rolled up and turned into the most perfect twisty bread. Perfect for a delicious breakfast or a snack with a coffee. #babka #brioche #tahini #halva

    Whoopsies - I was just flicking through my drafts and realised that I never shared this with you! Here it is - a Dark Chocolate, Tahini, and Halva Brioche Babka, which was a product of a recent (ish) baking day with my friend Rachel! We made this babka, and these sesame buns, which both have the same filling, but a slightly different dough base and technique.

    This particular babka is filled with a dark chocolate and tahini mixture, which is super simple to put together - you essentially just melt it all together, and leave it to sit for a bit. We also filled it with some sea salt halva from Rachel’s amazing wee store in Chelsea Market here in NYC (they ship too if you are outside of the city, get on it!). She has the best tahini and halva I have ever tasted - if you haven’t had halva before it is essentially like a tahini candy. It is sweet, crumbly, and slightly savoury from the tahini. It holds up well in baking, and was insanely delicious rolled up in this babka. It perfectly offset the dark chocolate tahini filing, which isn’t super sweet.

    This recipe makes two loaves, but the good news is that they freeze super well, and make insanely good french toast and bread pudding. I often have a loaf of babka stashed in my freezer for when the need strikes - I love it just toasted and served with butter alongside a coffee or as a sneaky delicious breakfast. Just make sure you wrap it tightly in plastic or foil before you freeze.

    A few wee tips:

    • Ideally the tahini chocolate filling needs a little bit of time to rest and cool - either overnight, or a few hours. It won’t go super solid like nutella, but it will thicken a little as it sits!
    • You may have a little filling leftover, but it is great served with the babka, on toast, or drizzled over a banana.
    • If I know I am making something ahead of time, I like to do the first rise overnight. Just make the bread dough, shape into a ball, and place into a large bowl (I usually just reuse my mixer bowl), and leave it in the fridge overnight. Then in the morning the dough is risen and will be super easy to work with! I find if I rise overnight I can skip the chilling step once the dough is rolled out.

    ❤️ Made this recipe and love it? ❤️

    I would LOVE for you to leave me a review and star rating below to let me know how you liked it! Also, please make sure to tag me on Instagram!

    Answers to your baking questions

    Over the years, many of you have asked me questions about:

    • baking in grams
    • adjusting oven temperatures
    • what kind of salt to use
    • and many more!

    I've curated and answered them all for your easy reference in this frequently asked questions post!

    Filed Under: Babka and Brioche Knots, Brioche

    Brown Butter Carrot Cake


    Brown Butter Carrot Sheet Cake is taken to the next level with a fluffy, whipped vanilla bean cream cheese german buttercream. This cake comes together super easily but is super delicious, and would make the perfect easter dessert. #brownbutter #carrotcake #sheetcake #germanbuttercream
    Brown Butter Carrot Sheet Cake is taken to the next level with a fluffy, whipped vanilla bean cream cheese german buttercream. This cake comes together super easily but is super delicious, and would make the perfect easter dessert. #brownbutter #carrotcake #sheetcake #germanbuttercream
    Brown Butter Carrot Sheet Cake is taken to the next level with a fluffy, whipped vanilla bean cream cheese german buttercream. This cake comes together super easily but is super delicious, and would make the perfect easter dessert. #brownbutter #carrotcake #sheetcake #germanbuttercream
    Brown Butter Carrot Sheet Cake is taken to the next level with a fluffy, whipped vanilla bean cream cheese german buttercream. This cake comes together super easily but is super delicious, and would make the perfect easter dessert. #brownbutter #carrotcake #sheetcake #germanbuttercream
    Brown Butter Carrot Sheet Cake is taken to the next level with a fluffy, whipped vanilla bean cream cheese german buttercream. This cake comes together super easily but is super delicious, and would make the perfect easter dessert. #brownbutter #carrotcake #sheetcake #germanbuttercream
    Brown Butter Carrot Sheet Cake is taken to the next level with a fluffy, whipped vanilla bean cream cheese german buttercream. This cake comes together super easily but is super delicious, and would make the perfect easter dessert. #brownbutter #carrotcake #sheetcake #germanbuttercream
    Brown Butter Carrot Sheet Cake is taken to the next level with a fluffy, whipped vanilla bean cream cheese german buttercream. This cake comes together super easily but is super delicious, and would make the perfect easter dessert. #brownbutter #carrotcake #sheetcake #germanbuttercream
    Brown Butter Carrot Sheet Cake is taken to the next level with a fluffy, whipped vanilla bean cream cheese german buttercream. This cake comes together super easily but is super delicious, and would make the perfect easter dessert. #brownbutter #carrotcake #sheetcake #germanbuttercream
    Brown Butter Carrot Sheet Cake is taken to the next level with a fluffy, whipped vanilla bean cream cheese german buttercream. This cake comes together super easily but is super delicious, and would make the perfect easter dessert. #brownbutter #carrotcake #sheetcake #germanbuttercream

    Can we take a quick wee sec to talk about how AMAZING sheet cakes are?! Nothing on regular layer cakes, I love them too, but sheet cakes are the perfect combo of fancy and laid back (I like to think of myself as that, dreams are free right?!). There’s no stacking required, but you can still use a fancy buttercream, and you get the best buttercream to cake ratio, in my opinion anyway. You can also frost them directly in the pan, which makes them the best for transporting. When I offer to take cake places, I often will make a sheet cake if it’s a bit more of a casual situation. I’ve had my fair share of cake disasters in an uber in the NYC summer, so a stress free transport is a huge bonus for me too. Plus, you get to live your best buttercream swooping life, which is one of my favourite things to do.

    Today’s recipe is one that I am so excited to share with you - it’s a brown butter carrot sheet cake, with a vanilla bean cream cheese german buttercream. I’ve teamed up with my faves at Heilala Vanilla to bring it to you - their amazing vanilla bean paste is in both the cake, and in the dreamy frosting. Not only is their product great, but they are run by the most amazing people, who are doing all kinds of incredible things by injecting money into the economy and providing jobs in the Kingdom of Tonga - you can read a little more about what they do here. They control the whole process from the growing to the processing of the beans, which results in an extremely ethical, high quality, organic product. I am super proud to be partnering with them again.

    I started with a pretty simple cake - a fairly standard carrot cake, but upped my game a little by replacing some of the oil with brown butter, and adding some cardamom in along with the other spices. Cakes with both butter and oil are my new fave. You get the moistness from the oil, in this case a neutral oil, but you also get the richness and flavour from the butter, giving you a total win win situation. In this case I browned the butter, which gives it the most incredible depth of flavour to the cake, and plays perfectly with the spices.

    And now let’s talk about the buttercream. Ohhhh my, this buttercream. Another thing that I love about sheet cakes is that you can load them up with buttercream that might typically be too unstable to stack a cake with - like soft peaks of whipped cream, or in this case, a German buttercream with a whole load of cream cheese whipped into it. I love cream cheese frosting, but I am not a huge fan of how sweet and gritty it can be from the powdered sugar, so instead I whipped cream cheese into a vanilla bean German buttercream. If you’re new round here, German buttercream is my absolute fave. It is custard or pastry cream (same thing) based, rather than the meringue base of an Italian or Swiss, or powdered sugar base of an American buttercream. This gives it a whole dimension of flavour that the others lack - a beautiful richness, with the pastry cream cutting the butter just perfectly.

    Because this cake didn’t have to stack, the buttercream was able to tolerate much more cream cheese than it usually would. The cream cheese gives it a beautiful tang, and sits so nicely with the vanilla, and against the subtle spice of the cake. It is also pillowy soft, and impossibly smooth, making it the perfect pair for the slightly denser nature of a carrot cake. I know I say this a lot about a lot of things, but this buttercream might be my favourite so far. It’s just perfect.

    This cake would make the most perfect Easter baking project - I can’t wait to see you enjoy it. Happy Sheet Caking! x

    A few wee tips:

    • Heilala have given me a discount code for you to use on vanilla! You can purchase it here, and the code CLOUDY20 will get you 20% off any of their products! I love the paste, the extract, and also the beans (Affiliate link).
    • Both the cake and the pastry cream need time to cool, so I like to make the pastry cream either the day before, or just before I start the cake, to give it plenty of time to cool. Putting it in a shallow dish to cool in the fridge helps too by increasing the surface area, meaning it cools a bit faster. Make sure your cream cheese and butter is also at room temp.
    • If you don’t like nuts in carrot cake, you can just leave them out!
    • If you haven’t made brown butter before, here is a great tutorial. Make sure that you allow it to cool a little before using in your recipe. I like pouring it into my stand mixer then leaving it to cool, swirling occasionally to help distribute some of the heat.
    • I took the cake out of the pan to add the buttercream, but you can absolutely frost it in the pan if you like. Frosting it in the pan is perfect for if you are transporting it, as it makes it super, super easy to carry, because the pan protects it.

    Thank you so much to Heilala Vanilla for sponsoring this post! All opinions are my own,.

    ❤️ Made this recipe and love it? ❤️

    I would LOVE for you to leave me a review and star rating below to let me know how you liked it! Also, please make sure to tag me on Instagram!

    Answers to your baking questions

    Over the years, many of you have asked me questions about:

    • baking in grams
    • adjusting oven temperatures
    • what kind of salt to use
    • and many more!

    I've curated and answered them all for your easy reference in this frequently asked questions post!

    Filed Under: Sheet and Snack Cakes

    The Ultimate Easter Macaron Box

    This is the ultimate Easter Macaron box, filled with the perfect Easter Macaron flavours. An easy French Macaron shell is filled with a variety of easter themed macaron fillings! This box has Creme Egg Macarons, Chocolate Peanut Butter Macarons, Coconut Macarons, Hot Cross Bun Macarons, and Peeps Macarons!

    The ultimate Easter Macaron Box - creme egg macarons, hot cross bun macarons, coconut macarons, chocolate peanut butter macarons and peeps marshmallow macarons make up the most amazing Easter inspired box. This would make an incredible easter gift, and can be customised however you like!
    The ultimate Easter Macaron Box - creme egg macarons, hot cross bun macarons, coconut macarons, chocolate peanut butter macarons and peeps marshmallow macarons make up the most amazing Easter inspired box. This would make an incredible easter gift, and can be customised however you like!

    Easter Macarons

    Hi hi! Just popping in to share this epic easter themed macaron box with you! I love Easter baking, and I love making homemade french macarons, so it made sense to combine the both of them!

    There are some super cute Easter macaron flavours in this box, which all use the same base French macaron shell. Mix and match as you like!

    The ultimate Easter Macaron Box - creme egg macarons, hot cross bun macarons, coconut macarons, chocolate peanut butter macarons and peeps marshmallow macarons make up the most amazing Easter inspired box. This would make an incredible easter gift, and can be customised however you like!

    Easter French Macaron Flavours

    Here’s what we ended up with:

    • Creme Egg Macarons - Speckled shell filled with a Creme Egg chocolate ganache
    • Hot Cross Bun Macaron - Vanilla bean shell filled with a spiced German buttercream
    • Coconut Macaron - Vanilla bean shell filled with a coconut Swiss Meringue Buttercream
    • Chocolate Peanut Butter Macaron - Chocolate shell filled with peanut butter Swiss Meringue Buttercream
    • Peeps Macaron - Sugared Vanilla bean shell filled with a vanilla bean marshmallow and rolled in sanding sugar
    The ultimate Easter Macaron Box - creme egg macarons, hot cross bun macarons, coconut macarons, chocolate peanut butter macarons and peeps marshmallow macarons make up the most amazing Easter inspired box. This would make an incredible easter gift, and can be customised however you like!

    Tips and Tricks for French Macarons

    There are a lot of tips and tricks for making homemade french macarons. Check out my post on how to make french macarons at home for a full breakdown on how to make your own macarons.

    What is the best box to use for making a cookie / macaron box?

    We used a box from the craft store to make our macaron box. Anything similar would work such as a wooden gift box or a wooden wine box - you can use a cardboard box and make your own dividers, or just snuggle everything in. My husband cut us some wooden dividers on his laser cutter, but you could also just use a craft knife.

    The ultimate Easter Macaron Box - creme egg macarons, hot cross bun macarons, coconut macarons, chocolate peanut butter macarons and peeps marshmallow macarons make up the most amazing Easter inspired box. This would make an incredible easter gift, and can be customised however you like!

    How to make a batch of macarons into two colours

    If you are colouring one batch of batter two different colours, mix it part of the way, then split the batter into separate bowls (half a batch of batter weighs 420g), then add the gel food colouring and finish the mixing process. For example we split a batch and coloured half for the creme egg macs, and half for the peeps macs, then did the same with the coconut macs and the hot cross bun macs. We made one bigger batch of the chocolate shells as the cocoa powder has to be mixed in with the ground almond mixture.

    The ultimate Easter Macaron Box - creme egg macarons, hot cross bun macarons, coconut macarons, chocolate peanut butter macarons and peeps marshmallow macarons make up the most amazing Easter inspired box. This would make an incredible easter gift, and can be customised however you like!

    Tips and tricks for making an Easter macaron box

    • I have added the base recipe we use for the shells down below, then at the end I have put the variations in food colouring or finishing that we did to make each shell ‘flavour’ (they are all vanilla bean flavour, except for the chocolate, and I have added in a note, or you can just refer to my chocolate french macaron shell recipe. The filling recipes and assembly instructions will be underneath the shell recipe.
    • We made all the shells except for the chocolate ones on one day (we could have done them all on the one day, we just got lazy), the mini egg ganache, and the pastry cream for the Hot Cross Bun German buttercream, and then the following day made the remainder of the fillings, filled the macarons, and filled and shot the box. If you break up your workload, and prep your ingredients before you start (having enough sheet pans is important), it isn’t too much work!
    • We worked it so that we could re-use some of the fillings - we made one larger batch of swiss meringue buttercream, then split it, and added the coconut to half and the peanut butter to the remaining half. This made the filling process super easy as we didn’t need to make five fillings from scratch
    • In terms of work flow, we were able to start the next batch of shells soon after piping out the previous ones. Like I mentioned before, this only works if you have lots of sheet pans!
    • Store all the shells in an airtight container until ready to fill.

    ❤️ Made this recipe and love it? ❤️

    I would LOVE for you to leave me a review and star rating below to let me know how you liked it! Also, please make sure to tag me on Instagram!

    Answers to your baking questions

    Over the years, many of you have asked me questions about:

    • baking in grams
    • adjusting oven temperatures
    • what kind of salt to use
    • and many more!

    I've curated and answered them all for your easy reference in this frequently asked questions post!

    Filed Under: Macarons, Treat Boxes Tagged With: Gluten Free

    Salted Caramel Shortbread Bars

    Salted Caramel Shortbread bars - buttery shortbread is topped with a creamy salted caramel, then finished off with a dark chocolate layer and flaky sea salt. The perfect sweet treat. #caramelslice #caramelshortbread
    Salted Caramel Shortbread bars - buttery shortbread is topped with a creamy salted caramel, then finished off with a dark chocolate layer and flaky sea salt. The perfect sweet treat. #caramelslice #caramelshortbread
    Salted Caramel Shortbread bars - buttery shortbread is topped with a creamy salted caramel, then finished off with a dark chocolate layer and flaky sea salt. The perfect sweet treat. #caramelslice #caramelshortbread
    Salted Caramel Shortbread bars - buttery shortbread is topped with a creamy salted caramel, then finished off with a dark chocolate layer and flaky sea salt. The perfect sweet treat. #caramelslice #caramelshortbread
    Salted Caramel Shortbread bars - buttery shortbread is topped with a creamy salted caramel, then finished off with a dark chocolate layer and flaky sea salt. The perfect sweet treat. #caramelslice #caramelshortbread
    Salted Caramel Shortbread bars - buttery shortbread is topped with a creamy salted caramel, then finished off with a dark chocolate layer and flaky sea salt. The perfect sweet treat. #caramelslice #caramelshortbread
    https://www.phaidon.com/store/food-cook/simple-and-classic-9780714878119/
    Salted Caramel Shortbread bars - buttery shortbread is topped with a creamy salted caramel, then finished off with a dark chocolate layer and flaky sea salt. The perfect sweet treat. #caramelslice #caramelshortbread

    Hi hi! I’ve been wanting to share a caramel slice recipe on here for the longest time! Caramel slice was a classic bakery treat I grew up eating (we call a ‘bar’ a slice in New Zealand), and they are an absolute favourite of mine. They are essentially a baked shortbread base, which then has a salted caramel mixture poured over it, followed by a dark chocolate ganache topping, and, if you like, a heavy sprinkling of salt. I love to get them out when I am at a bakery, but they are also super easy to make at home, and make the perfect sweet treat. From a quick google, it seems as if this is called a bunch of things - salted caramel shortbread, millionaire’s shortbread, caramel slice, etc. They all seem to be iterations of the same recipe, but all super delicious.

    This version comes from a beautiful new book I was sent by the lovely folks at Phaidon - it is the newest from Jane Hornby, called ‘Simple and Classic - 123 Step by Step recipes’. The idea behind it is super clever - it is jam packed with recipes, ranging from sweet to savoury, all with step by step photos accompanying each recipe. So often in cook books there will only be one hero image of each recipe, so it is amazing to see not only step by step photos of each part of the recipe, but also broken down ingredient shots. This book would be perfect for a visual learner, or for someone who is beginning to cook and needs a little more guidance in terms of breaking down the recipe steps. I have my eye on a bunch more recipes, and have already sent one to a friend as a gift!

    This recipe is super simple, but tastes anything but. It starts with a baked shortbread dough, which is baked until golden brown in the oven. Once it is slightly cooled, a thick layer of salted caramel is poured on, and left to set. The whole thing is then finished off with a layer of dark chocolate, and loaded up with flaky sea salt. A little goes a long way with this, but once you start snacking on it, you somehow find it disappearing much faster than you thought it would. The best.

    A few wee tips:

    • This looks a little complicated, but I promise that it is not - each component is super simple.

    • I left my caramel to cool overnight, but you can probably just leave it for a few hours if you need - it does hold onto heat for longer than you think!

    • I wanted the top of my slice to have some texture in the chocolate, so I poured the chocolate on, then popped it in the fridge for about 10 minutes, then used an offset spatula to swirl up the chocolate, then left it to set completely.

    • According to Jane, to make this traditional Millionaire’s shortbread, you can add only a pinch of salt in the filling, and leave it out from the top, and then use semisweet chocolate on the top (about 30% milk solids)

    Simple and Classic is copyright Phaidon Press Limited, and was written by Jane Hornby and published in 2019

    Filed Under: Bars and Slices

    Raspberry Ricotta Bundt Cake


    Raspberry Ricotta bundt cake - a tender vanilla bean bundt cake is accented with tart raspberries. This easy, stir together cake is the perfect texture, is simple to put together, and is perfect for feeding a crowd. #bundtcake #ricottacake #raspberrybundt
    Raspberry Ricotta bundt cake - a tender vanilla bean bundt cake is accented with tart raspberries. This easy, stir together cake is the perfect texture, is simple to put together, and is perfect for feeding a crowd. #bundtcake #ricottacake #raspberrybundt
    Raspberry Ricotta bundt cake - a tender vanilla bean bundt cake is accented with tart raspberries. This easy, stir together cake is the perfect texture, is simple to put together, and is perfect for feeding a crowd. #bundtcake #ricottacake #raspberrybundt
    Raspberry Ricotta bundt cake - a tender vanilla bean bundt cake is accented with tart raspberries. This easy, stir together cake is the perfect texture, is simple to put together, and is perfect for feeding a crowd. #bundtcake #ricottacake #raspberrybundt
    Raspberry Ricotta bundt cake - a tender vanilla bean bundt cake is accented with tart raspberries. This easy, stir together cake is the perfect texture, is simple to put together, and is perfect for feeding a crowd. #bundtcake #ricottacake #raspberrybundt
    Raspberry Ricotta bundt cake - a tender vanilla bean bundt cake is accented with tart raspberries. This easy, stir together cake is the perfect texture, is simple to put together, and is perfect for feeding a crowd. #bundtcake #ricottacake #raspberrybundt
    Raspberry Ricotta bundt cake - a tender vanilla bean bundt cake is accented with tart raspberries. This easy, stir together cake is the perfect texture, is simple to put together, and is perfect for feeding a crowd. #bundtcake #ricottacake #raspberrybundt
    Raspberry Ricotta bundt cake - a tender vanilla bean bundt cake is accented with tart raspberries. This easy, stir together cake is the perfect texture, is simple to put together, and is perfect for feeding a crowd. #bundtcake #ricottacake #raspberrybundt

    This cake tested me a wee bit. The funny thing about recipe testing is that you never quite know which way it is going to go - sometimes I set out to make something I assume will need tweaking and nail it first try, other times I think I can quickly bring something together, like this cake, only to have it totally fail on me a whole bunch of times (6 to be exact). I love the process so much, but it is always good to remember that sometimes the things that seem the easiest are the ones which are going to trip you up the most!

    I’m always so interested in the recipe testing process, so I thought I would share a little bit of it today! I started off knowing I wanted to make a raspberry bundt cake in this party pan, and that’s all I knew. My process was:

    1. Start with a bundt version of a vanilla cake recipe of mine that used the reverse creaming method. Giant, giant fail. Cake looked fine, then collapsed in on itself. Giant mess. Abort mission.

    2. Change direction completely. Go for a pound cake style bundt. Learn that pound cakes don’t have any leavening agent in them (we don’t have them in Nz!). Possibly densest cake I’ve ever made.
    3. Figure If I add leavening agent into it, it will help lighten it up. Still super dense. Abort mission.
    4. Go in another direction - adapting a loaf cake recipe of mine. Total flop. weird cooked parts and raw parts and a strange texture on the outside (super yum as a cake, clearly not meant to be a bundt).
    5. Not quite abort mission, but change almost all the components of the loaf cake recipe, tweaking and tweaking. Comes out ok texture, but super bland and big holes on the outside.
    6. Up the moisture, switch the milk to buttermilk, bang the shit out of the pan on the counter before it bakes. Ok, but kind of bland, texture is amazing.
    7. Switch out some of the oil for butter and add in some lemon zest. Waaaay better - switching out the butter was just what I needed to do. Super happy with the outcome. Done!

    And that’s how it went down! The resulting cake is, to me, perfect - it is a dense bundt cake (not pound cake dense but just the right texture), with a tender crumb from ricotta and oil, but some richness of flavour from vanilla bean and butter. I added in some almond meal to help elevate the flavour, and folded some raspberries through the batter, which I managed to get to stay very nicely distributed! I was initially going to give this a glaze, but after the final test came out as well as it did, all it really needs is a light dusting of powdered sugar.

    After all those tests, the cake itself is actually super simple. It is a stir together situation - all you have to do is combine your wet ingredients (plus sugar), then whisk together your dry ingredients, add the two together, then fold in raspberries which have been dusted in a little flour to stop them sinking. It all then goes into a well sprayed bundt pan, and is baked off, before having a wee cool in the pan, then turned out and allowed to finish cooling. Bundt cakes are my favourite in that they are generally super easy to make, with the fancy details coming from the shape of the pan. This one will most definitely be on heavy rotation from now on.

    A few wee tips:

    • The recipe here is by weight - if you bake by weight you won’t have to use a single measuring cup, as everything can be weighed directly into the bowl. The best.
    • I tossed the raspberries lightly with flour before incorporating them into the batter, to help prevent them from sinking.
    • I used fresh berries, but frozen would also definitely work - make sure that if they are frozen they get a good coating of the flour!
    • The trick to getting a bundt cake out cleanly comes down to a few factors. The first is a well greased pan - you can either grease and flour your pan (make sure you get in all the crevices), or you can use a baking spray with flour in it, which is my preferred method for a bundt. The second is the cooling time - 10 minutes is the sweet spot to allow the cake to pull away from the sides enough to release cleanly. Too soon and it may not hold its structure if it is too warm, and too long in the pan and you run the risk of it sticking. Set your timer for 10 as soon as the cake comes out of the oven!
    • The cake needs to be baked enough that it will not stick to the sides - make sure that a skewer inserted into the cake comes out clean - I like to stick it in a few different spots just to check
    • Make sure your ingredients are nice and room temp before you bake the cake - I like to take mine out an hour or so before.

    ❤️ Made this recipe and love it? ❤️

    I would LOVE for you to leave me a review and star rating below to let me know how you liked it! Also, please make sure to tag me on Instagram!

    Answers to your baking questions

    Over the years, many of you have asked me questions about:

    • baking in grams
    • adjusting oven temperatures
    • what kind of salt to use
    • and many more!

    I've curated and answered them all for your easy reference in this frequently asked questions post!

    Filed Under: Bundt Cakes

    Cheese, Spring Onion, and Chive Brioche Buns

    Fluffy brioche is rolled out thin, then spread with a cheese sauce filling, sprinkled with spring onion and chives, and rolled up into a tight spiral. It is then cut up into buns, snuggled into a skillet, and baked to golden perfection. The perfect savoury bun!

    Cheese, Spring Onion, and Chive Brioche Buns - fluffy brioche is rolled out thin, then spread with a cheese sauce filling, sprinkled with spring onion and chives, and rolled up into a tight spiral. It is then cut up into buns, snuggled into a skillet, and baked to golden perfection. The perfect savoury bun! #cheesebuns #cheeserolls #cheeseandchive

    Cheese Brioche Buns with Chive and Spring Onion

    I think we all know by now my intense love for swirly bread. I developed a killer brioche recipe a few years back, and it sneaks its way onto here at least once a month - in doughnuts, babka, fancy knots, buns, rolls, pull-apart bread, you name it, it’s probably lurking around here somewhere. The thing I love the most about brioche is how versatile it is. You can switch up the filling or ingredients slightly, change up the baking or frying method, and you have a whole new recipe.

    Today I am sharing the recipe for these Cheese, Spring Onion, and Chive Brioche Buns. These first came about when I was testing for another recipe and was left with a batch of brioche dough in the fridge. I also happened to have a batch of cheese sauce from another recipe test, so I combined them, and the result was magical. These are just essentially a savoury version of the cinnamon roll - enriched dough is spread with a chilled cheese sauce filling, sprinkled with spring onions (scallions for those in the US) and chives, and then rolled into a tight spiral and snuggled up in a skillet. They kind of taste like the pizza rolls that we grew up on as kids that we used to get from the supermarket. They are great on their own, or amazing served alongside a soup for an easy meal. The cheese sauce filling is also perfect for using up the weird odds and ends of cheese you have in your fridge (or is that just me). Either way, swirly bread is the best, and I think this is a recipe you are going to love. Enjoy! x

    If you wanted a smaller batch version of these rolls, you could use my small batch cheese buns recipe!

    Cheese, Spring Onion, and Chive Brioche Buns - fluffy brioche is rolled out thin, then spread with a cheese sauce filling, sprinkled with spring onion and chives, and rolled up into a tight spiral. It is then cut up into buns, snuggled into a skillet, and baked to golden perfection. The perfect savoury bun! #cheesebuns #cheeserolls #cheeseandchive

    A few wee tips for making Cheese Brioche Buns

    • The great thing about the cheese sauce in this recipe is that you can use whatever you like in it - I usually have a whole range of cheese in my fridge, so use whatever you have! Just make sure that the total amount of cheese is the same as the weight in the recipe (250g).
    • The cream cheese in the recipe really helps to smooth out the filling.
    • Ideally the cheese sauce needs to be chilled overnight, but no worries at all if you don’t have time for that- just place it into a shallow container or bowl, chill for 20 min in the freezer, give it a good stir, then place in the fridge to continue chilling. Ideally make it before you get started on the bread dough so that it has as much time to chill as possible.
    • I like making my brioche dough the night before sometimes - it means that it’s super easy to roll out if it’s a little cooler, and it breaks up the tasks, making it a little more manageable.
    • baked cheese, scallion and chive buns
    • cheese, scallion and chive brioche buns ready for oven

    Tips for making these buns ahead of time

    If you want to do some of the work ahead of time for these buns that is totally fine! I like to prepare the cheese sauce filling the day before so that it has some time to chill down. You can also do the first rise for the brioche overnight in the fridge, or alternatively on the same day in the fridge - it will need a minimum of 3 hours. You can make these work to your schedule!

    Cheese, Spring Onion, and Chive Brioche Buns - fluffy brioche is rolled out thin, then spread with a cheese sauce filling, sprinkled with spring onion and chives, and rolled up into a tight spiral. It is then cut up into buns, snuggled into a skillet, and baked to golden perfection. The perfect savoury bun! #cheesebuns #cheeserolls #cheeseandchive

    More Cheese Bun Recipes:

    • Caramelised Onion and Sharp Cheddar Brioche Buns
    • Pretzels with Cheese Sauce Dip
    • Tomato and Ricotta Pesto Pull-apart Buns
    • Spicy Tomato Pesto Star Bread

    ❤️ Made this recipe and love it? ❤️

    I would LOVE for you to leave me a review and star rating below to let me know how you liked it! Also, please make sure to tag me on Instagram!

    Answers to your baking questions

    Over the years, many of you have asked me questions about:

    • baking in grams
    • adjusting oven temperatures
    • what kind of salt to use
    • and many more!

    I've curated and answered them all for your easy reference in this frequently asked questions post!

    Filed Under: Brioche, Buns and Rolls

    Malasadas with Liliko'i (Passionfruit) Pastry Cream Filling


    Malasadas with Liliko'i (Passionfruit) Pastry Cream Filling from Alana Kysar's new book, Aloha Kitchen. Malasadas are Portuguese style doughnuts, which are soft and fluffy. They are fried off, then rolled in sugar, then filled with a silky liliko'i pastry cream. These are the perfect indulgent treat, and are super easy to make. #malasadas #doughnuts #lilikoi #passionfruit
    Malasadas with Liliko'i (Passionfruit) Pastry Cream Filling from Alana Kysar's new book, Aloha Kitchen. Malasadas are Portuguese style doughnuts, which are soft and fluffy. They are fried off, then rolled in sugar, then filled with a silky liliko'i pastry cream. These are the perfect indulgent treat, and are super easy to make. #malasadas #doughnuts #lilikoi #passionfruit
    Malasadas with Liliko'i (Passionfruit) Pastry Cream Filling from Alana Kysar's new book, Aloha Kitchen. Malasadas are Portuguese style doughnuts, which are soft and fluffy. They are fried off, then rolled in sugar, then filled with a silky liliko'i pastry cream. These are the perfect indulgent treat, and are super easy to make. #malasadas #doughnuts #lilikoi #passionfruit
    Malasadas with Liliko'i (Passionfruit) Pastry Cream Filling from Alana Kysar's new book, Aloha Kitchen. Malasadas are Portuguese style doughnuts, which are soft and fluffy. They are fried off, then rolled in sugar, then filled with a silky liliko'i pastry cream. These are the perfect indulgent treat, and are super easy to make. #malasadas #doughnuts #lilikoi #passionfruit
    Malasadas with Liliko'i (Passionfruit) Pastry Cream Filling from Alana Kysar's new book, Aloha Kitchen. Malasadas are Portuguese style doughnuts, which are soft and fluffy. They are fried off, then rolled in sugar, then filled with a silky liliko'i pastry cream. These are the perfect indulgent treat, and are super easy to make. #malasadas #doughnuts #lilikoi #passionfruit

    Hi hi! My sweet friend Alana wrote a cookbook, and I am so, so excited to be sharing a recipe from it today! Although Alana and I have never actually met IRL (story of my life, this is what happens when you’re a hermit and lots of your friends don’t live in NYC), but we have been internet friends for a few years now, and I was so stoked to get a copy of her new beautiful book, Aloha Kitchen, in the mail recently!

    Alana is originally from Hawai’i, and her book not only gives you an incredible history of Hawai’i, the food, and all the cultures that have made it their home, but it is filled with the most beautiful food and recipes. Most people don’t realise just how diverse the food in Hawai’i really is, and this is reflected so, so perfectly in the book. I can’t wait to explore it a little more - the book is already filled with post it notes. Congrats lady, the book is so incredible! x

    I thought I was going to have a tough time choosing a recipe to share from the book, but as soon as I came across this recipe for Malasadas with Liliko’i Pastry Cream, my decision was made incredibly easily. I think we all know by now my obsession for a) doughnuts and b) passionfruit / liliko’i, and this ticks both boxes. Passionfruit is super hard to come by in NYC, so when we went to Hawai’i with family a few years ago, it took us a few days to realise that Liliko’i were passionfruit - they are round and yellow in Hawai’i, whereas they are weird purple shrivelled things in NZ, so we didn’t put two and two together! When we did realise, we went on a mad mission to buy a bunch from the local farmer’s market to bring back to NYC, stupidly not realising we weren’t allowed to take fruit off of Maui (I promise we aren’t as stupid tourist as we sound), so we stood outside airport security in Maui, and ate about 15 each in the space of 5 minutes, before leaving the rest of the giant bag with the dude working the scanner (he was stoked). I’ve never had a stomach ache more worth it.

    Malasadas are Portuguese style doughnuts - it was my first time making them, but definitely won’t be my last. The process is a little different to making brioche doughnuts, in that the dough is much sweeter and softer than brioche, which results in the softest, most pillowy doughnuts. It uses evaporated milk, which only adds to the amazing flavour. I’m totally obsessed with the texture. Alana’s recipe includes a pastry cream filling, spiked with Liliko’i juice, which is tart and flavourful, and goes perfectly with the sugar rolled doughnuts. These would be perfect for a party, or for feeding a crowd, or for whenever you feel the need to make some incredible doughnuts.

    A few wee tips:

    • I made both the dough for the Malasadas and the pastry cream the night before, giving the dough an overnight rest for it’s first rise in the fridge, and giving the pastry cream time to chill completely. Splitting up the process like this makes it super manageable.
    • The dough for the Malasadas is much wetter and softer than standard brioche dough - don’t freak out (I did, a classic me move)! Just keep kneading in the mixer - it will smooth out and become beautiful and super stretchy. You’re looking for it to pull away from the sides.
    • This recipe makes 20-24 doughnuts, which is lots if there aren’t too many of you. I am sure that it can be easily halved!
    • If you’re in NZ, Bread flour is the same as high grade 🙂

    ❤️ Made this recipe and love it? ❤️

    I would LOVE for you to leave me a review and star rating below to let me know how you liked it! Also, please make sure to tag me on Instagram!

    Answers to your baking questions

    Over the years, many of you have asked me questions about:

    • baking in grams
    • adjusting oven temperatures
    • what kind of salt to use
    • and many more!

    I've curated and answered them all for your easy reference in this frequently asked questions post!

    Filed Under: Doughnuts

    The Ultimate Easter Treat Box


    The Ultimate Easter treat box - iced cookies, cardamom linzers, hand pies, macarons, crispy rice treats and Easter mallows make the most amazing treat box, and are complimented perfectly by super cute foil wrapped chocolate eggs. This box would make the most perfect Easter gift, or the components are perfect alone for Easter treats. #easterbox #cookiebox #easterbaking
    The Ultimate Easter treat box - iced cookies, cardamom linzers, hand pies, macarons, crispy rice treats and Easter mallows make the most amazing treat box, and are complimented perfectly by super cute foil wrapped chocolate eggs. This box would make the most perfect Easter gift, or the components are perfect alone for Easter treats. #easterbox #cookiebox #easterbaking
    The Ultimate Easter treat box - iced cookies, cardamom linzers, hand pies, macarons, crispy rice treats and Easter mallows make the most amazing treat box, and are complimented perfectly by super cute foil wrapped chocolate eggs. This box would make the most perfect Easter gift, or the components are perfect alone for Easter treats. #easterbox #cookiebox #easterbaking
    The Ultimate Easter treat box - iced cookies, cardamom linzers, hand pies, macarons, crispy rice treats and Easter mallows make the most amazing treat box, and are complimented perfectly by super cute foil wrapped chocolate eggs. This box would make the most perfect Easter gift, or the components are perfect alone for Easter treats. #easterbox #cookiebox #easterbaking
    The Ultimate Easter treat box - iced cookies, cardamom linzers, hand pies, macarons, crispy rice treats and Easter mallows make the most amazing treat box, and are complimented perfectly by super cute foil wrapped chocolate eggs. This box would make the most perfect Easter gift, or the components are perfect alone for Easter treats. #easterbox #cookiebox #easterbaking
    The Ultimate Easter treat box - iced cookies, cardamom linzers, hand pies, macarons, crispy rice treats and Easter mallows make the most amazing treat box, and are complimented perfectly by super cute foil wrapped chocolate eggs. This box would make the most perfect Easter gift, or the components are perfect alone for Easter treats. #easterbox #cookiebox #easterbaking
    The Ultimate Easter treat box - iced cookies, cardamom linzers, hand pies, macarons, crispy rice treats and Easter mallows make the most amazing treat box, and are complimented perfectly by super cute foil wrapped chocolate eggs. This box would make the most perfect Easter gift, or the components are perfect alone for Easter treats. #easterbox #cookiebox #easterbaking
    The Ultimate Easter treat box - iced cookies, cardamom linzers, hand pies, macarons, crispy rice treats and Easter mallows make the most amazing treat box, and are complimented perfectly by super cute foil wrapped chocolate eggs. This box would make the most perfect Easter gift, or the components are perfect alone for Easter treats. #easterbox #cookiebox #easterbaking
    The Ultimate Easter treat box - iced cookies, cardamom linzers, hand pies, macarons, crispy rice treats and Easter mallows make the most amazing treat box, and are complimented perfectly by super cute foil wrapped chocolate eggs. This box would make the most perfect Easter gift, or the components are perfect alone for Easter treats. #easterbox #cookiebox #easterbaking

    Thank you so much to ALDI for sponsoring this post! All opinions are my own - thank you for supporting the businesses that keep Cloudy Kitchen going!

    I’m not sure how, but it’s suddenly almost Easter. Which makes me so excited for a few reasons - the weather should finally warm up, I love Easter Eggs (I always get Mum to send me some from home), but most of all - Easter baking is so, so much fun! I love how many different treats can be made to incorporate Easter and Spring flavours, and pastel coloured anything is always going to be a winner in my books.

    I figured the best way to kick off the Easter Baking season was with a treat box! These are super fun to make, and make incredible gifts. I have partnered with ALDI for this treat box - showing off some of their baking staples. Their products are incredibly well priced (something that is super hard to come by in NYC!!), and are great quality. They are definitely my go-to for stocking up on basics such as their Countryside Creamery Unsalted Butter, Baker’s Corner Powdered Sugar, and Baker’s Corner All-Purpose Flour. Also - I’m not sure if it’s just me (it most likely is just me), but I get a huge kick out of going to new supermarkets and looking at all the new and different things that they have! If you have an ALDI I highly recommend checking it out if you haven’t already!

    I wanted to make a variety of treats for this box to show how easy and fun they are to put together - I like making a couple of time intensive recipes that can easily be doubled (such as the macarons and hand pies), and then pairing them with some easy to make treats (Cardamom Linzers, Marshmallows, and Brown Butter Crispy Rice Bars), and then rounding it out with some store bought items - this time I chose to use a bunch of Moser Roth and Choceur Easter Eggs from ALDI (which are available Starting the 27th of March). I also like using recipes that can be used in a few applications - for example I made one batch of the Cardamom Linzer dough, and filled some with Jam, and iced others with some Royal icing to provide a variation in designs. Adding in the Easter eggs was the perfect finishing touch - not only are they super delicious, but they are crazy cute and really help with driving the Easter theme home! This treat box would make a great Easter gift, or as something to take along to an event or Easter brunch - either one or two batches of the recipes that I have included here would be great for making 7-8 boxes for family and friends.

    A few wee tips:

    • I find that prep is key for these! The day before I put these together, I made the cookies for the Linzers and iced Cookies, made the Crispy Rice Treat bars, made the shells for the macarons, made the dough for the and pies, covered some of the cardamom cookies in royal icing, and made the marshmallows. That meant that on the day of assembly, I just had to bake off the hand pies, fill the macarons, fill the linzers, and cut shapes from the marshmallows. Breaking up the jobs like this really helped to keep on top of things.
    • You can use whatever box you like! I used a wooden box and made some dividers from craft wood, but I have seen them done in cardboard boxes using dividers or even cupcake liners to pop the treats in.
    • Don’t feel like you have to make everything in a treat box! Even just one homemade cookie with a bunch of Easter eggs is perfect - you do you here. ALDI has an amazing range of Easter goodies that would go great in your box. I used the Choceur Milk Chocolate Hollow Eggs, the Choceur Hollow Mini Bunnies, the Moser Roth Mini Truffle Easter Eggs in Milk Chocolate and Hazelnut, and the Choceur Solid Milk Chocolate Eggs.

    Thank you so much to ALDI for sponsoring this post! All opinions are my own.

    ❤️ Made this recipe and love it? ❤️

    I would LOVE for you to leave me a review and star rating below to let me know how you liked it! Also, please make sure to tag me on Instagram!

    Answers to your baking questions

    Over the years, many of you have asked me questions about:

    • baking in grams
    • adjusting oven temperatures
    • what kind of salt to use
    • and many more!

    I've curated and answered them all for your easy reference in this frequently asked questions post!

    Filed Under: Treat Boxes

    Chocolate and Peanut Butter Layer Cake with Chocolate and Peanut Butter Buttercream


    Chocolate and Peanut Butter Layer Cake with Chocolate and Peanut Butter Buttercream - this party cake is from the latest book from Bake from Scratch Magazine. Soft chocolate and peanut butter cake layers are sandwiched with chocolate and peanut butter buttercream, then finished off with playful blobs of the buttercream to create the perfect chocolate ombre cake. This cake is easy to make and is great to serve a crowd - you can't go wrong with peanut butter and chocolate! #chocolatecake #peanutbuttercake #chocolatebuttercream #peanutbutterbuttercream
    Chocolate and Peanut Butter Layer Cake with Chocolate and Peanut Butter Buttercream - this party cake is from the latest book from Bake from Scratch Magazine. Soft chocolate and peanut butter cake layers are sandwiched with chocolate and peanut butter buttercream, then finished off with playful blobs of the buttercream to create the perfect chocolate ombre cake. This cake is easy to make and is great to serve a crowd - you can't go wrong with peanut butter and chocolate! #chocolatecake #peanutbuttercake #chocolatebuttercream #peanutbutterbuttercream
    Chocolate and Peanut Butter Layer Cake with Chocolate and Peanut Butter Buttercream - this party cake is from the latest book from Bake from Scratch Magazine. Soft chocolate and peanut butter cake layers are sandwiched with chocolate and peanut butter buttercream, then finished off with playful blobs of the buttercream to create the perfect chocolate ombre cake. This cake is easy to make and is great to serve a crowd - you can't go wrong with peanut butter and chocolate! #chocolatecake #peanutbuttercake #chocolatebuttercream #peanutbutterbuttercream
    Chocolate and Peanut Butter Layer Cake with Chocolate and Peanut Butter Buttercream - this party cake is from the latest book from Bake from Scratch Magazine. Soft chocolate and peanut butter cake layers are sandwiched with chocolate and peanut butter buttercream, then finished off with playful blobs of the buttercream to create the perfect chocolate ombre cake. This cake is easy to make and is great to serve a crowd - you can't go wrong with peanut butter and chocolate! #chocolatecake #peanutbuttercake #chocolatebuttercream #peanutbutterbuttercream
    Chocolate and Peanut Butter Layer Cake with Chocolate and Peanut Butter Buttercream - this party cake is from the latest book from Bake from Scratch Magazine. Soft chocolate and peanut butter cake layers are sandwiched with chocolate and peanut butter buttercream, then finished off with playful blobs of the buttercream to create the perfect chocolate ombre cake. This cake is easy to make and is great to serve a crowd - you can't go wrong with peanut butter and chocolate! #chocolatecake #peanutbuttercake #chocolatebuttercream #peanutbutterbuttercream
    Chocolate and Peanut Butter Layer Cake with Chocolate and Peanut Butter Buttercream - this party cake is from the latest book from Bake from Scratch Magazine. Soft chocolate and peanut butter cake layers are sandwiched with chocolate and peanut butter buttercream, then finished off with playful blobs of the buttercream to create the perfect chocolate ombre cake. This cake is easy to make and is great to serve a crowd - you can't go wrong with peanut butter and chocolate! #chocolatecake #peanutbuttercake #chocolatebuttercream #peanutbutterbuttercream
    Chocolate and Peanut Butter Layer Cake with Chocolate and Peanut Butter Buttercream - this party cake is from the latest book from Bake from Scratch Magazine. Soft chocolate and peanut butter cake layers are sandwiched with chocolate and peanut butter buttercream, then finished off with playful blobs of the buttercream to create the perfect chocolate ombre cake. This cake is easy to make and is great to serve a crowd - you can't go wrong with peanut butter and chocolate! #chocolatecake #peanutbuttercake #chocolatebuttercream #peanutbutterbuttercream
    Chocolate and Peanut Butter Layer Cake with Chocolate and Peanut Butter Buttercream - this party cake is from the latest book from Bake from Scratch Magazine. Soft chocolate and peanut butter cake layers are sandwiched with chocolate and peanut butter buttercream, then finished off with playful blobs of the buttercream to create the perfect chocolate ombre cake. This cake is easy to make and is great to serve a crowd - you can't go wrong with peanut butter and chocolate! #chocolatecake #peanutbuttercake #chocolatebuttercream #peanutbutterbuttercream

    Put your party pants on, because this is a party cake! I am super excited to be sharing the recipe for this dude - it comes from the newest book from Brian and Bake From Scratch! Each year they put together an incredible compilation of all the recipes from the last year, and turn them into one big, beautiful book. I have a couple of recipes in there from my contribution to the holiday cookie issue last year - it’s always so, so exciting to see my photographs in print alongside some of my fave bakers and bloggers. The book is such a lovely round up, but also an amazing idea if you live outside of the States and want all the recipes that were included this past year, rather than having to get the magazine sent overseas each month!

    When I was choosing something to make (with the assistance of Brooke and Brian via facetime while they had cocktail hour in their hotel), I was looking for something a wee bit epic. I went back and forth for a bit, before Brian suggested I take a bunch of recipes from their layer cake section, and mix and match them. There’s a super cool section at the start of the cake chapter that has a whole lot of cake recipes, and a whole lot of buttercream recipes, and you can essentially just pick a cake, pick a buttercream, and you have an instant combination. It’s such a clever idea - I’ve highlighted two of the cake recipes here and two of the buttercreams, but there are a whole load more in the book! Definitely pick up a copy if you can - it would make the most amazing present for the baking enthusiast in your life!

    I couldn’t go past the classic peanut butter and chocolate combination for this cake. I made both the chocolate and the peanut butter cakes - both are stir together cakes (rather than needing a mixer), so come together super quickly. I made them the night before, then once they were cool, wrapped them up tightly and popped them in the freezer overnight - ideally if I have the time, this is my favourite way to frost a cake, but room temp or chilled cakes work great too! I then stacked them up, alternating not only the cake flavour, but the buttercream filling inside, which made for a super exciting cake interior.

    I’m not usually a huge fan of American Buttercream (We all know I am a die hard German buttercream girl), but there are a two times when I absolutely love it: when it has peanut butter, and when it has chocolate. I used both of these to finish off this cake, both from the mix and match section I mentioned - I crumb coated it using both flavours, then couldn’t help but finish it off in a way that’s my ultimate go to, blobs of buttercream piped on using a french star tip. I was going to just do a sparse covering of the buttercream blobs, but always end up getting carried away (they are so, so fun), so covered the whole thing, which I’m super happy I did, as it ended up being the most perfect cake:buttercream ratio!

    This cake looks super fancy but I promise that it is much easier than it looks - it’s two batches of cake, but both come together super easy, and bake up amazingly flat, with no levelling required. Then it’s just two quick batches of buttercream which you use to fill and crumb coat the cake, then transfer the remainder into your piping bags and blob away! I wanted to have three colours of buttercream so I mixed together some of the chocolate and peanut butter (I actually used the frosting that got scraped off in the crumb coating process), to give me a light brown choc peanut butter buttercream too, which worked so perfectly! This cake would be the most amazing thing to take to a celebration or for a birthday - it’s the perfect texture, and the flavour combination is just incredible.

    A few wee tips:

    • I almost always add more heavy cream to american buttercream to get it to the texture I want - you want something smooth and silky that is going to be really nice to pipe, so I often add up to about a ¼ cup more than the recipe calls for. Once you have mixed up the buttercream, just keep adding heavy cream until it is a nice soft smooth texture, then crank up the speed of the mixer and let it go on high for a few minutes to make sure it is super fluffy.
    • Once I have the buttercream super fluffy, I then like to turn the mixer to low and let it go for a minute or two, just to help get rid of any big air pockets which will make bubbles when you’re frosting the cake.
    • I ended up with a wee ombre crumb coat situation which I kind of loved - to get this, I plopped some peanut butter buttercream in a piping bag, then a little chocolate, another scoop of peanut butter, then a big scoop of chocolate, then snipped the end off the bag and used that to cover the cake on the turntable. I then smoothed it off, and used any excess to fill in holes and to do the top. The ombre was a happy accident, but I will be definitely be doing it this way again!
    • As you can see in the photos I didn’t worry toooo much about making the cake super flat on the top or getting the edges super sharp, because I knew that I was going to be covering it in blobs of buttercream.
    • When I’m making two cakes in a row, I usually cool the pan quickly by running it under cold water when I wash it - this means you can get your second cake on the go as soon as you can!

    ❤️ Made this recipe and love it? ❤️

    I would LOVE for you to leave me a review and star rating below to let me know how you liked it! Also, please make sure to tag me on Instagram!

    Answers to your baking questions

    Over the years, many of you have asked me questions about:

    • baking in grams
    • adjusting oven temperatures
    • what kind of salt to use
    • and many more!

    I've curated and answered them all for your easy reference in this frequently asked questions post!

    Filed Under: Layer Cakes

    Choux au Craquelin (Cream Puffs) with Passionfruit Cream

    Choux au Craquelin - Cream Puffs with Passionfruit Cream and Passionfruit Whipped Cream. These Passionfruit Cream Puffs have Crispy, light cream puffs, topped with crunchy craquelin, are filled with a tart passionfruit cream, then topped with a smooth passionfruit whipped cream. The perfect dessert for if you are feeling a little fancy!

    Choux au Craquelin - Cream Puffs with Passionfruit Cream and Passionfruit Whipped Cream. Crispy, light cream puffs, topped with crunchy craquelin, are filled with a tart passionfruit cream, then topped with a smooth passionfruit whipped cream. The perfect dessert for if you are feeling a little fancy! #creampuffs #passionfruit
    Choux au Craquelin - Cream Puffs with Passionfruit Cream and Passionfruit Whipped Cream. Crispy, light cream puffs, topped with crunchy craquelin, are filled with a tart passionfruit cream, then topped with a smooth passionfruit whipped cream. The perfect dessert for if you are feeling a little fancy! #creampuffs #passionfruit
    Choux au Craquelin - Cream Puffs with Passionfruit Cream and Passionfruit Whipped Cream. Crispy, light cream puffs, topped with crunchy craquelin, are filled with a tart passionfruit cream, then topped with a smooth passionfruit whipped cream. The perfect dessert for if you are feeling a little fancy! #creampuffs #passionfruit
    Choux au Craquelin - Cream Puffs with Passionfruit Cream and Passionfruit Whipped Cream. Crispy, light cream puffs, topped with crunchy craquelin, are filled with a tart passionfruit cream, then topped with a smooth passionfruit whipped cream. The perfect dessert for if you are feeling a little fancy! #creampuffs #passionfruit
    Choux au Craquelin - Cream Puffs with Passionfruit Cream and Passionfruit Whipped Cream. Crispy, light cream puffs, topped with crunchy craquelin, are filled with a tart passionfruit cream, then topped with a smooth passionfruit whipped cream. The perfect dessert for if you are feeling a little fancy! #creampuffs #passionfruit
    Choux au Craquelin - Cream Puffs with Passionfruit Cream and Passionfruit Whipped Cream. Crispy, light cream puffs, topped with crunchy craquelin, are filled with a tart passionfruit cream, then topped with a smooth passionfruit whipped cream. The perfect dessert for if you are feeling a little fancy! #creampuffs #passionfruit
    Choux au Craquelin - Cream Puffs with Passionfruit Cream and Passionfruit Whipped Cream. Crispy, light cream puffs, topped with crunchy craquelin, are filled with a tart passionfruit cream, then topped with a smooth passionfruit whipped cream. The perfect dessert for if you are feeling a little fancy! #creampuffs #passionfruit

    Choux au Craquelin (Cream Puffs) with Passionfruit Cream

    Now that they sell passionfruit at my local, that’s me done - the passionfruit recipes aren’t going to stop. I have to make up for four years of passionfruit deprivation all in one go. Hahahhaha. I’m kidding, but it is really just my fave.

    I love everything about cream puffs, particularly when they have a disc of cookie dough like craquelin on the top, which kind of melts down in the oven to form this perfect, crackly top. Cream puffs without the craquelin tend to bake up a bit lumpy and bumpy (but still taste super yum), but the craquelin ensures that it rises in a perfect circle, which is not only super satisfying, but makes it super easy to fill - you just pop the top off with a sharp knife, and fill away.

    How to make passionfruit cream

    I filled these with a super delicious and fairly easy filling. It’s technically two components - a passionfruit cream a passionfruit whipped cream, but the part that makes it easy is that the passionfruit whipped cream is literally just passionfruit cream folded through some whipped cream. So by making the passionfruit cream, you’re really making the base of both the filling components. If you haven’t had passionfruit cream before (or lemon cream), it’s essentially a curd, but instead of cooking everything down together like a curd, you leave the butter out and then emulsify it in at the last step, giving you something with a little more stability than a curd. Same ingredients, different process. Science is the best. The passionfruit cream is perfectly smooth and tart, and then the whipped cream is also amazing - it still has the flavour of the passionfruit from the cream, but also adds some smoothness to help cut through the tart flavour.

    These would make an incredible wee dessert to take to a dinner party or something - it’s not too hard to make loads of them (this recipe makes 24), and they look like they are way more effort than they are. I love using the choux as a base and making up different fillings - they are amazing just filled with a vanilla bean whipped cream!

    A few wee tips for making Choux au Craquelin with Passionfruit Cream

    • I have included an extra 'just in case' egg in the ingredients. The reason that this is in there, is that sometimes you need to add extra egg to the pastry if necessary. You want the mixture to be at a consistency where if you dip in the beater of the mixer, the batter will form a 'v' shape and eventually break off. If it is too stiff, and breaks off very quickly, you may need to add another beaten egg, and mix again, before performing the test.
    • I can only do one tray of these at a time because of my oven, so I pipe all of them, then add craquelin to one tray, bake it off, then add the craquelin to the second tray before I bake it.
    • The passionfruit cream takes a while. Make sure you bring it right up to 180˚f / 80˚c. This will make sure that it is thick enough so that when it cools, it gets super thick. Ideally it needs overnight to cool and thicken. It will look sloppy when you are done, but just give it time to chill overnight and it will thicken nicely.
    • Choux Freezes! Freeze the cream puffs just after they have been piped out, then once solid, place in a ziploc bag in the freezer. Bake off as usual - do not add the craquelin until just before you bake.
    • If you make the choux buns ahead of time, freeze them in an airtight container. Then defrost in the fridge or at room temp. Even if you only make them a day before, store them overnight in the freezer so they don't go soggy!

    For more Passionfruit Recipes:

    • Olive Oil Passionfruit Loaf Cake
    • Passionfruit and White Chocolate Macarons
    • Small Batch No-Bake Passionfruit and Lemon Meringue Bars
    • Vanilla Layer Cake with passionfruit filling

    ❤️ Made this recipe and love it? ❤️

    I would LOVE for you to leave me a review and star rating below to let me know how you liked it! Also, please make sure to tag me on Instagram!

    Answers to your baking questions

    Over the years, many of you have asked me questions about:

    • baking in grams
    • adjusting oven temperatures
    • what kind of salt to use
    • and many more!

    I've curated and answered them all for your easy reference in this frequently asked questions post!

    Filed Under: Choux

    Earl Grey Buns with Dark Chocolate Filling

    Earl Grey Buns with Dark Chocolate and Cocoa Nib Filling. Fluffy brioche dough is filled with an earl grey dark chocolate custard, and a crunchy cacao nib filling, then rolled up and sliced into buns. Once baked, the rolls are brushed with butter and rolled in a cocoa nib earl grey sugar. These are a must for tea lovers!

    Earl Grey Buns with Dark Chocolate and Cocoa Nib Filling. Fluffy brioche dough is filled with an earl grey dark chocolate custard, and a crunchy cacao nib filling, then rolled up and sliced into buns. Once baked, the rolls are brushed with butter and rolled in a cocoa nib earl grey sugar. Rich and indulgent, and the most perfect treat. #earlgreybuns #chocolatebuns #earlgreycustard
    Earl Grey Buns with Dark Chocolate and Cocoa Nib Filling. Fluffy brioche dough is filled with an earl grey dark chocolate custard, and a crunchy cacao nib filling, then rolled up and sliced into buns. Once baked, the rolls are brushed with butter and rolled in a cocoa nib earl grey sugar. Rich and indulgent, and the most perfect treat. #earlgreybuns #chocolatebuns #earlgreycustard
    Earl Grey Buns with Dark Chocolate and Cocoa Nib Filling. Fluffy brioche dough is filled with an earl grey dark chocolate custard, and a crunchy cacao nib filling, then rolled up and sliced into buns. Once baked, the rolls are brushed with butter and rolled in a cocoa nib earl grey sugar. Rich and indulgent, and the most perfect treat. #earlgreybuns #chocolatebuns #earlgreycustard
    Earl Grey Buns with Dark Chocolate and Cocoa Nib Filling. Fluffy brioche dough is filled with an earl grey dark chocolate custard, and a crunchy cacao nib filling, then rolled up and sliced into buns. Once baked, the rolls are brushed with butter and rolled in a cocoa nib earl grey sugar. Rich and indulgent, and the most perfect treat. #earlgreybuns #chocolatebuns #earlgreycustard
    Earl Grey Buns with Dark Chocolate and Cocoa Nib Filling. Fluffy brioche dough is filled with an earl grey dark chocolate custard, and a crunchy cacao nib filling, then rolled up and sliced into buns. Once baked, the rolls are brushed with butter and rolled in a cocoa nib earl grey sugar. Rich and indulgent, and the most perfect treat. #earlgreybuns #chocolatebuns #earlgreycustard
    Earl Grey Buns with Dark Chocolate and Cocoa Nib Filling. Fluffy brioche dough is filled with an earl grey dark chocolate custard, and a crunchy cacao nib filling, then rolled up and sliced into buns. Once baked, the rolls are brushed with butter and rolled in a cocoa nib earl grey sugar. Rich and indulgent, and the most perfect treat. #earlgreybuns #chocolatebuns #earlgreycustard
    Earl Grey Buns with Dark Chocolate and Cocoa Nib Filling. Fluffy brioche dough is filled with an earl grey dark chocolate custard, and a crunchy cacao nib filling, then rolled up and sliced into buns. Once baked, the rolls are brushed with butter and rolled in a cocoa nib earl grey sugar. Rich and indulgent, and the most perfect treat. #earlgreybuns #chocolatebuns #earlgreycustard
    Earl Grey Buns with Dark Chocolate and Cocoa Nib Filling. Fluffy brioche dough is filled with an earl grey dark chocolate custard, and a crunchy cacao nib filling, then rolled up and sliced into buns. Once baked, the rolls are brushed with butter and rolled in a cocoa nib earl grey sugar. Rich and indulgent, and the most perfect treat. #earlgreybuns #chocolatebuns #earlgreycustard
    Earl Grey Buns with Dark Chocolate and Cocoa Nib Filling. Fluffy brioche dough is filled with an earl grey dark chocolate custard, and a crunchy cacao nib filling, then rolled up and sliced into buns. Once baked, the rolls are brushed with butter and rolled in a cocoa nib earl grey sugar. Rich and indulgent, and the most perfect treat. #earlgreybuns #chocolatebuns #earlgreycustard

    Earl Grey Buns with Chocolate Filling

    I have written and re-written this first wee bit of my post. Nothing I can seem to think of even comes close to how I am feeling right now - a very weird mixture of feelings. Huge sorrow for the Muslim Community back in New Zealand is the main one. I am just so, so sorry that these people came to New Zealand seeking safety, and we weren’t able to provide that. New Zealand is their home just as much as it is mine. There is also a sense of pride and hope - seeing how our leader has reacted, and seeing the country band together to support a community always reminds me why I am so proud to come from the country that I do. I really do hope that tragic events like this cause our country and the rest of the world to take a good hard look at the underlying racism and white supremacy issue that is so, so prevalent in New Zealand, whether we like it or not. We are ALL responsible for moving forward and for taking responsibility, and to stand in solidarity and unity to provide support to those whose rights may be in more danger than our own. We are all human, we all deserve to have the same rights. I believe speaking up is much more important than staying silent - even if it is just my voice adding to the chorus of people showing support. This isn’t about how we are affected individually - it is how we are going to unite as a whole to provide support.

    Once again, I turn to food as my way of showing love and support. Today’s recipe for Earl Grey Buns is one that I made a while back - it is a riff on a recipe from one of my favourite books, Making Chocolate, which is from the makers of Dandelion Chocolate, an amazing small batch chocolate factory in San Francisco. They released their book last year, and I have been slowly making my way through it - each recipe I make seems to quickly become a new favourite (the chocolate spread I seem to put into everything is from this book!).

    How to make Earl Grey Buns

    I had been eyeing their cocoa nib buns up for a long time, and when I finally got around to making them, I couldn’t help but riff on them slightly. I stuck to my theory of “if you can infuse it, you can add earl grey to it”, and as per usual, it worked out very, very well. I added ground earl grey tea leaves to the dough, then infused the gooey chocolate custard filling with earl grey, which is then covered with a cocoa nib and brown sugar mixture, before being rolled up and cut into buns. These are made in a muffin tin, which causes the top to pop out slightly as they are baking, which makes them super cute. The chocolate custard filling bakes up to be gooey and perfect, with a lovely crunch from the cocoa nibs. The buns are then brushed with butter, and, while still slightly warm, rolled in a cocoa nib and earl grey sugar. The result is one of the most decadent, delicious buns I have ever had - I am obsessed with the chocolate custard filling, and the perfect spiral on these wee things.

    A few wee tips for making Earl Grey Buns:

    • The Dough needs an overnight rise, and the custard ideally needs to cool overnight, which makes these the perfect breakfast pastry.
    • Good quality chocolate is super important here - I used a 70% bar, which I chopped up.
    • If Earl Grey isn’t your thing, you can leave out the tea in the dough, and skip the infusing step custard and just use 150g of whole milk. Leave the tea out of the finishing sugar, and add 4 teaspoons of cinnamon.

    More Earl Grey Recipes:

    • Earl Grey Sugar Pie
    • Earl Grey Cake with Raspberry Filling and Vanilla German Buttercream
    • Chocolate earl grey ice cream sandwiches
    • Earl Grey Crullers with Earl Grey Glaze

    ❤️ Made this recipe and love it? ❤️

    I would LOVE for you to leave me a review and star rating below to let me know how you liked it! Also, please make sure to tag me on Instagram!

    Answers to your baking questions

    Over the years, many of you have asked me questions about:

    • baking in grams
    • adjusting oven temperatures
    • what kind of salt to use
    • and many more!

    I've curated and answered them all for your easy reference in this frequently asked questions post!

    Filed Under: Brioche, Buns and Rolls

    Salted Caramel Chocolate Ganache Brioche Doughnuts

    Salted Caramel and Milk Chocolate Ganache filled Brioche Doughnuts - Fluffy brioche doughnuts are rolled in sugar, then filled with a silky salted caramel and milk chocolate ganache. These are the ultimate stuffed doughnut.

    Salted Caramel and Milk Chocolate Ganache filled Brioche Doughnuts - Fluffy brioche doughnuts are rolled in sugar, then filled with a silky salted caramel and milk chocolate ganache. These are the ultimate treat - the rich chocolate ganache is a total game changer. #doughnuts #briochedoughnuts
    Salted Caramel and Milk Chocolate Ganache filled Brioche Doughnuts - Fluffy brioche doughnuts are rolled in sugar, then filled with a silky salted caramel and milk chocolate ganache. These are the ultimate treat - the rich chocolate ganache is a total game changer. #doughnuts #briochedoughnuts

    I took my all time favourite brioche recipe, spiked it with some vanilla bean, and shaped it into balls, which I then fried up into fluffy, crunchy, sugary brioche doughnuts. You really can’t get any better than a fresh doughnut!

    I then filled them with a new to me filling - a salted caramel milk chocolate ganache. The process behind this is super clever - you make a caramel, and then pour it over chocolate and emulsify it in, the same way you would with the ganache. The result is silky and fudgy, with a creaminess from the milk chocolate and a sweetness from the caramel. It makes the perfect doughnut filling - I will definitely be using it in a bunch more things to come.

    Salted Caramel and Milk Chocolate Ganache filled Brioche Doughnuts - Fluffy brioche doughnuts are rolled in sugar, then filled with a silky salted caramel and milk chocolate ganache. These are the ultimate treat - the rich chocolate ganache is a total game changer. #doughnuts #briochedoughnuts

    A few wee tips for making Salted Caramel Milk Chocolate Ganache Brioche Doughnuts

    • The Ganache (which is possibly my new favourite thing) needs to cool overnight in order to firm up. It can be made ahead if desired. If you have any leftover, it makes incredible salted caramel hot chocolates when you mix it with warm milk.
    • You ideally need a stick blender / emulsion blender for the ganache. It helps to emulsify the caramel, giving you a super silky finish. A stick blender is a great investment - I use mine loads for making curds and creams, and also a whole bunch for making salad dressing (It makes super quick aioli!).
    • I made the brioche dough the night before, and did the first rise overnight in the fridge, which makes the process feel a little less involved.
    • Make sure that you give the doughnuts adequate time to cool before filling, otherwise the ganache will melt.
    • It seems like a lot of oil used, but I wait for the oil to cool once I am finished frying, then just return to the bottle and use again another time. You can use it a bunch of times before you need to dispose of it! You need it to be deep enough that the doughnuts don’t touch the bottom.
    • A thermometer is super important when you are deep frying - too hot and the doughnuts won’t cook inside, and too cold and they will soak up oil and be too greasy. Make sure to test the oil between batches to make sure that it hasn’t changed too much. Frying in cast iron helps this a lot.
    Salted Caramel and Milk Chocolate Ganache filled Brioche Doughnuts - Fluffy brioche doughnuts are rolled in sugar, then filled with a silky salted caramel and milk chocolate ganache. These are the ultimate treat - the rich chocolate ganache is a total game changer. #doughnuts #briochedoughnuts

    Related Recipes to Salted Caramel Doughnuts

    • Mini Cinnamon Sugar Brioche Doughnuts
    • Brioche Doughnuts with Blueberry Balsamic Cheesecake Filling
    • Earl Grey Salted Caramel Tart
    • Tahini Macarons Two Ways

    ❤️ Made this recipe and love it? ❤️

    I would LOVE for you to leave me a review and star rating below to let me know how you liked it! Also, please make sure to tag me on Instagram!

    Answers to your baking questions

    Over the years, many of you have asked me questions about:

    • baking in grams
    • adjusting oven temperatures
    • what kind of salt to use
    • and many more!

    I've curated and answered them all for your easy reference in this frequently asked questions post!

    Salted Caramel and Milk Chocolate Ganache filled Brioche Doughnuts - Fluffy brioche doughnuts are rolled in sugar, then filled with a silky salted caramel and milk chocolate ganache. These are the ultimate treat - the rich chocolate ganache is a total game changer. #doughnuts #briochedoughnuts

    Filed Under: Brioche, Doughnuts

    Malted Dark Chocolate Cream Pie with Cream Cheese Whip

    Malted Dark Chocolate Cream Pie with Cream Cheese Whip. A flaky pie crust is topped with a silky malted dark chocolate pudding, and topped with a chocolate and vanilla bean piped cream cheese whipped cream.

    Malted Dark Chocolate Cream Pie with Cream Cheese Whip. A flaky pie crust is topped with a silky malted dark chocolate pudding, and topped with a chocolate and vanilla bean piped cream cheese whipped cream. #creamcheese #chocolatepie #maltedmilk
    Malted Dark Chocolate Cream Pie with Cream Cheese Whip. A flaky pie crust is topped with a silky malted dark chocolate pudding, and topped with a chocolate and vanilla bean piped cream cheese whipped cream. #creamcheese #chocolatepie #maltedmilk
    Malted Dark Chocolate Cream Pie with Cream Cheese Whip. A flaky pie crust is topped with a silky malted dark chocolate pudding, and topped with a chocolate and vanilla bean piped cream cheese whipped cream. #creamcheese #chocolatepie #maltedmilk
    Malted Dark Chocolate Cream Pie with Cream Cheese Whip. A flaky pie crust is topped with a silky malted dark chocolate pudding, and topped with a chocolate and vanilla bean piped cream cheese whipped cream. #creamcheese #chocolatepie #maltedmilk
    Malted Dark Chocolate Cream Pie with Cream Cheese Whip. A flaky pie crust is topped with a silky malted dark chocolate pudding, and topped with a chocolate and vanilla bean piped cream cheese whipped cream. #creamcheese #chocolatepie #maltedmilk
    Malted Dark Chocolate Cream Pie with Cream Cheese Whip. A flaky pie crust is topped with a silky malted dark chocolate pudding, and topped with a chocolate and vanilla bean piped cream cheese whipped cream. #creamcheese #chocolatepie #maltedmilk
    Malted Dark Chocolate Cream Pie with Cream Cheese Whip. A flaky pie crust is topped with a silky malted dark chocolate pudding, and topped with a chocolate and vanilla bean piped cream cheese whipped cream. #creamcheese #chocolatepie #maltedmilk

    Malted Chocolate Cream Pie

    Ahhhh happy Pi(e) day! If there’s a week that it’s ok to share three pies in a row, I’m going to go ahead and say that it’s this one! Pie week is waaaay better than birthday week IMO, which is really saying something because damn I love birthday week.

    I’ve had this one floating round in my head for a while now - I bought a big jar of malted milk powder to use in a recipe a few months ago and never got around to it, so I’ve been so excited to use it! Since I overcame my fear of crimping pie crust (weirdest fear ever), I have so many fun new recipes in the works I can’t wait to share!

    I went with a classic twist on the chocolate cream pie for this recipe - a blind baked pie crust, filled with a dark chocolate pudding, which I spiked with some malted milk powder. I then finished it off with a quick cream cheese whipped cream - I added a teeny bit of cocoa powder to half in order to give some variation in the decoration on the top. And oh my. It is such a winning combo - flaky pie crust, silky chocolate pudding, and then a slightly tangy whipped cream on the top. I took it to friends for dessert and someone told me it was ‘the best chocolate pie they had ever had, but in a pie’. I’ll take that. This pie would be perfect for any occasion - it can easily be made ahead of time and finished off quickly just before you serve. You absolutely do not have to pipe the topping on like I did - a big pile of cream cheese whipped cream on top would be just as amazing.

    Tips for making the best Pie Crust

    I like to do this wee trick with my pie dough: After you mix the dough and shape it into discs, rest it in the fridge for about an hour, and then roll it out on a floured surface into a rectangle, fold it in thirds like a letter, then roll again and repeat the folding. Then you shape it into a disc by folding the edges under, rewrap tightly in plastic, and rest for at least two hours before using.

    What this step does is make the dough homogenous and therefore easy to work with, but also adds layers through the rolling and folding - the same way puff pastry is laminated. It is definitely an optional step but from my experience it makes the world of difference when it comes to rolling out the dough, and makes the dough really easy to crimp.

    The pie dough recipe makes a double crust - so enough for two pies. You might as well make the extra while you are at it in my opinion - pie dough freezes well, tightly wrapped, for at least a few months, or lasts a few days in the fridge. Defrost overnight if using from frozen.

    A few wee tips for Malted Chocolate Cream Pie

    • Ideally, you want to give your pie dough an overnight rest, but if you’re in a pinch, 2-3 hours in the fridge should be ok.
    • The pudding does need a few hours to cool up and set, so make sure you account for this.
    • If you are making this ahead of time, make sure that you only add the cream cheese whipped cream close-ish to serving so that it is nice and fresh.

    ❤️ Made this recipe and love it? ❤️

    I would LOVE for you to leave me a review and star rating below to let me know how you liked it! Also, please make sure to tag me on Instagram!

    Answers to your baking questions

    Over the years, many of you have asked me questions about:

    • baking in grams
    • adjusting oven temperatures
    • what kind of salt to use
    • and many more!

    I've curated and answered them all for your easy reference in this frequently asked questions post!

    Filed Under: Single-crust pies

    Apple and Cardamom Pie

    Apple and Cardamom Pie with Cardamom and Vanilla Bean Crust - a pie dough spiked with warming cardamom and fragrant vanilla bean encloses a spiced apple cardamom brown sugar filling. This variation on an apple pie is simple but delicious - it makes the perfect dessert or anytime treat.

    Apple and Cardamom Pie with Cardamom and Vanilla Bean Crust - a pie dough spiked with warming cardamom and fragrant vanilla bean encloses a spiced apple cardamom brown sugar filling. This variation on an apple pie is simple but delicious - it makes the perfect dessert or anytime treat. #cardamom #applepie
    Apple and Cardamom Pie with Cardamom and Vanilla Bean Crust - a pie dough spiked with warming cardamom and fragrant vanilla bean encloses a spiced apple cardamom brown sugar filling. This variation on an apple pie is simple but delicious - it makes the perfect dessert or anytime treat. #cardamom #applepie
    Apple and Cardamom Pie with Cardamom and Vanilla Bean Crust - a pie dough spiked with warming cardamom and fragrant vanilla bean encloses a spiced apple cardamom brown sugar filling. This variation on an apple pie is simple but delicious - it makes the perfect dessert or anytime treat. #cardamom #applepie
    Apple and Cardamom Pie with Cardamom and Vanilla Bean Crust - a pie dough spiked with warming cardamom and fragrant vanilla bean encloses a spiced apple cardamom brown sugar filling. This variation on an apple pie is simple but delicious - it makes the perfect dessert or anytime treat. #cardamom #applepie
    Apple and Cardamom Pie with Cardamom and Vanilla Bean Crust - a pie dough spiked with warming cardamom and fragrant vanilla bean encloses a spiced apple cardamom brown sugar filling. This variation on an apple pie is simple but delicious - it makes the perfect dessert or anytime treat. #cardamom #applepie
    Apple and Cardamom Pie with Cardamom and Vanilla Bean Crust - a pie dough spiked with warming cardamom and fragrant vanilla bean encloses a spiced apple cardamom brown sugar filling. This variation on an apple pie is simple but delicious - it makes the perfect dessert or anytime treat. #cardamom #applepie
    Apple and Cardamom Pie with Cardamom and Vanilla Bean Crust - a pie dough spiked with warming cardamom and fragrant vanilla bean encloses a spiced apple cardamom brown sugar filling. This variation on an apple pie is simple but delicious - it makes the perfect dessert or anytime treat. #cardamom #applepie

    Apple and Cardamom Pie

    I’ve never really been one to do things by halves - Mum instilled a ‘go hard or go home’ mentality in us from a very young age, which rears its wee head quite often! I have had a couple of pie ideas lurking in my brain for a while now, so figured that the week of pie day would be the best time to just dump them here all at once! I used to find making pie really really stressful, but as I have made more and more throughout the years, it’s come to be something that I find super relaxing - there’s just something about rolling out pie dough and cutting lattice strips that I find so chill.

    I’ve done a few flavoured crusts before - this fresh sage one, and an earl grey one a forever ago, but haven’t played round too much with spicing the dough before. I added cardamom and vanilla bean to this dough, then filled the pie with a super simple but delicious sliced apple filling, thickened with a bit of flour and spiced with cardamom and cinnamon. I traded the regular raw sugar for dark brown - the result is a super warming, spiced apple pie. The great thing about adding powdered spices to pie dough is that it doesn’t take any extra work or fancy techniques, but adds a huge dimension to the pie flavour wise. I’m definitely going to be spicing up my pie doughs from now on!

    How to make Apple and Cardamom Pie

    I went a wee bit fancy with the lattice on this guy, but not in a complicated weaving way - I just went with single vertical strips, then added two strips per ‘weave’ horizontally. This worked out super super well - I love how it came out, and looks different to a regular lattice, but really takes the same amount of effort as a lattice that has one strip vertically and one horizontally. It’s always good to remember that when you do a tight lattice like this, you are essentially covering the surface of the pie twice, so you need to make sure you account for this when making your dough. I’ve included the amount of dough I used in the recipe below, along with some changes if you need to scale it back. I love using a pasta cutter to cut my lattice strips because they come out super, super even, so are great for a really tidy lattice. I then finished the pie with a wee braided border, which held up beautifully in the oven - the key to this, I have found, is a long chill in the fridge before you bake the pie off, giving it a good amount of time to set up nicely.

    A few wee tips for Apple and Cardamom Pie

    • The recipe for the pie dough I have listed here makes quite a lot - I needed almost all of it for this lattice. If you are making a less complicated top for your pie and just want a standard double crust recipe, reduce the quantities by ⅓ - so you will use 2 ½ cups flour, and 225g butter, 1 teaspoon cardamom etc.
    • I like using a wee tip that my friend Erin taught me to make the pie dough nice and smooth and easy to work with. I make the dough, shape it into two rectangles, rest it in the fridge wrapped for about an hour, then remove it and roll it out into a rectangle on a lightly floured surface. I then give it a letter fold (as you would a letter), roll out to a rectangle, letter fold again, then roll out slightly, and shape into a disc. I then re-wrap it, and leave it to rest overnight. This makes the dough more homogenous without compromising the flaky texture that you want in the pie dough, and it makes it a total dream to work with. For me, it’s a game changer.
    • When I am making a lattice pie I know I will need more dough for the top crust than the bottom, so I usually make one portion of dough bigger than the other when I initially divide it after mixing to account for this. For this dough I split it ⅓ to ⅔. I usually shape the dough for the bottom crust into a disc, and the dough for the top crust into a rectangle which makes for an easy roll-out for cutting strips for lattice.
    • The cardamom in this is subtle enough to provide some warmth, but still definitely there, so feel free to dial it back a little in the filling if you want. I thought it was the perfect balance! It’s epic with vanilla bean ice cream.
    • I popped this pie out of the tin on my IG stories and had loads of questions about how to avoid a soggy bottom - I have found the key to this is a good, solid bottom crust, and baking the pie at a higher temp for the first 20 minutes near the bottom of the oven, which starts to cook the bottom of the pie and also sets the pastry - a tip I borrowed from the four and twenty blackbirds pie book.

    For more Cardamom recipes, check out:

    • Swedish Cinnamon Rolls
    • Golden Sugar Macarons with Cardamom Cream Cheese Filling
    • Apple and Cardamom Babka
    • Cardamom Sour Cream Bundt Cake with Cardamom Syrup Glaze

    ❤️ Made this recipe and love it? ❤️

    I would LOVE for you to leave me a review and star rating below to let me know how you liked it! Also, please make sure to tag me on Instagram!

    Answers to your baking questions

    Over the years, many of you have asked me questions about:

    • baking in grams
    • adjusting oven temperatures
    • what kind of salt to use
    • and many more!

    I've curated and answered them all for your easy reference in this frequently asked questions post!

    Filed Under: Fruit Pies

    Double Chocolate Mint Chip Pie

    Double Chocolate Mint Chip Pie from 'The New Pie'. Chocolate pastry is drizzled with white and green chocolate, filled with a dark chocolate ganache, topped with chopped mints, then topped with a mint chocolate chip cream filling loaded up with crispy pearls. The whole thing is then finished with a cocoa whipped cream. If there was a pie version of the perfect scoop of mint chocolate chip ice cream, this pie would be it.

    Double Chocolate Mint Chip Pie from 'The New Pie'. Chocolate pastry is drizzled with white and green chocolate, filled with a dark chocolate ganache, topped with chopped mints, then topped with a mint chocolate chip cream filling loaded up with crispy pearls. The whole thing is then finished with a cocoa whipped cream. If there was a pie version of the perfect scoop of mint chocolate chip ice cream, this pie would be it. #mintchip #doublechocolate #creampie
    Double Chocolate Mint Chip Pie from 'The New Pie'. Chocolate pastry is drizzled with white and green chocolate, filled with a dark chocolate ganache, topped with chopped mints, then topped with a mint chocolate chip cream filling loaded up with crispy pearls. The whole thing is then finished with a cocoa whipped cream. If there was a pie version of the perfect scoop of mint chocolate chip ice cream, this pie would be it. #mintchip #doublechocolate #creampie
    Double Chocolate Mint Chip Pie from 'The New Pie'. Chocolate pastry is drizzled with white and green chocolate, filled with a dark chocolate ganache, topped with chopped mints, then topped with a mint chocolate chip cream filling loaded up with crispy pearls. The whole thing is then finished with a cocoa whipped cream. If there was a pie version of the perfect scoop of mint chocolate chip ice cream, this pie would be it. #mintchip #doublechocolate #creampie
    Double Chocolate Mint Chip Pie from 'The New Pie'. Chocolate pastry is drizzled with white and green chocolate, filled with a dark chocolate ganache, topped with chopped mints, then topped with a mint chocolate chip cream filling loaded up with crispy pearls. The whole thing is then finished with a cocoa whipped cream. If there was a pie version of the perfect scoop of mint chocolate chip ice cream, this pie would be it. #mintchip #doublechocolate #creampie
    Double Chocolate Mint Chip Pie from 'The New Pie'. Chocolate pastry is drizzled with white and green chocolate, filled with a dark chocolate ganache, topped with chopped mints, then topped with a mint chocolate chip cream filling loaded up with crispy pearls. The whole thing is then finished with a cocoa whipped cream. If there was a pie version of the perfect scoop of mint chocolate chip ice cream, this pie would be it. #mintchip #doublechocolate #creampie
    Double Chocolate Mint Chip Pie from 'The New Pie'. Chocolate pastry is drizzled with white and green chocolate, filled with a dark chocolate ganache, topped with chopped mints, then topped with a mint chocolate chip cream filling loaded up with crispy pearls. The whole thing is then finished with a cocoa whipped cream. If there was a pie version of the perfect scoop of mint chocolate chip ice cream, this pie would be it. #mintchip #doublechocolate #creampie
    Double Chocolate Mint Chip Pie from 'The New Pie'. Chocolate pastry is drizzled with white and green chocolate, filled with a dark chocolate ganache, topped with chopped mints, then topped with a mint chocolate chip cream filling loaded up with crispy pearls. The whole thing is then finished with a cocoa whipped cream. If there was a pie version of the perfect scoop of mint chocolate chip ice cream, this pie would be it. #mintchip #doublechocolate #creampie

    Double Chocolate Mint Chip Pie

    I’m a big fan of drawing out fun dates to last a whole week. With my birthday, I tend to make it birthday month, which is really just an excuse to go fun places and buy fun things. Going off that same logic, this week is pie week! The 14th of March is International Pi(e) day, (in America the date is written at 3/14, hence pi day), so I’m calling it pie week. I have a couple of super fun recipes coming your way, starting with this ridiculously good Double Chocolate Mint Chip Pie.

    This recipe comes from Chris Taylor and Paul Arguin’s book that comes out on the 14th, called ‘The New Pie’. Chris and Paul are a married couple from Georgia, who were originally brought together by baking, and have made it their hobby entering (and winning) all kinds of pie contests (which I had no idea were a thing until I read their book!). The book is just beautiful - and filled with the most inventive, unique pie recipes I have ever seen. All the recipes are super clearly explained (and have weight measurements!!), and I am so, so excited to make some more pies from it!

    The New Pie by Christ Taylor and Paul Arguin

    I had a really hard time picking a recipe to share here with you - I must have flicked through the book 10 or 15 times before I finally found myself returning over and over again to this Double Chocolate Mint Chip Pie. Mint chocolate chip is my all time fave flavour of ice cream - always has been, always will be. This recipe encapsulates all the aspects of the flavour, with a cocoa pastry, a layer of ganache topped with chopped mints, a mint chip cream topping filled with crispy pearls (!!), and a cocoa whipped cream. Alone, the components are amazing, but together, they combine to form some kind of magic combination. If mint chocolate chip ice cream was a pie, this is exactly what it would taste like.

    A few wee tips for Double Chocolate Mint Chip Pie

    • I used a ‘deep dish’ pie plate for this recipe - Chris and Paul describe this as having a top internal diameter of 9 ⅛” to 9 ⅝”, between 1 ⅜” and 2” tall, and having a capacity for about 5 cups filling.
    • This pie can be broken up over a few days if you like - I made the pie dough then gave it an overnight rest, then the next day I blind baked the shell, did the ganache, let it set, then added the mint cream layer, and let it set for 4 hours before finishing it off.
    • The wee drizzle on the shell is a cute, quick step - Chris and Paul use white chocolate and green candy melts, but I popped a little bit of gel food colouring into some white chocolate to make the green and it worked great!
    • I used super orange yolks when I was making the filling, so ended up adding a bit more food colouring to counter this - if you don’t want a super green pie, slightly paler yolks might work better!

    For more Peppermint Recipes, Check out:

    • No-Bake Peppermint Slice
    • Black Cocoa Brownie Ice Cream Sandwiches with Oreo Mint Chip Philadelphia Style Ice Cream
    • Dark Chocolate Peppermint Sweet Rolls
    • Mint Chocolate Chip Macarons with German Buttercream

    ❤️ Made this recipe and love it? ❤️

    I would LOVE for you to leave me a review and star rating below to let me know how you liked it! Also, please make sure to tag me on Instagram!

    Answers to your baking questions

    Over the years, many of you have asked me questions about:

    • baking in grams
    • adjusting oven temperatures
    • what kind of salt to use
    • and many more!

    I've curated and answered them all for your easy reference in this frequently asked questions post!

    Filed Under: Single-crust pies

    Passionfruit and White Chocolate Macarons

    Passionfruit and White Chocolate Macarons - Vanilla bean macaron shell, filled with white chocolate swiss meringue buttercream and tangy passionfruit curd, then finished with a chocolate drizzle. #frenchmacaron #macarons #passionfruit
    Passionfruit and White Chocolate Macarons - Vanilla bean macaron shell, filled with white chocolate swiss meringue buttercream and tangy passionfruit curd, then finished with a chocolate drizzle. #frenchmacaron #macarons #passionfruit
    Passionfruit and White Chocolate Macarons - Vanilla bean macaron shell, filled with white chocolate swiss meringue buttercream and tangy passionfruit curd, then finished with a chocolate drizzle. #frenchmacaron #macarons #passionfruit
    Passionfruit and White Chocolate Macarons - Vanilla bean macaron shell, filled with white chocolate swiss meringue buttercream and tangy passionfruit curd, then finished with a chocolate drizzle. #frenchmacaron #macarons #passionfruit
    Passionfruit and White Chocolate Macarons - Vanilla bean macaron shell, filled with white chocolate swiss meringue buttercream and tangy passionfruit curd, then finished with a chocolate drizzle. #frenchmacaron #macarons #passionfruit
    Passionfruit and White Chocolate Macarons - Vanilla bean macaron shell, filled with white chocolate swiss meringue buttercream and tangy passionfruit curd, then finished with a chocolate drizzle. #frenchmacaron #macarons #passionfruit
    Passionfruit and White Chocolate Macarons - Vanilla bean macaron shell, filled with white chocolate swiss meringue buttercream and tangy passionfruit curd, then finished with a chocolate drizzle. #frenchmacaron #macarons #passionfruit

    Hi! Coming at you with a wee spring inspired macaron this month! Ever since I discovered that the supermarket near me sells passionfruit pulp in a pouch, it’s been going into everything (I made passionfruit cream puffs today, coming at you soon!). I had some passionfruit curd leftover from testing this passionfruit layer cake a while back, so we repurposed it in these macs.

    The passionfruit curd is perfect for a mac filling - it is thick and silky, and the passionfruit cuts through the yolks and butter in the curd, giving it a much ‘lighter’ taste than something like lemon curd, which I find can get a little bogged down by the egg yolks and butter if it isn’t done right. We kept the pairing simple and filled the mac with a white chocolate swiss meringue buttercream - creamy and smooth, and the perfect compliment to the tangy curd filling. The shells were finished with a quick drizzle of white and passionfruit chocolate - which is a totally optional but super cute detail to add to tie everything together.

    You could absolutely customise these if you wanted - you could do a lemon curd in the middle, or ditch the white chocolate in the buttercream and just have it as a vanilla base. The cool thing about macarons is that you can really mix and match the filling - we have found it easiest to keep the base shell the same recipe, coloured to compliment the flavour, and then drive the flavour through the fillings. So, please feel free to mix and match these as you feel fit! It’s all part of the fun.

    A few wee tips:

    • All my Macaron tips are here!
    • Ideally, the passionfruit curd needs overnight to chill to come to the right consistency.
    • The White chocolate buttercream can be a little soft when you first add the chocolate. Popping it in the fridge for 10-15 minutes will help to firm it up, or you can pipe the macarons then rest in the fridge for an hour or so to help firm it up.

    ❤️ Made this recipe and love it? ❤️

    I would LOVE for you to leave me a review and star rating below to let me know how you liked it! Also, please make sure to tag me on Instagram!

    Answers to your baking questions

    Over the years, many of you have asked me questions about:

    • baking in grams
    • adjusting oven temperatures
    • what kind of salt to use
    • and many more!

    I've curated and answered them all for your easy reference in this frequently asked questions post!

    Filed Under: Macarons Tagged With: Gluten Free

    Dark Chocolate, Tahini, and Sesame Buns


    Dark Chocolate, Tahini, and Sesame Buns - a variation on the traditional swedish cinnamon bun, sweet dough is filled with a dark chocolate tahini spread, before being rolled out and twirled into perfect little buns. These are easy to make, and super pretty, not to mention crazy delicious. #swedishbuns #tahini #chocolate
    Dark Chocolate, Tahini, and Sesame Buns - a variation on the traditional swedish cinnamon bun, sweet dough is filled with a dark chocolate tahini spread, before being rolled out and twirled into perfect little buns. These are easy to make, and super pretty, not to mention crazy delicious. #swedishbuns #tahini #chocolate
    Dark Chocolate, Tahini, and Sesame Buns - a variation on the traditional swedish cinnamon bun, sweet dough is filled with a dark chocolate tahini spread, before being rolled out and twirled into perfect little buns. These are easy to make, and super pretty, not to mention crazy delicious. #swedishbuns #tahini #chocolate
    Dark Chocolate, Tahini, and Sesame Buns - a variation on the traditional swedish cinnamon bun, sweet dough is filled with a dark chocolate tahini spread, before being rolled out and twirled into perfect little buns. These are easy to make, and super pretty, not to mention crazy delicious. #swedishbuns #tahini #chocolate
    Dark Chocolate, Tahini, and Sesame Buns - a variation on the traditional swedish cinnamon bun, sweet dough is filled with a dark chocolate tahini spread, before being rolled out and twirled into perfect little buns. These are easy to make, and super pretty, not to mention crazy delicious. #swedishbuns #tahini #chocolate
    Dark Chocolate, Tahini, and Sesame Buns - a variation on the traditional swedish cinnamon bun, sweet dough is filled with a dark chocolate tahini spread, before being rolled out and twirled into perfect little buns. These are easy to make, and super pretty, not to mention crazy delicious. #swedishbuns #tahini #chocolate
    Dark Chocolate, Tahini, and Sesame Buns - a variation on the traditional swedish cinnamon bun, sweet dough is filled with a dark chocolate tahini spread, before being rolled out and twirled into perfect little buns. These are easy to make, and super pretty, not to mention crazy delicious. #swedishbuns #tahini #chocolate
    Dark Chocolate, Tahini, and Sesame Buns - a variation on the traditional swedish cinnamon bun, sweet dough is filled with a dark chocolate tahini spread, before being rolled out and twirled into perfect little buns. These are easy to make, and super pretty, not to mention crazy delicious. #swedishbuns #tahini #chocolate

    I’ve been meaning to post a wee variation on my Swedish Cinnamon Roll recipe for a while now, but just kinda never got around to it. It’s a super popular recipe on the blog, and I totally understand why - swirly bread, cardamom, and swedish pearl sugar is the most perfect combo.

    We dreamed these Dark Chocolate, Tahini, and Sesame buns up during a baking day with my good friend Rachel, who owns an amazing Tahini and Halva business, Seed and Mill, in Chelsea Market here in NYC. We spent the day shooting at her beautiful apartment in Chelsea - there was loads of Tahini and Chocolate, and a casual professional butt mask shoot going on in the living room (It’s exactly what you think it is). There was loads of baking, and a couple of weird recipe tests, and a whole lot of butts. Dream day, right?!

    I made the dough the evening before, and did the first rise in the fridge, and Rachel made a ridiculous dark chocolate tahini spread to go inside the buns. We rolled out the dough, slathered it with the chocolate tahini mixture, then folded it up, cut it into strips, and twisted the strips into twirly, swirly buns. The buns look complicated to make, but lots of the hard work is done by twisting the strip up so it is swirly before you shape it into the final bun.

    To me, these are the perfect variation on the swedish bun. Because there is no sugar in the filling, they aren’t super sweet, but the flavour of tahini and chocolate play beautifully with the sesame on top. They are easy to make but look fancy, and I love how fun and pretty the twisted dough looks. Enjoy! x

    A few wee tips:

    • This little tutorial from the lovely Izy is a perfect visual on how to make these! Basically you go around your fingers and thumb twice, then take your thumb out before you take the strip over the top and tuck it under. Watch the gif. It makes it much less confusing. Even if they get a bit messy, I promise they will still taste amazing
    • These aren’t super sweet. We finished them with some sesame seeds, but if you wanted to up the sweetness in them, you could finish them with some swedish pearl sugar.
    • Ideally the tahini chocolate filling needs a little bit of time to rest and cool - either overnight, or a few hours. It won’t go super solid like nutella, but it will thicken a little as it sits!
    • You may have a little filling leftover, but it is great served with the buns, on toast, or drizzled over a banana.
    • If I know I am making something ahead of time, I like to do the first rise overnight. Just make the bread dough, shape into a ball, and place into a large bowl (I usually just reuse my mixer bowl), and leave it in the fridge overnight. Then in the morning the dough is risen and will be super easy to work with! I find if I rise overnight I can skip the chilling step once the dough is rolled out.

    ❤️ Made this recipe and love it? ❤️

    I would LOVE for you to leave me a review and star rating below to let me know how you liked it! Also, please make sure to tag me on Instagram!

    Answers to your baking questions

    Over the years, many of you have asked me questions about:

    • baking in grams
    • adjusting oven temperatures
    • what kind of salt to use
    • and many more!

    I've curated and answered them all for your easy reference in this frequently asked questions post!

    Filed Under: Brioche, Buns and Rolls

    Vegan Chocolate Chunk Cookies

    These Vegan Chocolate Chunk cookies are not just super delicious and incredibly easy to make, but they also happen to be refined sugar free, AND vegan, and you would never know! The recipe comes from Maggie Batista's new beautiful book, "A new way to food".

    These cookies are not just super delicious and incredibly easy to make, but they also happen to be refined sugar free, AND vegan, and you would never know! The recipe comes from Maggie Batista's new beautiful book, "A new way to food". #chocolatechipcookies #vegan #refinedsugarfree #dairyfree
    These cookies are not just super delicious and incredibly easy to make, but they also happen to be refined sugar free, AND vegan, and you would never know! The recipe comes from Maggie Batista's new beautiful book, "A new way to food". #chocolatechipcookies #vegan #refinedsugarfree #dairyfree
    These cookies are not just super delicious and incredibly easy to make, but they also happen to be refined sugar free, AND vegan, and you would never know! The recipe comes from Maggie Batista's new beautiful book, "A new way to food". #chocolatechipcookies #vegan #refinedsugarfree #dairyfree
    These cookies are not just super delicious and incredibly easy to make, but they also happen to be refined sugar free, AND vegan, and you would never know! The recipe comes from Maggie Batista's new beautiful book, "A new way to food". #chocolatechipcookies #vegan #refinedsugarfree #dairyfree
    These cookies are not just super delicious and incredibly easy to make, but they also happen to be refined sugar free, AND vegan, and you would never know! The recipe comes from Maggie Batista's new beautiful book, "A new way to food". #chocolatechipcookies #vegan #refinedsugarfree #dairyfree
    These cookies are not just super delicious and incredibly easy to make, but they also happen to be refined sugar free, AND vegan, and you would never know! The recipe comes from Maggie Batista's new beautiful book, "A new way to food". #chocolatechipcookies #vegan #refinedsugarfree #dairyfree
    These cookies are not just super delicious and incredibly easy to make, but they also happen to be refined sugar free, AND vegan, and you would never know! The recipe comes from Maggie Batista's new beautiful book, "A new way to food". #chocolatechipcookies #vegan #refinedsugarfree #dairyfree

    Vegan Chocolate Chunk Cookies

    One of the cool parts about calling a little corner of the internet mine is that I get to meet other people who also inhabit wee spaces on the internet. As someone who pretty much packed up their life to move across the world to a place where I only knew one person, having a little online community of people also doing the same as me who I can connect with has been super, super important. I’ve made some amazing, amazing friends on the internet, some of which have turned into incredible real life friends too (I am literally sitting next to an IG friend turned real friend Erin as I write this - we are having a wee coffee shop date!).

    Today’s post comes from one of those Internet friend’s amazing new cookbook. I have been following the lovely Maggie for a long while now, and so was so excited when she released her beautiful new book, A New Way to Food. The book is not just filled with beautiful, nourishing recipes, but Maggie also writes about self love and acceptance, and goes deep into her wellness journey, talking about all the important things so many of us are too chicken to bring up. So many of her words resonated very deeply with me, particularly those about self love and acceptance, which is something I’ve struggled with for most of my life (along with most people, but, like I mentioned, most of us are too chicken to mention it!). Maggie’s writing is like being given a big snuggly hug - I was actually lucky enough to meet up with her a couple of days ago, and she’s even more amazing in person. Congrats on the book, lady! I am so, so excited to work my way through it! xx

    Flicking through the book, I had a super hard time deciding what to make - there are so many beautiful looking savoury recipes, along with some baking recipes I can’t wait to try out (can Rhubarb season please hurry up?!). I finally settled on these Chocolate Chip cookies, which just so happen to also be vegan and refined sugar free. I haven’t yet posted a vegan cookie recipe on this site, so figured this was a perfect way to get one up here! These come together super quickly, with no stand mixer required - everything is just whisked up, then rested in the fridge until you’re ready to bake them off. I finished them off with a heavy dose of salt - and they didn’t last long at all. Maggie uses coconut sugar and maple sugar in these - this was my first time baking with maple sugar, and I loved the subtle flavour it leant to the cookies. These are definitely going to be on heavy rotation in my house now. They would be the perfect dessert to prepare ahead for a dinner party etc - nobody can resist warm cookies.

    A few wee tips for making Vegan Chocolate Chunk Cookies

    • The cookies need to rest for 6-12 hours - I actually got a bit distracted and left them for a full 24 hours, which worked great too!
    • Maggie uses a 1 tablespoon scoop for her cookies, but I sometimes like them a bit bigger, so I used a 2 Tbsp. Either works great - I tested both, just decrease the bake time by a minute for the 1 tablespoon size.
    • I also popped the scooped dough in the freezer just for 15 min before I baked to help it hold the shape. This step is totally optional, but I really like scooping all the dough and storing it chilled so I can do some dishes while it bakes, and feel like I somewhat have my shit together!

    Similar Recipes to Vegan Chocolate Chunk Cookies

    • My Perfect Chocolate Chip Cookie
    • Small Batch Double Chocolate, Olive Oil and Rye Cookies
    • Brown Butter Salted Caramel Chocolate Chunk Cookies

    ❤️ Made this recipe and love it? ❤️

    I would LOVE for you to leave me a review and star rating below to let me know how you liked it! Also, please make sure to tag me on Instagram!

    Answers to your baking questions

    Over the years, many of you have asked me questions about:

    • baking in grams
    • adjusting oven temperatures
    • what kind of salt to use
    • and many more!

    I've curated and answered them all for your easy reference in this frequently asked questions post!

    Filed Under: Chocolate Chip Cookies Tagged With: Dairy Free, Vegan

    No Bake Chocolate Cheesecake with Raspberry Balsamic Glaze

    This No Bake Chocolate Cheesecake ticks all the boxes - the chocolate graham cracker base is thick, with the perfect balance of salt. It is then topped with a fluffy, creamy, rich, chocolate filling, which is loaded with dutch process cocoa and dark chocolate, which gives it a super rich chocolate flavour, and helps it set without the need for gelatine. The filling is smoothed onto the crust, then the whole thing is set in the fridge.

    No Bake Chocolate Cheesecake - a chocolate graham cracker base is topped with a silky, no bake chocolate cheesecake filling, and finished with a drizzle of sweet, sticky raspberry balsamic glaze. This dessert comes together quickly, and is perfect for feeding a crowd. #cheesecake #chocolatecheesecake #nobakecheesecake
    No Bake Chocolate Cheesecake - a chocolate graham cracker base is topped with a silky, no bake chocolate cheesecake filling, and finished with a drizzle of sweet, sticky raspberry balsamic glaze. This dessert comes together quickly, and is perfect for feeding a crowd. #cheesecake #chocolatecheesecake #nobakecheesecake
    No Bake Chocolate Cheesecake - a chocolate graham cracker base is topped with a silky, no bake chocolate cheesecake filling, and finished with a drizzle of sweet, sticky raspberry balsamic glaze. This dessert comes together quickly, and is perfect for feeding a crowd. #cheesecake #chocolatecheesecake #nobakecheesecake

    I really, really love cheesecake. I get asked lots where all the food that I make goes, and how I manage not to eat it all. The truth is, when I’ve made something 3,4,5,6 times in a row to test, it’s pretty easy to stay away. I usually have a little bite, and then send it to a friend’s place or to the studio. Not cheesecake though. I have absolutely zero self control when it comes to cheesecake. I have to have a wee bit for myself, and then immediately treat all my friends / whoever will take the cheesecake off my hands, otherwise it slowly but surely disappears. Which totally isn’t a bad thing. I have a little bit in a container in the fridge right now, and over the course of writing this post, I’ve already snuck about six little bites. It’s just the best.

    However, it’s not all cheesecake that I love. I didn’t really grow up on baked cheesecake like lots of people over here did - Cheesecake in New Zealand tends to be the no bake variety, a creamy base set with gelatine, rather than baked in the oven. I much prefer the texture of a no-bake cheesecake to a baked one, and they are so much easier to make - a crust comes together quickly in the food processor, and is topped with a silky, smooth filling. A quick nap in the fridge, and you have a super simple dessert that is perfect for serving a crowd.

    I finished this cheesecake with a Raspberry Balsamic Glaze. It cut perfectly through the chocolate filling, and the raspberry in the glaze complimented the chocolate in the most amazing way. This cheesecake is literally everything I want in a dessert, all tied into one. This is absolutely going to be my go-to dessert from now on when I need something that is quick, easy, and everyone will love.

    No Bake Chocolate Cheesecake - a chocolate graham cracker base is topped with a silky, no bake chocolate cheesecake filling, and finished with a drizzle of sweet, sticky raspberry balsamic glaze. This dessert comes together quickly, and is perfect for feeding a crowd. #cheesecake #chocolatecheesecake #nobakecheesecake

    A few wee tips:

    • There are two measures of cream in this recipe - the first gets whipped up and folded into the mixture, and the second is to loosen the mixture slightly once you have added the chocolate. When you are folding in the whipped cream before you put it into the tin, after it is incorporated, if you find it is still a little too thick for your liking, you can add liquid heavy cream about a tablespoon at a time to help loosen it further - you can add up to about 4 tablespoon without affecting the texture too much, just make sure it is very well incorporated.
    • Ideally, this needs to set for a few hours or overnight in the fridge, but if you are pressed for time, about two hours rest will do in a pinch.
    • I used this cheesecake pan, and lined it with a circle of parchment paper on the bottom, and then a collar of acetate. Parchment paper around the edge would work fine too, but I love how cleanly it pulls away with the acetate. A springform pan would work great too.
    • If you don't have a stand mixer, you can do this with an electric hand mixer in a big bowl! Just make sure to really beat the cream cheese mixture until it is nice and fluffy - make sure your cream cheese is very room temperature for this.
    • This recipe can easily be scaled if you are making for a crowd, or if you don’t have a springform pan it will be great in an 8” square pan - just make sure that you give it a good parchment sling.
    No Bake Chocolate Cheesecake - a chocolate graham cracker base is topped with a silky, no bake chocolate cheesecake filling, and finished with a drizzle of sweet, sticky raspberry balsamic glaze. This dessert comes together quickly, and is perfect for feeding a crowd. #cheesecake #chocolatecheesecake #nobakecheesecake

    ❤️ Made this recipe and love it? ❤️

    I would LOVE for you to leave me a review and star rating below to let me know how you liked it! Also, please make sure to tag me on Instagram!

    Answers to your baking questions

    Over the years, many of you have asked me questions about:

    • baking in grams
    • adjusting oven temperatures
    • what kind of salt to use
    • and many more!

    I've curated and answered them all for your easy reference in this frequently asked questions post!

    No Bake Chocolate Cheesecake - a chocolate graham cracker base is topped with a silky, no bake chocolate cheesecake filling, and finished with a drizzle of sweet, sticky raspberry balsamic glaze. This dessert comes together quickly, and is perfect for feeding a crowd. #cheesecake #chocolatecheesecake #nobakecheesecake

    Filed Under: Cheesecakes

    One Bowl Devil's Food Bundt Cake with Bay Leaf Caramel


    One Bowl Devil's food bundt cake with bay leaf caramel - a dense, moist chocolate bundt cake is loaded up with a lightly infused bay caramel. The cake is amazing alone, but with the caramel it is the perfect match. #devilsfoodcake #chocolatebundtcake #baycaramel
    One Bowl Devil's food bundt cake with bay leaf caramel - a dense, moist chocolate bundt cake is loaded up with a lightly infused bay caramel. The cake is amazing alone, but with the caramel it is the perfect match. #devilsfoodcake #chocolatebundtcake #baycaramel
    One Bowl Devil's food bundt cake with bay leaf caramel - a dense, moist chocolate bundt cake is loaded up with a lightly infused bay caramel. The cake is amazing alone, but with the caramel it is the perfect match. #devilsfoodcake #chocolatebundtcake #baycaramel
    One Bowl Devil's food bundt cake with bay leaf caramel - a dense, moist chocolate bundt cake is loaded up with a lightly infused bay caramel. The cake is amazing alone, but with the caramel it is the perfect match. #devilsfoodcake #chocolatebundtcake #baycaramel
    One Bowl Devil's food bundt cake with bay leaf caramel - a dense, moist chocolate bundt cake is loaded up with a lightly infused bay caramel. The cake is amazing alone, but with the caramel it is the perfect match. #devilsfoodcake #chocolatebundtcake #baycaramel
    One Bowl Devil's food bundt cake with bay leaf caramel - a dense, moist chocolate bundt cake is loaded up with a lightly infused bay caramel. The cake is amazing alone, but with the caramel it is the perfect match. #devilsfoodcake #chocolatebundtcake #baycaramel

    Hi hi! I’m back with a wee variation on an old friend of mine - this Devil’s food Bundt Cake with a Bay Caramel. One of my very favourite chocolate cakes comes from my friend Stella’s book - it is rich, the most amazing texture, and comes together in one bowl. The layers bake beautifully flat, which makes it a dream to stack up into a layer cake.

    After I made a bundt cake a few weeks back, I haven’t been able to stop thinking about them - I love how easy they are, that they don’t need a frosting, and that the fancy pan does most of the work. I wanted to develop a go-to chocolate bundt cake, but thought maybe first I could try and see if this Devil’s food cake could be adapted for a bundt recipe. And not only did it turn out amazingly, but the quantity of batter required for the layer cake happened to also be the perfect amount needed for a bundt cake. I was expecting a huge amount of recipe testing, but since this worked, and it’s one of my faves, I figured I might as well stick with this!

    This cake was originally going to have a tahini caramel on it, but my friend tagged me in a post recently that had doughnuts with a bay leaf caramel, so I figured I needed to give that a try. The bay gives a beautifully subtle flavour to the caramel - not too overpowering, but a slight variation on the traditional caramel taste. It goes perfectly with the not too sweet cake. The cake is amazing alone - perfectly dense, so if you don’t want to make the caramel to go alongside, a quick dust of icing sugar would be delicious too.

    A few wee tips:

    • If you need cup or oz measurements for this, you can see the original post. I adapted the method just slightly to make this done in one bowl rather than a pot. It’s super easy to just plonk the bowl down on the scale and add everything in!
    • I used the Bavaria pan by Nordicware
    • Bundt cakes can be a bit intimidating. You have to spray the shit out of with baking spray, then dust it with either flour or cocoa powder. Alternatively I like the baking spray with flour and then a little dust of cocoa. 10 minutes also seems to be the sweet spot in terms of cooling time to get the cake out of the pan - set a timer as soon as you take it out of the oven.
    • I used a 10 cup bundt pan - the batter will all fit if you want it to, but I found it best to hold back just a little to make sure it won’t overflow in the oven (about ¼ cup) - I baked it in a little ramekin and had a little snack!
    • Ideally you want to give the caramel time to cool - if it is too thick to pour, you can quickly zap in the microwave for 30 seconds at a time.
    • This cake is super moist, so keeps super well - just store in an airtight container at room temperature.

    ❤️ Made this recipe and love it? ❤️

    I would LOVE for you to leave me a review and star rating below to let me know how you liked it! Also, please make sure to tag me on Instagram!

    Answers to your baking questions

    Over the years, many of you have asked me questions about:

    • baking in grams
    • adjusting oven temperatures
    • what kind of salt to use
    • and many more!

    I've curated and answered them all for your easy reference in this frequently asked questions post!

    Filed Under: Bundt Cakes

    Vanilla Layer Cake

    Vanilla Layer Cake with Passionfruit Curd and Vanilla Swiss Meringue Buttercream. Perfect for any occasion - layers of vanilla cake are sandwiched with a silky vanilla bean Swiss meringue buttercream, and filled with a tangy, creamy passionfruit curd.

    Vanilla Layer Cake with Passionfruit Curd and Vanilla Swiss Meringue Buttercream. Perfect for any occasion - layers of vanilla cake are sandwiched with a silky vanilla bean swiss meringue buttercream, and filled with a tangy, creamy passionfruit curd. #layercake #passionfruitcake
    Vanilla Layer Cake with Passionfruit Curd and Vanilla Swiss Meringue Buttercream. Perfect for any occasion - layers of vanilla cake are sandwiched with a silky vanilla bean swiss meringue buttercream, and filled with a tangy, creamy passionfruit curd. #layercake #passionfruitcake
    Vanilla Layer Cake with Passionfruit Curd and Vanilla Swiss Meringue Buttercream. Perfect for any occasion - layers of vanilla cake are sandwiched with a silky vanilla bean swiss meringue buttercream, and filled with a tangy, creamy passionfruit curd. #layercake #passionfruitcake
    Vanilla Layer Cake with Passionfruit Curd and Vanilla Swiss Meringue Buttercream. Perfect for any occasion - layers of vanilla cake are sandwiched with a silky vanilla bean swiss meringue buttercream, and filled with a tangy, creamy passionfruit curd. #layercake #passionfruitcake
    Vanilla Layer Cake with Passionfruit Curd and Vanilla Swiss Meringue Buttercream. Perfect for any occasion - layers of vanilla cake are sandwiched with a silky vanilla bean swiss meringue buttercream, and filled with a tangy, creamy passionfruit curd. #layercake #passionfruitcake
    Vanilla Layer Cake with Passionfruit Curd and Vanilla Swiss Meringue Buttercream. Perfect for any occasion - layers of vanilla cake are sandwiched with a silky vanilla bean swiss meringue buttercream, and filled with a tangy, creamy passionfruit curd. #layercake #passionfruitcake
    Vanilla Layer Cake with Passionfruit Curd and Vanilla Swiss Meringue Buttercream. Perfect for any occasion - layers of vanilla cake are sandwiched with a silky vanilla bean swiss meringue buttercream, and filled with a tangy, creamy passionfruit curd. #layercake #passionfruitcake
    Vanilla Layer Cake with Passionfruit Curd and Vanilla Swiss Meringue Buttercream. Perfect for any occasion - layers of vanilla cake are sandwiched with a silky vanilla bean swiss meringue buttercream, and filled with a tangy, creamy passionfruit curd. #layercake #passionfruitcake

    Vanilla Layer Cake with Passionfruit Curd and Vanilla Bean Swiss Meringue Buttercream

    It’s always around this time of year that it feels like winter is never, ever going to end. February really tends to drag it’s butt round here - today we had snow, then freezing rain (never seen that wee symbol on my weather app until I moved here, and it’s not a fun one), so it’s kind of hard to motivate myself to do anything other than stay inside with the cat and eat soup. Which is exactly what we have been doing. Whoopsies.

    I’ve been meaning to make this Vanilla Layer cake for a while now. Passionfruit is my ultimate fave fruit of all time, but almost impossible to find in NYC. It grows like crazy in New Zealand, and so I guess I just assumed it would be easy to get here, but unfortunately this is not the case. However, my local supermarket has just started stocking it in pouches (most exciting day ever when I realised), so I’m super super excited to start sharing more passionfruit recipes! I am dying to add the curd as a ripple in an ice cream, or as the base for a passionfruit cream filling in a cream puff.

    Passionfruit Curd

    If you haven’t made passionfruit curd before, it’s almost exactly the same process as making lemon curd. I removed the seeds to make the curd, then added back in a few tablespoons of them, which is nice to give a little crunch without being too overwhelming. The thing I love about passionfruit curd is that the fruit is tart enough to stand up to the egg yolks, so you don’t run the risk of the eggy taste you can get with other fruit curds, but still get the delicious flavour and velvety texture from the yolks.

    The rest of the decisions from there in terms of flavour pairing were super simple - I made a basic vanilla bean layer cake, and paired it with a silky vanilla bean Swiss meringue buttercream. Both of these serve as the perfect base to make the curd filling really shine.

    How to make an Ombre Finish on a Vanilla Layer cake

    I finished the vanilla layer cake with an ombre finish, which is one of my favourite ways to ice a cake. You essentially plop the buttercream on, creating a gradient, then smooth it all with a bench scraper to create a beautiful ombre effect. If you haven’t tried it before it’s definitely worth giving a go - it’s super easy, but really really effective.

    This cake would make the most amazing birthday cake, or anytime cake! Happy February! I hope it’s less dreary than mine.

    A few wee tips for Vanilla Passionfruit Cake:

    • This cake was made with the reverse creaming method - instead of creaming the butter and sugar together, you slowly incorporate the butter into the dry ingredients. This means that the flour particles get coated in the butter, inhibiting the formation of gluten, and giving you a tender crumb. With that being said, I did go for a slightly denser textured cake, in order to have something which stands up to the filling and buttercream.
    • For the passionfruit filling, I used pulp I found in a pouch at my local supermarket. The recipe for the curd does make quite a lot because I think it’s an amazing thing to have on hand. You can either use frozen passionfruit pulp for this recipe (don’t worry if it doesn’t have seeds in it), fresh, or packaged pulp. If you don’t like seeds in your curd, they can be left out.
    • I use Fat Daddio’s Cake pans - they aren’t too expensive, and give me a clean cake every time!
    • I like to divide the batter between the pans by weight. To do this, you zero the scales with one of the empty cake pans on it, then once you have eyeballed your dividing of the batter, you can weigh each pan to ensure that they have the same weight of batter in them. Note that this only works if your cake pans are identical.
    • If I can, I like to make the cake ahead of time, then wrap and store in the fridge until I am ready to assemble. Level it off just before you assemble.
    • I decorated this with an ombre style buttercream, then put the remainder of the buttercream (both the white and yellow) into a piping bag fitted with a wilton 1M tip, and piped on the little blobs at the top. Fill and crumb coat the cake, and then divide the rest of the buttercream ⅔ to ⅓ and colour the ⅓ portion yellow.

    Related recipes to Vanilla Layer Cake with Passionfruit Curd and Vanilla Swiss Meringue Buttercream

    • Passionfruit and White Chocolate Macarons
    • Funfetti Cake with Chocolate American Buttercream
    • Passionfruit Loaf Cake
    • Small Batch No-Bake Passionfruit and Lemon Meringue Bars
    • Two Layer Vanilla Bean Buttermilk Cake

    ❤️ Made this recipe and love it? ❤️

    I would LOVE for you to leave me a review and star rating below to let me know how you liked it! Also, please make sure to tag me on Instagram!

    Answers to your baking questions

    Over the years, many of you have asked me questions about:

    • baking in grams
    • adjusting oven temperatures
    • what kind of salt to use
    • and many more!

    I've curated and answered them all for your easy reference in this frequently asked questions post!

    Filed Under: Layer Cakes

    Caramelised White Chocolate Brownie Cookies with Salted Dark Chocolate German Buttercream


    Caramelised White Chocolate Brownie Cookies with Salted Dark Chocolate German Buttercream. Perfect tiny mouthfuls of soft chocolate brownie cookie filled with caramelised white chocolate specks, and sandwiched with silky buttercream. These are bound to become your new favourite. #sandwichcookies #browniecookie #germanbuttercream
    Caramelised White Chocolate Brownie Cookies with Salted Dark Chocolate German Buttercream. Perfect tiny mouthfuls of soft chocolate brownie cookie filled with caramelised white chocolate specks, and sandwiched with silky buttercream. These are bound to become your new favourite. #sandwichcookies #browniecookie #germanbuttercream
    Caramelised White Chocolate Brownie Cookies with Salted Dark Chocolate German Buttercream. Perfect tiny mouthfuls of soft chocolate brownie cookie filled with caramelised white chocolate specks, and sandwiched with silky buttercream. These are bound to become your new favourite. #sandwichcookies #browniecookie #germanbuttercream
    Caramelised White Chocolate Brownie Cookies with Salted Dark Chocolate German Buttercream. Perfect tiny mouthfuls of soft chocolate brownie cookie filled with caramelised white chocolate specks, and sandwiched with silky buttercream. These are bound to become your new favourite. #sandwichcookies #browniecookie #germanbuttercream
    Caramelised White Chocolate Brownie Cookies with Salted Dark Chocolate German Buttercream. Perfect tiny mouthfuls of soft chocolate brownie cookie filled with caramelised white chocolate specks, and sandwiched with silky buttercream. These are bound to become your new favourite. #sandwichcookies #browniecookie #germanbuttercream
    Caramelised White Chocolate Brownie Cookies with Salted Dark Chocolate German Buttercream. Perfect tiny mouthfuls of soft chocolate brownie cookie filled with caramelised white chocolate specks, and sandwiched with silky buttercream. These are bound to become your new favourite. #sandwichcookies #browniecookie #germanbuttercream
    Caramelised White Chocolate Brownie Cookies with Salted Dark Chocolate German Buttercream. Perfect tiny mouthfuls of soft chocolate brownie cookie filled with caramelised white chocolate specks, and sandwiched with silky buttercream. These are bound to become your new favourite. #sandwichcookies #browniecookie #germanbuttercream

    Hi! Here with another collab - this time these super delicious Caramelised White Chocolate Brownie Cookies with Salted Dark Chocolate German Buttercream. They sound like a mouthful, and they truly are, but the good kind. lolz.

    These wee cookies were something that my friend Becky and I dreamt up for Cherry Bombe University last year. We partnered up for a bake-off, and because we live on opposite coasts, decided to divide and conquer our recipe by doing a sandwich cookie, and coming up with one component each. Being our resident internet cookie queen, Becky whipped up these incredible cookies - little brownie cookies with a caramelised white chocolate ‘dust’ swirled throughout. I paired them with my very favourite thing - a salted chocolate german buttercream. Alone, the components are pretty good, but paired up, these cookies are just ridiculous. The cookies are perfectly soft, and sandwiched with the slightly salty, silky buttercream, they are some of the very best cookies I have had in quite some time. Becky came around the morning of the event and we baked our little butts off, filling my teeny apartment with boxes and boxes of cookies - we had to make 200, so kept them on the small side, because making 400 cookies is a whole shitload of cookies. They won crowd favourite at the event, and I promise you they will become your new favourite too.

    A few wee tips:

    • Don’t go out and buy amazing quality white chocolate for this. Get good dutch cocoa and good dark chocolate and good butter, but we found that for a great dusty texture, regular white baking chips worked best. We used the white baking chips from Ghirardelli.
    • The time for the caramelised white chocolate may vary from brand to brand. If you take it too far by mistake and it goes smooth again, just chop up once cool into small pieces.
    • The white chocolate dust recipe is easily doubled on one half sheet pan - I suggest making extra because they are super good to have as a garnish for a dessert, or just for a quick stress eat when you need it (happened to me v recently)
    • You will see that there is bread flour and all-purpose flour in these cookies, which is a signature move of Becky’s. It gives the cookies amazing height and chew - don’t skip it if you are able. If you are in NZ, Bread flour is the same as High-grade.
    • I used King Arthur’s Double dutch cocoa for this - which is a blend of black cocoa and dutch cocoa, so the cookies came out a little darker than they would if you used regular dutch cocoa. Either works!
    • These will seem small, but remember that there will be two cookies, plus buttercream in a sandwich. They pack a wee punch. A tablespoon cookie scoop really helps to keep them consistent in size.
    • Muscovado sugar is great - it is dark and super flavourful. If you can’t get hold of it, dark brown sugar works great too.
    • The dough for the cookies will seem quite loose - but with an overnight rest it firms up nicely. Make sure you account time for this.

    ❤️ Made this recipe and love it? ❤️

    I would LOVE for you to leave me a review and star rating below to let me know how you liked it! Also, please make sure to tag me on Instagram!

    Answers to your baking questions

    Over the years, many of you have asked me questions about:

    • baking in grams
    • adjusting oven temperatures
    • what kind of salt to use
    • and many more!

    I've curated and answered them all for your easy reference in this frequently asked questions post!

    Filed Under: Sandwich Cookies

    The Ultimate Valentine's Day Treat Box

    The Ultimate Valentine's Day treat box - a perfect mix of cookies and sweet treats to help celebrate valentine's day or the ones you love. This would make the most amazing gift - we included macarons, painted sugar cookies, linzer cookies, chocolate sandwich cookies, meringue kisses, soft earl grey caramels, and marshmallow hearts.

    The Ultimate Valentine's Day treat box - a perfect mix of cookies and sweet treats to help celebrate valentine's day or the ones you love. This would make the most amazing gift - we included macarons, painted sugar cookies, linzer cookies, chocolate sandwich cookies, meringue kisses, soft earl grey caramels, and marshmallow hearts. #valentinesday #cookiebox
    The Ultimate Valentine's Day treat box - a perfect mix of cookies and sweet treats to help celebrate valentine's day or the ones you love. This would make the most amazing gift - we included macarons, painted sugar cookies, linzer cookies, chocolate sandwich cookies, meringue kisses, soft earl grey caramels, and marshmallow hearts. #valentinesday #cookiebox

    Valentine's Day Treat Box

    I couldn’t let Valentine’s day go by without a sneaky wee cookie box, or in this case, a Valentine's Treat Box! Personally I’m not a giant fan of Valentine’s day, but what I do really love is making super cute pink stuff, so here we are! My friend Chelsea reached out a while back and asked if I wanted to do a wee valentine’s day collab with some macarons, so I roped in Jase and we took it one step further and came up with this epic Valentine’s treat box! We each did a bunch of prep the day before, then got together and put it all together, hung out, and took 12 zillion photos. It was the best day.

    To make our Valentine's Treat Box, Jase and I made Dark Chocolate and Raspberry Macarons (classic v day flavour, chocolate and berries), and then some meringue kisses, which are super easy to make - the recipe makes loads, and they keep for a super long time. We also tried our hand at making some soft caramels, which turned out beautifully. We made an earl grey version, and I’m now hooked on making them and can’t wait to make more in the future. Finally, we also made some super cute marshmallow hearts, flavoured with a freeze dried raspberry powder.

    Chelsea brought Sugar cookies, linzers, and chocolate sandwich cookies. She ices the cookies with royal icing and then paints on them with edible paint - I am totally, totally blown away by her talent. She did some wee heart cookies which became little conversation hearts, and then made THE most amazing, detailed, valentine’s themed cookies I have ever, ever seen. She chatted away while she just casually painted macarons, a task which would have me hiding in the corner in tears five seconds in. She’s also just an amazing human being, and will be opening a bakeshop in the near future. I am so excited for her, but also so, so grateful that I am lucky enough to call so many amazingly talented people my friends! Yay to more collabs in the future!

    • Valentine's Sugar Cookies
    • Valentine's Macarons

    Components of Valentine's Day Treat Box

    • Earl Grey caramels
    • Vanilla bean Meringue Kisses
    • Raspberry Heart Shaped Marshmallows
    • Linzer Cookies with Raspberry Jam (Chelsea brought these but I have included a version below)
    • Dark Chocolate and Raspberry Macarons - Recipe Here
    • Chocolate Sandwich Cookies (This recipe, but without any leavener, and filled with extra buttercream from the macarons)
    • Decorated Sugar cookies (Chelsea made these with her recipe, but I have a version here - I like this royal icing recipe)
    The Ultimate Valentine's Day treat box - a perfect mix of cookies and sweet treats to help celebrate valentine's day or the ones you love. This would make the most amazing gift - we included macarons, painted sugar cookies, linzer cookies, chocolate sandwich cookies, meringue kisses, soft earl grey caramels, and marshmallow hearts. #valentinesday #cookiebox

    A few wee tips for making a treat box

    • The key to a good Cookie box (in my opinion), is choosing one colour and sticking with it as a theme throughout. We went with pink for this Valentine's Day Treat Box
    • We did all the prep work the day beforehand, then put it together and shot it the next day!
    • Make sure you plan out your cookie box before you start so that you have a good mixture of things - I like to do a combination of cookies but also little sweet treaty things such as as the caramels and the meringue kisses
    • A good way of making things a little easier on yourself is to make some components that can be used in a few places - for example, the jam and the buttercream from the macarons can be used to fill the linzers and chocolate cookies.
    • Here is the box we used - I got Rich to make us some dividers on the laser cutter.
    • corner shot of valentine's day treat box
    • Valentines' day macarons
    The Ultimate Valentine's Day treat box - a perfect mix of cookies and sweet treats to help celebrate valentine's day or the ones you love. This would make the most amazing gift - we included macarons, painted sugar cookies, linzer cookies, chocolate sandwich cookies, meringue kisses, soft earl grey caramels, and marshmallow hearts. #valentinesday #cookiebox

    For more Treat Box Recipes, check out:

    • The Ultimate Christmas Cookie Box
    • Easter Treat Box
    • Vanilla Bean Treat Box
    • Holiday Bar Box
    • Easter Macaron Box

    ❤️ Made this recipe and love it? ❤️

    I would LOVE for you to leave me a review and star rating below to let me know how you liked it! Also, please make sure to tag me on Instagram!

    Answers to your baking questions

    Over the years, many of you have asked me questions about:

    • baking in grams
    • adjusting oven temperatures
    • what kind of salt to use
    • and many more!

    I've curated and answered them all for your easy reference in this frequently asked questions post!

    Filed Under: Treat Boxes

    Raspberry and Dark Chocolate Macarons

    These Raspberry Dark Chocolate French Macarons are perfect for Valentines' day or an any time treat. A macaron shell is filled with a dark chocolate Swiss Meringue Buttercream and a Raspberry Jam Filling.

    Raspberry and Dark Chocolate Macarons - A classic pink shell, filled with a homemade raspberry quick jam, and a silky Dark chocolate swiss meringue buttercream, deepened with a little black cocoa. These are a classic valentine's day pairing, and would be perfect as a gift, but would also make an amazing anytime treat for a chocolate or berry lover. #frenchmacaron #valentinesmacaron
    • chocolate raspberry macarons
    • raspberry chocolate macarons on sheet pan

    Raspberry Chocolate Macarons

    Hi! Happy Happy Wednesday! Things have been a little hectic around here - we are preparing to shoot our new collection for the studio this Saturday, which is super exciting, but it wouldn’t be shoot prep without a wee bit of last minute running around trying to get everything sorted (currently waiting for an email from a lady about a fig tree). I wanted to quickly pop by and share this recipe before we post our epic Valentine’s day box for tomorrow, because 1. the recipe takes up loads of space, but 2. these are so delicious and cute that I figured they would need their own post so we could really show them off.

    For our February Macaron recipe we kept it kinda cliche Valentines day with Raspberry and Chocolate. I’m really not a huge Valentines fan, but I can’t resist making a whole heap of pink stuff. We went with a pink shell, which we filled with a dark chocolate Swiss Meringue Buttercream, darkened with a little black cocoa, which turned out to be the most amazing tasting thing ever - all dark chocolate buttercream will have cocoa in it from now on. The inside got a wee dollop of a raspberry quick jam - I made my own, but you can absolutely use a store bought one to save some time!

    These Macs were a part of our Valentine’s cookie box, which is coming tomorrow - but they would be perfect on their own, as a valentine’s gift, or just for a little anytime treat.

    Raspberry and Dark Chocolate Macarons - A classic pink shell, filled with a homemade raspberry quick jam, and a silky Dark chocolate swiss meringue buttercream, deepened with a little black cocoa. These are a classic valentine's day pairing, and would be perfect as a gift, but would also make an amazing anytime treat for a chocolate or berry lover. #frenchmacaron #valentinesmacaron

    Components of Macarons

    • Macaron Shells - Gluten free French Macaron shells. We added some pink food colouring to the shells during the meringue stage.
    • Raspberry Jam - These Raspberry Dark Chocolate Macarons have a homemade filling, but a store bought would work great too.
    • Dark Chocolate Swiss Meringue Buttercream - Swiss Meringue Buttercream is named after the Swiss Meringue it is based on. Dark chocolate is added, along with a little black cocoa powder for some depth of flavour.
    Raspberry and Dark Chocolate Macarons - A classic pink shell, filled with a homemade raspberry quick jam, and a silky Dark chocolate swiss meringue buttercream, deepened with a little black cocoa. These are a classic valentine's day pairing, and would be perfect as a gift, but would also make an amazing anytime treat for a chocolate or berry lover. #frenchmacaron #valentinesmacaron

    A few wee tips for Raspberry Chocolate Macarons

    • Everything I know about Macarons - all the tips and tricks I can think of, are in this post
    • We used Black cocoa in the buttercream, but a dutch cocoa would work great too if you don’t have black cocoa.
    • You will have some Swiss Meringue Buttercream left over - you can either half the recipe if you don't want this, or it keeps super well in the fridge if you wanted to use it for another project. I find that making half a batch of buttercream can be a little tricky, depending on your mixer. Plus I think if you're going to go to the effort you might as well make lots to use again! It goes perfectly on a sheet cake - it would be epic on this banana cake.
    • The Raspberry jam does need a little time to cool, so make sure you account for this. I like to make my own, but store bought is also perfect - you can even get a few flavours to mix up the filling if you like. Again - this will make a bit more than you need, but it’s a great thing to have around.
    • stack of painted macarons
    • macarons on surface painted with valentine's images

    For more Macaron Recipes, check out:

    • Hundreds and Thousands Macarons
    • S'mores Macarons
    • Valentine's treat box
    • French Macarons with Strawberry Buttercream

    ❤️ Made this recipe and love it? ❤️

    I would LOVE for you to leave me a review and star rating below to let me know how you liked it! Also, please make sure to tag me on Instagram!

    Answers to your baking questions

    Over the years, many of you have asked me questions about:

    • baking in grams
    • adjusting oven temperatures
    • what kind of salt to use
    • and many more!

    I've curated and answered them all for your easy reference in this frequently asked questions post!

    Filed Under: Macarons

    Boston Bun (Raisin Brioche Bun with Coconut Icing)


    Boston Bun is a raisin brioche bun, covered with vanilla icing, and finished with shredded coconut. It is super easy to make, requires no fancy equipment or dough twisting, and makes the perfect treat with a cup of coffee or to entertain guests. #bostonbun #sallylunn #raisinbrioche
    Boston Bun is a raisin brioche bun, covered with vanilla icing, and finished with shredded coconut. It is super easy to make, requires no fancy equipment or dough twisting, and makes the perfect treat with a cup of coffee or to entertain guests. #bostonbun #sallylunn #raisinbrioche
    Boston Bun is a raisin brioche bun, covered with vanilla icing, and finished with shredded coconut. It is super easy to make, requires no fancy equipment or dough twisting, and makes the perfect treat with a cup of coffee or to entertain guests. #bostonbun #sallylunn #raisinbrioche
    Boston Bun is a raisin brioche bun, covered with vanilla icing, and finished with shredded coconut. It is super easy to make, requires no fancy equipment or dough twisting, and makes the perfect treat with a cup of coffee or to entertain guests. #bostonbun #sallylunn #raisinbrioche
    Boston Bun is a raisin brioche bun, covered with vanilla icing, and finished with shredded coconut. It is super easy to make, requires no fancy equipment or dough twisting, and makes the perfect treat with a cup of coffee or to entertain guests. #bostonbun #sallylunn #raisinbrioche
    Boston Bun is a raisin brioche bun, covered with vanilla icing, and finished with shredded coconut. It is super easy to make, requires no fancy equipment or dough twisting, and makes the perfect treat with a cup of coffee or to entertain guests. #bostonbun #sallylunn #raisinbrioche
    Boston Bun is a raisin brioche bun, covered with vanilla icing, and finished with shredded coconut. It is super easy to make, requires no fancy equipment or dough twisting, and makes the perfect treat with a cup of coffee or to entertain guests. #bostonbun #sallylunn #raisinbrioche

    I know there’ s a lot of fancy, swirly bread round here. Knots, and rolls, and babkas. Swirly bread is one of my absolute favourite things to make, but today I’m sharing something a little more simple, but still super delicious - a Boston Bun. I did a little crowd sourced research on Instagram, and discovered that, although it is called a Boston bun, nobody from Boston has ever heard of it - I have no idea where the name came from, but I do know it’s super yum, so lets just go from there.

    The Boston bun is essentially one big brioche bun, filled with raisins, and topped with icing and covered in coconut. They are a bakery staple back home - we always used to get them as a special treat from the supermarket for being good and not standing up in the trolley while Mum and Dad shopped. Turns out it’s called two different things in New Zealand which is super weird - from what I can gather, anyone from the South Island or Wellington calls it a Boston Bun, while anyone further North calls it a Sally Lunn. This is one of the few things I can think of where things have different names throughout New Zealand. It’s strange.

    Anyway, this is super simple to make, and doesn’t require any fancy folding or knotting or even rolling out of the dough. It starts with a basic enriched dough, which has some raisins kneaded through it. After the first rise, it gets patted into a disc and popped into a ring from a springform pan or a cake tin, which removes the need for any fancy shaping, and makes the bun rise nicely within the confines of the pan. Once it has baked to a fluffy, golden brown bun, it gets loaded up with a vanilla icing, and covered in shredded coconut. It’s essentially just fruity bread with icing, but it’s crazy easy and perfect for morning or afternoon tea treat with a cup of tea or coffee.

    A few wee tips:

    • The first rise for this can be done overnight if you like - you may just have to increase the second rising time by 30-45 minutes to account for cold dough, but this is a great option if you want to serve it for morning tea or breakfast!
    • If you don’t have a stand mixer this can be done by hand - bring the dough together in a bowl, then turn onto a surface and knead for 10-15 minutes until smooth, then incorporate the raisins.
    • If you don’t have a ring to bake this in, you can do it in an 8” cake tin too. Just make sure you lightly butter it, and place a parchment paper circle in the bottom.

    ❤️ Made this recipe and love it? ❤️

    I would LOVE for you to leave me a review and star rating below to let me know how you liked it! Also, please make sure to tag me on Instagram!

    Answers to your baking questions

    Over the years, many of you have asked me questions about:

    • baking in grams
    • adjusting oven temperatures
    • what kind of salt to use
    • and many more!

    I've curated and answered them all for your easy reference in this frequently asked questions post!

    Filed Under: Brioche, New Zealand Recipes

    Olive Oil, Lemon, and Yoghurt Bundt Cake

    lemon yogurt and olive oil bundt cake

    Olive Oil, Lemon, and Yoghurt Bundt Cake - a simple cake which comes together in two bowls, no fancy equipment required. Perfectly dense, flavoured with tangy greek yoghurt and floral, fruity olive oil. the perfect cake for any occasion.

    Top down shot of bundt cake on a cooling rack

    Olive Oil, Lemon, and Yoghurt Bundt Cake

    Hi! Happy Sunday! Things are a little quiet around here - I managed to catch the cold that most of NYC seems to have at the moment, so I have been hiding at home a bit more than usual so I don’t spread it to everyone else that I know!

    I had to pop on though, and share this recipe with you, because I’m super excited about it, and don’t think I can wait any longer to get it out in the world. I worked on it all of last week, tweaking and tweaking, until I came up with what I think is the perfect Olive Oil, Lemon, and Yoghurt Bundt Cake recipe. I am a sucker for a pretty cake pan, so purchased a couple of bundt pans a few years ago and haven’t used them anywhere near as much as I would like, and I am determined to change that! I think that lots of people (me included) are scared of bundt cakes because they are worried that they won’t pop out of the tin nicely. After a horrific fail during my first test of the recipe, I think I have a couple of wee tips up my sleeve to help prevent that - more on those later!

    Olive Oil, Lemon, and Yoghurt Bundt Cake - a simple cake which comes together in two bowls, no fancy equipment required. Perfectly dense, flavoured with tangy greek yoghurt and floral, fruity olive oil. the perfect cake for any occasion. #bundtcake #lemonbundt

    Super easy Lemon Yoghurt Bundt Cake

    First, lets talk about this Lemon Bundt Cake. I love all things lemon, and I also love the way that fruity olive oil plays against the tart citrus flavour. I wanted a cake that was perfectly dense, with the perfect amount of moisture, but still super simple to put together. I added some almond meal for texture, and also some greek yoghurt to give some tang and to compliment the smooth olive oil and lemon flavour. This cake comes together in two bowls, with no stand mixer or fancy equipment required - everything is just whisked up, before being poured into the bundt pan and baked until perfectly golden. I finished it with a quick brush of syrup while it was still warm to help drive the lemon flavour home and help lock in some of the moisture of the cake. This cake is perfect for any occasion, and serves loads of people, so would be great to feed a crowd.

    Olive Oil, Lemon, and Yoghurt Bundt Cake - a simple cake which comes together in two bowls, no fancy equipment required. Perfectly dense, flavoured with tangy greek yoghurt and floral, fruity olive oil. the perfect cake for any occasion. #bundtcake #lemonbundt

    A few wee tips for Lemon Olive Oil Bundt Cake - the best way to release a bundt from the pan

    • I found that there were a few things that helped for an easy release from the bundt pan. The first being the type of recipe - the cake has to be dense enough that it has enough structure to release from the sides. The first test of this recipe I did was far too light in texture, and it stuck something wicked. By the end of the testing, I developed a Lemon Bundt recipe that popped right out of the pan!
    • The second tip is to adequately grease the tin. You can use a baking spray to get in all the little holes in the bundt pan, then generously dust the pan with flour and tap out the excess, or you can use a baking spray that also contains flour. I am not usually a big fan of the spray with the flour in it, but I do find that it is reassuring to use for bundt pans because you know the cake will not stick.
    • The cake needs to be baked enough that it will not stick to the sides - make sure that a skewer inserted into the cake comes out clean - I like to stick it in a few different spots just to check.
    • The final tip is turning out the cake while it is still warm. If you wait for it to cool, it will stick. 10 minutes is the sweet spot - I pull it out of the oven, then set a timer for 10 minutes and let it sit in the pan before turning out.
    • I used a Nordicware Crown Bundt pan, which has a 10 cup capacity. Ensure you double check the size of your pan.
    Olive Oil, Lemon, and Yoghurt Bundt Cake - a simple cake which comes together in two bowls, no fancy equipment required. Perfectly dense, flavoured with tangy greek yoghurt and floral, fruity olive oil. the perfect cake for any occasion. #bundtcake #lemonbundt

    ❤️ Made this recipe and love it? ❤️

    I would LOVE for you to leave me a review and star rating below to let me know how you liked it! Also, please make sure to tag me on Instagram!

    Answers to your baking questions

    Over the years, many of you have asked me questions about:

    • baking in grams
    • adjusting oven temperatures
    • what kind of salt to use
    • and many more!

    I've curated and answered them all for your easy reference in this frequently asked questions post!

    Filed Under: Bundt Cakes

    New Year's Macarons

    New Year's Macarons with Vanilla Bean Swiss Meringue Buttercream and Pop Rocks. Light, sparkly, and perfect for ringing in the new year.
    New Year's Macarons with Vanilla Bean Swiss Meringue Buttercream and Pop Rocks. Light, sparkly, and perfect for ringing in the new year.
    New Year's Macarons with Vanilla Bean Swiss Meringue Buttercream and Pop Rocks. Light, sparkly, and perfect for ringing in the new year.
    New Year's Macarons with Vanilla Bean Swiss Meringue Buttercream and Pop Rocks. Light, sparkly, and perfect for ringing in the new year.
    New Year's Macarons with Vanilla Bean Swiss Meringue Buttercream and Pop Rocks. Light, sparkly, and perfect for ringing in the new year.
    New Year's Macarons with Vanilla Bean Swiss Meringue Buttercream and Pop Rocks. Light, sparkly, and perfect for ringing in the new year.
    New Year's Macarons with Vanilla Bean Swiss Meringue Buttercream and Pop Rocks. Light, sparkly, and perfect for ringing in the new year.

    New Year, uhhh new macaron. There’s not much to say about these ones except they are a bit fancy and very delicious. We took our regular Vanilla Bean French Macaron shell, popped some New Years themed sprinkles on top, then filled it with cute wee blobs of Vanilla Bean Swiss Meringue Buttercream, and finished it off with a pop rock centre for a little post NYE fireworks.

    A few wee tips:

    • Everything I know about macarons (all the tips and tricks we have learnt along the way) can be found in this post.
    • Be careful when you are choosing sprinkles to use - if they are solid sugar or chocolate balls, they may get hot and melt through the shells. Go for small balls and baubles in your sprinkles mix if you can!
    • We added pop rocks just to give a little fancy finish, but this step is totally optional!

    ❤️ Made this recipe and love it? ❤️

    I would LOVE for you to leave me a review and star rating below to let me know how you liked it! Also, please make sure to tag me on Instagram!

    Answers to your baking questions

    Over the years, many of you have asked me questions about:

    • baking in grams
    • adjusting oven temperatures
    • what kind of salt to use
    • and many more!

    I've curated and answered them all for your easy reference in this frequently asked questions post!

    Filed Under: Macarons

    Chocolate Brownie Cake with Chocolate Hazelnut filling and Mocha German Buttercream


    Chocolate Brownie Cake with Chocolate Hazelnut filling and Mocha German Buttercream - perfectly indulgent.
    Chocolate Brownie Cake with Chocolate Hazelnut filling and Mocha German Buttercream - perfectly indulgent.
    Chocolate Brownie Cake with Chocolate Hazelnut filling and Mocha German Buttercream - perfectly indulgent.
    Chocolate Brownie Cake with Chocolate Hazelnut filling and Mocha German Buttercream - perfectly indulgent.
    Chocolate Brownie Cake with Chocolate Hazelnut filling and Mocha German Buttercream - perfectly indulgent.
    Chocolate Brownie Cake with Chocolate Hazelnut filling and Mocha German Buttercream - perfectly indulgent.

    I just checked, and I haven’t posted a layer cake in the LONGEST time. Like, in almost a year. Whoopsies. Hopefully posting a super extravagant one will make up for it? Anyway, I don’t intend on leaving it that long again, because I forgot just how fun making layer cakes can be.

    This has to be one of the best cakes I have ever made. I took a bunch of my favourite things, and combined them into one perfect (to me) cake. Fudgy brownie cake layers, sandwiched with chocolate hazelnut filling, and a silky mocha German buttercream. I finished it with some fancy gold leaf and buttercream stripes (more on that new technique later), and what has become somewhat of a signature move from me - some french star tip piping. The flavours compliment each other perfectly - the chocolate hazelnut filling is so delicious against fudgy cake layers and silky silky mocha German buttercream. If you haven’t tried German buttercream you should - I love that you can infuse it with whatever you like, in this case some strong coffee. I whipped some melted chocolate into it, and it became almost like room temperature ice cream - silky and amazing. So tempting to eat with a spoon, but even more magical layered into the cake.

    It only made sense to then pop it on my favourite cake stand - made by the lovely Amy from Aheirloom. We have been good friends for a while now, and it’s amazing having someone to bounce ideas off and complain about the internet with. The stand I used here is one I’ve been looking forward to for the longest time - the cake plate is 8” in diameter, which makes it perfect to pop 6” cakes on. To kick off the new year, we are giving away two of these cake stands, one here and one over on Instagram! All you have to do is make sure you are following both Aheirloom and I on Instagram, then leave a comment letting me know your favourite type of cake! Competition is open until Friday 25th of January at 8pm EST, and is open to US residents only. Happy caking! x

    A few wee tips:

    • Both the chocolate hazelnut filling and the pastry cream do need some time to cool, so I like to prepare those the day ahead if I can. The layers of the brownie can also be made ahead - I like to wrap the cooled layers in plastic wrap and store in the fridge overnight so they are nice and cool for assembly.
    • The recipe for the chocolate hazelnut filling will make more than you need, but it is an amazing thing to have on hand for no extra effort - store it in an airtight container at room temperature. I use it in a few recipes on the blog - this babka and also these brownie bites, but it is perfect just used like nutella
    • I gave this cake stripes - I followed this tutorial, using an icing comb. They are a little tricky but they come out super cute. I have included instructions in the recipe for dividing up the buttercream for this, which gives you some coffee buttercream and some mocha, which is a really nice variation in taste. If you don’t want to add stripes, assemble the cake using the mocha buttercream, then add blobs of the coffee on the outside. You can also just skip the step of reserving some coffee buttercream, and make one batch of mocha buttercream to use.
    • Once you refrigerate the cake, the chocolate hazelnut filling will harden slightly - but it becomes this amazing dense nutella like layer. Make sure you make a good buttercream dam to hold in the chocolate hazelnut filling between layers - if it seems like it is leaking out, quickly patch up the hole and then freeze the cake for 10-15 minutes to help solidify.
    • These are my favourite cake pans! I have them in both 6” and 8”. I have 3 of each, which makes making layer cakes so much easier than having to divide one cake into several layers.

    ❤️ Made this recipe and love it? ❤️

    I would LOVE for you to leave me a review and star rating below to let me know how you liked it! Also, please make sure to tag me on Instagram!

    Answers to your baking questions

    Over the years, many of you have asked me questions about:

    • baking in grams
    • adjusting oven temperatures
    • what kind of salt to use
    • and many more!

    I've curated and answered them all for your easy reference in this frequently asked questions post!

    Filed Under: Layer Cakes

    Roasted Pear and Vanilla Bean Scones with Salty Honey Glaze

    These roasted pear and salted honey scones have giant chunks of pear, held together by tender scone dough. They are topped with an easy salty honey to give your homemade scone-game a lift to the next level.

    Roasted Pear and Vanilla Bean Scones with Salty Honey Glaze - Giant Craggy Scones filled with pear chunks held together with tender scone dough, and finished with a sticky honey glaze and a generous dose of flaky sea salt.

    Because pear, like most fruit, releases liquid when it bakes, I decided to roast the pear chunks slightly first to help get rid of some of the moisture, stopping the final product from being too soggy. The cooled roasted pear chunks are then tossed through the scone dough, and stay firm enough after baking to give an amazing variation in texture. The honey on the top adds a lovely sweetness, and then the flaky salt on top cuts perfectly through the honey, while adding crunch. Because of the giant chunks of pear, the scones are slightly more craggy and rustic than regular scones, but I promise you that this is totally made up for by how they taste. They would make a perfect morning or afternoon treat, and are easy enough that you can quickly whip them up at short notice. Enjoy!

    Roasted Pear and Vanilla Bean Scones with Salty Honey Glaze - Giant Craggy Scones filled with pear chunks held together with tender scone dough, and finished with a sticky honey glaze and a generous dose of flaky sea salt.

    A few wee tips:

    • These are a little more craggy than traditional scones, because of the moisture provided by the pear. This also makes them super tender and delicious.
    • Depending on the juiciness of the pear, you may need a little additional liquid in the scones. Add the amount called for in the recipe, then add by the teaspoon as needed, focussing on dry spots. The pears do provide some moisture, so make sure you are aware of this - you won’t need more than 240g (1 cup) of milk total.
    • Because you don’t want to completely squish the pear, I add three quarters of the milk and mix it into the flour mixture, before tossing in the roasted pear chunks. This helps reduce the chances of breaking up the pear as you mix in the rest of the milk.
    • Don’t take the honey too far - you only want to boil it for a minute tops. If you take it too far it turns into a hard caramel that is super hard to eat. I took mine to 240°f / 115°c and then left it to stand, where it thickened nicely.
    Roasted Pear and Vanilla Bean Scones with Salty Honey Glaze - Giant Craggy Scones filled with pear chunks held together with tender scone dough, and finished with a sticky honey glaze and a generous dose of flaky sea salt.

    ❤️ Made this recipe and love it? ❤️

    I would LOVE for you to leave me a review and star rating below to let me know how you liked it! Also, please make sure to tag me on Instagram!

    Answers to your baking questions

    Over the years, many of you have asked me questions about:

    • baking in grams
    • adjusting oven temperatures
    • what kind of salt to use
    • and many more!

    I've curated and answered them all for your easy reference in this frequently asked questions post!

    Roasted Pear and Vanilla Bean Scones with Salty Honey Glaze - Giant Craggy Scones filled with pear chunks held together with tender scone dough, and finished with a sticky honey glaze and a generous dose of flaky sea salt.

    Filed Under: Scones

    One Bowl Gingerbread Sheet Cake

    gingerbread cake on plate

    This easy gingerbread cake is sure to be a crowd pleaser, and only takes ten minutes to mix up. This homemade ginger cake is topped with a maple cream cheese frosting and is the perfect any time cake.

    Gingerbread Sheet Cake with Maple Cream Cheese Frosting - a warming spiced cake, topped with a silky, maple, ream cheese frosting. A super simple yet delicious cake, perfect for feeding a crowd or for a quick holiday pick me up.

    Hi hi! Just popping in to share this super easy gingerbread cake recipe with you! This homemade gingerbread cake is quick to make (comes together in 10 minutes!), and is perfectly moist, so is great to make ahead. It has a rich molasses flavor and is perfectly spiced - I love it so much.

    I love making homemade cake recipes, but they often require a lot of time or effort, which is why sheet cakes are the perfect compromise. They bake up as a single layer, and are really easy to transport in the pan that you made them in. My Devil's food cake and my Tiramisu cake are both easy sheet cakes that I make often.

    I topped this ginger cake recipe with a super simple maple cream cheese frosting, although it would be delicious as is too! The recipe for this gingerbread cake comes from my friend Brooke Bell's book, “Cake: Layered, Frosted, Sliced and Shared”. I also made it in layer cake form in this gingerbread layer cake.

    I hope you love this gingerbread cake! It is amazing any time of the year, but also makes a perfect holiday cake recipe.

    Gingerbread Sheet Cake with Maple Cream Cheese Frosting - a warming spiced cake, topped with a silky, maple, ream cheese frosting. A super simple yet delicious cake, perfect for feeding a crowd or for a quick holiday pick me up.

    How to make Gingerbread Cake

    This gingerbread cake recipe is super easy - the cake itself is a one bowl gingerbread cake recipe, and because it is oil based, which makes it super moist, there is no need to warm up the butter before, so it comes together quickly.

    • Prep your pan. I use a 9"x13" (20cm x 30cm) pan, and line it with parchment paper which sticks up a little up the sides of the pan to help with easy removal once cooled. If you are serving straight from the pan you could also just spray with some cooking spray or brush with butter.
    • Combine dry ingredients. You can do this in a mixer or by hand - place them all into the mixer and mix until incorporated.
    • Add wet ingredients. Make a well in the middle and add your wet ingredients - I like to break up the yolks of the egg with a fork.
    • Mix to combine. It's almost too easy - mix all the ingredients together and you are good to go!
    • Bake. Bake the gingerbread cake until a toothpick comes out clean - this should take 28-30 minutes.
    Gingerbread Sheet Cake with Maple Cream Cheese Frosting - a warming spiced cake, topped with a silky, maple, ream cheese frosting. A super simple yet delicious cake, perfect for feeding a crowd or for a quick holiday pick me up.

    Maple Cream Cheese Frosting

    I topped this homemade gingerbread cake with a maple cream cheese frosting, as I had some cream cheese that needed using up.

    However, the gingerbread cake would be delicious just as is, served with a sprinkle of powdered sugar before serving.

    If you wanted to make both components ahead, you could make the the maple cream cheese frosting a few days in advance and store in an airtight container in the fridge and assemble closer to serving.

    Gingerbread Sheet Cake with Maple Cream Cheese Frosting - a warming spiced cake, topped with a silky, maple, ream cheese frosting. A super simple yet delicious cake, perfect for feeding a crowd or for a quick holiday pick me up.

    How to Store Gingerbread

    This gingerbread cake is best stored in an airtight container in the fridge because of the cream cheese frosting. If you are making it ahead and just storing the cake, it can be stored in an airtight container at room temperature for up to 3 days.

    Gingerbread Sheet Cake with Maple Cream Cheese Frosting - a warming spiced cake, topped with a silky, maple, ream cheese frosting. A super simple yet delicious cake, perfect for feeding a crowd or for a quick holiday pick me up.

    For more sheet cake recipes, check out:

    • slices of chocolate cake with chocolate frosting
      Mini Olive Oil Chocolate Cake (Small Batch)
    • side cut shot of tiramisu sheet cake
      Tiramisu Cake
    • Mini funfetti cake top down image
      Mini Funfetti Cake
    • Lemon Yogurt Sheet Cake with Lemon Curd Swiss Meringue Buttercream

    ❤️ Made this recipe and love it? ❤️

    I would LOVE for you to leave me a review and star rating below to let me know how you liked it! Also, please make sure to tag me on Instagram!

    Answers to your baking questions

    Over the years, many of you have asked me questions about:

    • baking in grams
    • adjusting oven temperatures
    • what kind of salt to use
    • and many more!

    I've curated and answered them all for your easy reference in this frequently asked questions post!

    Filed Under: Sheet and Snack Cakes

    • « Previous Page
    • 1
    • …
    • 7
    • 8
    • 9
    • 10
    • 11
    • 12
    • Next Page »
    Erin Clarkson Cloudy Kitchen

    HI, I'M ERIN

    My recipes range from quick & easy all the way to complex & impressive. I love the science and process of recipe development almost as much as baking itself. I specialize in rigorously tested recipes that are fun, reliable, and accurate.

    More about me →

    • https://www.instagram.com/cloudykitchen/
    • Facebook
    • Pinterest
    • TikTok

    Popular

    • Christmas Macaron Box
    • close up of roll with cream cheese frosting
      10 Minute Cream Cheese Frosting for Cinnamon Rolls
    • cookie on sheet pan with parchment paper
      Brown Butter Chocolate Chip Cookies
    • burger bun on wire rack
      Homemade Burger Buns

    Footer

    Cloudy Kitchen Classics

    • Chocolate chip cookies
    • Brownie cookies
    • Chocolate cookies
    • Vanilla cookies
    • Cheesecake brownies
    • Focaccia bread
    • Ciabatta recipe

    Popular Cookie Recipes

    • Oatmeal raisin cookies
    • Peanut butter oatmeal cookies
    • White chocolate chip cookies
    • Gingersnap cookies
    • Shortbread cookies
    • Snickerdoodles cookies
    • Anzac biscuits

    Easy Breads & Buns

    • Hot cross buns
    • Sticky buns
    • Burger buns
    • Dinner rolls
    • Soft pretzels
    • Pretzel buns
    • Garlic knots

    Links

    • About
    • Contact
    • Web Stories

    Newsletter

    • Sign Up! for emails and updates

    Resources

    • FAQ
    • Policies
    • All recipes at once

    Copyright © 2026 Cloudy Kitchen

    Support by Foodie Digital