


Hi hi! Same old same old around here - we go to Canada on Saturday which I am SO excited about, but I am also trying to haul ass to get as much shot before I leave so that I have some sneaky computer work to do while I am there to hopefully get a wee bit of a backlog of posts ready so that I can plan ahead a little! I also just finished shooting a whole bunch of Christmas cookies (!!) for a little project that I can tell you about in a few months, so there’s a weird mix of summer desserts and Christmas cookies kicking around in my fridge right about now.
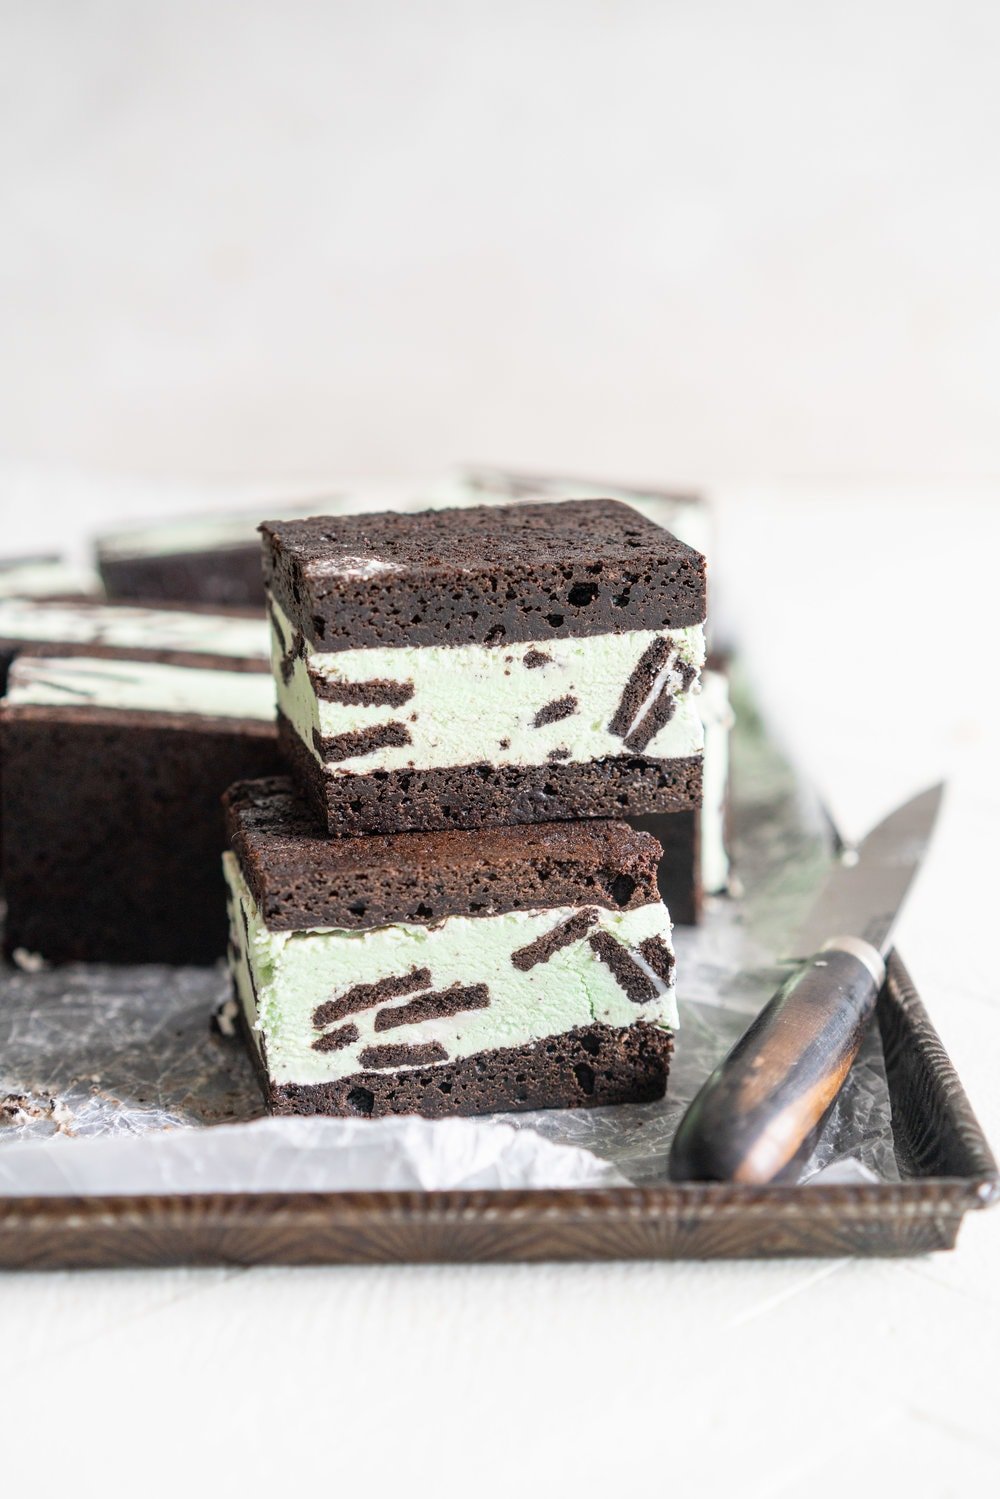
I made these Black Cocoa Brownie Ice Cream Sandwiches a few weeks ago as sort of a procrastination situation, and OH BOY am I glad I did. I basically just mashed up two of my favourite recipes - these black cocoa brownies (which are adapted from the amazing Sarah Kieffer’s book), and a Philadelphia style ice cream, which I turned into a mint Oreo chip kind of thing, and combined them to make ice cream sandwiches! Philadelphia ice cream is made without eggs, so the process of making the base is super simple, as you don’t have to make a custard. I think there’s a place for both - I love custard based ice cream if you are serving it alone, but if you are pairing it with something else rich like these brownies, or you are after something a little lighter, Philadelphia is perfect!
Black cocoa is what is used to give Oreos their distinctive flavour, so it made sense to pair the brownies with an Oreo ice cream. Mint chip will be my forever fave ice cream flavour, so it made sense to add some peppermint extract in too. That is totally optional - these would also be amazing with a vanilla ice cream base with the Oreos added in. You could also ditch making your own ice cream all together and soften some store bought ice cream and freeze it between the brownies - you could even get super fancy and use two flavours, one on each half, for a bit of a choose your own adventure vibe.
The great thing about Brownie Ice Cream Sandwiches is that they are super simple to assemble - you just layer up the brownie and the ice cream, and freeze it, and you have a dessert that will feed loads! They are a little less involved than a cookie sandwich which you have to assemble individually - with these you can just pop them together, then all you have to do is cut them up and you are ready to go! I conveniently timed the making of these with two BBQs that we were invited to, so I took half along to each, and they were a giant hit!
A few wee tips:
- This needs overnight to freeze down. I made the ice cream base, then chilled that while I baked the brownies and allowed them to cool, then churned the ice cream and assembled, before freezing overnight. If you like, you can store the brownies in the freezer or fridge until you are ready to assemble to ensure that they are cool and there is minimal melting when you add the ice cream.
- You need the brownie to be fudgy when you bake it, so you want it to come out of the oven juuuuust cooked so it doesn’t go rock solid when you freeze it.
- The green food colouring is totally optional - it’s only a tiny bit and I love how it looks! I know some people don’t like green mint stuff, so you do you here.
- These last for so long in the freezer! They are also super rich so I would cut them up into smaller pieces to serve (I just had them in larger pieces to shoot then ended up cutting them all in half before serving)
- If you don’t want to make your own ice cream, then store bought works great! You can just let a litre / quart of ice cream soften slightly, spread it onto one layer of brownie, top with the second, and freeze it down!
- When I am assembling these, I like to put the top layer of brownie onto the ice cream upside down to ensure that the outside edges of the sandwiches are flat and level. This is totally aesthetic, but just thought I would mention!
❤️ Made this recipe and love it? ❤️
I would LOVE for you to leave me a review and star rating below to let me know how you liked it! Also, please make sure to tag me on Instagram!
Answers to your baking questions
Over the years, many of you have asked me questions about:
- baking in grams
- adjusting oven temperatures
- what kind of salt to use
- and many more!
I've curated and answered them all for your easy reference in this frequently asked questions post!

Black Cocoa Brownie Ice Cream Sandwiches with Oreo Mint Chip Philadelphia Style Ice Cream
- Yield: Makes 12 large or 16 smaller ice cream sandwiches 1x
Description
Black Cocoa Brownie Ice Cream Sandwiches with Oreo Mint Chip Philadelphia Style Ice Cream
Ingredients
Black Cocoa Brownie
- 85g cold unsalted butter
- 170g dark chocolate, coarsely chopped
- 40g Black cocoa, or extra dutched cocoa
- 105g all-purpose flour
- ¼ tsp plus ⅛ teaspoon baking powder
- ¾ tsp salt
- 3 large eggs, at room temperature
- 90g neutral oil
- 200g sugar
- 75g brown sugar
- 1 tsp vanilla
Oreo Mint Chip Philadelphia Style Ice Cream
- 500g (2 cups) heavy Cream
- 150g (¾ cup) granulated sugar
- pinch of kosher salt
- 250g (1 cup) whole milk
- ½ tsp vanilla bean paste
- 1 tsp peppermint extract
- 1-2 drops of mint gel food colour
- 20 oreo cookies, chopped
Instructions
BLACK COCOA BROWNIE
- Preheat the oven to 350˚f / 180˚c. Grease two 9” square baking tins and line with parchment paper slings.
- Melt together the butter and chocolate in a medium pan over low heat, stirring well until smooth. Add the cocoa powder and mix well to combine, then set aside to cool.
- Whisk together the flour, baking powder, and salt in a small bowl. In a large bowl, combine the eggs, oil, sugar, brown sugar, and vanilla. Mix until well combined. Add the chocolate mixture and mix until combined. Gently fold in the dry ingredients until just combined.
- Divide the mixture between the two prepared tins. Bake for 18 to 20 minutes, until the top of the brownie is set and a skewer inserted comes out with still a few crumbs attached. You want them to be slightly on the underbaked side so that when they freeze they stay soft. Remove from the oven and allow to cool completely.
OREO MINT CHIP PHILADELPHIA STYLE ICE CREAM
- Combine 250ml (1 cup) of the Cream, Sugar, and salt in a small pot, and heat over low heat, stirring gently, until warmed through and the sugar has dissolved.
- Remove from the heat and add the rest of the cream, the milk, vanilla bean paste, peppermint extract, and gel food colouring, if using. Transfer to a container, and place in the refrigerator until completely cool.
- Line a 9” square baking tin with two parchment paper slings (so that you have pieces of parchment extending from all of the edges - this will help removing the ice cream sandwiches). Place one layer of brownie into the pan.
- Churn the ice cream in your ice cream maker according to manufacturer’s instructions. When the ice cream is almost churned, add the chopped oreo cookies and churn to incorporate.
- Give the ice cream mixture a few turns by hand using a rubber spatula to ensure that the oreos are distributed evenly, then transfer it to the pan, smoothing down with a small offset spatula. Top with the second layer of brownie, making sure to turn it upside down so that the smooth side is on the top. Press down lightly to adhere.
- Wrap the baking pan in plastic wrap to ensure it does not pick up any freezer smell, then transfer to the freezer and freeze overnight until solid.
- Remove the ice cream sandwiches from the pan by pulling on the parchment paper sling. Cut into squares using a sharp knife which has been run under warm water and dried off, wiping between each cut.
- Store leftovers in an airtight container in the freezer until ready to serve.
Notes
Brownie recipe adapted from The Vanilla Bean Baking Book, Ice Cream Base Slightly adapted from The Perfect Scoop