


I just checked, and I haven’t posted a layer cake in the LONGEST time. Like, in almost a year. Whoopsies. Hopefully posting a super extravagant one will make up for it? Anyway, I don’t intend on leaving it that long again, because I forgot just how fun making layer cakes can be.
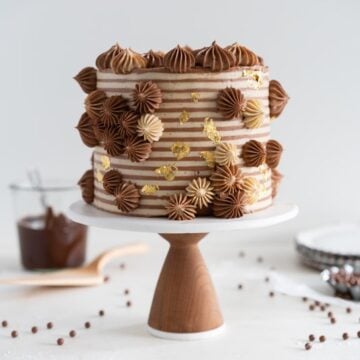
This has to be one of the best cakes I have ever made. I took a bunch of my favourite things, and combined them into one perfect (to me) cake. Fudgy brownie cake layers, sandwiched with chocolate hazelnut filling, and a silky mocha German buttercream. I finished it with some fancy gold leaf and buttercream stripes (more on that new technique later), and what has become somewhat of a signature move from me - some french star tip piping. The flavours compliment each other perfectly - the chocolate hazelnut filling is so delicious against fudgy cake layers and silky silky mocha German buttercream. If you haven’t tried German buttercream you should - I love that you can infuse it with whatever you like, in this case some strong coffee. I whipped some melted chocolate into it, and it became almost like room temperature ice cream - silky and amazing. So tempting to eat with a spoon, but even more magical layered into the cake.
It only made sense to then pop it on my favourite cake stand - made by the lovely Amy from Aheirloom. We have been good friends for a while now, and it’s amazing having someone to bounce ideas off and complain about the internet with. The stand I used here is one I’ve been looking forward to for the longest time - the cake plate is 8” in diameter, which makes it perfect to pop 6” cakes on. To kick off the new year, we are giving away two of these cake stands, one here and one over on Instagram! All you have to do is make sure you are following both Aheirloom and I on Instagram, then leave a comment letting me know your favourite type of cake! Competition is open until Friday 25th of January at 8pm EST, and is open to US residents only. Happy caking! x
A few wee tips:
- Both the chocolate hazelnut filling and the pastry cream do need some time to cool, so I like to prepare those the day ahead if I can. The layers of the brownie can also be made ahead - I like to wrap the cooled layers in plastic wrap and store in the fridge overnight so they are nice and cool for assembly.
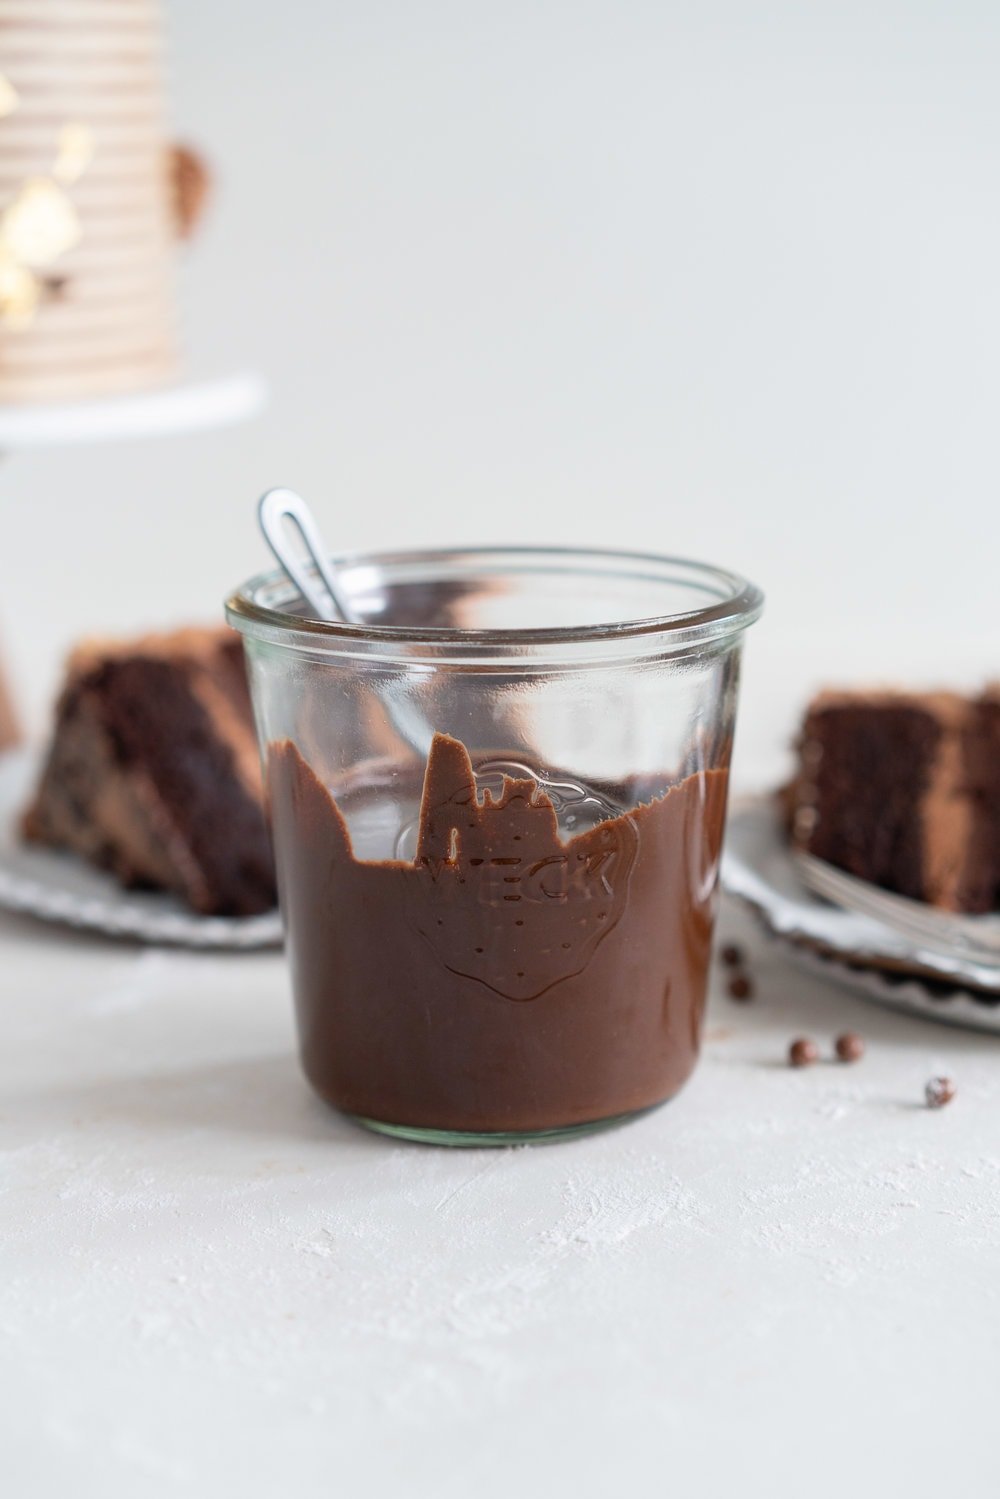
- The recipe for the chocolate hazelnut filling will make more than you need, but it is an amazing thing to have on hand for no extra effort - store it in an airtight container at room temperature. I use it in a few recipes on the blog - this babka and also these brownie bites, but it is perfect just used like nutella
- I gave this cake stripes - I followed this tutorial, using an icing comb. They are a little tricky but they come out super cute. I have included instructions in the recipe for dividing up the buttercream for this, which gives you some coffee buttercream and some mocha, which is a really nice variation in taste. If you don’t want to add stripes, assemble the cake using the mocha buttercream, then add blobs of the coffee on the outside. You can also just skip the step of reserving some coffee buttercream, and make one batch of mocha buttercream to use.
- Once you refrigerate the cake, the chocolate hazelnut filling will harden slightly - but it becomes this amazing dense nutella like layer. Make sure you make a good buttercream dam to hold in the chocolate hazelnut filling between layers - if it seems like it is leaking out, quickly patch up the hole and then freeze the cake for 10-15 minutes to help solidify.
- These are my favourite cake pans! I have them in both 6” and 8”. I have 3 of each, which makes making layer cakes so much easier than having to divide one cake into several layers.
❤️ Made this recipe and love it? ❤️
I would LOVE for you to leave me a review and star rating below to let me know how you liked it! Also, please make sure to tag me on Instagram!
Answers to your baking questions
Over the years, many of you have asked me questions about:
- baking in grams
- adjusting oven temperatures
- what kind of salt to use
- and many more!
I've curated and answered them all for your easy reference in this frequently asked questions post!
Chocolate Brownie Cake with Chocolate Hazelnut filling and Mocha German Buttercream
- Yield: Makes one six inch, three layer cake, serves 8-10 1x
Description
Chocolate Brownie Cake with Chocolate Hazelnut filling and Mocha German Buttercream
Ingredients
Chocolate Brownie Cake
- 125g unsalted butter
- 250g good quality dark chocolate, at least 70% cocoa solids, roughly chopped
- 200g sugar
- 135g dark brown sugar
- 5 eggs, at room temperature
- 1 tsp vanilla extract or vanilla bean paste
- 125g neutral oil
- 100g all-purpose flour
- 100g cocoa powder
- ¾ tsp baking powder
- ½ tsp salt
Chocolate Hazelnut Filling
- 280g (2 cups) raw hazelnuts
- 424g (1 ½ cups) melted dark chocolate (at least 70%)
- 200g (1 cup) sugar
- 1 tsp kosher salt
Mocha German Buttercream
- 375g Whole milk
- 35g (4 Tbsp) coarsely ground coffee
- 1 tsp vanilla bean paste
- 24g corn starch
- 225g sugar
- 1 egg
- 2 egg yolks
- 675g unsalted butter (6 sticks), at room temperature
- 300g 70% dark chocolate, melted and cooled
Instructions
CHOCOLATE BROWNIE CAKE
- Preheat the oven to 350° / 180°. Grease and line three six inch cake pans with parchment paper.
- In a small saucepan over medium heat, heat the butter and chocolate, stirring constantly, until melted and combined. Set aside to cool.
- In a small bowl, whisk together the flour, cocoa powder, baking powder, and salt.
- In a large bowl, whisk together the sugar, dark brown sugar, eggs, vanilla, and oil. Add the cooled chocolate mixture, and mix to combine. Add the dry ingredients, and gently fold to combine.
- Divide the batter between the three cake pans, and bang once or twice on the counter to help settle.
- Bake for 25 to 30 minutes, checking for doneness after 20 minutes, until a the top of the cakes are set, and skewer inserted in the middle of the cake comes out with a few crumbs attached.
- Cool in the tins for 10 minutes, then turn out onto a wire rack and allow to cool completely. If you are making ahead, once cool, wrap tightly in plastic wrap and store in the fridge until you are ready to assemble the cake.
CHOCOLATE HAZELNUT FILLING
- Preheat the oven to 350˚f / 180˚c. Place the hazelnuts on a baking sheet. Roast in the oven, shaking occasionally, for 8-10 mins, checking often, until the are golden brown. Allow to cool completely, then rub between your hands to remove the skins. Do not worry about any stubborn skins. Transfer to the work bowl of a food processor, and pulse briefly to chop.
- Add the melted dark chocolate, sugar, and salt. Pulse to combine, then mix on high speed for at least five minutes. Check, and give more time mixing if needed. Transfer to a container and store at room temperature until you are ready to use.
MOCHA GERMAN BUTTERCREAM
- In a medium saucepan, heat the milk to just shy of a simmer. Remove from the heat, add the coffee, stir well, and steep for 20 minutes. Strain through a very fine mesh sieve, and re-weigh the infused milk and top up to 375g. Wipe out the saucepan, and return to the milk mixture to the heat. Bring to just shy of a simmer. Meanwhile, In a bowl, whisk together the vanilla, corn starch, sugar, egg, egg yolk and salt.
- Using one hand to whisk constantly, pour half of the hot milk mixture into the egg mixture. This helps to temper the eggs and stop them from scrambling. Whisk until incorporated, and then pour the whole lot back into the saucepan.
- Heat the milk and egg mixture over medium heat, whisking constantly, until it begins to bubble. It will thicken quickly. Once it has thickened, cook for one minute, then remove from the heat. Pour into a shallow container or bowl of a stand mixer and press some plastic wrap over the surface to avoid a skin from forming. Refrigerate until cold - at least four hours, preferably overnight. If you need to speed this process up, you can place the pastry cream in a bowl, then place the bowl in an ice bath. Stir frequently.
- Fit your mixer with the whisk attachment, and place the pastry cream in the bowl. Whip the mixture on medium until creamy and lump-free. Begin adding the butter, a few cubes at a time, until fully incorporated. It may look curdled at some point but just keep whipping - it will come together! Whip for a further 2 minutes.
- Remove 250g of the coffee buttercream, and transfer to a piping bag (do not snip the end off just yet). Add the cooled chocolate to the remaining coffee buttercream left in the mixer, and mix to combine.
ASSEMBLY
- If the cakes domed in the oven, level them a little with a sharp bread knife. Transfer some of the mocha buttercream to a piping bag fitted with a medium round tip - this will be used to make a buttercream dam to hold in the chocolate filling between layers.
- Secure one of the layers of cake to a cake turntable using a little buttercream. Add about half a cup of mocha buttercream onto the first layer of cake, and smooth using an offset spatula. Create a buttercream dam using the buttercream in the piping bag by piping a ring of frosting around the outside edge of the first layer. Fill in the ring with approximately ⅓ cup of the hazelnut filling. Place the second layer of cake onto the first, pressing very lightly to secure, and sealing the joins with a thin layer of buttercream. Repeat the layering process - add half a cup of buttercream, make a dam, fill with ⅓ cup hazelnut filling, then top with the third layer of cake - I like to put this one upside down to ensure that the top of the cake is flat.
- Crumb coat the cake - to do this, apply a thin layer of buttercream over the surface of the cake, and smooth with a bench scraper or icing smoother. Refrigerate the cake for 30-45 minutes, until the crumb coat has set.
- To ice without stripes (see notes): Cover the cake with a second, thicker layer of mocha buttercream. Smooth. Decorate as desired.
- To ice with stripes: (see this highlight for more details / photos) Apply a thick layer of buttercream, and smooth completely, ensuring that there are no holes and it is completely smooth. Chill 15 minutes. Using a warmed icing comb (run under hot water then dry), go around the cake, creating grooves in your buttercream. Make sure that the grooves are sharp edged and deep - you may have to do a few passes to ensure this.
- Freeze the cake for 30 minutes, then, using the reserved coffee buttercream, snip a small hole off the end of the piping bag, and pipe coffee buttercream into the grooves. Do not be afraid to overfill slightly. Once you have filled all of the grooves, smooth the cake using a warmed cake scraper, wiping between passes. Chill the cake for 10-20 minutes.
- Place the remainder of the buttercream in piping bags fitted with french star tips (ateco #866 is my favourite) - I did one for the mocha buttercream, one for the coffee buttercream, and one for the excess scraped off from smoothing off the stripes, which was marbled.
- Add gold leaf to the cake where desired, then pipe blobs of buttercream randomly over the surface of the cake, as desired.
- Chill cake until ready to serve, then bring out of the fridge to come to room temperature about an hour before you serve. Store leftovers in an airtight container in the fridge.
Notes
Buttercream Stripe method from Brittany May Cakes
Comments
Libby says
Make this cake!! It's everything you love about brownies plus everything you love about cakes. It's soooo good. I will warn you, don't be so enchanted by the smell that you take the cake out too early. (Patience is not always my virtue.) Know that the aroma is so wonderful you'll be tempted. I'm curious to make this with milk chocolate for a slightly sweeter option. Either way, it's bound to be delicious.
Michelle says
Would this brownie cake mix work well within a fondant covered cake with say a cookies & cream type buttercream?
Erin says
Hi! I've only made it this way but that sounds so good so I am sure that it would work fine! 🙂
Michelle says
Thank you for your response 🤗
Kara says
Could I cheat and use Nutella for the filling? It's impossible to find hazelnuts here.
Erin says
Yessss it will work just fine! Not at all cheating - I LOVE nutella!
Viki says
Hi Erin, I'm so happy I ran across this recipe to try! Do you know if using dutch processed cocoa is advised for the brownie portion?
Thanks!
Erin says
Hihi! Ooooh it's quite old so I can't remember what I used sorry! I would say it was probably dutch process! Either should be fine though as there's not loads of leavening 🙂
Libby says
I recently made this cake again and still absolutely love it. The frosting is a labor of love and worth every minute. The cake itself is perfectly chocolatey and dense. Together they're an absolute crowd pleasure. This certainly won't be the last time I make this!
Eileen says
I found this cake too sweet in my opinion as well as a few of my friends who I baked it for (even when using 82% cocoa chocolate) but the flavors are amazing so I'd definitely try make it with less sugar. Thanks for this recipe and I plan to try other recipes of yours in the near future 🙂
Nancy says
I wanted to convert the cake to cupcakes. Do you have any advice on how to approach this? Thank you in advance
Nancy
Erin Clarkson says
Hi! So sorry for the late reply! I am not sure how these would go as cupcakes as the recipe is quite dense? You could try it though - just divide between cupcake pans! I would start checking for doneness about 18 minutes
Lisa says
Do you cover your cakes before placing them into the fridge?
Erin Clarkson says
Once they are frosted I put them in uncovered! If it's just the layers they go in covered.
Amy says
I made this cake for my daughter. Super rich but yummy. I had to add milk to the hazelnut filling because my blender couldn't hack it but worked well. Had a heart attack over the buttercream but trusted you Erin and it was luxe!
Cheers
Jennifer Mayer-Singh says
I am planning on making this today for my son’s birthday party next weekend - would this freeze okay until then? 😬 Will let you know how it turns out!