


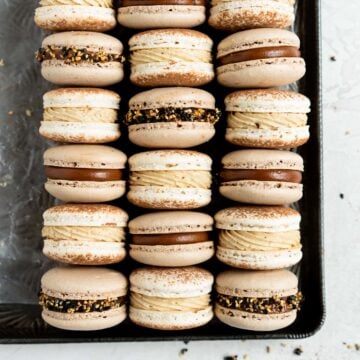
Hi hi! Just popping in to share the recipe for sesame macarons two ways - Tahini and chocolate ganache filled, and a coffee and halva macaron!
I made a salted caramel milk chocolate ganache a while back and used it to fill doughnuts, and have been thinking about how I can incorporate it into a mac filling. The great thing about a ganache is that it is cream based, so you can very easily add in anything to the cream which will flavour it - tea, miso, etc etc. I stirred a solid amount of tahini into the cream before proceeding with the rest of the ganache, and it added the most incredible depth of flavour. Tahini and chocolate is such an amazing combination, and paired perfectly with a lightly chocolate flavoured mac shell. We finished them off with a sesame brittle Jase happened to have in his pantry, which was the best co-incidence but also the perfect pairing, as the sesame seeds provided an amazing crunchy texture which stood up perfectly against the silky ganache.
The second mac we dusted with cocoa powder before baking, and filled with one of my fave things ever - coffee German buttercream, which we amped up a little with a piece of coffee halva inside each macaron. I could go on and on about how much I love Coffee German buttercream, but I won’t - just make it. It is SO GOOD, and so delicious against the chewy mac shell.
I think you’ll be seeing a bunch more of these variation on a theme posts from now - they are super fun to come up with, and extra fun to shoot! Of course you don’t have to make both flavours, but we all love options!
A few wee tips:
- All my best mac tips are here!
- The Sesame brittle on the chocolate macs is totally optional but a lovely crunchy element - we added it to only some to give some visual variation and I loved how it looked!
- If you wanted to just do a regular salted caramel milk chocolate ganache in the macs, use this recipe - I would drop the cream to 500g
- The ganache definitely needs some time to set up - overnight is best, and if you can, make the brittle and the pastry cream for the coffee buttercream the day before too.
- The Chocolate tahini ganache ideally needs to be kept in the fridge, so store your finished macs in the fridge until ready to eat, then let sit at room temp to warm up slightly!
❤️ Made this recipe and love it? ❤️
I would LOVE for you to leave me a review and star rating below to let me know how you liked it! Also, please make sure to tag me on Instagram!
Answers to your baking questions
Over the years, many of you have asked me questions about:
- baking in grams
- adjusting oven temperatures
- what kind of salt to use
- and many more!
I've curated and answered them all for your easy reference in this frequently asked questions post!
CHOCOLATE MACARONS WITH SALTED CARAMEL TAHINI MILK CHOCOLATE GANACHE AND SESAME BRITTLE
- Yield: Makes about 24 Macarons 1x
Description
CHOCOLATE MACARONS WITH SALTED CARAMEL TAHINI MILK CHOCOLATE GANACHE AND SESAME BRITTLE
Ingredients
Salted Caramel Tahini Milk Chocolate Ganache
- 270g milk chocolate, chopped
- 500g heavy cream
- 250g Tahini
- 1 tsp vanilla bean paste
- ¾ tsp salt
- 35g water
- 240g sugar
- 30g light corn syrup or glucose
- 50g unsalted butter, at room temperature
Sesame Brittle
- 60g (3 Tbsp) honey
- 15g (1 Tbsp) water
- 65g (½ cup) black sesame seeds
- 65g (½ cup) white sesame seeds
Chocolate Macaron Shells
- 170g ground almonds
- 270g powdered sugar
- 20g cocoa powder
- 180g egg whites, at room temperature
- 160g white sugar
Instructions
SALTED CARAMEL TAHINI MILK CHOCOLATE GANACHE
- Place the chopped chocolate in a medium heat proof bowl.
- In a small, heavy bottomed saucepan, place the cream, tahini, vanilla bean paste and salt, and place over low heat. You just want to warm it - not let it boil. It will seem as if the mixture is very thick to begin with from the tahini but it will loosen up a little as it warms. Stir frequently and keep warm, but not boiling.
- In a medium heavy bottomed pan, combine the water, sugar, and corn syrup. Place over medium heat. Cook, stirring or swirling the pan occasionally, until the mixture is a deep amber colour. Remove from the heat and add a third of the warmed cream mixture. Be careful as it will steam and sputter. Whisk well to combine. Add the second third, combine, then add the remaining cream, and whisk until well incorporated.
- Pour a third of the caramel cream mixture over the chopped chocolate, then cover the bowl with a lid or plate and leave to stand for 2 minutes. Mix with a stick blender to emulsify the mixture. Add the remaining caramel mixture in two additions, mixing well with the stick blender to ensure even incorporation.
- Cool the mixture to 95°f / 35°c (you can either leave it at room temperature, stirring occasionally, which will take some time, or you can pop it into the fridge, stirring and checking the temperature often), then add in the butter and mix with the stick blender to emulsify. Transfer to an airtight container and leave to set overnight in the fridge.
SESAME BRITTLE
- Preheat the oven to 325°f / 160°c. Line a sheet pan with a silicone baking mat or parchment paper.
- Combine the honey and water in a small saucepan, and gently heat until combined. Add the sesame seeds and stir until incorporated, then spread the mixture thinly onto the prepared baking sheet. Bake until the sesame seeds are golden and fragrant, checking frequently.
- Remove from the oven and allow to cool - it will harden as it cools. Break into chunks. Store in an airtight container until needed.
CHOCOLATE MACARON SHELLS
- Preheat oven to 300˚f / 150˚c, and position the oven rack in the centre of the oven. Using a round cookie cutter or the base of a large piping tip (something about 1.5 inches in diameter), draw a "template" for your macarons on a piece of parchment paper, leaving about ¾" between each circle.
- Sift together the ground almonds, cocoa powder, and powdered sugar into a medium bowl. Sift again to ensure there are no large clumps.
- In the bowl of a stand mixer fitted with the whisk attachment, whip the egg whites on medium speed until foamy. Gradually add the sugar, increase the mixer speed, and whip on high until the meringue starts to firm up. Continue to whip until the meringue forms stiff peaks (there is a good example here).
- Remove the bowl from the mixer. Add half of the ground almond and powdered sugar mixture, and fold into the meringue. You want to deflate the meringue just a little at this stage, to combine the meringue and ground almond mixture.
- Add the remaining ground almond mixture, and stir lightly to combine. Now comes the important part - mixing the batter to the correct consistency. Again, this video does a good job of explaining it. Fold the mixture in a series of 'turns', deflating the batter by spreading it against the side of the bowl. Turn the bowl slightly and repeat the movement - scooping the batter from the bottom of the bowl, and spreading it against the side. Continuously check the consistency of the batter - you want it to flow like lava when you lift the spatula from the bowl, and you should be able to 'draw' a figure 8 with it, without the batter breaking (again, watch lots of videos to get an idea! They help so much). This step can take some practice until you know what it should feel and look like. If in doubt you are better to under mix them than over mix them - the process of putting the batter into the bag and piping out will help mix a little too.
- Fit a large pastry bag with a medium sized round tip, such as an ateco #805. Place the macaron template on a sheet pan, and place a second piece of parchment over it. Holding the piping bag at a 90˚ angle to the surface, pipe out the batter into blobs the size of the circles drawn on the template. Finish off each piped circle with a little "flick" of your wrist to minimise the batter forming a point (it will still form a small one, but we can get rid of this with banging). Remove the template from under the macarons.
- Hold the baking sheet in two hands, and carefully but firmly, evenly bang it against the bench. Repeat this a few more times - this will get rid of any air bubbles, remove points on the top, and help them to spread out slightly.
- Repeat the piping and banging process until you have used up all of the batter - I usually make three sheet pans worth.
- Allow the macarons to dry at room temperature for approximately 30 minutes, or until they form a skin that you can touch without your finger sticking to them. This time will drastically vary depending on the humidity.
- About fifteen minutes before you are going to bake the macarons, place a spare sheet pan in the oven to preheat - this is going to be used to place under the pan with the macarons on it, to double up, which should help with even baking. Bake the macarons one sheet at a time - place the sheet with the macarons on the preheated sheet, and place in the oven.
- Bake for 18-22 minutes, rotating the pan once during the cooking process, and checking for doneness after 15 minutes. The macarons should develop a foot (the ruffled part on the bottom of the macaron), and bake without browning. To see if they are done - press down lightly on a shell. If the foot gives way, it needs a little longer, if it is stable, then it is close to being done. Test a macaron shell - if you can peel it away cleanly from the paper, they are done. If they are stable but cannot yet peel away cleanly, give them another minute or so. Again, this part takes a little trial and error depending on your oven. If they seem done but do not peel away cleanly, do not worry - there is a little trick for that!
- Remove from the oven, and allow to cool on the sheet pan for 10 minutes before peeling off the parchment paper and allowing to cool completely on a wire rack. Repeat the baking with the remaining trays, using the same spare sheet pan to double up.
- If your macs do not peel away cleanly, place them, on the parchment paper, into the freezer for 5-10 minutes, then peel away from the paper.
- Store cooled macarons in an airtight container until ready to use.
ASSEMBLY
- Place the salted caramel tahini ganache in a piping bag fitted with a round tip. Crumble some of the brittle into a bowl.
- Pair up the macaron shells, and pipe a blob of ganache on one half of each pair. Top with the second shell, pressing down to secure. Sprinkle with the sesame brittle.
- Macarons taste best if you 'mature' them in the fridge overnight to let the flavours meld, but they are perfect eaten immediately too! Store leftovers in an airtight container in the fridge.
VANILLA BEAN MACARONS WITH COFFEE GERMAN BUTTERCREAM AND HALVA
- Yield: Makes about 24 Macarons 1x
Description
VANILLA BEAN MACARONS WITH COFFEE GERMAN BUTTERCREAM AND HALVA
Ingredients
Coffee German Buttercream
- 190g whole milk
- 20g (about 2.5 Tbsp) coarsely ground coffee
- 110g sugar
- 12g (1 ½ Tbsp) cornstarch
- 1 tsp vanilla bean paste
- 1 egg
- 1 egg yolk
- ½ teaspoon kosher salt
- 340g (3 sticks) unsalted butter, at room temperature
Macaron Shells
- 170g ground almonds
- 300g powdered sugar
- 180g egg whites, at room temperature
- 160g sugar
- 1 tsp vanilla bean paste
- Cocoa for dusting (optional)
- Crumbled Halva for assembly (We used Coffee Halva from Seed and Mill)
Instructions
COFFEE GERMAN BUTTERCREAM
- In a medium saucepan, heat the milk to just shy of a simmer. Remove from the heat, add the coffee, stir well, and steep for 20 minutes. Strain through a very fine mesh sieve, and re-weigh the infused milk and top up to 190. Wipe out the saucepan, and return to the milk mixture to the heat. Bring to just shy of a simmer. Meanwhile, In a bowl, whisk together the corn starch and sugar, then whisk in the vanilla, egg, egg yolk and salt.
- Using one hand to whisk constantly, pour half of the hot milk mixture into the egg mixture. This helps to temper the eggs and stop them from scrambling. Whisk until incorporated, and then pour the whole lot back into the saucepan.
- Heat the milk and egg mixture over medium heat, whisking constantly, until it begins to bubble. It will thicken quickly. Once it has thickened, cook for one minute, then remove from the heat. Pour into a shallow container or bowl of a stand mixer and press some plastic wrap over the surface to avoid a skin from forming. Refrigerate until cold - at least four hours, preferably overnight. If you need to speed this process up, you can place the pastry cream in a bowl, then place the bowl in an ice bath. Stir frequently.
- Fit your mixer with the whisk attachment, and place the pastry cream in the bowl. Whip the mixture on medium until creamy and lump-free. Begin adding the butter, a few cubes at a time, until fully incorporated. It may look curdled at some point but just keep whipping - it will come together! Whip for a further 2 minutes.
MACARON SHELLS
- Preheat oven to 300˚f / 150˚c, and position the oven rack in the centre of the oven. Using a round cookie cutter or the base of a large piping tip (something about 1.5 inches in diameter), draw a "template" for your macarons on a piece of parchment paper, leaving about ¾" between each circle.
- Combine the almond meal and powdered sugar together in a large bowl. Sift the mixture twice, to ensure there are no large lumps and that the mixture is properly aerated. Set aside.
- In the bowl of a stand mixer fitted with the whisk attachment, whip the egg whites on medium speed until foamy. Gradually add the sugar, increase the mixer speed, and whip on high until the meringue starts to firm up. Add vanilla and mix until incorporated. Continue to whip until the meringue forms stiff peaks (there is a good example here).
- Remove the bowl from the mixer. Add half of the ground almond and powdered sugar mixture, and fold into the meringue. You want to deflate the meringue just a little at this stage, to combine the meringue and ground almond mixture.
- Add the remaining ground almond mixture, and stir lightly to combine. Now comes the important part - mixing the batter to the correct consistency. Again, this video does a good job of explaining it. Fold the mixture in a series of 'turns', deflating the batter by spreading it against the side of the bowl. Turn the bowl slightly and repeat the movement - scooping the batter from the bottom of the bowl, and spreading it against the side. Continuously check the consistency of the batter - you want it to flow like lava when you lift the spatula from the bowl, and you should be able to 'draw' a figure 8 with it, without the batter breaking (again, watch lots of videos to get an idea! They help so much). This step can take some practice until you know what it should feel and look like. If in doubt you are better to under mix them than over mix them - the process of putting the batter into the bag and piping out will help mix a little too.
- Fit a large pastry bag with a medium sized round tip, such as an ateco #805. Place the macaron template on a sheet pan, and place a second piece of parchment over it. Holding the piping bag at a 90˚ angle to the surface, pipe out the batter into blobs the size of the circles drawn on the template. Finish off each piped circle with a little "flick" of your wrist to minimise the batter forming a point (it will still form a small one, but we can get rid of this with banging). Remove the template from under the macarons.
- Hold the baking sheet in two hands, and carefully but firmly, evenly bang it against the bench. Repeat this a few more times - this will get rid of any air bubbles, remove points on the top, and help them to spread out slightly. Dust the tops of the shells with cocoa powder.
- Repeat the piping and banging process until you have used up all of the batter - I usually make three sheet pans worth.
- Allow the macarons to dry at room temperature for approximately 30 minutes, or until they form a skin that you can touch without your finger sticking to them. This time will drastically vary depending on the humidity.
- About fifteen minutes before you are going to bake the macarons, place a spare sheet pan in the oven to preheat - this is going to be used to place under the pan with the macarons on it, to double up, which should help with even baking. Bake the macarons one sheet at a time - place the sheet with the macarons on the preheated sheet, and place in the oven.
- Bake for approximately 18 minutes, rotating the pan once during the cooking process, and checking for doneness after 15 minutes. The macarons should develop a foot (the ruffled part on the bottom of the macaron), and bake without browning. To see if they are done - press down lightly on a shell. If the foot gives way, it needs a little longer, if it is stable, then it is close to being done. Test a macaron shell - if you can peel it away cleanly from the paper, they are done. If they are stable but cannot yet peel away cleanly, give them another minute or so. Again, this part takes a little trial and error depending on your oven. If they seem done but do not peel away cleanly, do not worry - there is a little trick for that!
- Remove from the oven, and allow to cool on the sheet pan for 10 minutes before peeling off the parchment paper and allowing to cool completely on a wire rack. Repeat the baking with the remaining trays, using the same spare sheet pan to double up.
- If your macs do not peel away cleanly, place them, on the parchment paper, into the freezer for 5-10 minutes, then peel away from the paper.
- Store cooled macarons in an airtight container until ready to use.
ASSEMBLY
- Place the coffee German Buttercream in a piping bag fitted with a french star tip such as an ateco #866. Crumble up the Halva.
- Pair up the macaron shells, and pipe a round of buttercream on one half of each pair. Place some crumbled halva in the middle of the ring of buttercream. Top with the second shell, pressing down to secure.
- Macarons taste best if you 'mature' them in the fridge overnight to let the flavours meld, but they are perfect eaten immediately too! Store leftovers in an airtight container in the fridge.