
This is the perfect recipe for a super easy homemade graham cracker crust. Made with graham cracker crumbs and toasty brown butter, This post walks you through a step by step method of how to make a quick graham cracker crust, and all the tips and tricks for a perfectly shaped crumb crust that holds its shape when used for a pie. This post also includes alternatives to graham crackers!

Hi hi! I am just popping in to share this super easy graham cracker pie crust recipe with you!
I love making a crumb crust for pies, and this homemade graham cracker crust is particularly good. It utilises brown butter for a super toasty finish, which gives amazing depth of flavour to whatever recipe you are using it for.
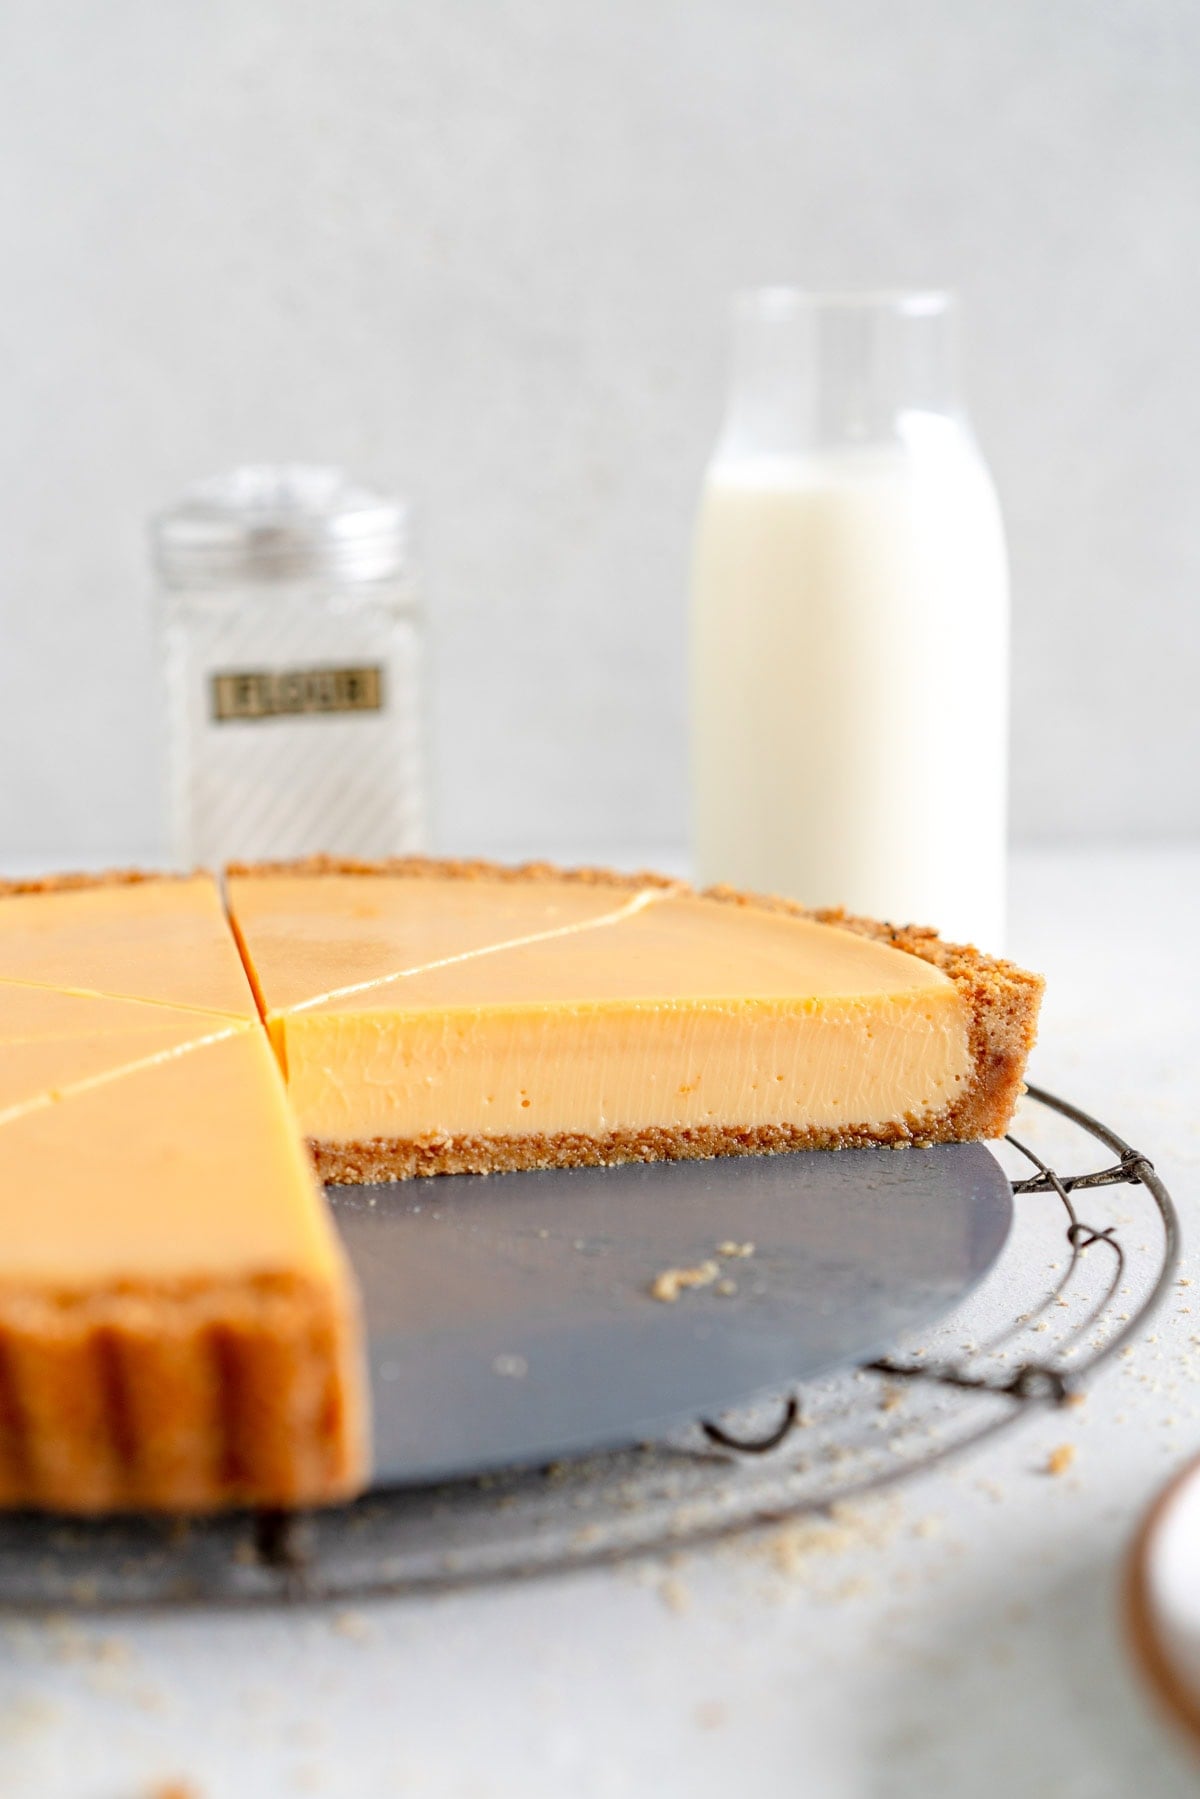
I use this graham cracker crust as the base of my Key Lime Pie and my Lemon pie, but it can be used in a bunch of different formats - it works great as the base of a bar or a cheesecake too.
I have made a bunch of crumb crusts in my time as a baking blogger, and have picked up a couple of tips and tricks along the way on how to get a perfect graham cracker crust that holds its shape that I will share with you!

Choose your pan carefully - non stick is not the way to go!
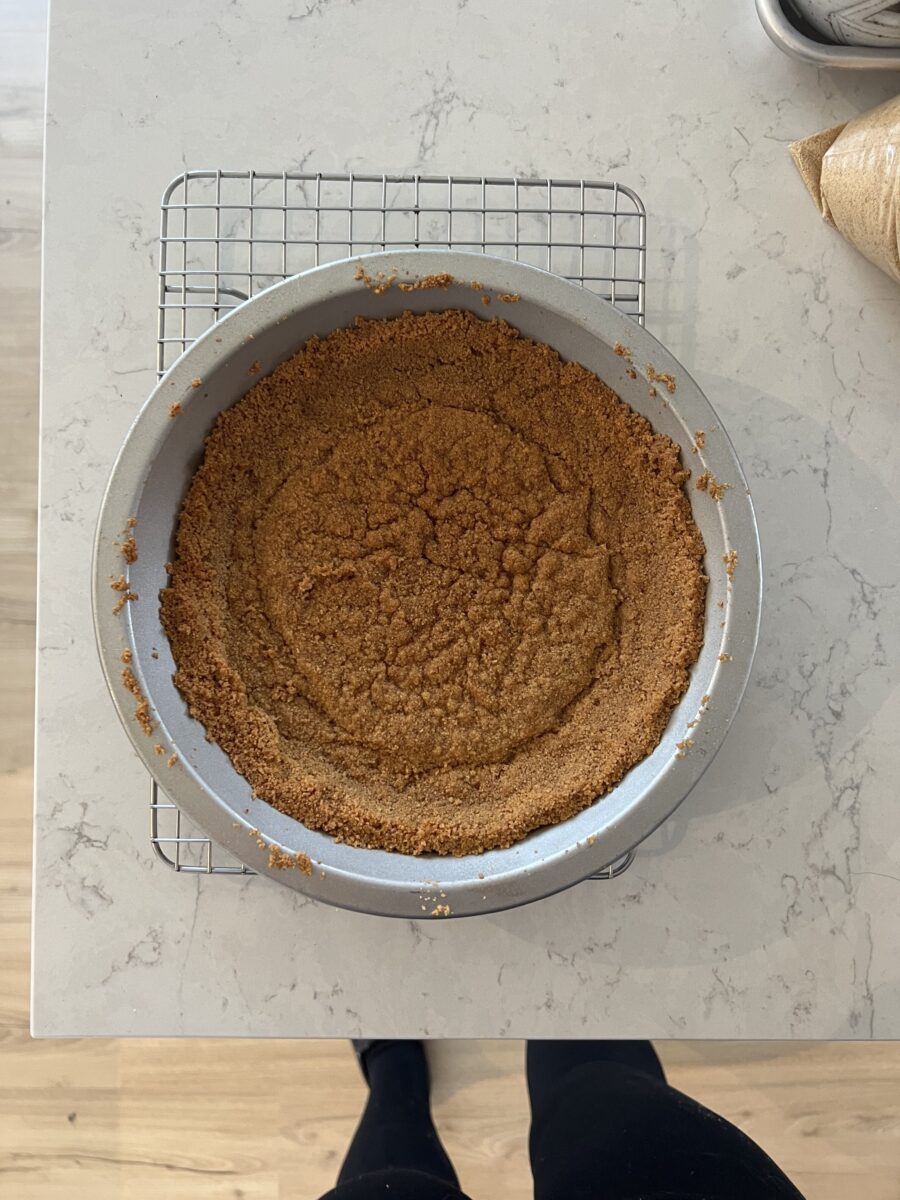
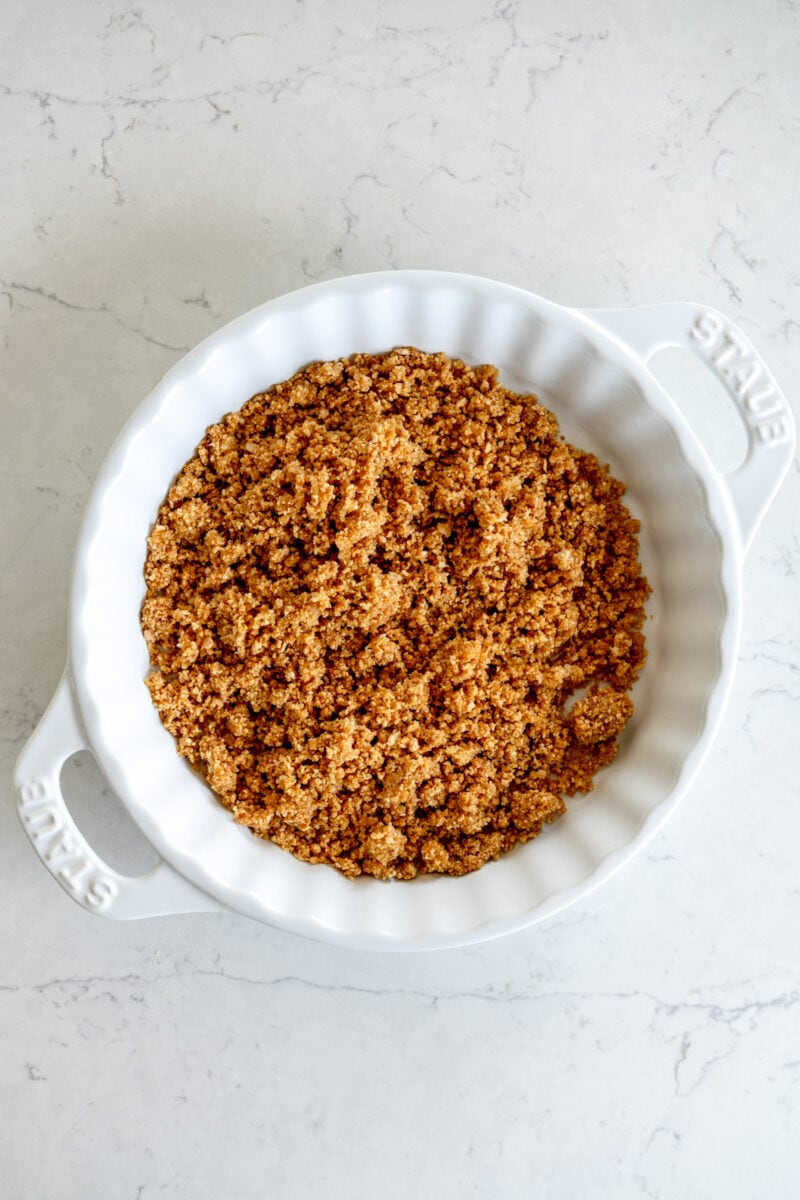
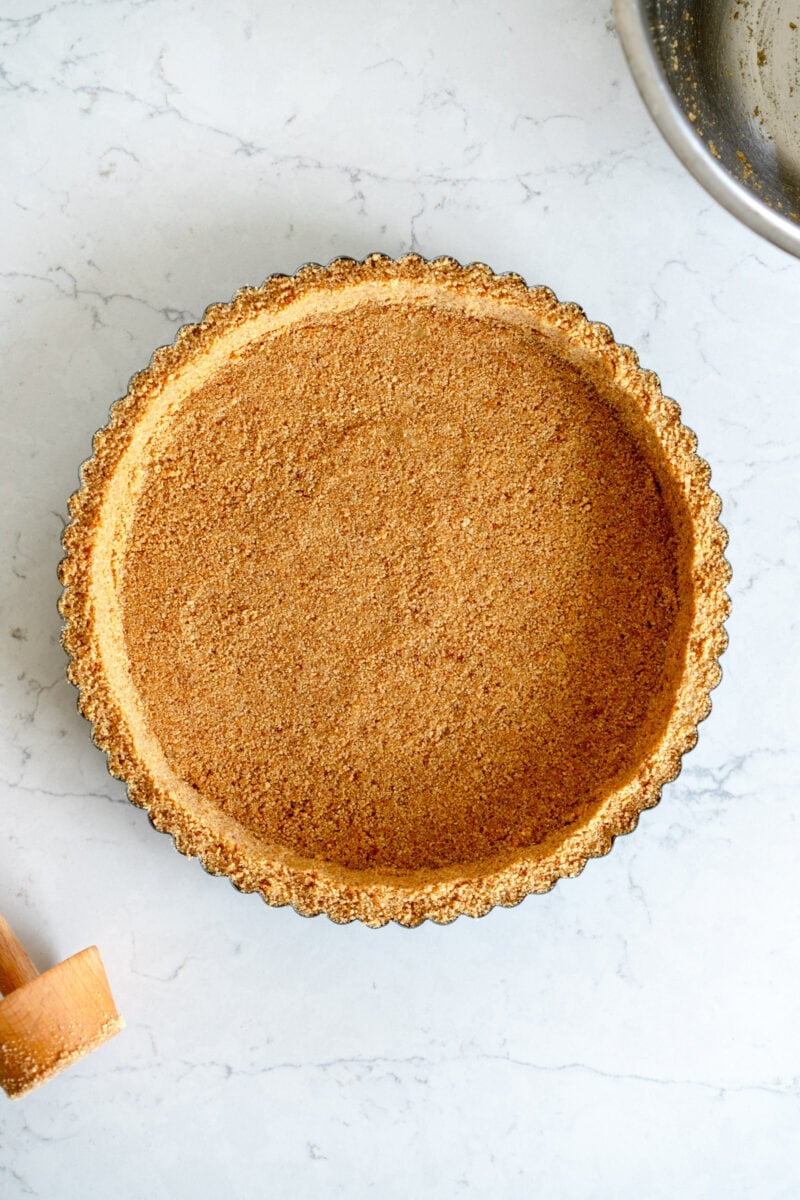
I am a metal pie pan girl when it comes to making a pie with a classic pastry crust, but for a crumb crust like this graham cracker crust or my oreo pie crust, I highly recommend a ceramic pan or a fluted tart pan. Metal pans can be a little too slippery and the crust can slip down the sides. This crust works great in a metal tart pan with a removable bottom, but tart pans have much straighter sides than a sloped pie pan.
I tested this recipe in my go-to non stick pan and the crust fully slumped down to the bottom of the pan. I have had the best success using this crust either in a ceramic pan or a tart pan (or it works great in a square pan too).
How to shape a graham cracker crust - a game changing tip.
I have made many graham cracker crusts before, and have found that the easiest way to get a nice even crust is to start with the sides. You can either dump all the crust in at once and go for it, or I find it much easier to weigh out some of the crust and then form the sides first, before adding the rest of the crust to form the bottom.
Depending on the pan that you use the crust will be thicker or thinner, so adjust the amount you use for the sides if needed.
The great thing about making a graham cracker crust is that you can work at it as much as you like - if you find that you aren't happy with how it is coming out, just transfer the crumbs back into the bowl and start again.

Flatten things down.
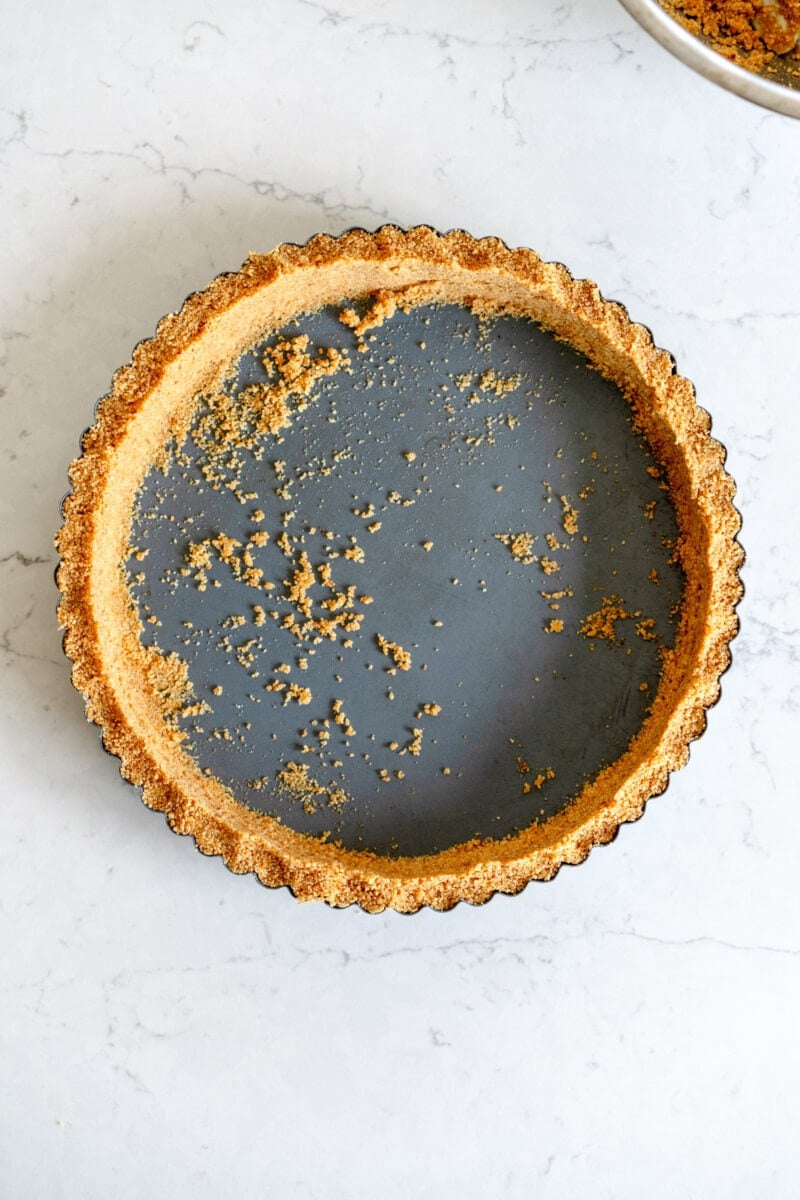
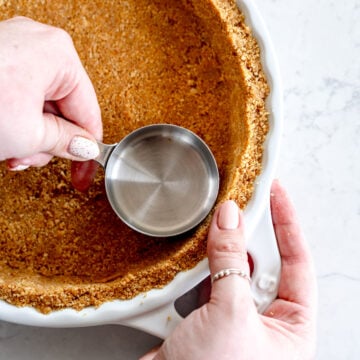
Another good little tip when making a graham cracker crust is to use something nice and flat. I like to use either a flat bottomed measuring cup (my good friend the ⅓ cup, if you've been here a while you will know she is my favourite for a crumb crust), or you can use a drinking glass or something similar. Make sure that the crust is nice and compacted in the pan to reduce crumbling. I also have a wooden tamper which is helpful to use.
I like to use the thumb or finger on my opposite hand to help shape the top edge of the crust - I push down lightly to stop it from rising too much up the sides of the pan and to keep everything nice and flat and tidy.

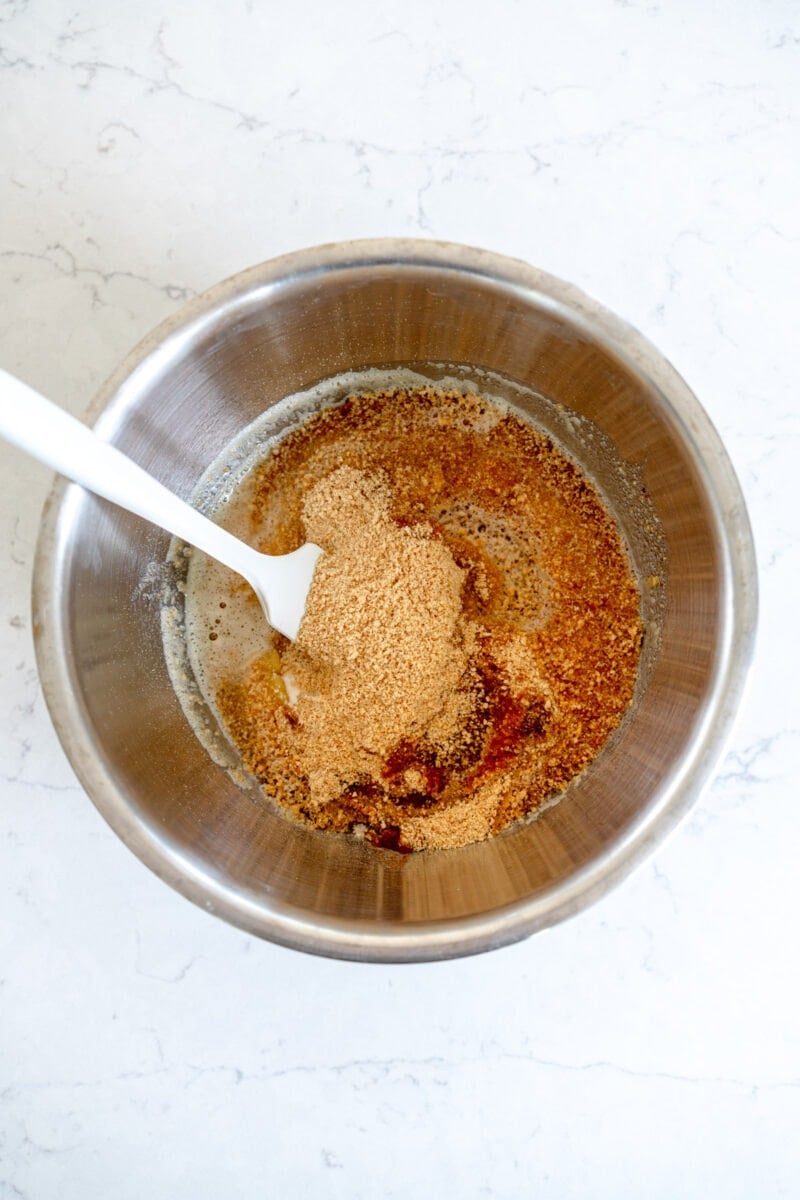
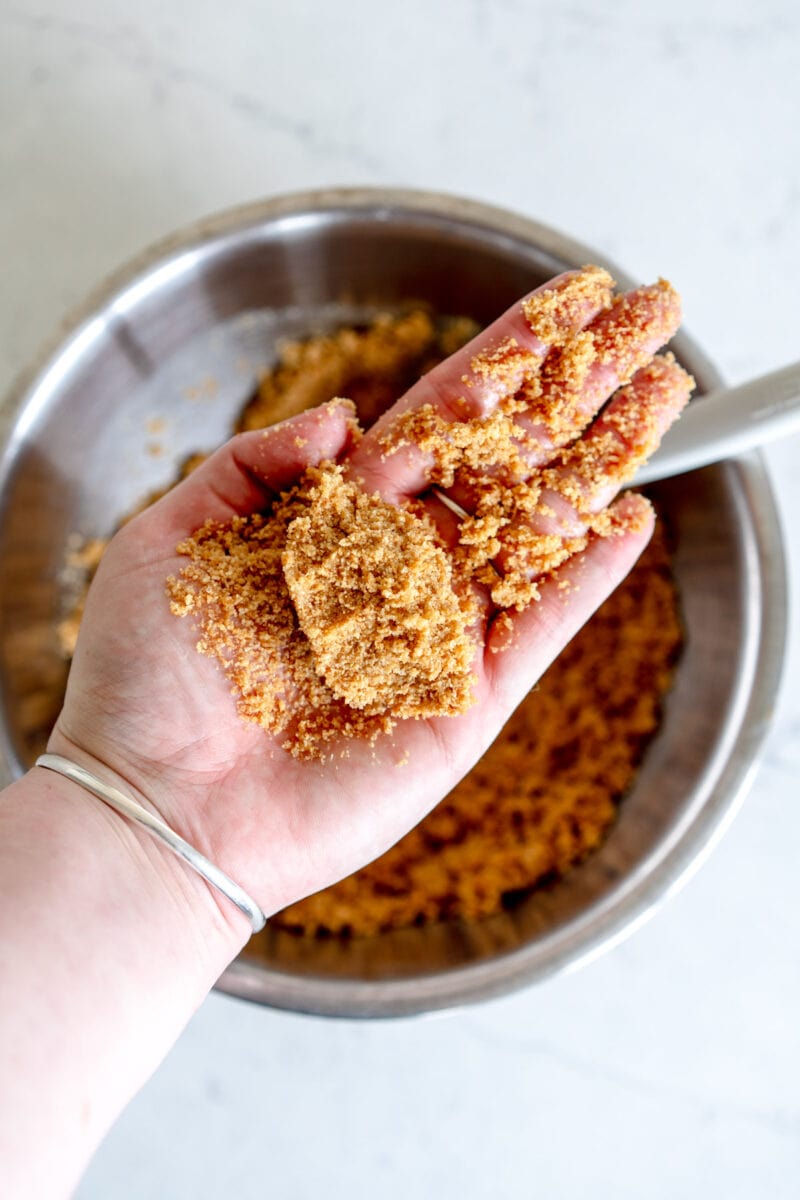
The ideal consistency for a sturdy graham cracker crust - wet sand.
Not all graham crackers have the same level of absorbency, so you may need to adjust the amount of butter that you use in the recipe.
The amount I call for in the recipe generally works, but as I haven't been able to test with every brand of graham cracker out there, you may need to just keep an eye on things.
You are aiming for the consistency to be like wet sand - if you see in the image below, when you squeeze some of the crust mixture together, it should hold its shape.
Browning butter - don't be scared!
If you haven't made brown butter before you're in for a treat - it is absolutely magical. Brown butter is butter that has been cooked until the water evaporates and the milk solids brown. It elevates the taste of this graham cracker crust by giving it an amazing depth of flavour - during recipe testing I found I much preferred the brown butter crust to a regular graham cracker crust. My top tip is to go slowly.
I know that making brown butter can be intimidating. Don't be scared, I will hold your hand the whole way through in my post and you'll be nailing it in no time: Brown Butter 101: The Ultimate Guide
Scaling a graham cracker crust
This graham cracker crust works great in a range of formats - the recipe as written will do one 9" pie dish or a fluted tart pan with a removable bottom. If you want to use it for other formats or to scale the recipe, there are notes within the recipe card on how to do that - I double it for a 9" pan, and do a 1.5 the recipe if I want more crust or my pie pan is slightly larger.
❤️ Made this recipe and love it? ❤️
I would LOVE for you to leave me a review and star rating below to let me know how you liked it! Also, please make sure to tag me on Instagram!
Answers to your baking questions
Over the years, many of you have asked me questions about:
- baking in grams
- adjusting oven temperatures
- what kind of salt to use
- and many more!
I've curated and answered them all for your easy reference in this frequently asked questions post!
20 Minute Brown Butter Graham Cracker Crust
- Prep Time: 10 minutes
- Cook Time: 10 minutes
- Total Time: 20 minutes
- Yield: One Pie Crust
- Category: Pie
- Method: Baking
- Cuisine: American
Description
This is the perfect recipe for a super easy homemade graham cracker crust. Made with graham cracker crumbs and toasty brown butter, This post walks you through a step by step method of how to make a quick graham cracker crust, and all the tips and tricks for a perfectly shaped crumb crust that holds its shape when used for a pie. This post also includes alternatives to graham crackers!
Ingredients
This recipe makes enough for a 9" (23cm) Pie Pan. For scaling, please see the notes section below.
- 180g graham crackers, processed into fine crumbs
- 20g granulated sugar
- Pinch of salt
- 125g unsalted butter, cold from the fridge is fine.
Instructions
This recipe makes enough for a 9" (23cm) Pie Pan. For scaling, please see the notes section below.
- Preheat the oven to 350°f / 180°c.
- Combine the graham crackers, sugar, and salt in a medium bowl.
- Place the butter in a medium saucepan, and place over medium heat. Cook until the butter has melted, and then continue to cook, swirling the pan often and stirring with a whisk, until the butter foams and turns golden brown and nutty - this should take 3-4 minutes.
- Weigh out 95g (see Notes section below if you are scaling the recipe) of the brown butter into the sugar and graham cracker mixture.
- Stir with a spatula to combine. The texture should resemble wet sand. Some graham crackers are more or less absorbent than others so adjust the butter as needed.
- Place 160g of the crust mixture into the pan you are using - this quantity will be used to build the sides of your crust.
- Pat the crust mixture onto the sides of the pan, then use a straight sided measuring cup or drinking glass to help press it evenly against the edges of the pan. You want to make it nice and compact. You can use the fingers or thumb on the other hand to help keep a nice even top edge on your crust.
- Add the remainder of the crust mixture and spread evenly over the bottom of the pie pan, then compact down with whatever flat tool you are using. Make sure that there is a good join between the edges and sides of the crust - if needed, use your fingers to make sure that it is all well sealed.
- Bake the graham cracker crust for 10 minutes, until golden brown and set. If you are using this crust for a no-bake pie recipe, bake for a further 2-3 minutes until nicely golden. If you are baking the crust again for a recipe like lemon pie or key lime pie, remember the crust will bake again when you bake the filling, so remove from the oven when it is lightly golden brown.
- Use immediately in recipe, or store until ready to use.
Notes
Scaling Graham Cracker Crust
The recipe listed is enough for a 9" pie pan, or a 9" removable bottom tart pan. I prefer to scale it depending on the size of the pan, or how much I need. Here are a few options:
If you want more crust, or you are using a slightly larger (10") pie pan or a 10" (25cm) fluted tart pan (use this quantity for Banoffee Pie)
Do 1.5x the recipe: 270g graham cracker crumbs, 30g granulated sugar, 190g butter (which browns down to 135g for the amount you measure out). If you are putting this into a pan and doing the sides first, use 240g crumbs to do the sides and use the rest for the base. The baking time is the same - for a banoffee pie, add on an extra 2-3 minutes to make sure it is fully baked before cooling.
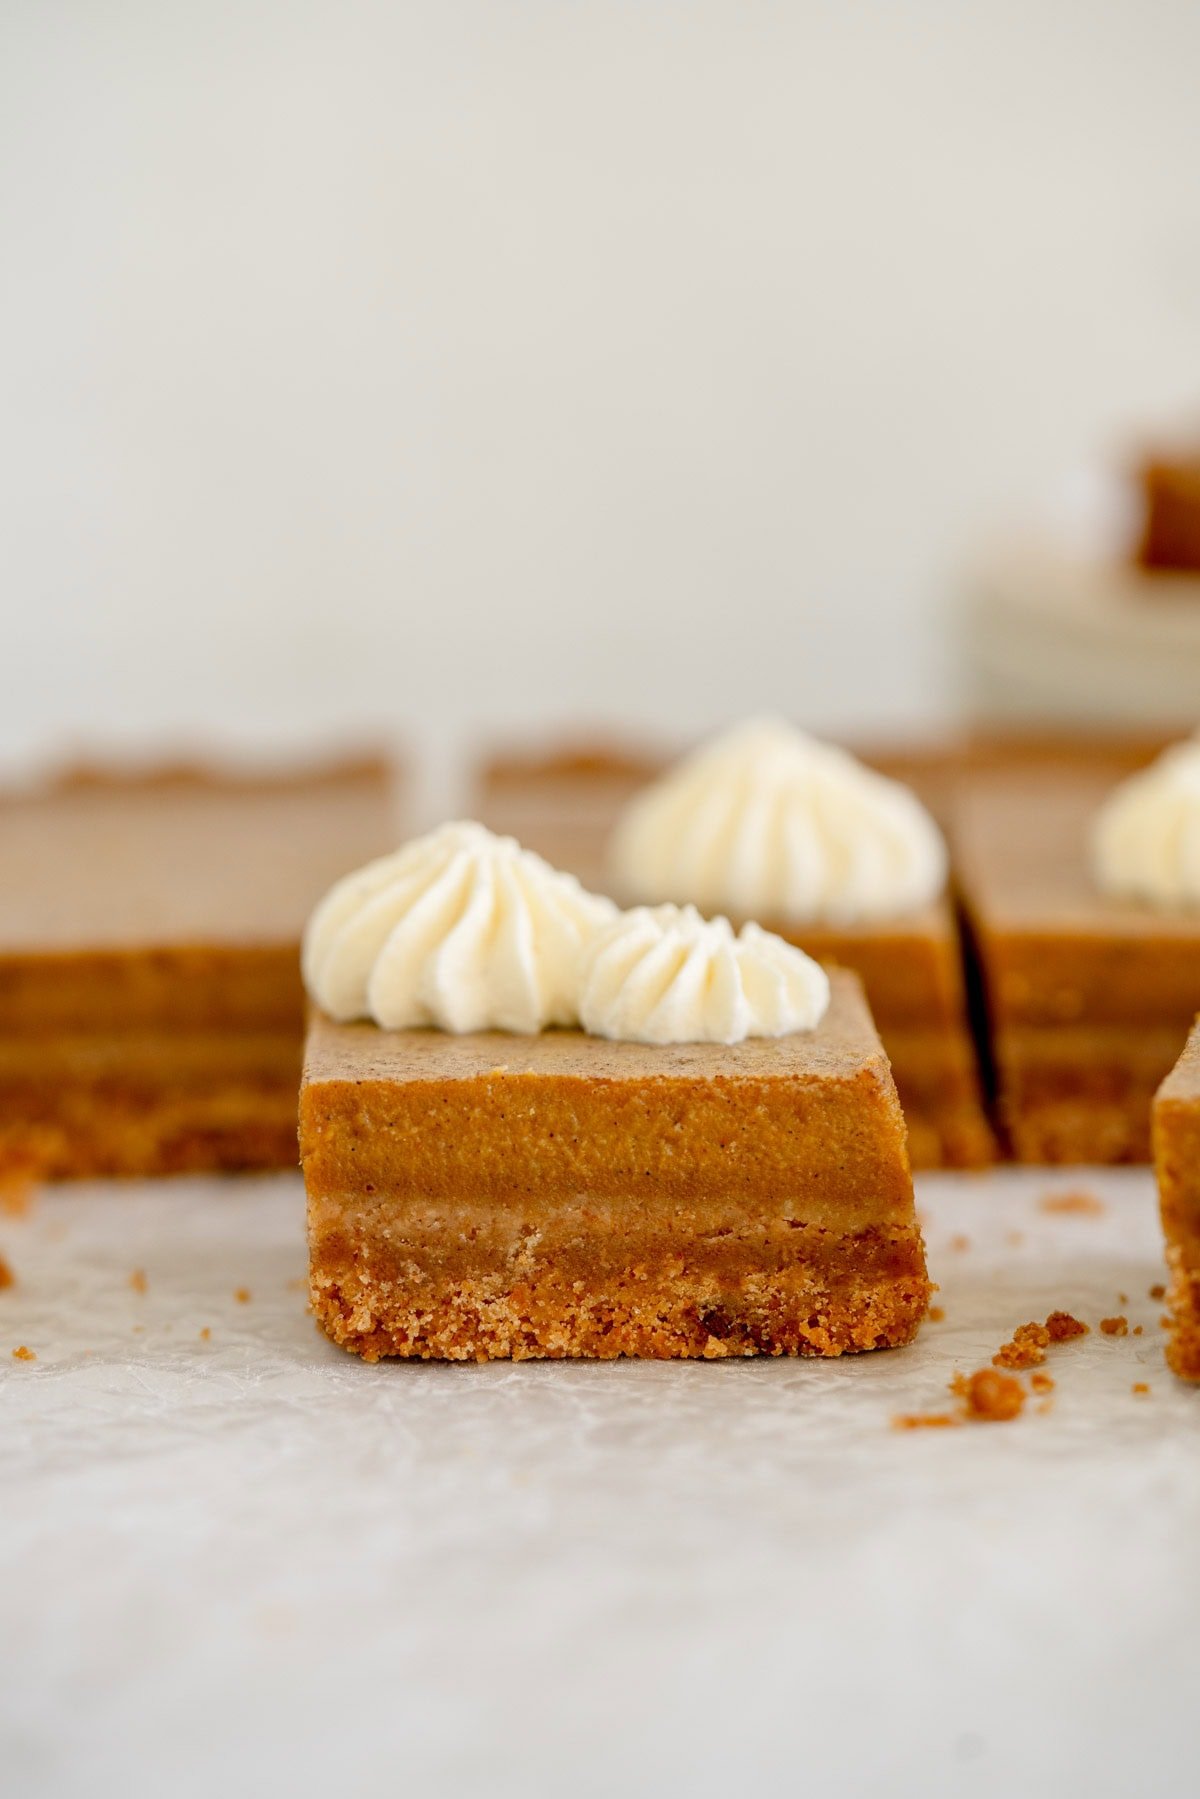
For a 9" square pan (Use this quantity for Pumpkin Pie Bars)
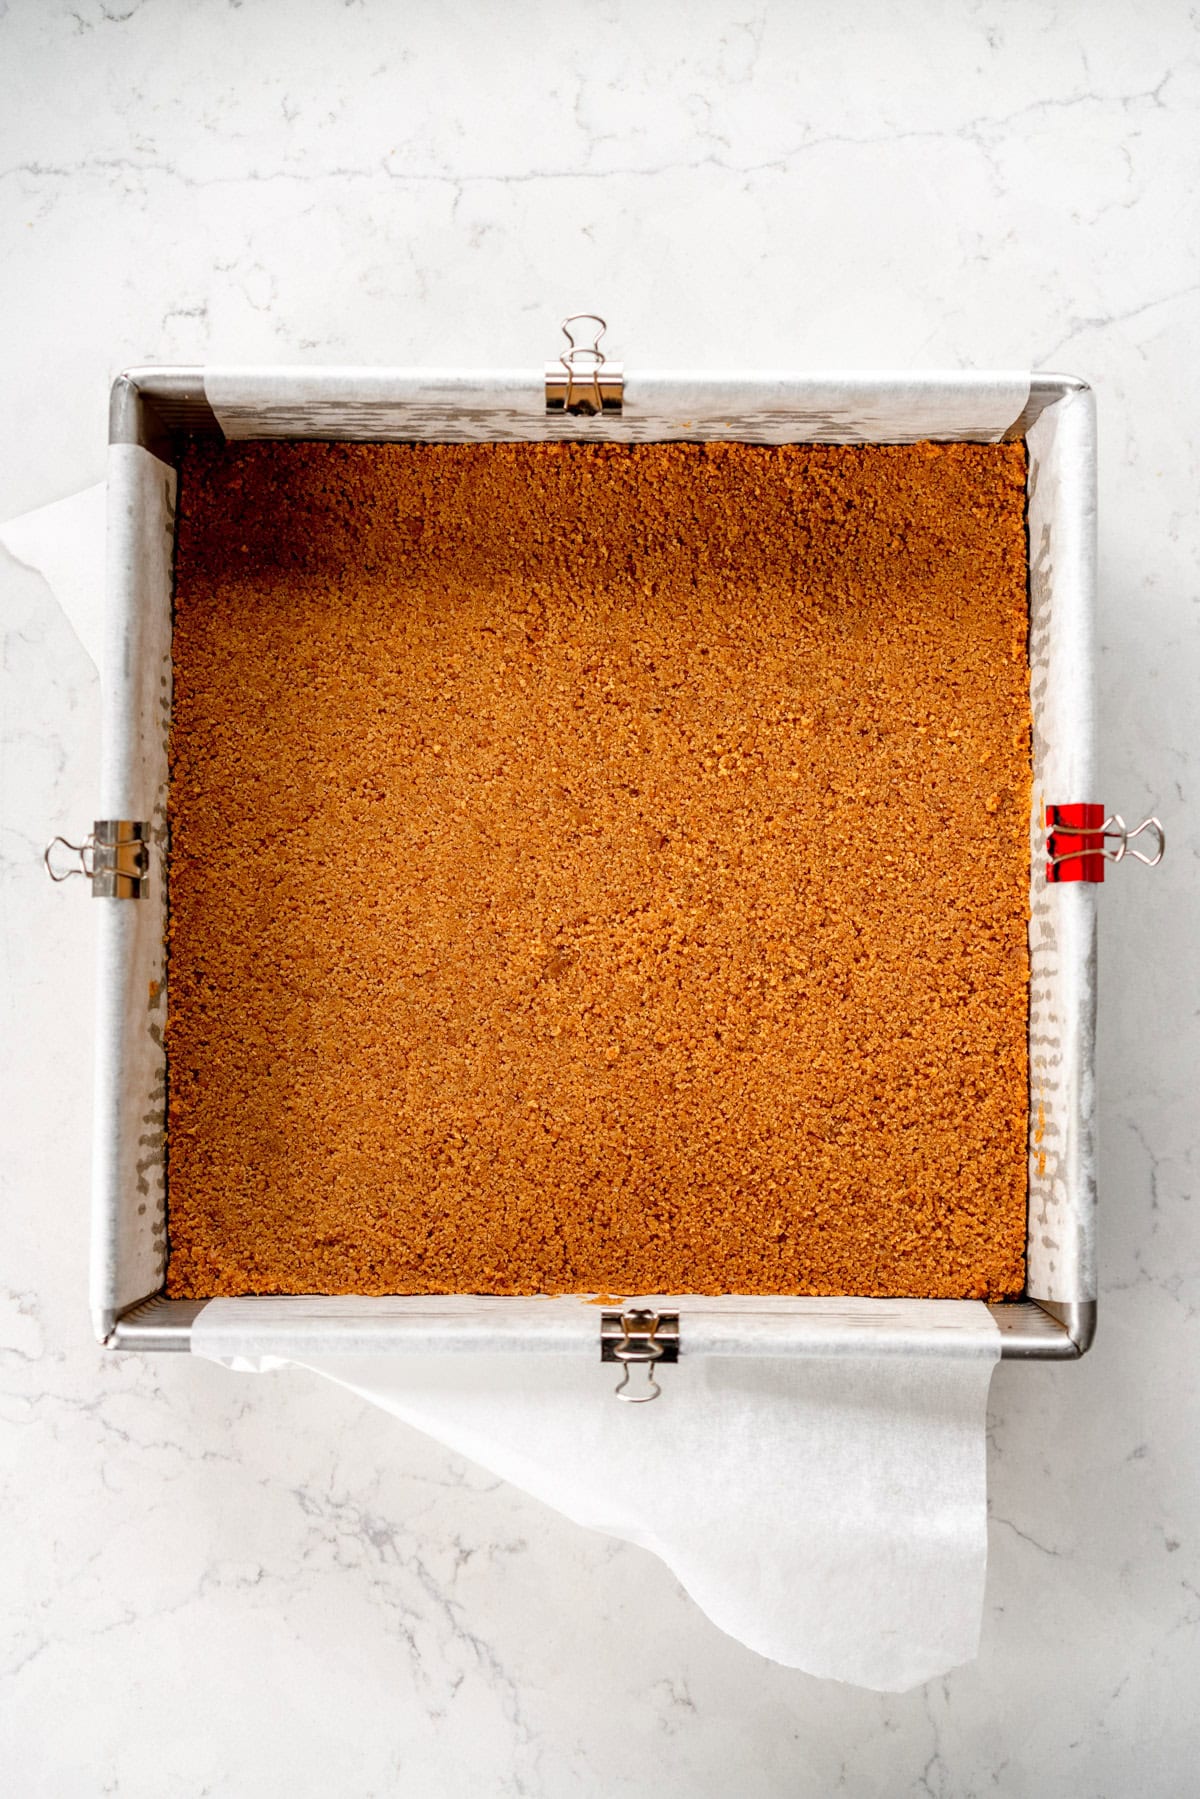
Double the recipe: Use 360g graham cracker crumbs, 40g sugar and 250g butter, which will brown down to 180g for the quantity you weigh out. Press into a pan lined with a parchment paper sling (grease the pan then line with two pieces of baking paper, extending over the sides for easy removal). Bake for 16-17 minutes until the crust is nicely golden brown. Cool completely before using for your recipe.
You will notice that there are two quantities of butter in the recipe - the initial quantity of butter, then a second measurement in the method which is the quantity of brown butter. The larger initial quantity is to account for water loss when browning - read more about that in my FAQ.
Graham Cracker Alternatives:
I tested this recipe using digestive biscuits and it worked great. You just need to reduce the butter quantity down to 75g of brown butter in order to account for the fact that digestives aren't as absorbent as graham crackers. You will need to add an extra 2-3 minutes onto the bake time too. If you are scaling the recipe to use a different sized pan make sure that you scale the 75g of butter for digestives, not the amount written in the notes for graham crackers (for example if you are doing a 9" square pan, use 150g brown butter)
Comments
stacy says
Thank you for giving us the quantity for the sides of the pie. This is incredibly helpful!!
Caribou says
My new go to crust 🙂
Taylor Abbey says
Paired perfectly with the lemon pie. Quick and easy and nutty to go with the sweetness and tartness of the lemon was perfection! It’s not often that someone complements the crust!
EM says
WOW. This recipe has forever changed a family recipe.
I typically buy a pre made graham cracker crust but the store was out so I bought graham crackers and immediately came here for a recipe. I knew I could trust it for a thanksgiving day on the fly change of plans. The recipe was easy to follow even in a busy kitchen, I loved the idea of doing the sides of the crust first. So clever!
Everyone agreed the brown butter added a depth to the pie we didn’t know it needed. Thank you!
Jas Ng says
Love this!It's delicious and so easy to make. Question. If i bake this in a ceramic pie pan, how do u remove the crust so perfectly from a pan without a removable base?
Erin Clarkson says
Once you get the first slice out it's not too bad!
Gabrielle Bryant says
Perfect crust!! Thanks for the tip about forming the sides first!! It worked perfectly!!
Erin says
Do you grease your pans for pie crust?
Erin Clarkson says
I don't - there's enough butter in the crust!
Jess says
Lovely recipe! I'm planning to prepare the tart crust ahead of time before my party 2 days later. Would you advise for me to prepare the tart crust, bake, then store it in the refrigerator before taking it out 2 days later and adding my non-baked filling, or to prepare the tart crust, store it in the refrigerator and only bake it 2 days later right before my party? Just wondering what's the best way to keep it fresh, while maintaining it's texture for my party. (I'm planning to top it with some lemon curd/ choc custard)
Cheers!
Erin Clarkson says
Hi! I would bake it and then store in the fridge in an airtight container until you are ready to use 🙂
Nicole says
Delicious crust and helpful instructions! Thank you! I had to use digestive biscuits as graham crackers aren't available here but the modifications mentioned in the recipe worked great! Excited to make it again.
Lene says
I can tell my crust is already too crumbly - Ive used digestive(in NZ) and are going to make the lemon pie -n used 80g butter to 180g crackers - but after baking it's quite crumbly - can I fix it now ? or just continue with the lemon filling ?
Erin Clarkson says
Hi! So sorry that I missed this - how did it turn out? You want the mix to feel like wet sand
Lene says
It was a little crumbly, but all the women at squash interclub absolutely loved it 😍
Amanda Paa says
Turned out great! The brown butter totally elevates it.
Layne says
So I haven’t tried this crust, but have the perfect (regional) recipe for you to try. It’s called Butterfinger Pie. You crush up as much Butterfinger candy bars (the more the better in my opinion) and mix it into softened vanilla ice cream. Then pour it into a graham cracker crust, top with whipped cream and additional Butterfinger pieces and freeze again until hard (overnight). My friends who aren’t from my area always ask for this and it is so simple but so delicious Next time I make it, I will absolutely use this recipe for the crust.
Erin Clarkson says
Oh yum! We don't get butterfingers in NZ!
Emily says
Hi! I want to use this crust in addition to your lemon pie recipe. However, I was wondering if I could instead use this recipe to make mini individual lemon pies in cupcake pans. Do you have any idea how it would affect the baking time, or if this is even possible using this recipe? I'm making this to share and it would be a lot easier if they were in smaller portions. Thank you!
Erin Clarkson says
Hi, yes you should be able to but I haven't tried it sorry! Getting them out of the muffin pans will be the main issue - make sure that you line the pan properly with something to help you remove them!
Bobbie says
They do make tart muffin cups with circle bottoms that push up to remove the contents, just as a tart pan does.
Rosie says
I know you give the option of digestive biscuits instead of graham crackers but are graham crackers available in NZ? If so, where did you get yours from? Thanks!
Erin Clarkson says
Hi yes they are but they are stupid expensive! You can get them from online US grocery stores!
Alyssia says
Delish
Ashleigh says
The taste of the brown butter in the crust is exceptional! Great step by step instructions too! I made a banoffee pie with the crust (and put the bananas under the toffee- thanks for the tip!) I just used canned condensed toffee / milk, next time I will use your toffee recipe too. Thanks!
Tricia Graham says
The BEST graham cracker crust ever! Such a simple, easy change to brown butter is the difference between a good, ok crust and an amazing, game changing crust! Can this crust be frozen before or after baking?
Thank you for this recipe!
Erin Clarkson says
I haven't tested freezing it sorry but it can definitely be chilled after baking!
Tabitha says
As a qualified pastry chef I have always used sweet shortcrust but after finally making a Key Lime pie this recipe has become a firm favourite. The detail provided is unlike most other baking blogs and as a certified pastry geek it makes me happy to have info overload & not need to use my brain
Bobbie says
If using Walmart’s gluten-free Graham crackers, what if any changes should I make for this crust? (I’ve read that gluten free products absorb moisture differently). Thank you!
Erin Clarkson says
I'm not sure sorry, I've never used those before!