
My Easy Pizza Dough Recipe is perfect for if you're a pizza beginner, or if you're an experienced pizza maker and want to try a new recipe. This simple pizza recipe makes two dough balls to make two pizzas, but can easily be scaled. Make pizza dough the night before and have it ready to go, or there is an option to make it the same day. My Pizza Dough recipe is the perfect base - the topping options are endless! My Pizza dough recipe can be used for a pizza oven, or for making pizza in your home oven.
Hi hi! I am just popping in to share my easy homemade pizza dough recipe with you! This recipe has been four years in the making and I am so excited to finally share it with you!
I have been playing around with this recipe for a very long time now, tweaking the rise time, water quantity and different proofing schedules and I have finally nailed it down - a super versatile crust recipe.
This is the perfect pizza dough if you are looking for a dough to use in a pizza oven, however it is also great for baking in a regular at home oven too. It gives a soft and chewy crust, with a dough that isn't too sticky and is super easy to work with. I've made this recipe so many times now I know it inside out, and I know that it is a good one.
It may seem like a lot of info in this post but I promise you that I will hold your hand every step of the way. This post gives you a run down on how to make the dough and shape it ready for baking - for topping ideas please see my pizza recipes.
Please allow me to nerd out here for a second.
I worked really really hard on this pizza dough recipe. I know that there are a ton on the internet, but I really wanted a super versatile, trustworthy pizza dough recipe that you can come back to again and again. I wanted something that could:
- Be made ahead or done on the same day. I tested this over and over again - and found that it is just one small tweak in the yeast quantity and the shaping that is needed to take this from an overnight to a same day pizza dough. There are notes in the recipe card on how to make this a same day dough.
- Be flexible. I will teach you how to make the dough work to your schedule, not the other way around. Because this dough uses a relatively small percentage of yeast, you can change up the rising times to suit you, and have it ready to pull out close to when you're ready to make your pizza.
- Is able to cope if you bail on pizza night. The overnight version can stay in the fridge for up to 3 days and be fine to use. The same day one can also be stored in the fridge for up to 2 days before using. If you decide you don't want pizza that day - no worries at all!
- Is an easy to work with dough. I wanted a dough that is super strong, but still gives an amazingly fluffy, chewy pizza crust. This dough is easy to work with, but you will still get amazing results.
- Doesn't need any fancy equipment. I make my dough in the stand mixer using the dough hook, but I also tested this recipe by hand.
- Works however you want to bake it. I use this pizza dough recipe for making pizza in my pizza oven, but it also makes amazing pizza baked in your home oven on a baking steel or even on a sheet pan.
Almost done with the nerd stuff: let's talk baker's percentages.
Sometimes in bread recipes, especially sourdough, you will see percentages being used. These can be confusing, especially as they often add up to more than 100%. These are baker's percentages. They are calculated around the amount of flour in the recipe. For example, this pizza dough recipe is 63% hydration as it has 252g of water to 400g of flour. This number is important - I wanted a middle of the road hydration dough that can be used both in a pizza oven (quick cook = less time for water to evaporate = you can use a lower hydration dough) and in a regular oven (longer cook = more time for water to evaporate = dough needs to be a little wetter).
I also played around with the yeast percentage. For the overnight option the dough has 0.3% yeast, or 1.2g, and for the same day option, it has 0.62%.
Once you know your baker's percentages, it makes it really easy to play around with the pizza dough recipe and make it your own. If you want to try a slightly higher or lower hydration then you can increase or decrease the water to test out different hydrations and what works for you.
Your environment plays an important role here.
Pizza making takes practice. While I have given you times and temperatures in this recipe, it is also super important to know that the environment that you are in will affect how your dough rises. If your house is warm, it will go faster, and if it is cool, it will go slower. Go by how the dough looks, not by the exact timing in the recipe.
The starting dough temperature is also important. Some recipes will tell you to use lukewarm water - not mine. Starting with lukewarm water means that by the time you have finished mixing the dough, the friction from the mixer and from sitting at room temperature will mean that the DDT (desired dough temperature) is higher than you want it to be, so will mean that the ambient 2 hour rise will go faster than it is meant to, making the dough hard to work with. Because my pizza dough recipe uses instant yeast there is no need to activate it using warm water, so you can start the dough making process with slightly cooler water.
Overnight vs Same Day Pizza Dough
I know we all love to plan ahead, but sometimes that doesn't happen, and you want to have pizza on the same day you decide you want it. Here is where my dough recipe is helpful - it is super easy to make a same day dough - you just need to manipulate the amount of yeast, and you skip the 2 hour ambient room temperature rise, and ball up the dough straight off the mixer. While I prefer the overnight pizza dough, the same day one also works great and I make it all the time.
That being said - choose the one that suits your schedule best. If you don't have time to proof the dough for the 2 hours before shaping and transferring to the fridge, but still want to make it the night before, make the same day version, but instead of proofing it at room temperature, transfer it to the fridge overnight and then take it out about an hour to an hour and a half before you need to use it. Make the dough work to your schedule.
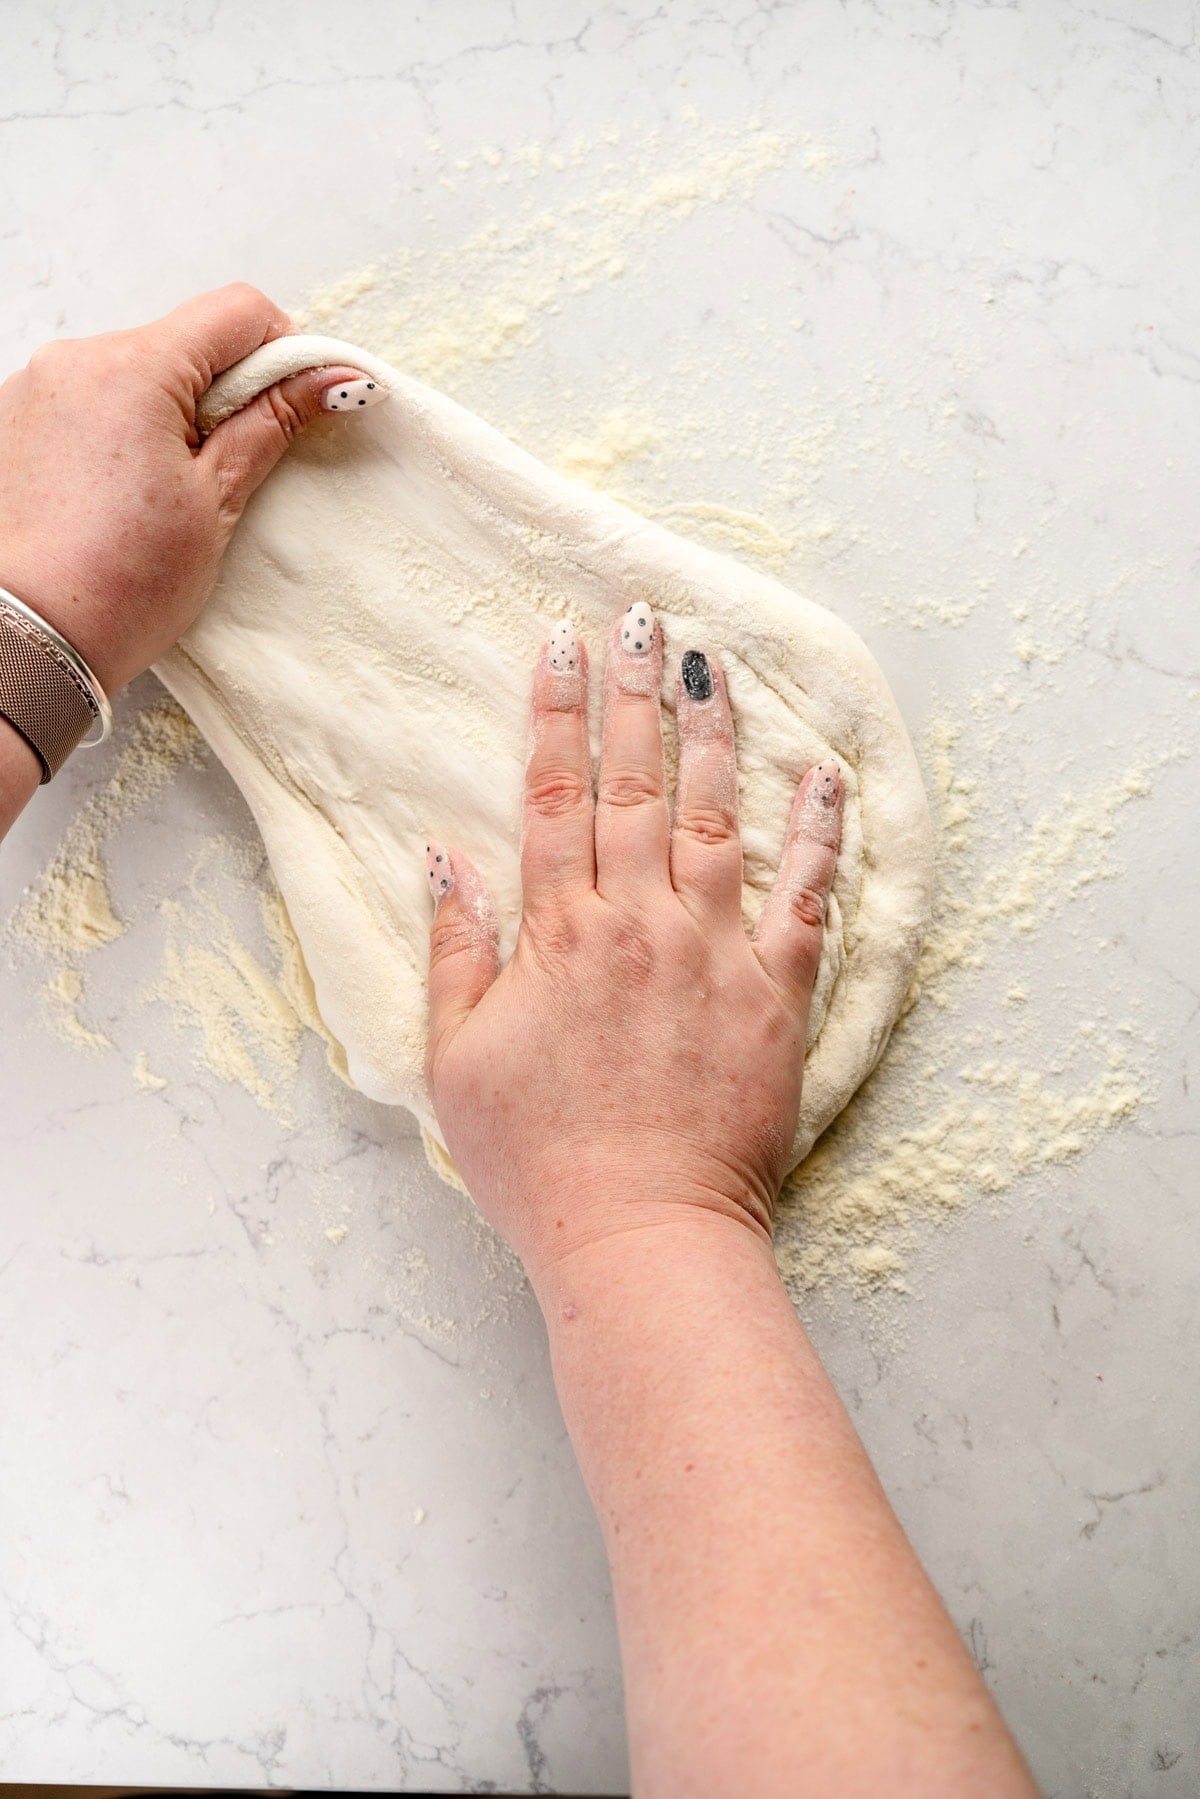
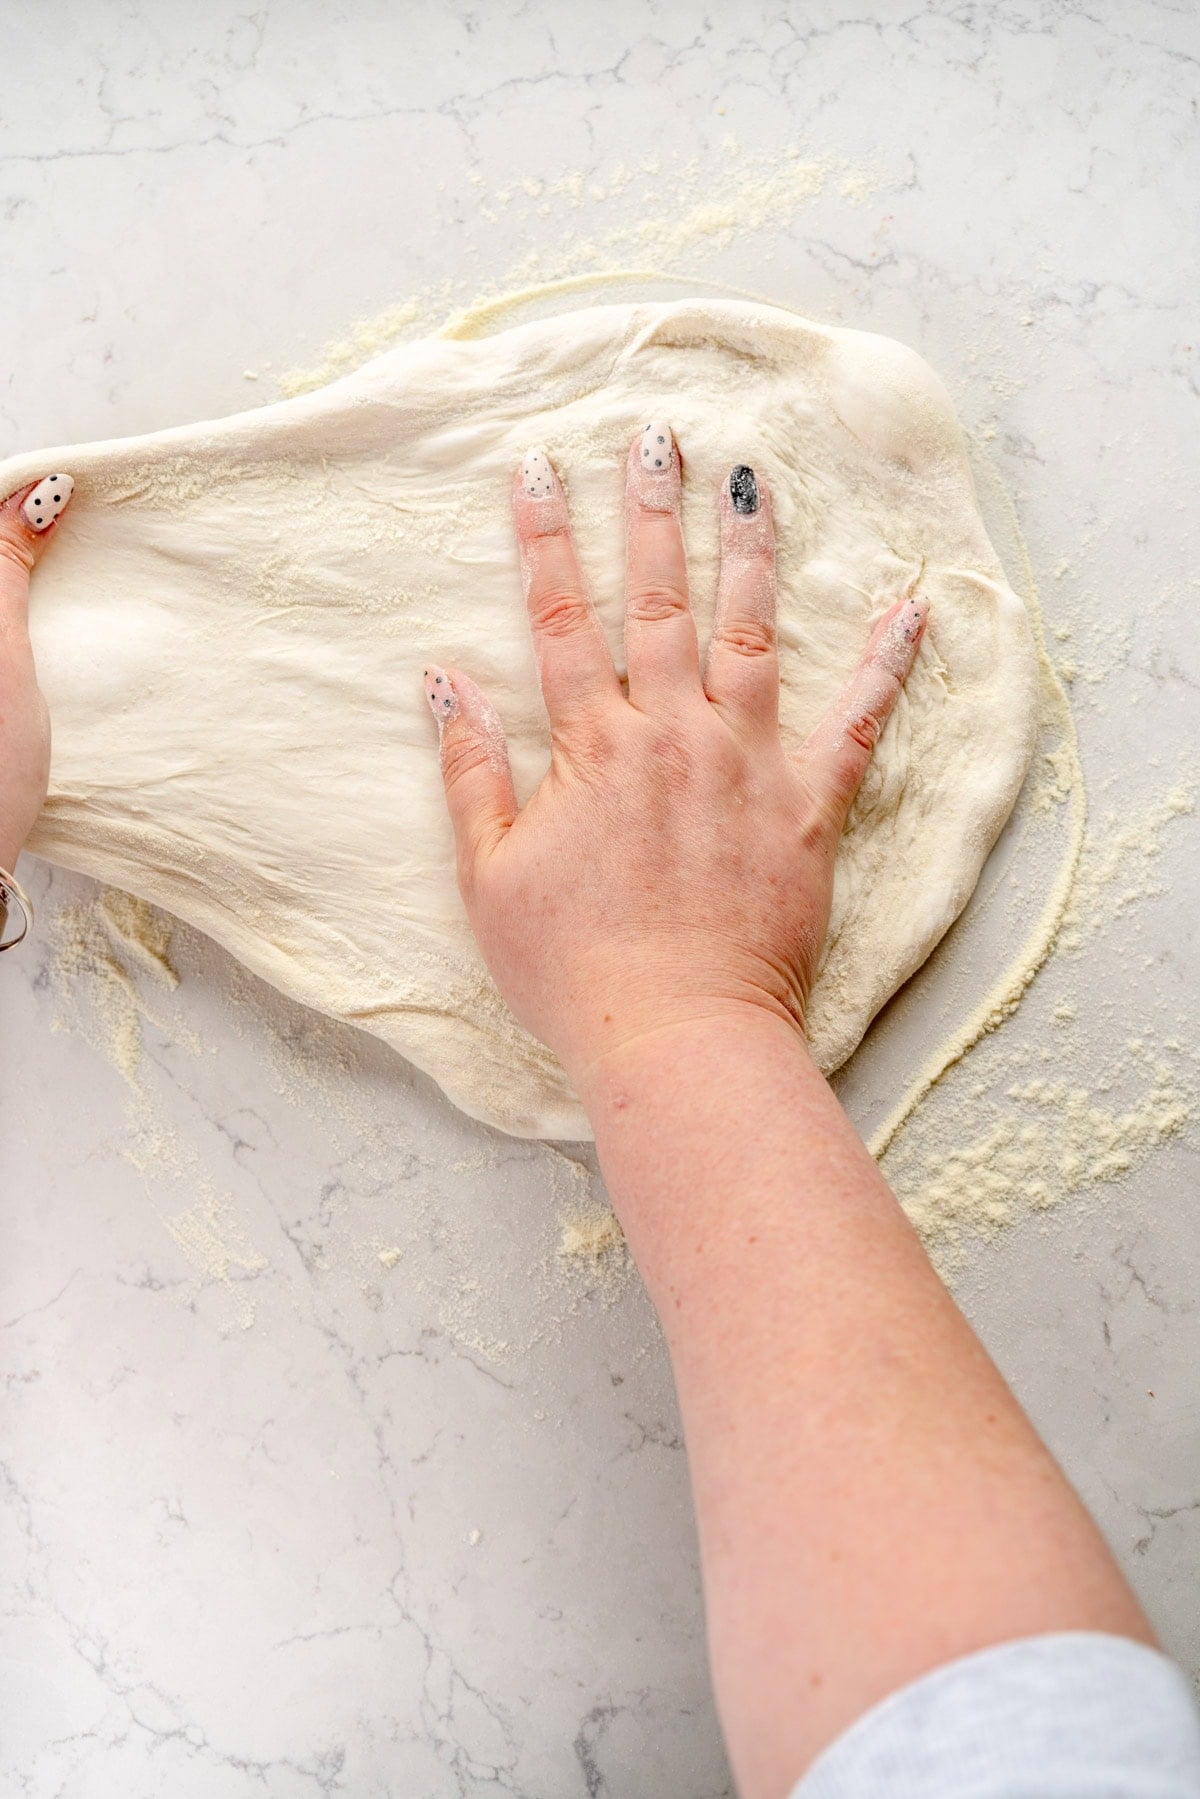
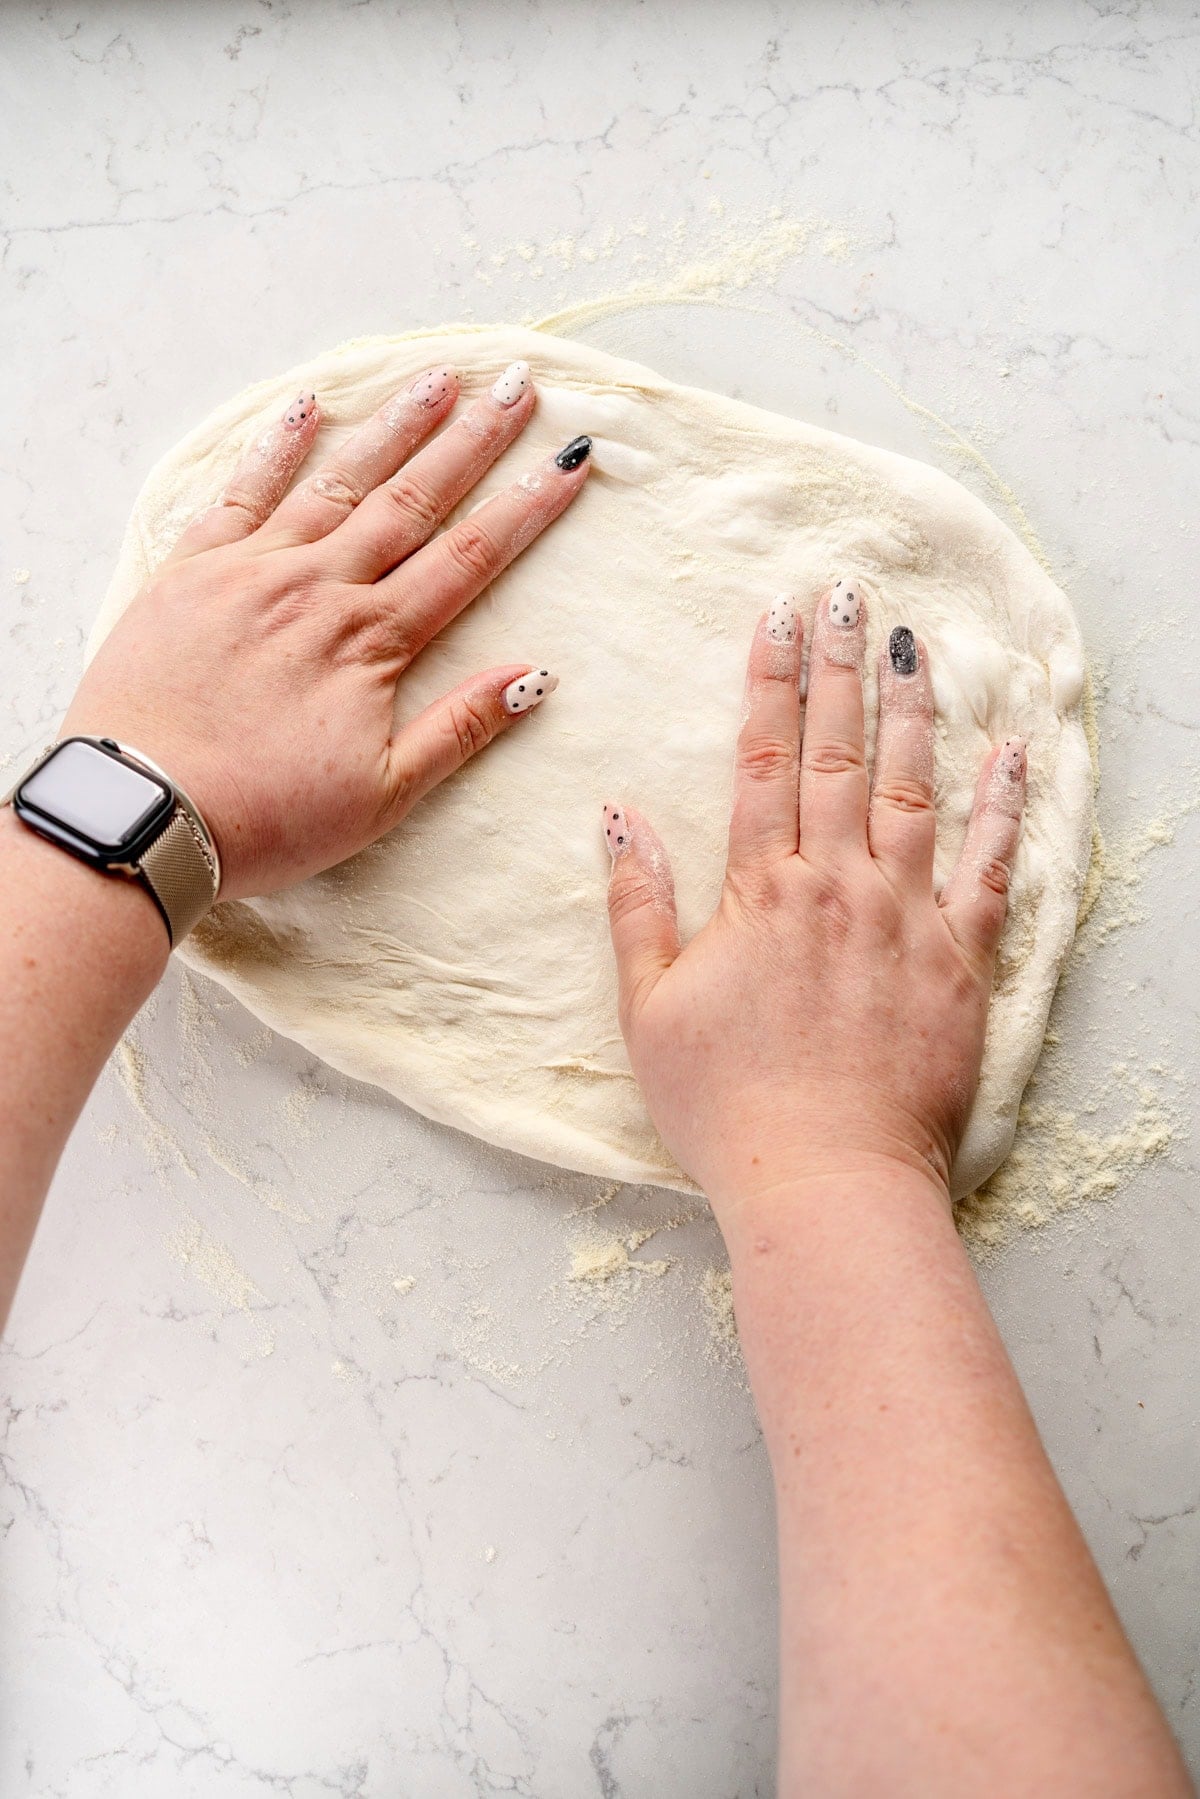
Shaping a Pizza - the Steering Wheel Method
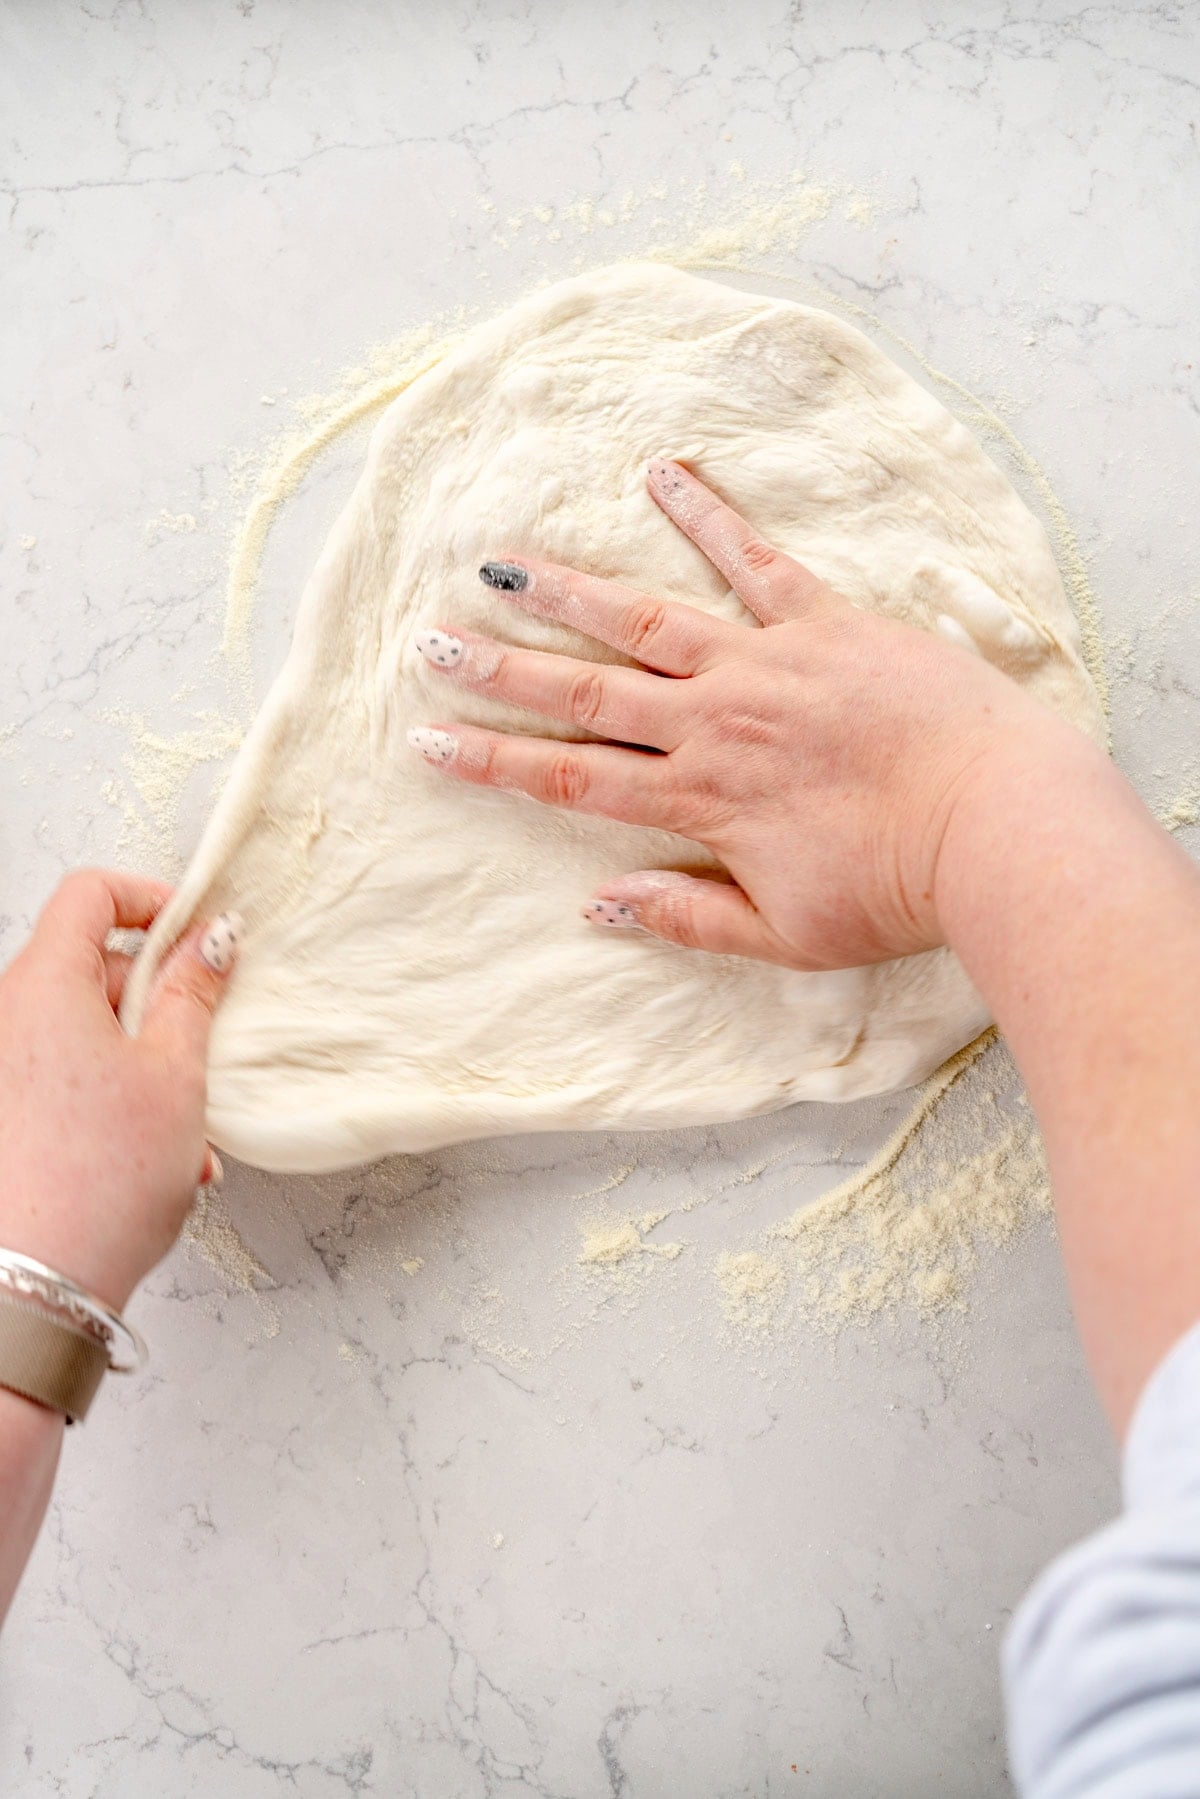
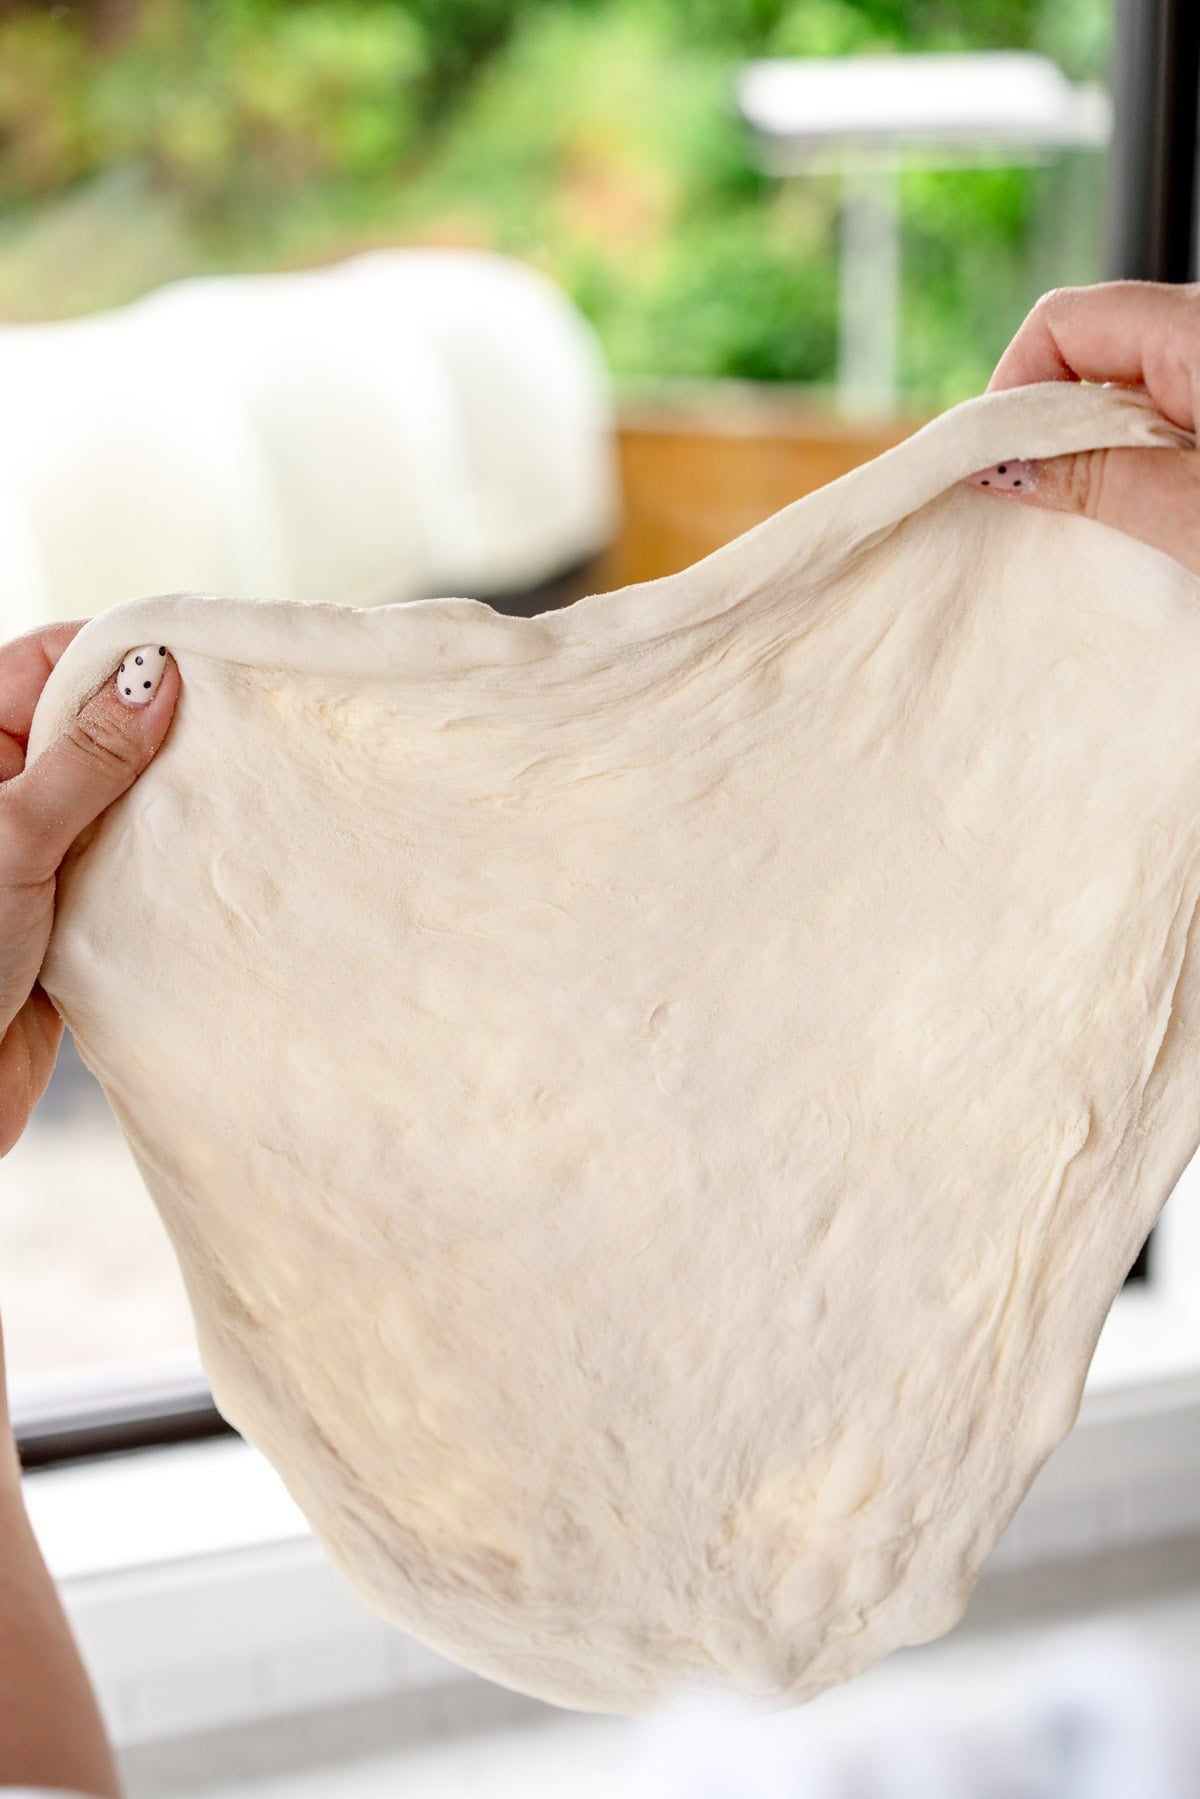
There are a bunch of ways to shape a pizza - this is how I do it. You don't have to flick pizza dough up in the air to shape a pizza. I shape the dough directly on the work surface, with one hand in the middle of the dough and the other gently pulling the edge outward. I then turn the whole dough about 45°, and do it again. This gently stretches the dough outward. I then use gravity to my advantage and pick the dough up and move my hands around the outside of the dough to gently let it stretch.
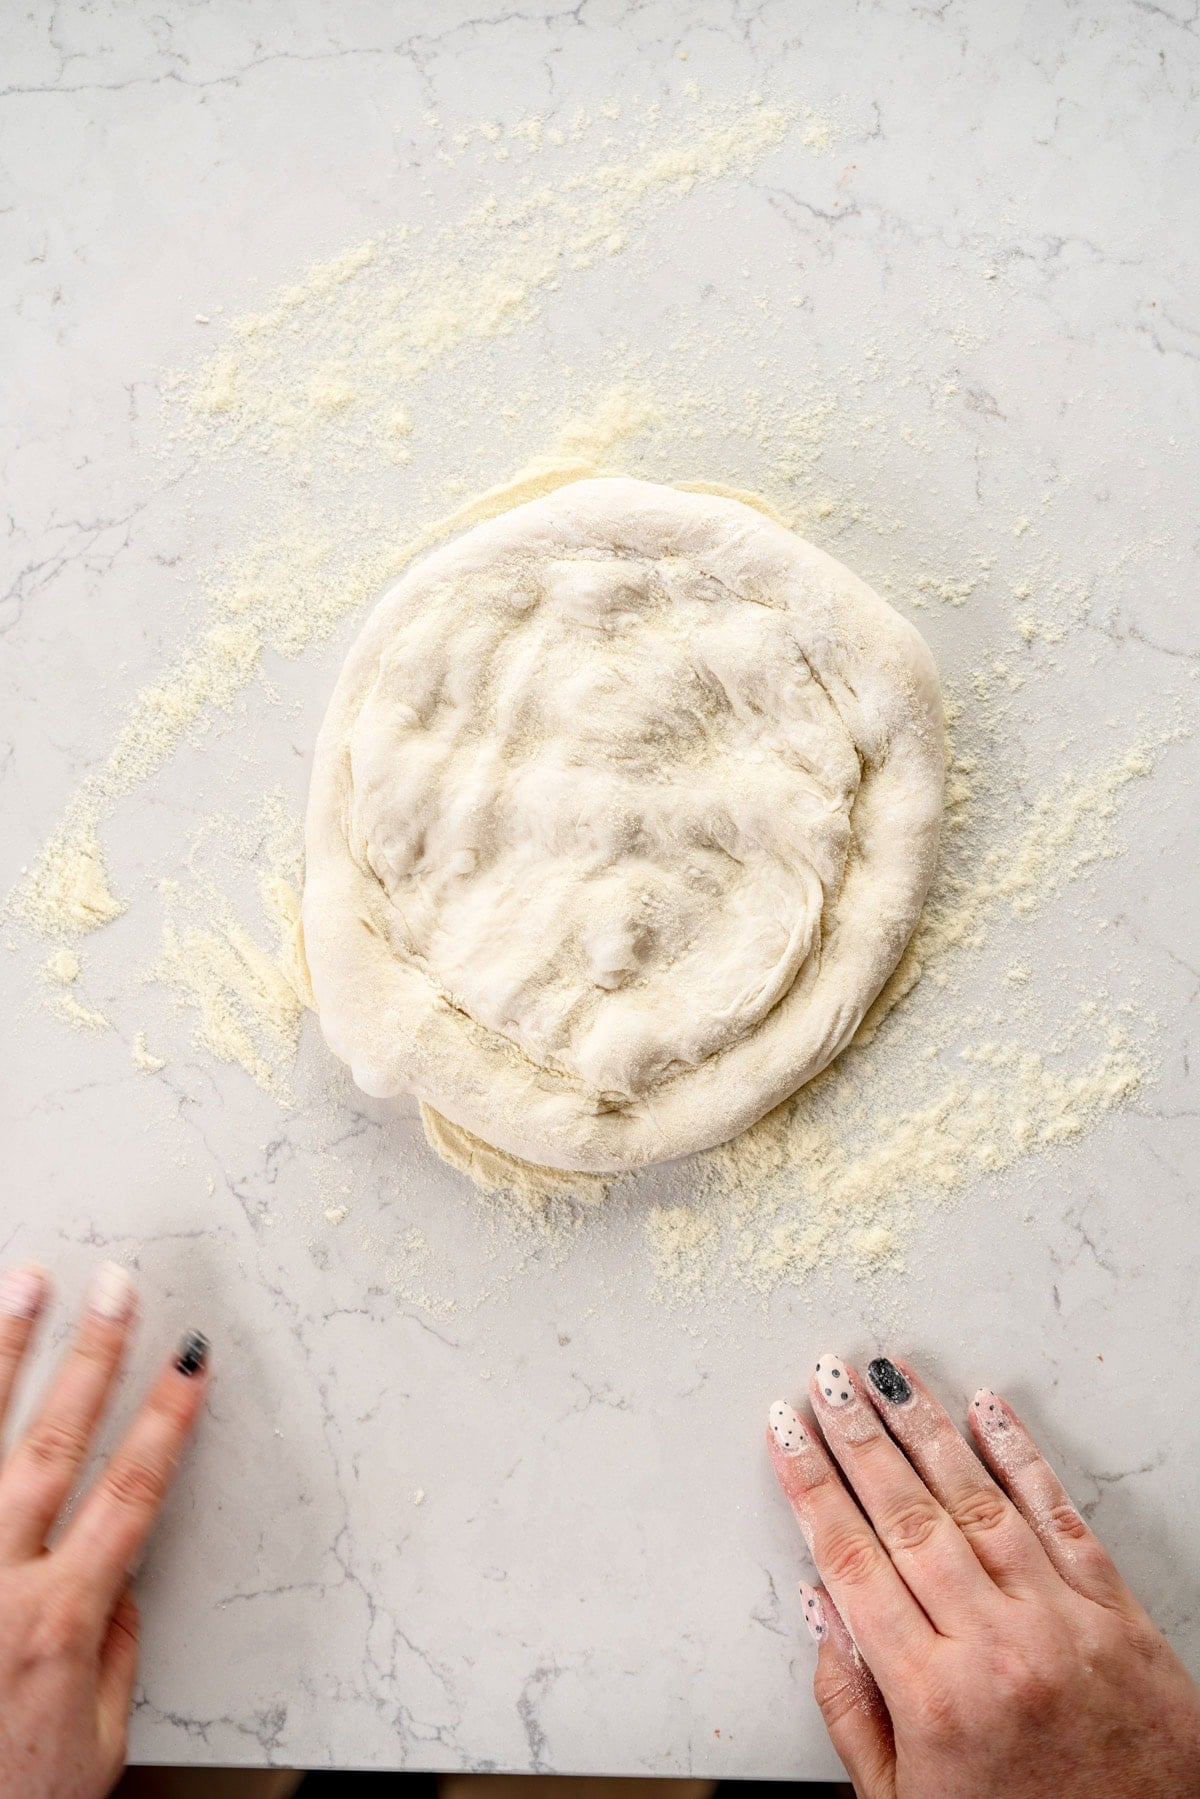
I dump the dough into some semolina flour before shaping, which I find really helps to stop it from sticking.
You are aiming for a 12" (30cm) circle which has a slightly thicker edge. There are step by step photos below!
❤️ Made this recipe and love it? ❤️
I would LOVE for you to leave me a review and star rating below to let me know how you liked it! Also, please make sure to tag me on Instagram!
Answers to your baking questions
Over the years, many of you have asked me questions about:
- baking in grams
- adjusting oven temperatures
- what kind of salt to use
- and many more!
I've curated and answered them all for your easy reference in this frequently asked questions post!
Foolproof Pizza Dough (Same day or Overnight Option!)
- Prep Time: 1 hour
- Cook Time: 15 minutes
- Total Time: 15 hours
- Yield: 2 Dough Ball 1x
- Category: Pizza
- Method: Baking
- Cuisine: American
Description
My Easy Pizza Dough Recipe is perfect for if you're a pizza beginner, or if you're an experienced pizza maker and want to try a new recipe. This simple pizza recipe makes two dough balls to make two pizzas, but can easily be scaled. Make pizza dough the night before and have it ready to go, or there is an option to make it the same day. My Pizza Dough recipe is the perfect base - the topping options are endless! My Pizza dough recipe can be used for a pizza oven, or for making pizza in your home oven.
Ingredients
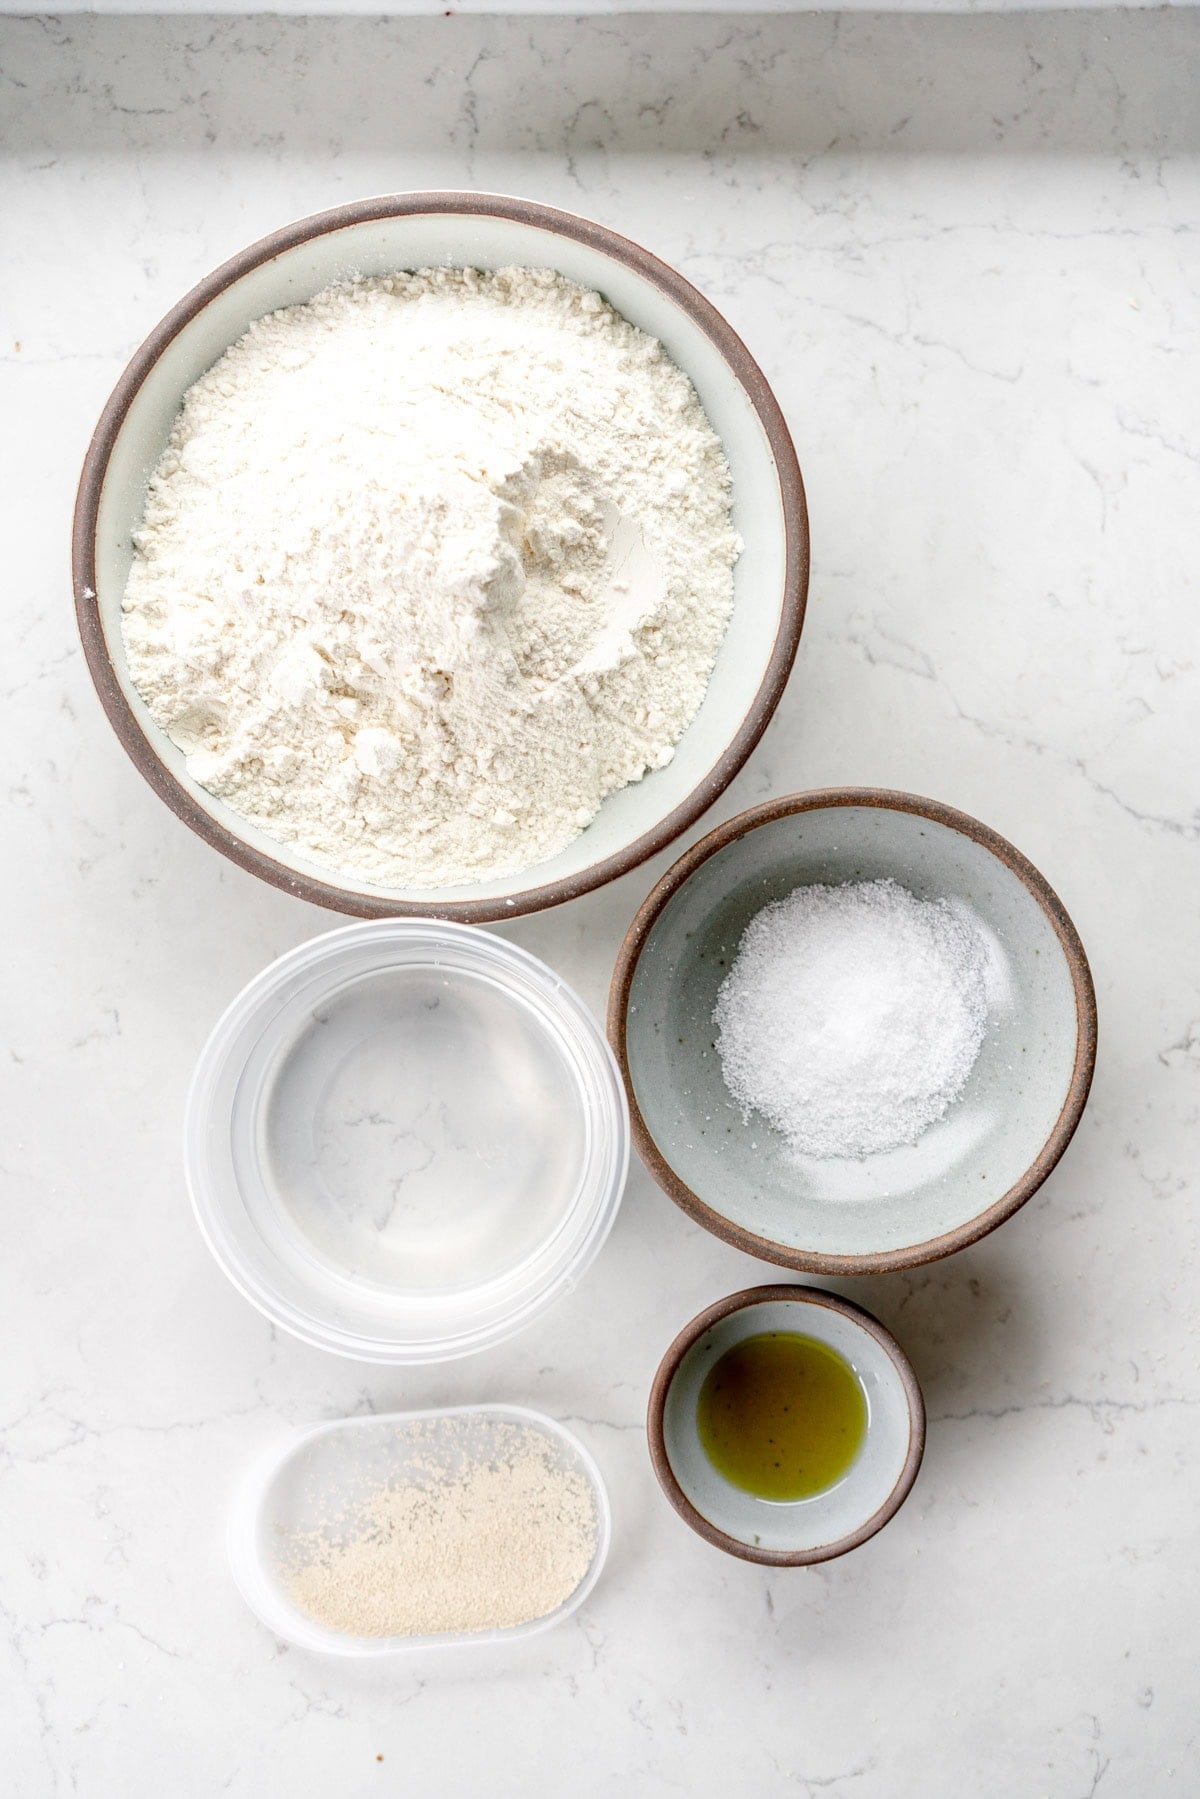
- 252g water, cool from the tap (about 20°c / 68°c)
- 5g Extra Virgin Olive Oil
- 400g 00 flour or high protein bread flour
- 10g salt (I use kosher but any kind is fine)
- 1.2g instant yeast (please see notes)
- Rice flour or regular flour for dusting (I use rice flour as it does not absorb into the dough)
- Semolina flour or regular flour for shaping (I prefer semolina flour)
- Pizza toppings of your choice - for ideas see my pizza recipes, or make up your own combination!
Instructions
Please read this entire post before starting. This pizza dough recipe gives an overview of how to bake pizza using different methods but does not give specific topping recipes. For those, please see my other pizza recipes.
PIZZA DOUGH
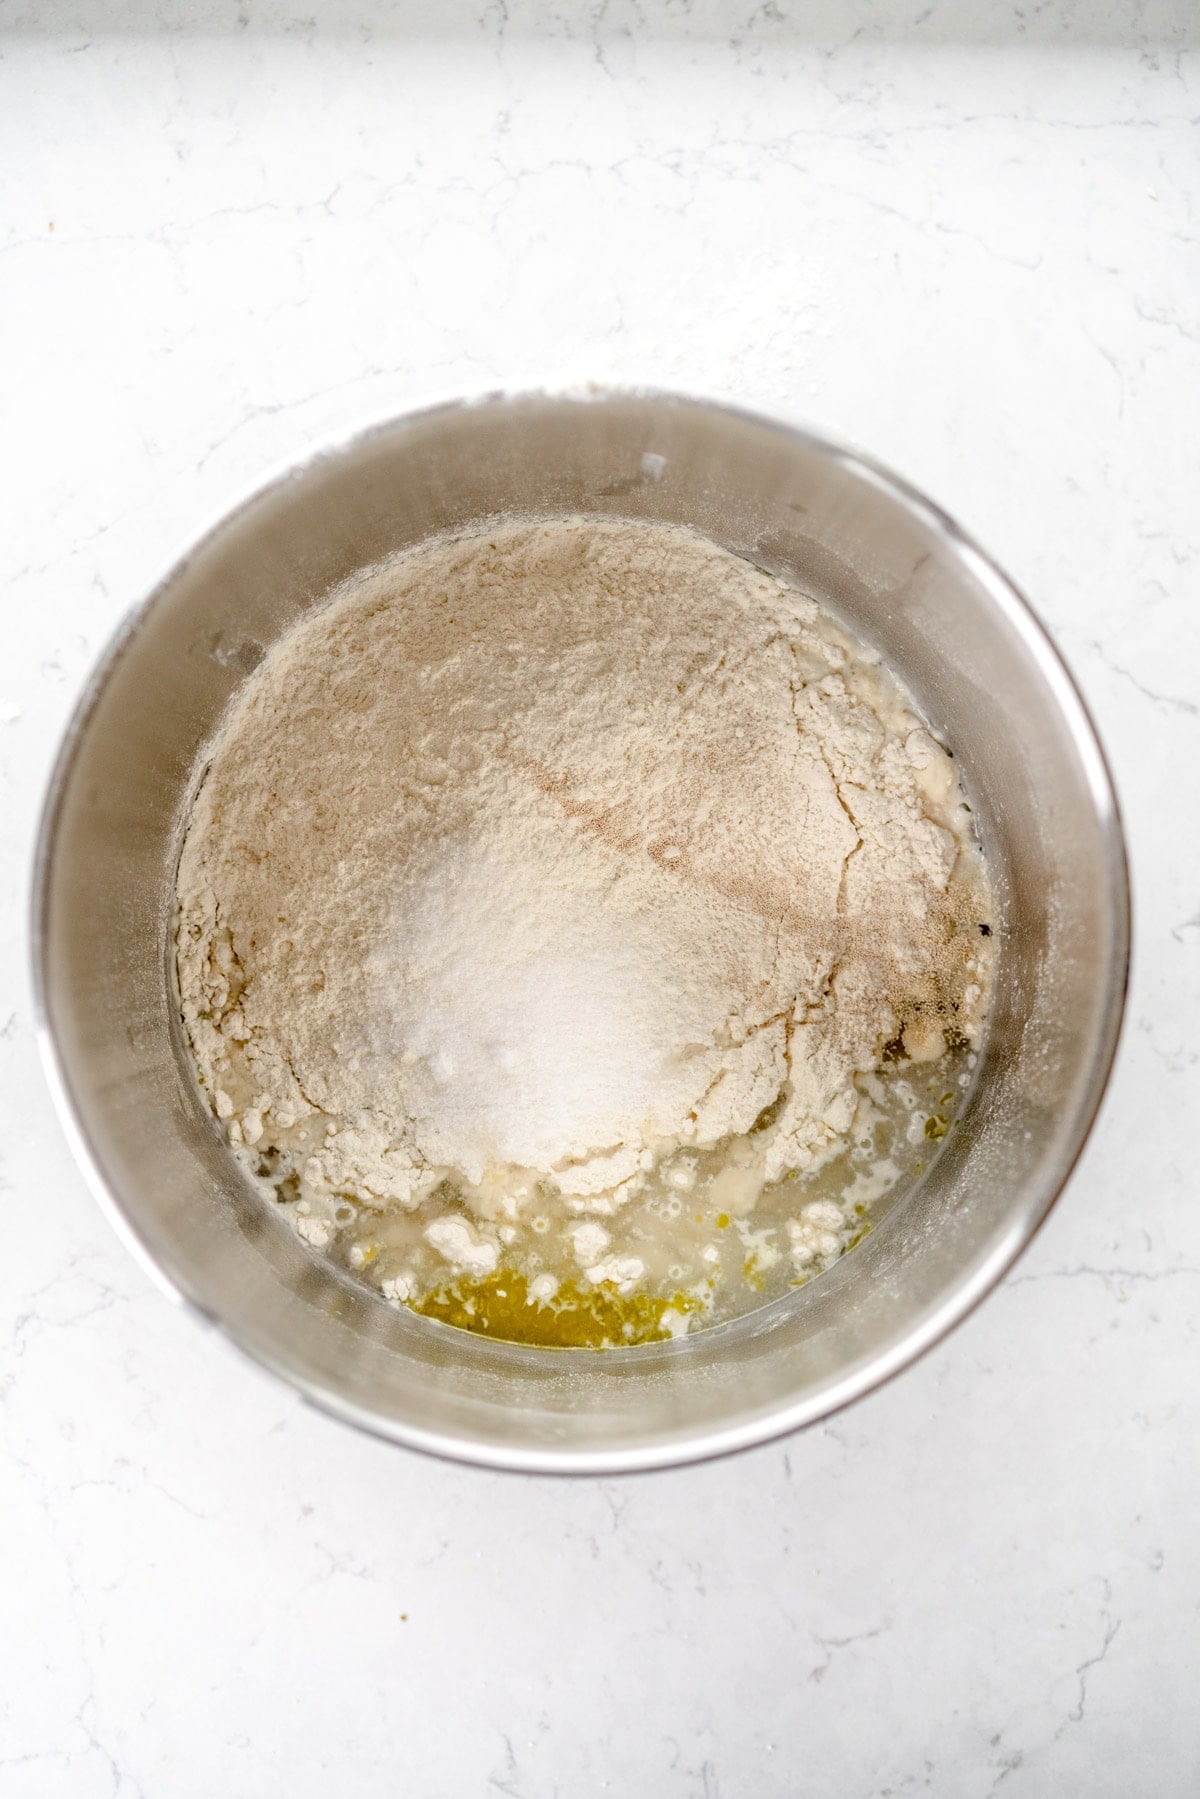
- To make with a stand mixer: Place the water and olive oil into the bowl of a stand mixer fitted with the dough hook. I put liquids in first to prevent dry pockets of ingredients in the mixing bowl.
- Add the flour, salt, and yeast. Mix on medium to low speed until combined. Turn off the mixer and cover the bowl, and leave to stand for 20 minutes.
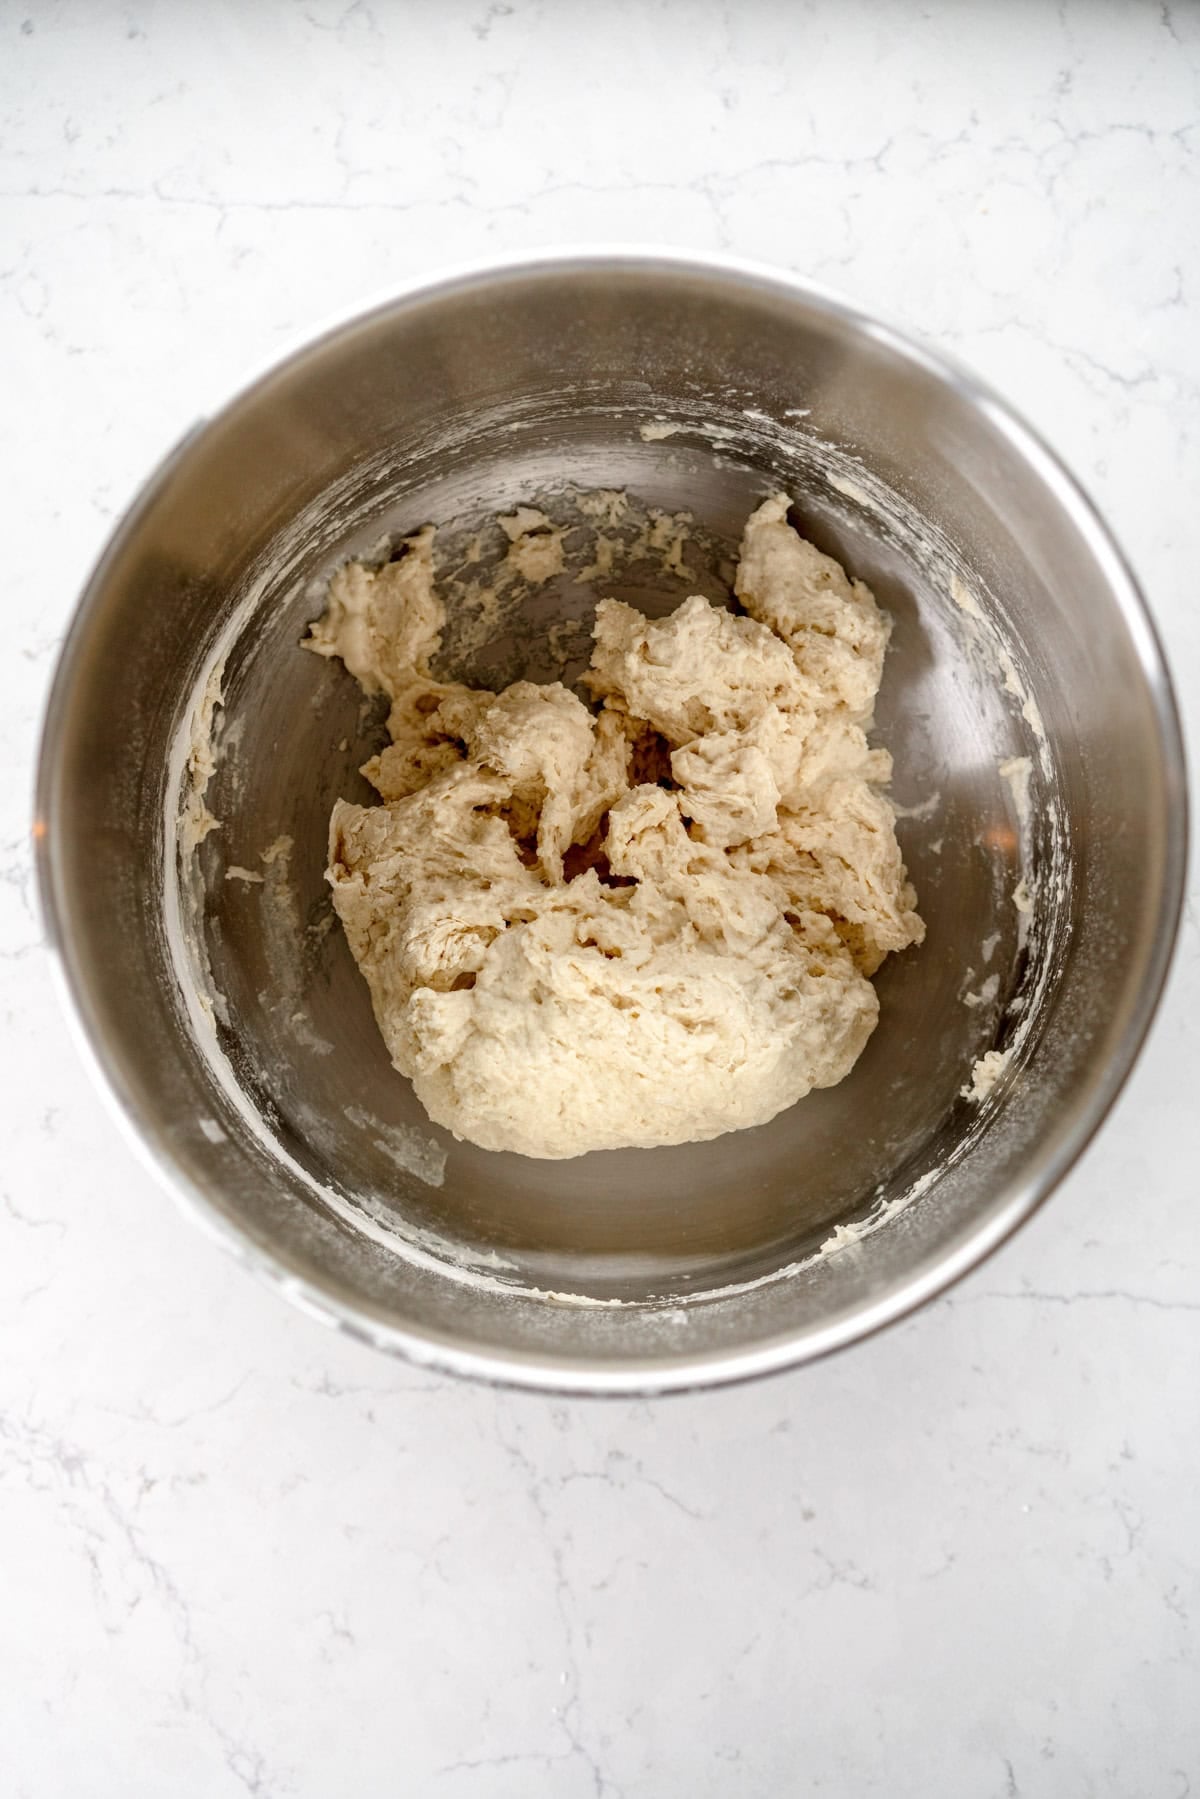
- With the mixer on medium speed, mix the pizza dough for about 1o-15 minutes, until it is smooth, elastic, and clearing the sides of the bowl. It will seem as if it does not come together to begin with but it will get there. If you are having trouble, turn off the mixer, leave the dough for 5 minutes to rest, then continue mixing.
- To mix by hand: Follow the same steps, but make the dough by hand in a mixing bowl rather than the dough mixer. Once it has rested for 20 minutes, turn out onto a work surface and knead by hand for about 10 minutes. The dough will seem sticky at first but will become smooth and elastic. Again, if it is too sticky or hard to work with, place it under an upside down mixing bowl and leave it to hang out for 5 minutes or so to relax before you keep kneading it. Follow the rest of the recipe as written.
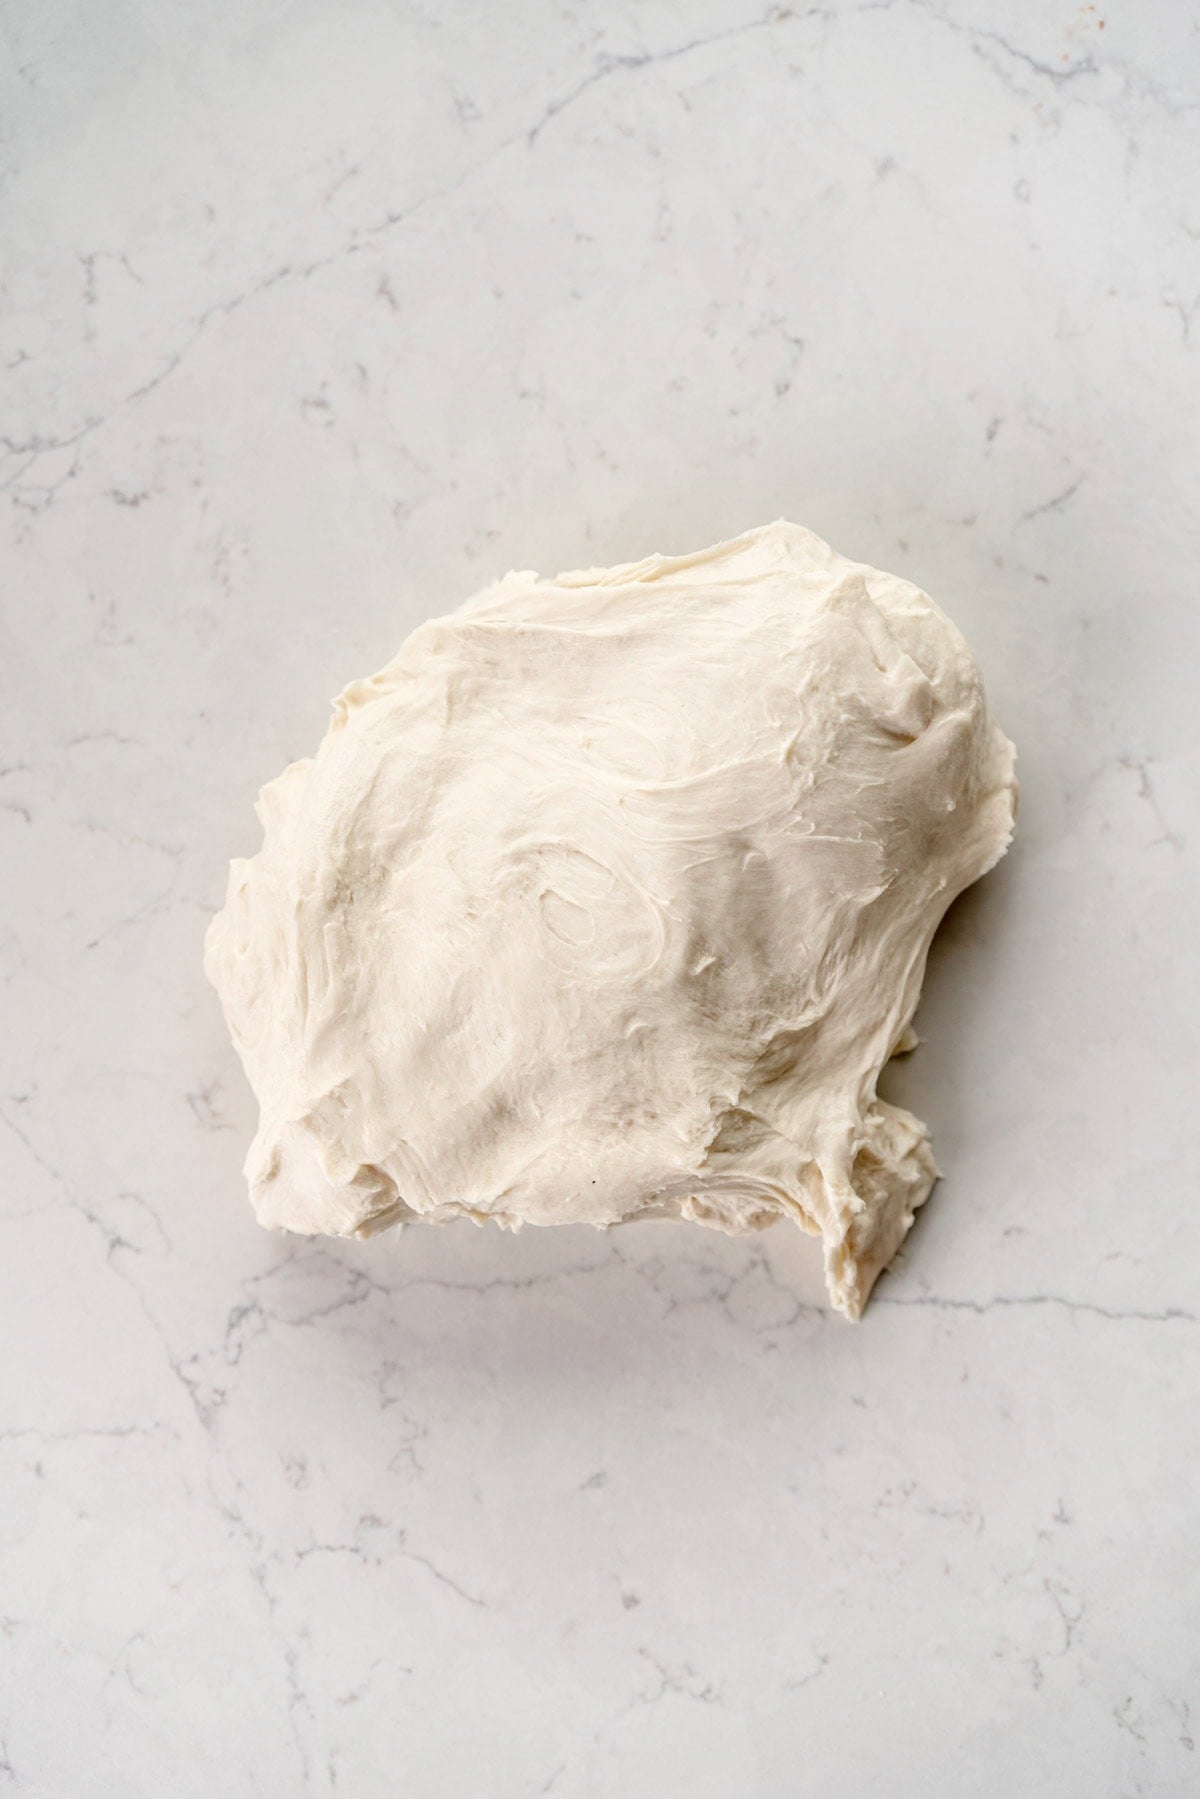
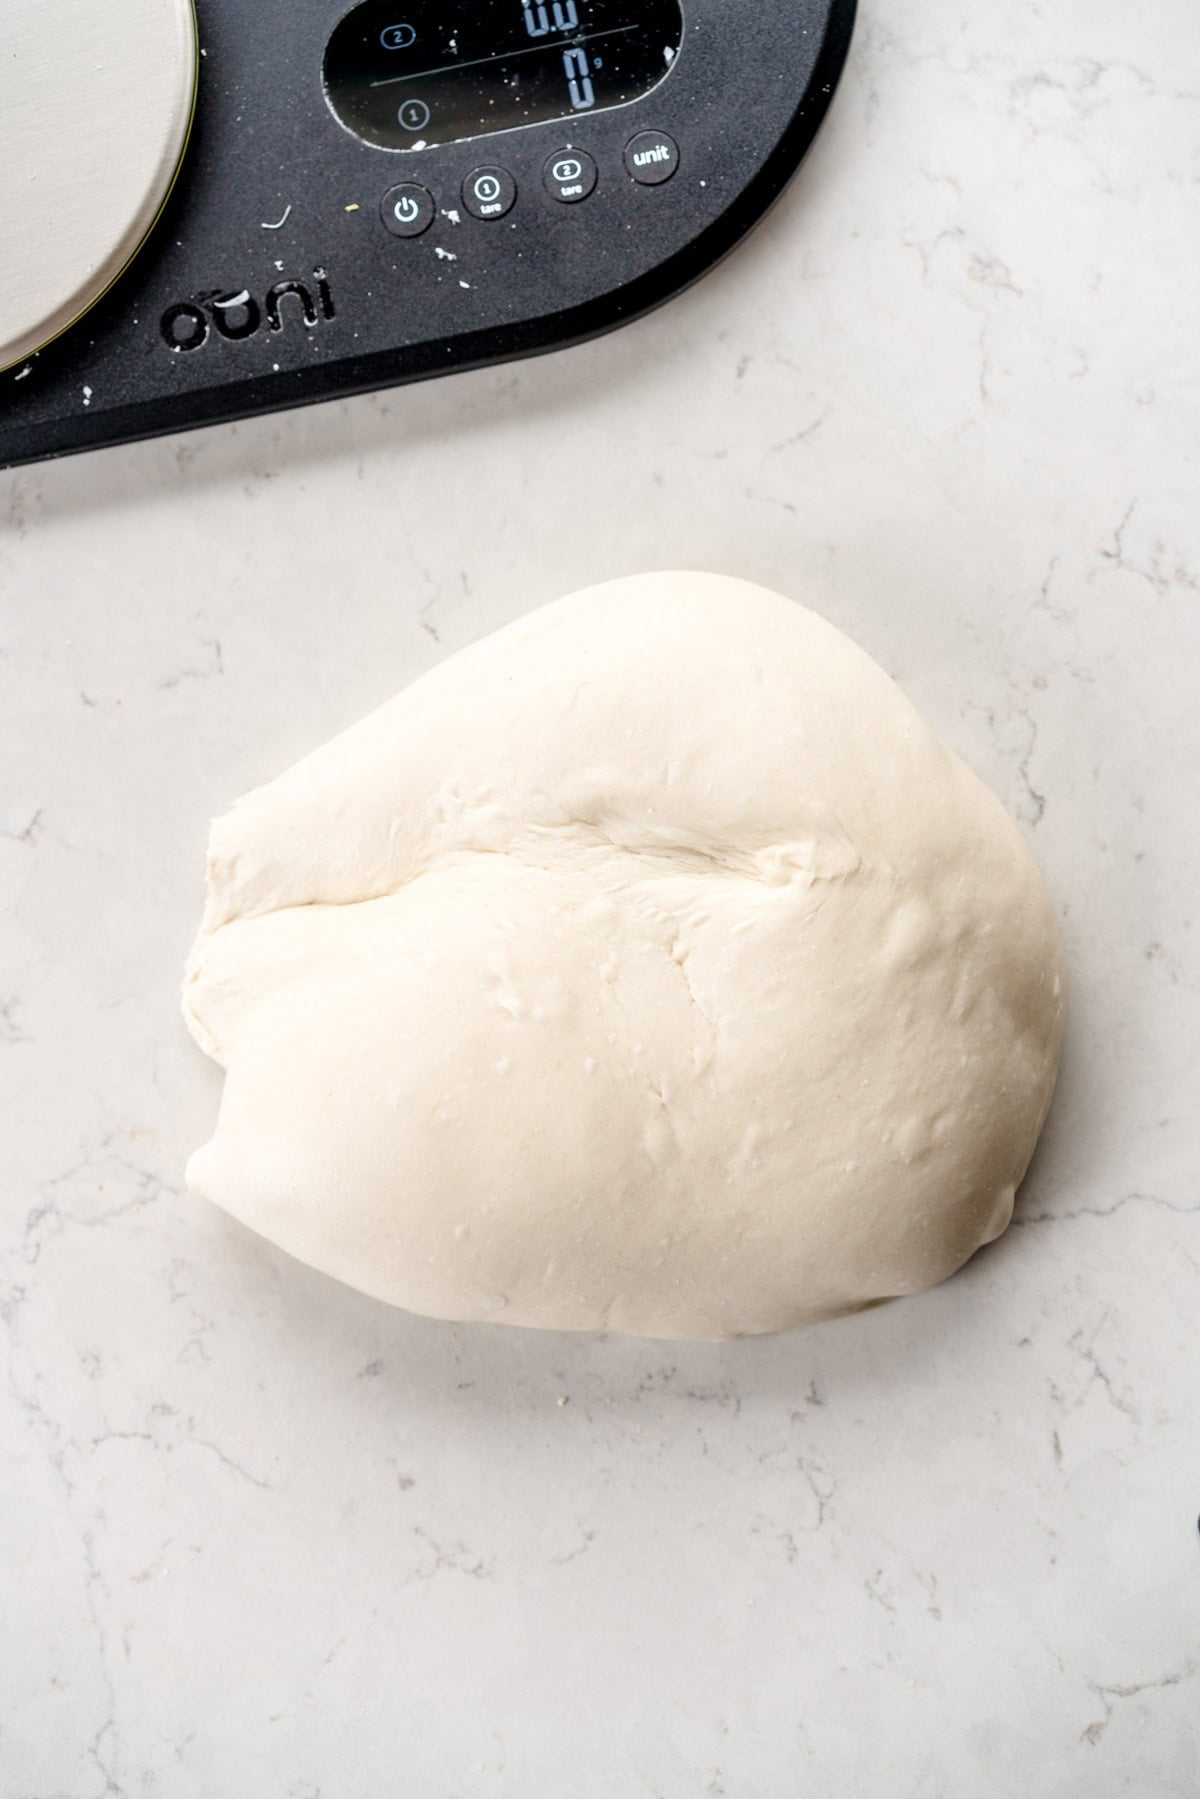
- Once the dough is smooth and stretchy, transfer it to your work surface. I can usually do this without needing to add any extra bench flour, but add a little if needed.
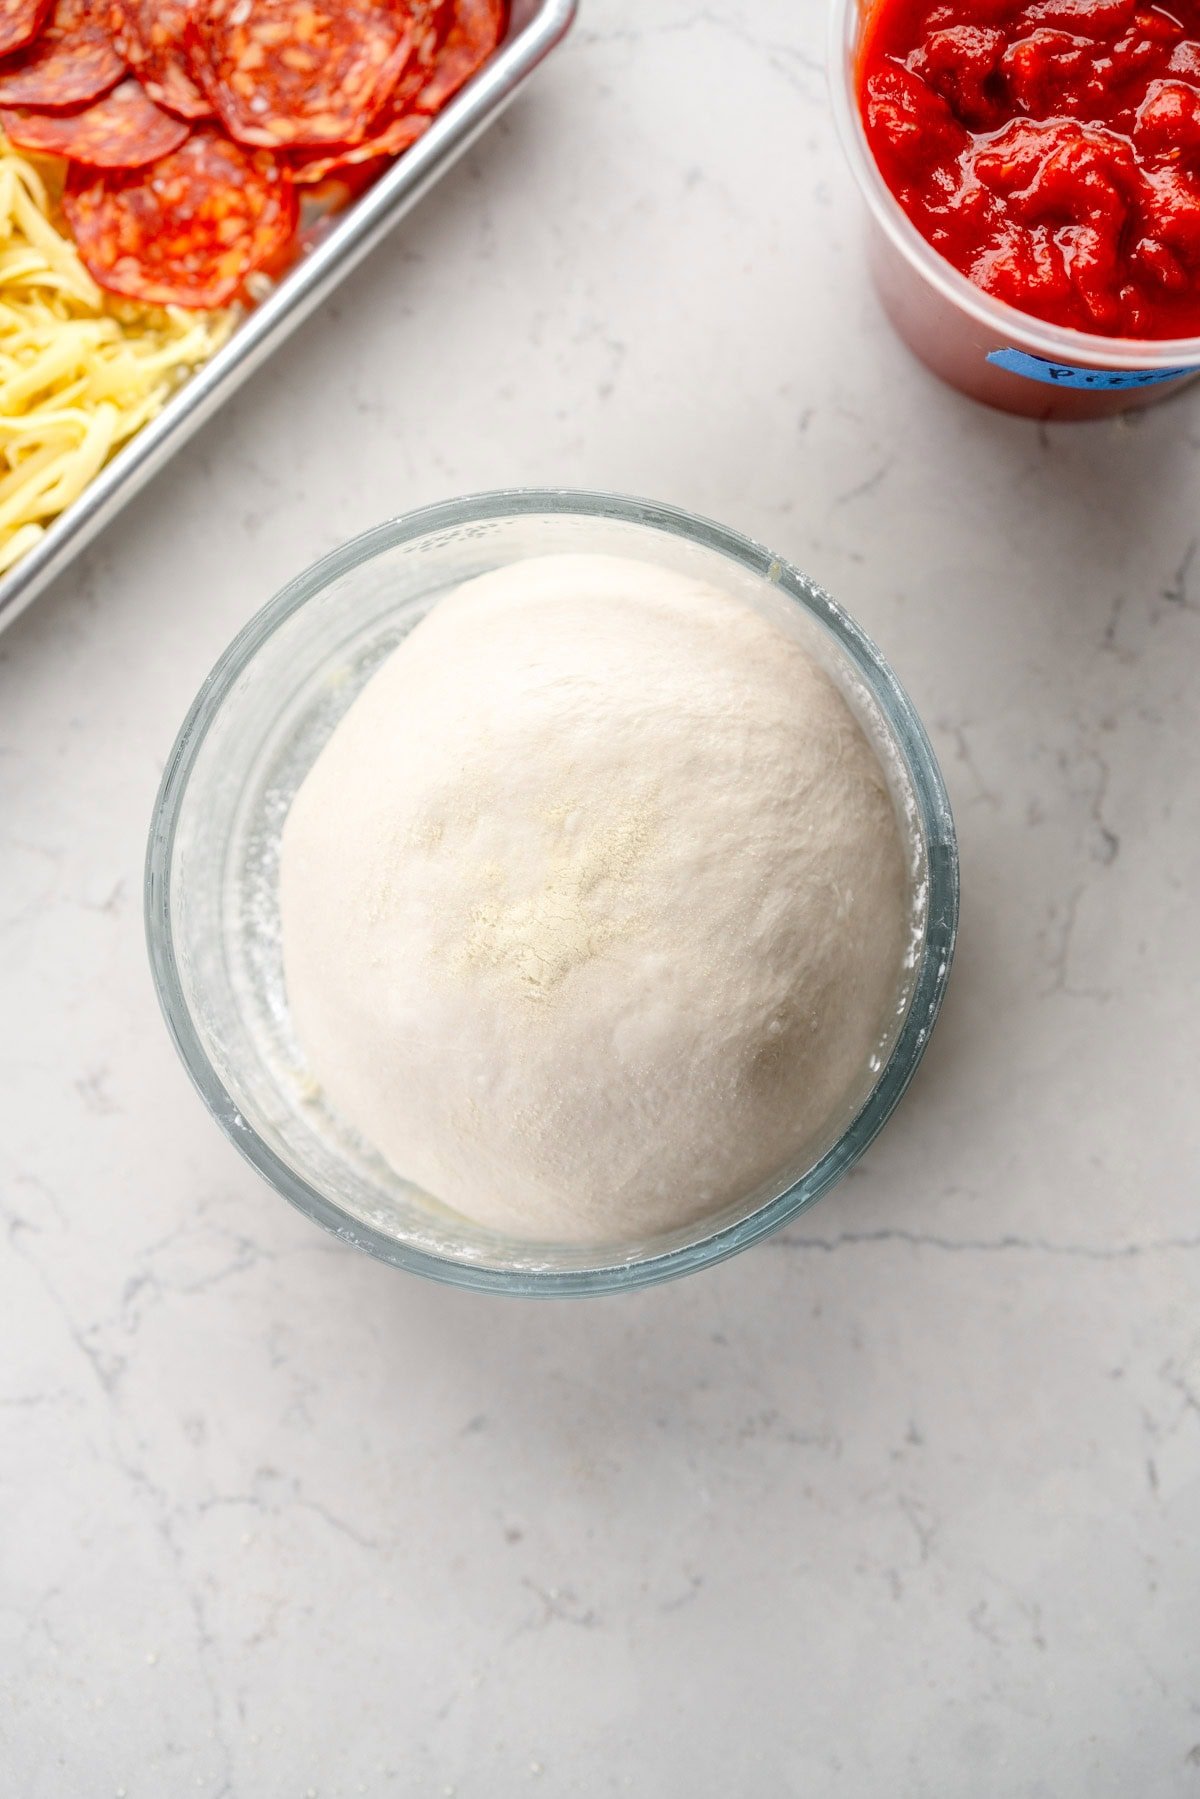
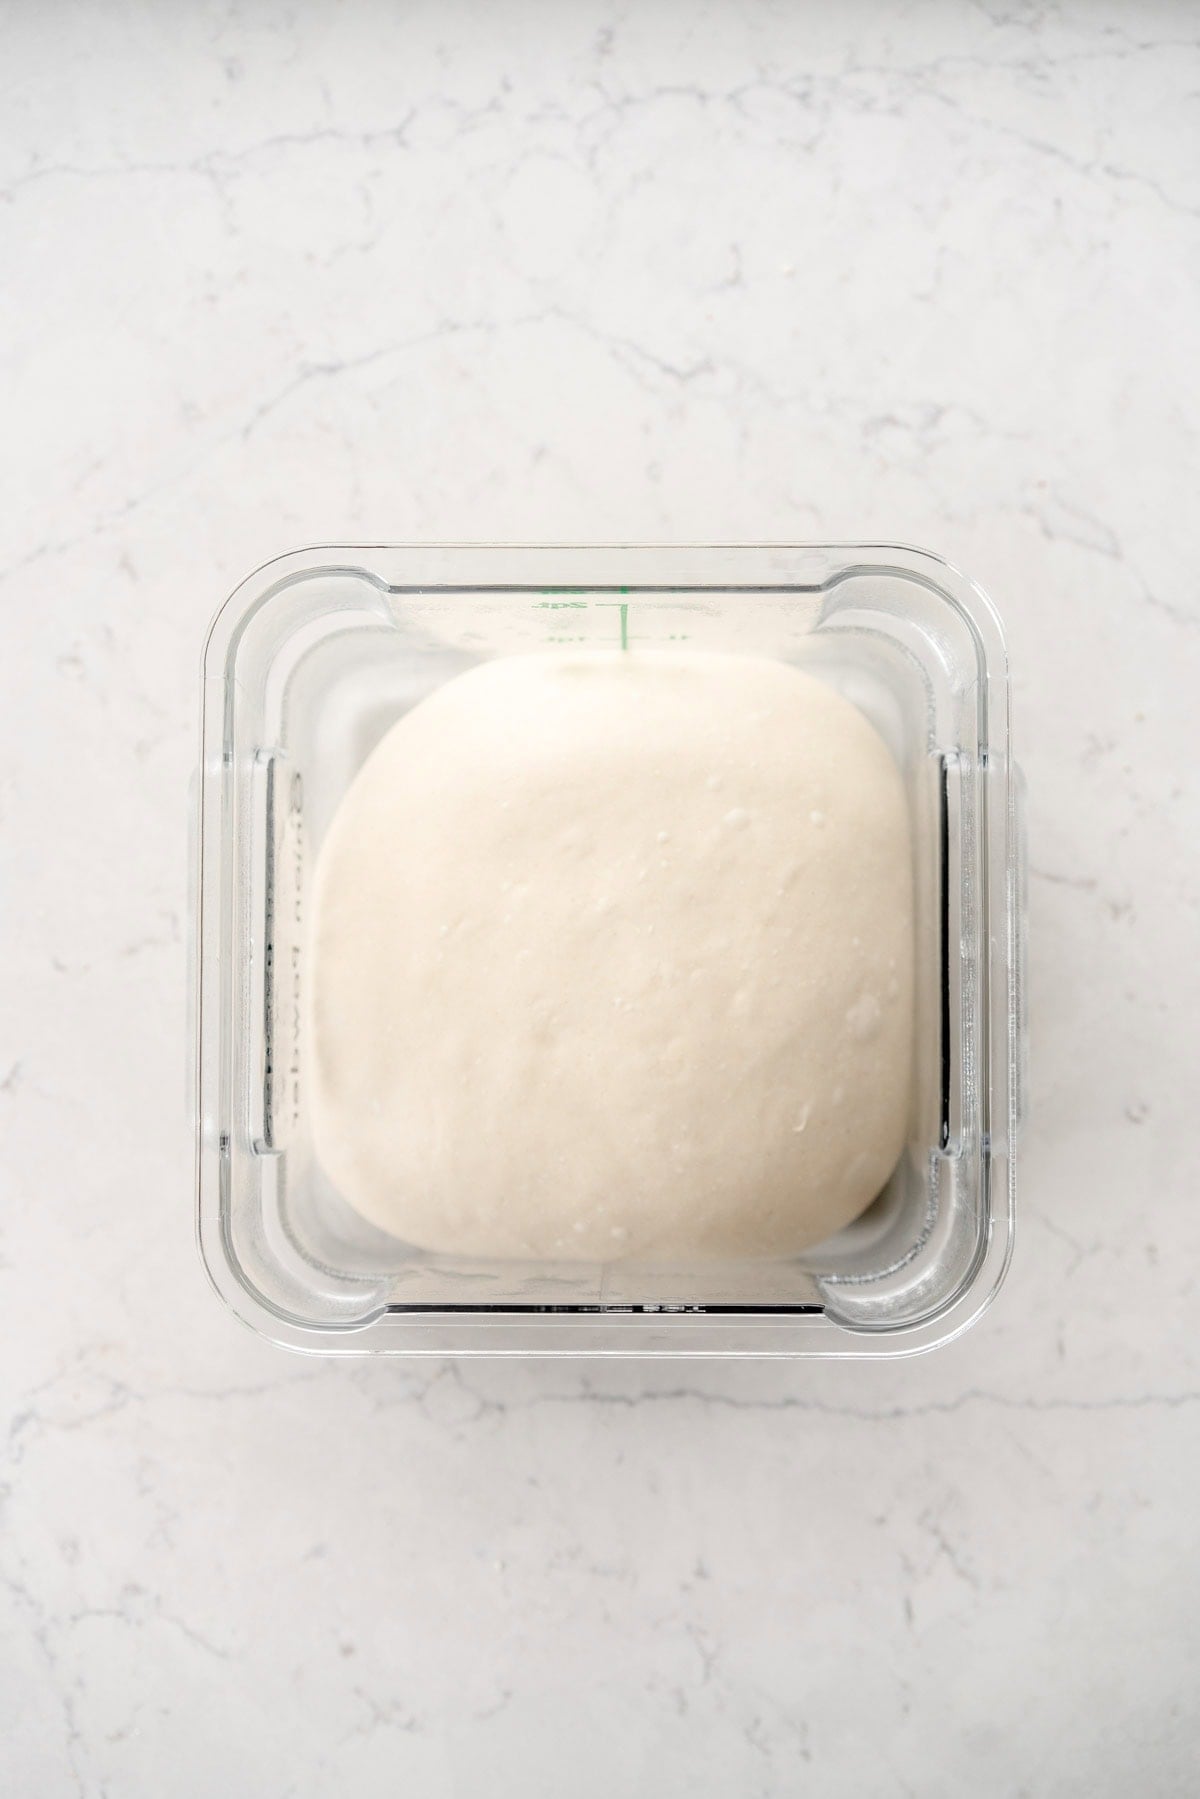
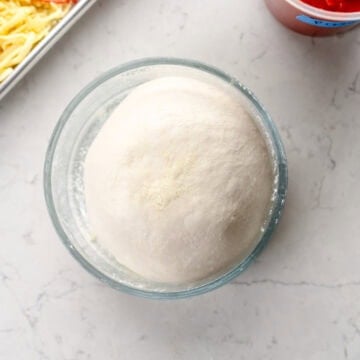
- Shape the dough into a ball, and place into a lidded container or a bowl you can cover with a clean towel or plate. Leave to proof at room temperature for 2 hours, until it has risen by about 50%.
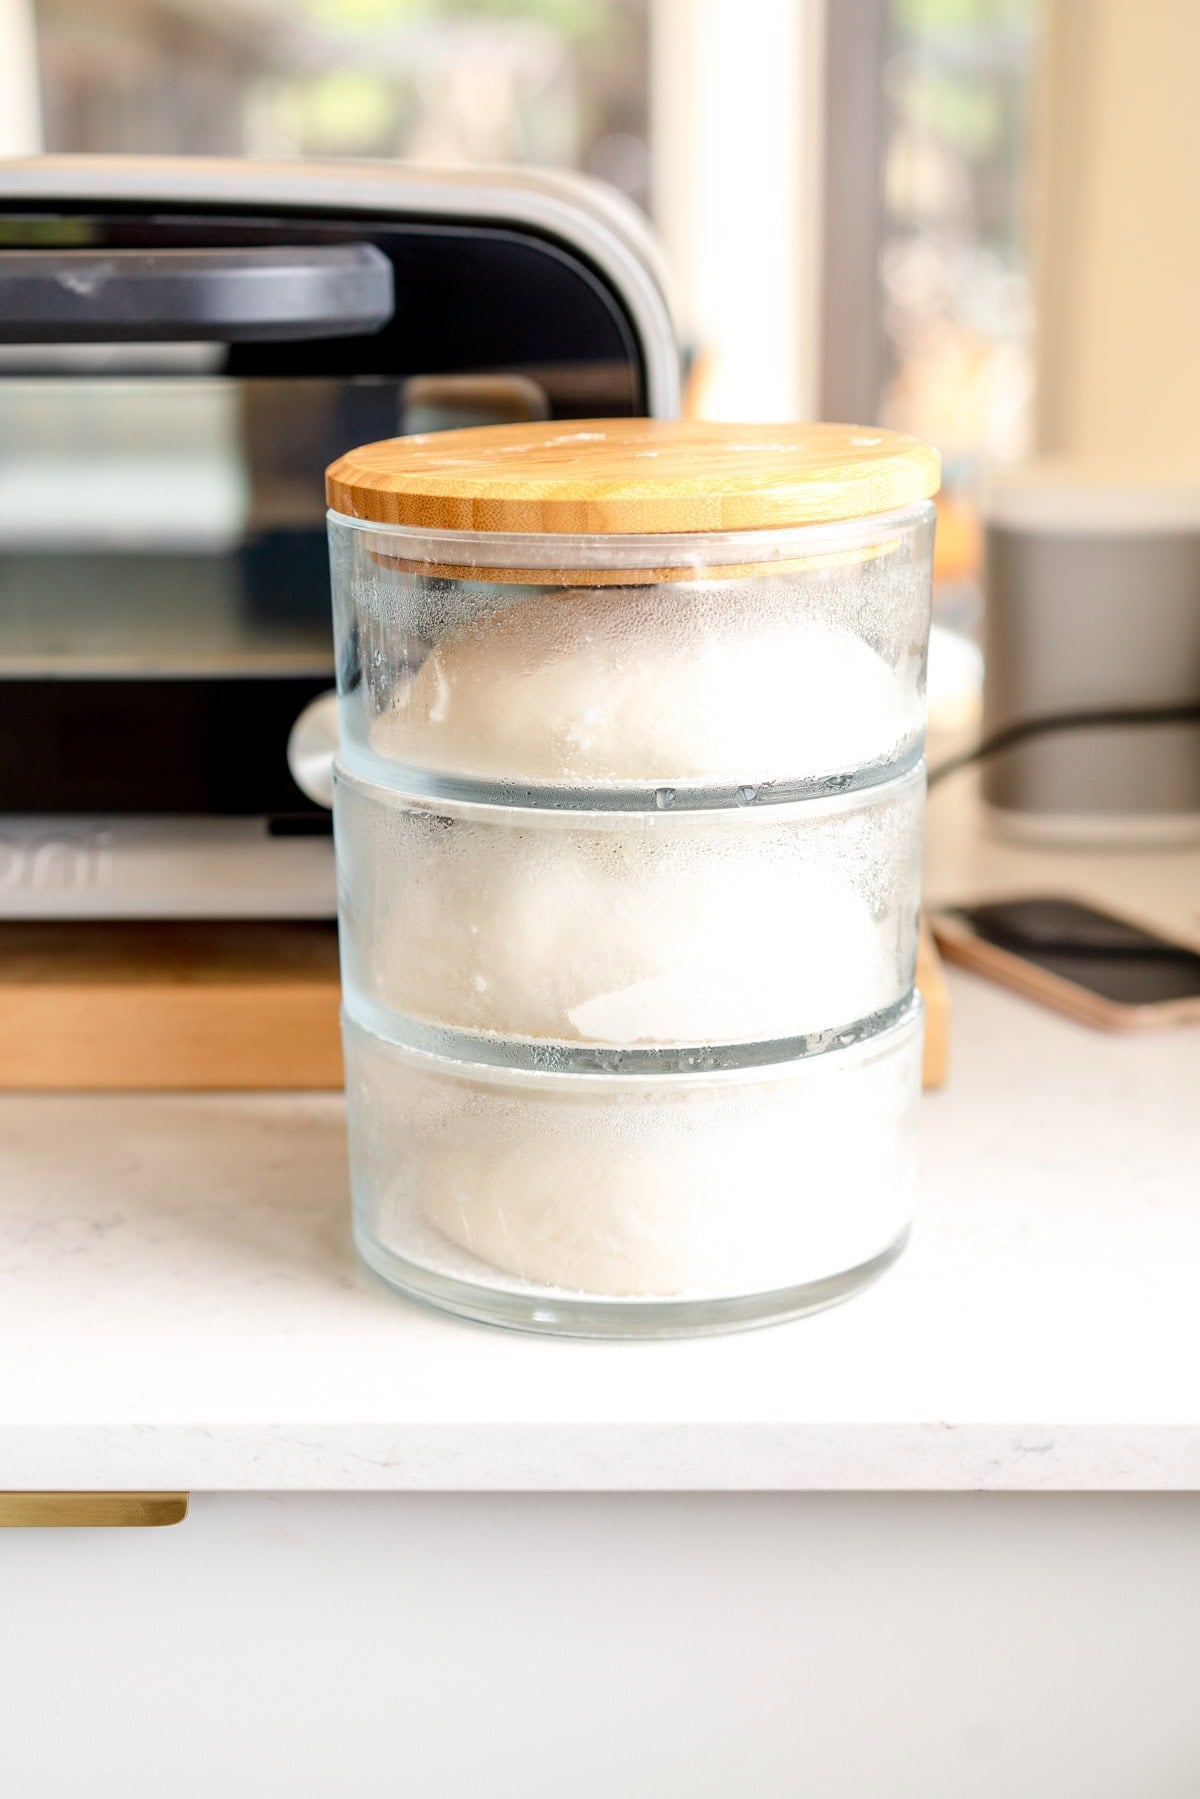
- Dust a lidded sheet pan or a container with a lid that you are going to rise the pizza dough in with rice flour or regular flour, or with semolina flour. I like to use the Ooni stack which is a set of stacking glass bowls.
- Turn the dough out onto a work surface (again I don't usually need to add any flour here but if you do, then go ahead.
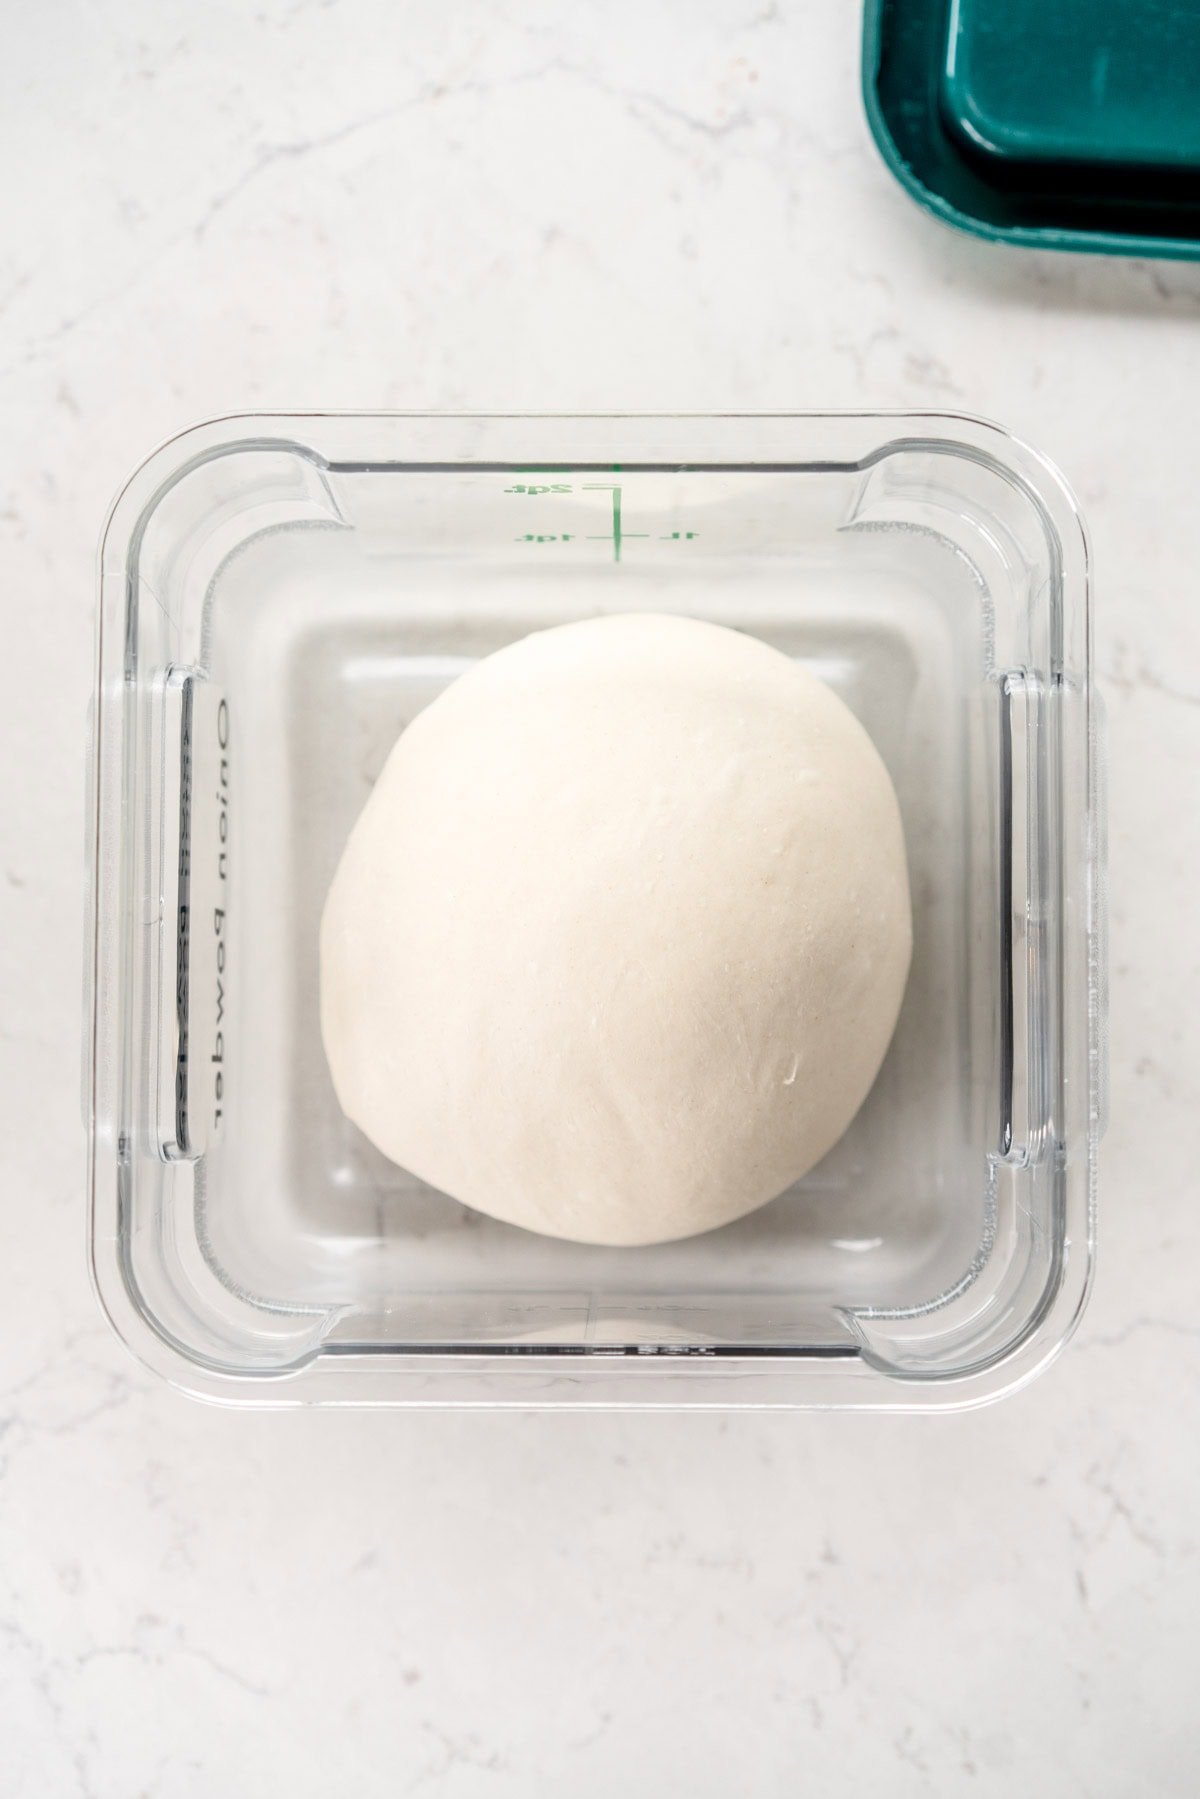
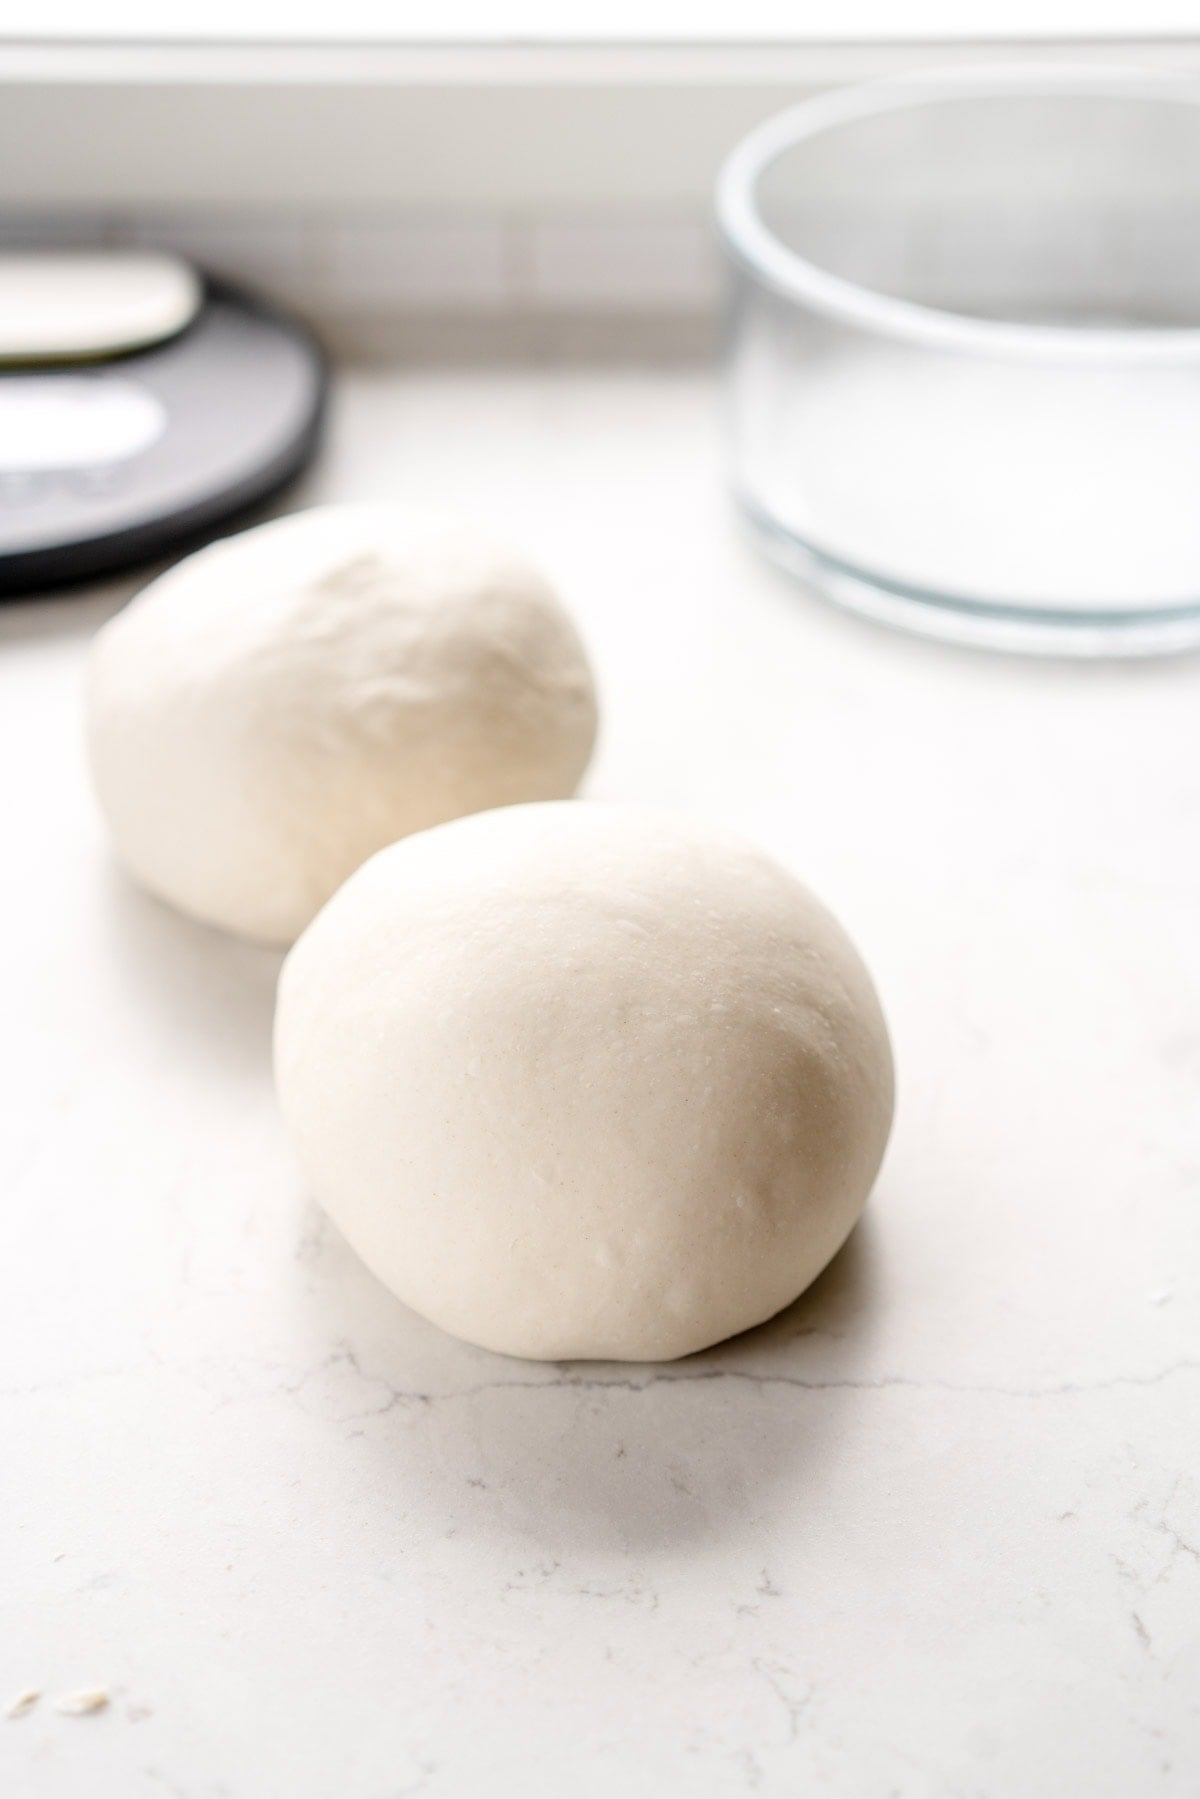
- Divide the dough into two pieces, each weighing about 330g. Shape the dough into a tight ball by using the surface tension of your work surface to shape it.
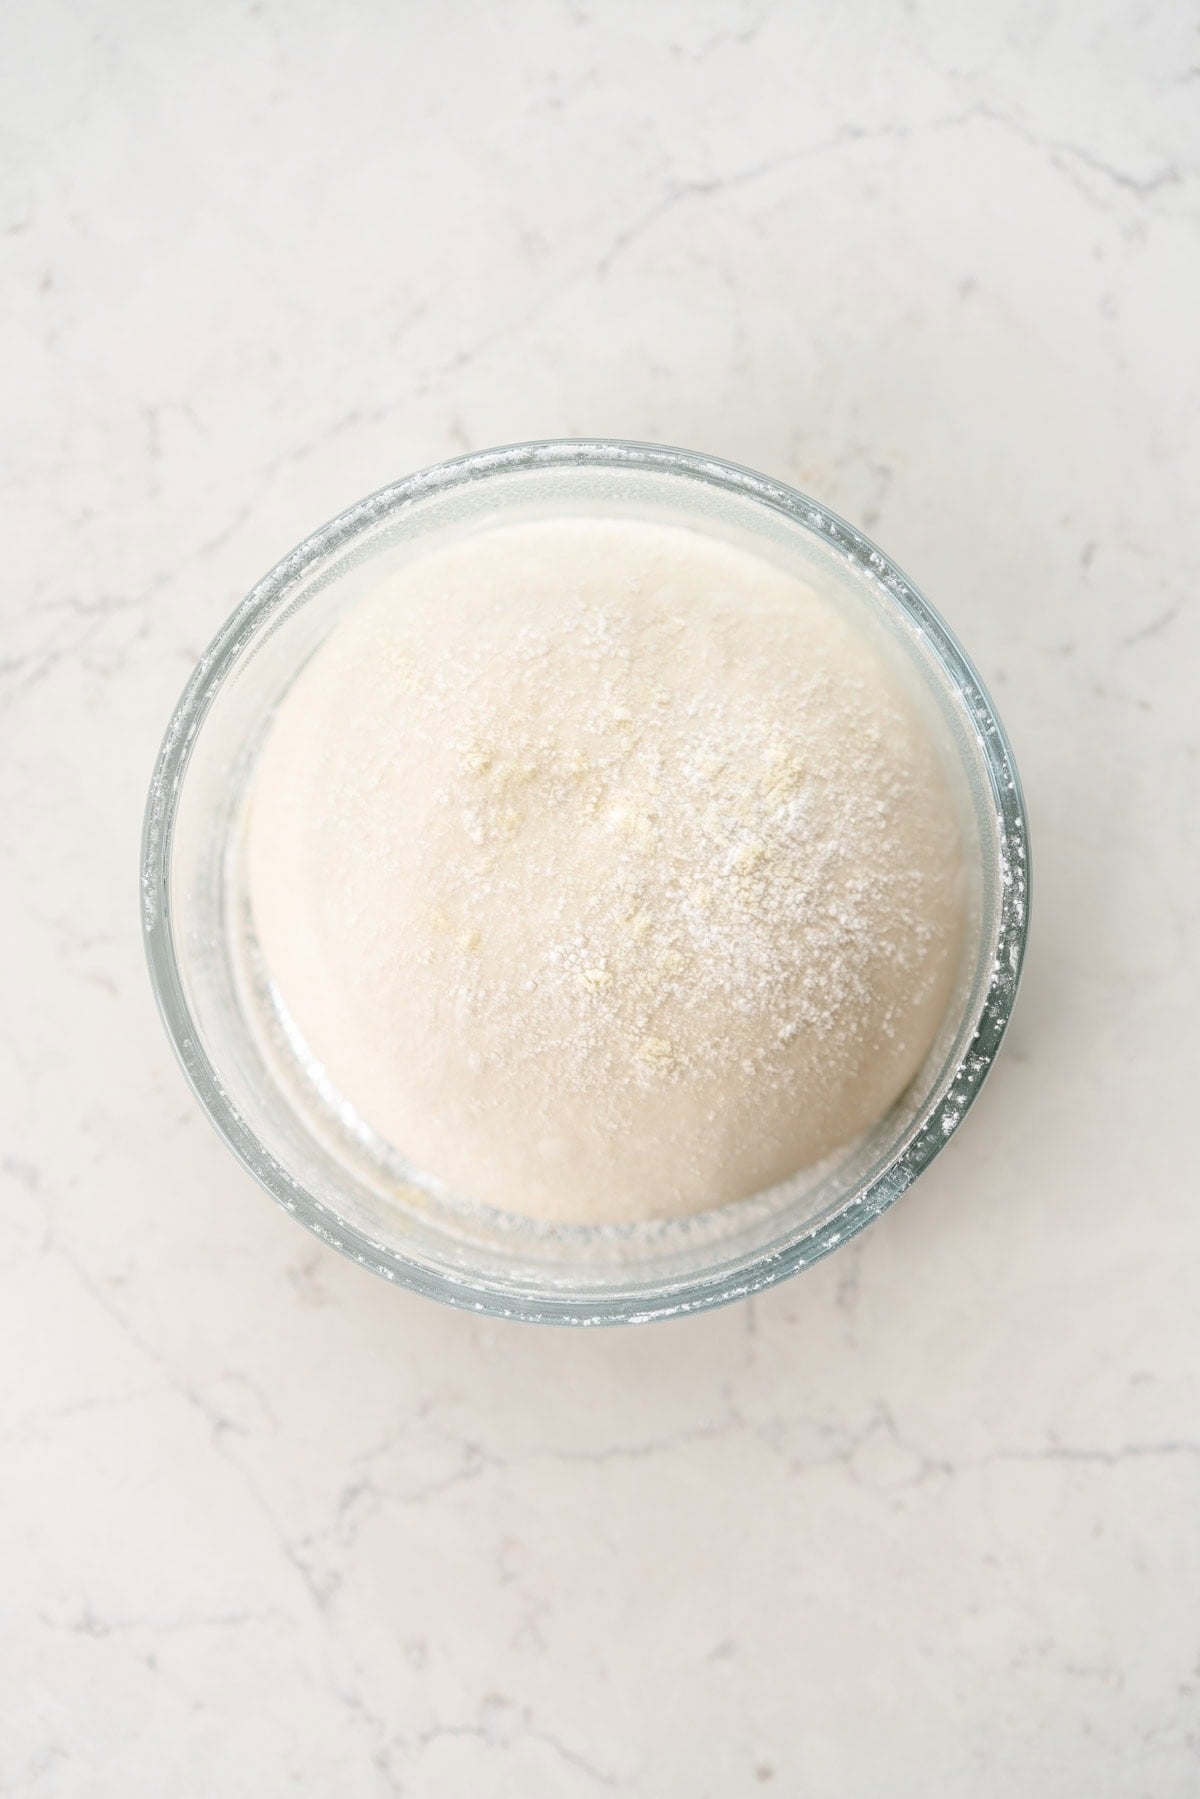
- Transfer the dough to the container you are going to use to rise it in, dust with rice flour, and transfer to the fridge for at least overnight and up to 3 days. The dough will 'flatten' out a little in the fridge but will not rise a ton.
- About an hour and a half before you want to use your pizza dough, remove it from the fridge. Allow to stand covered at room temperature until it has puffed up, and when pressed with a floured finger, the indentation that it leaves slowly springs back most of the way. It should no longer have any cold feeling to it.
- Shape, top, and bake by following the directions below.
SHAPING
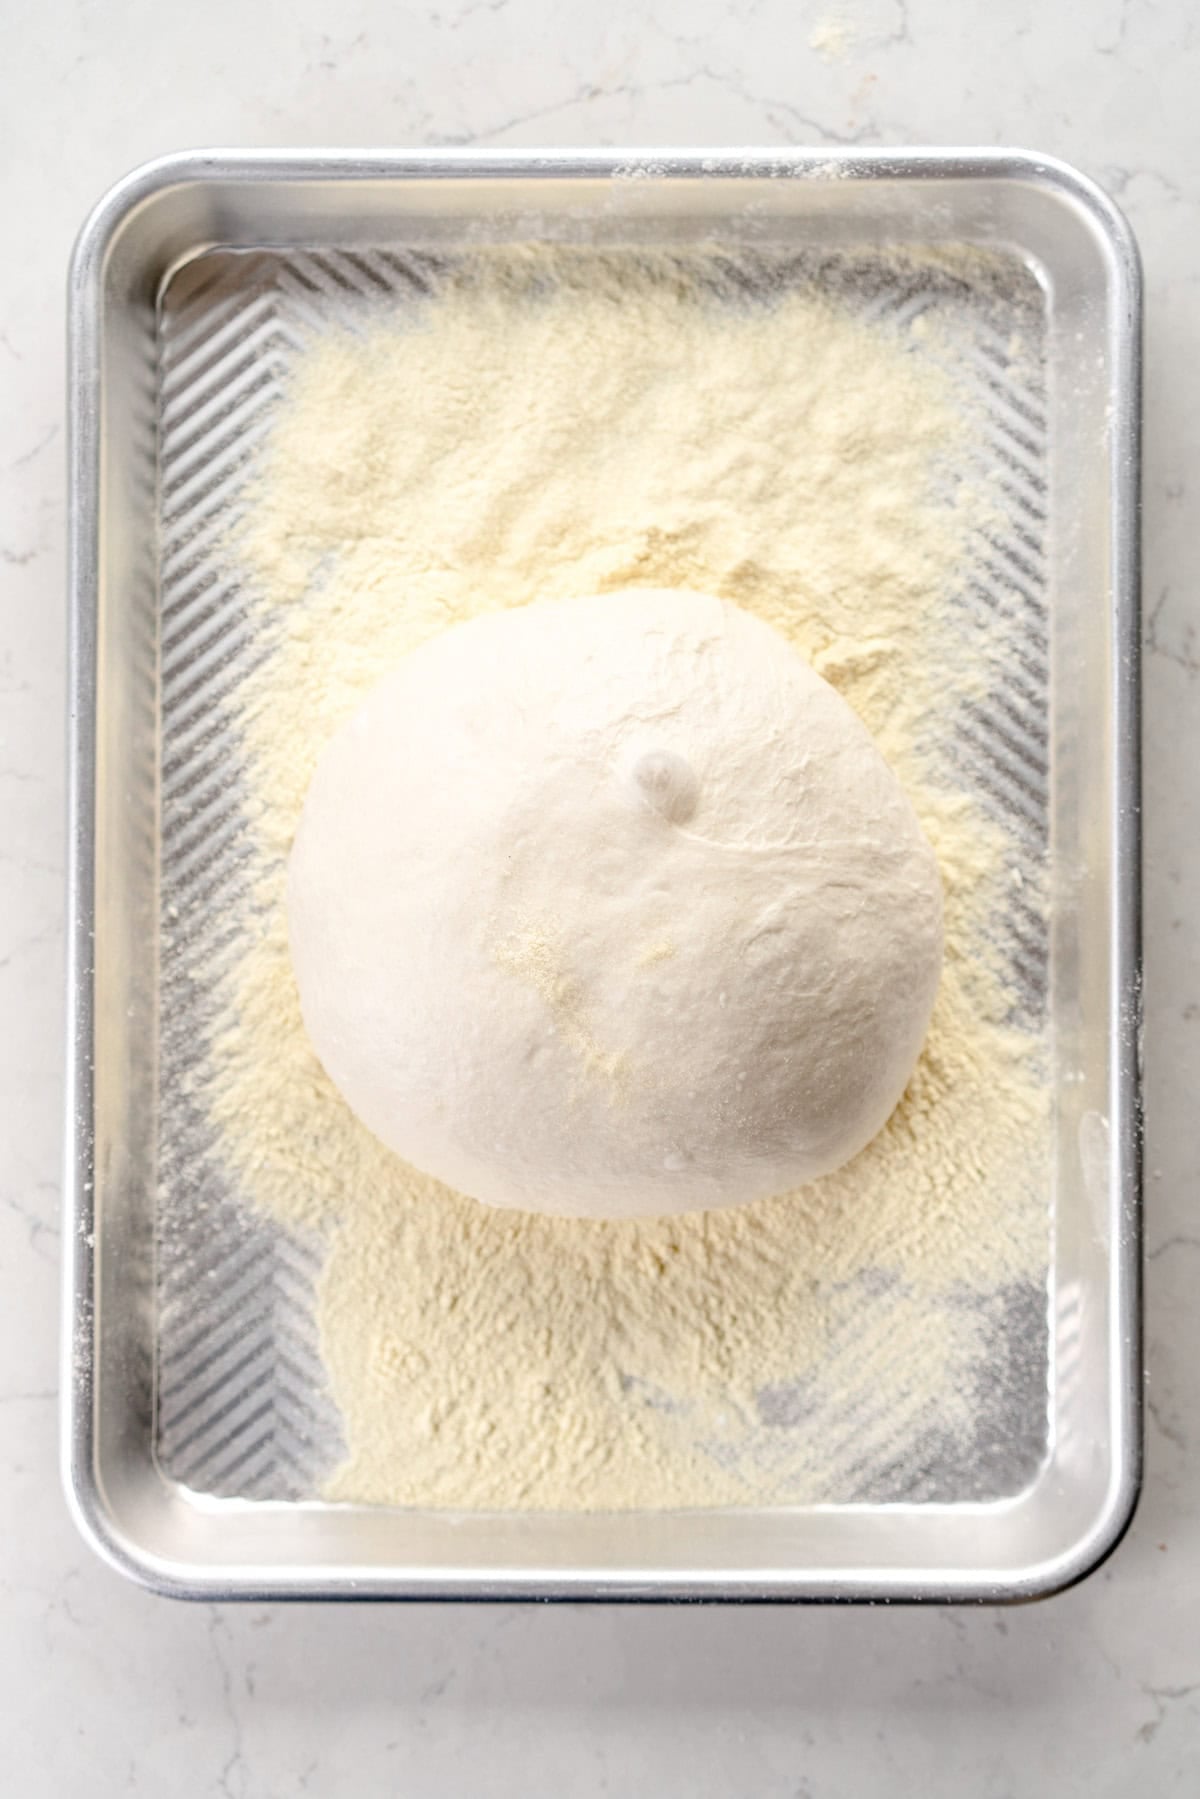
- Once the dough is ready to use, place some semolina flour onto a dinner plate or sheet pan. Carefully remove one piece of dough from the container you have risen it in, and place it directly onto the semolina, flipping it so that both sides are covered.
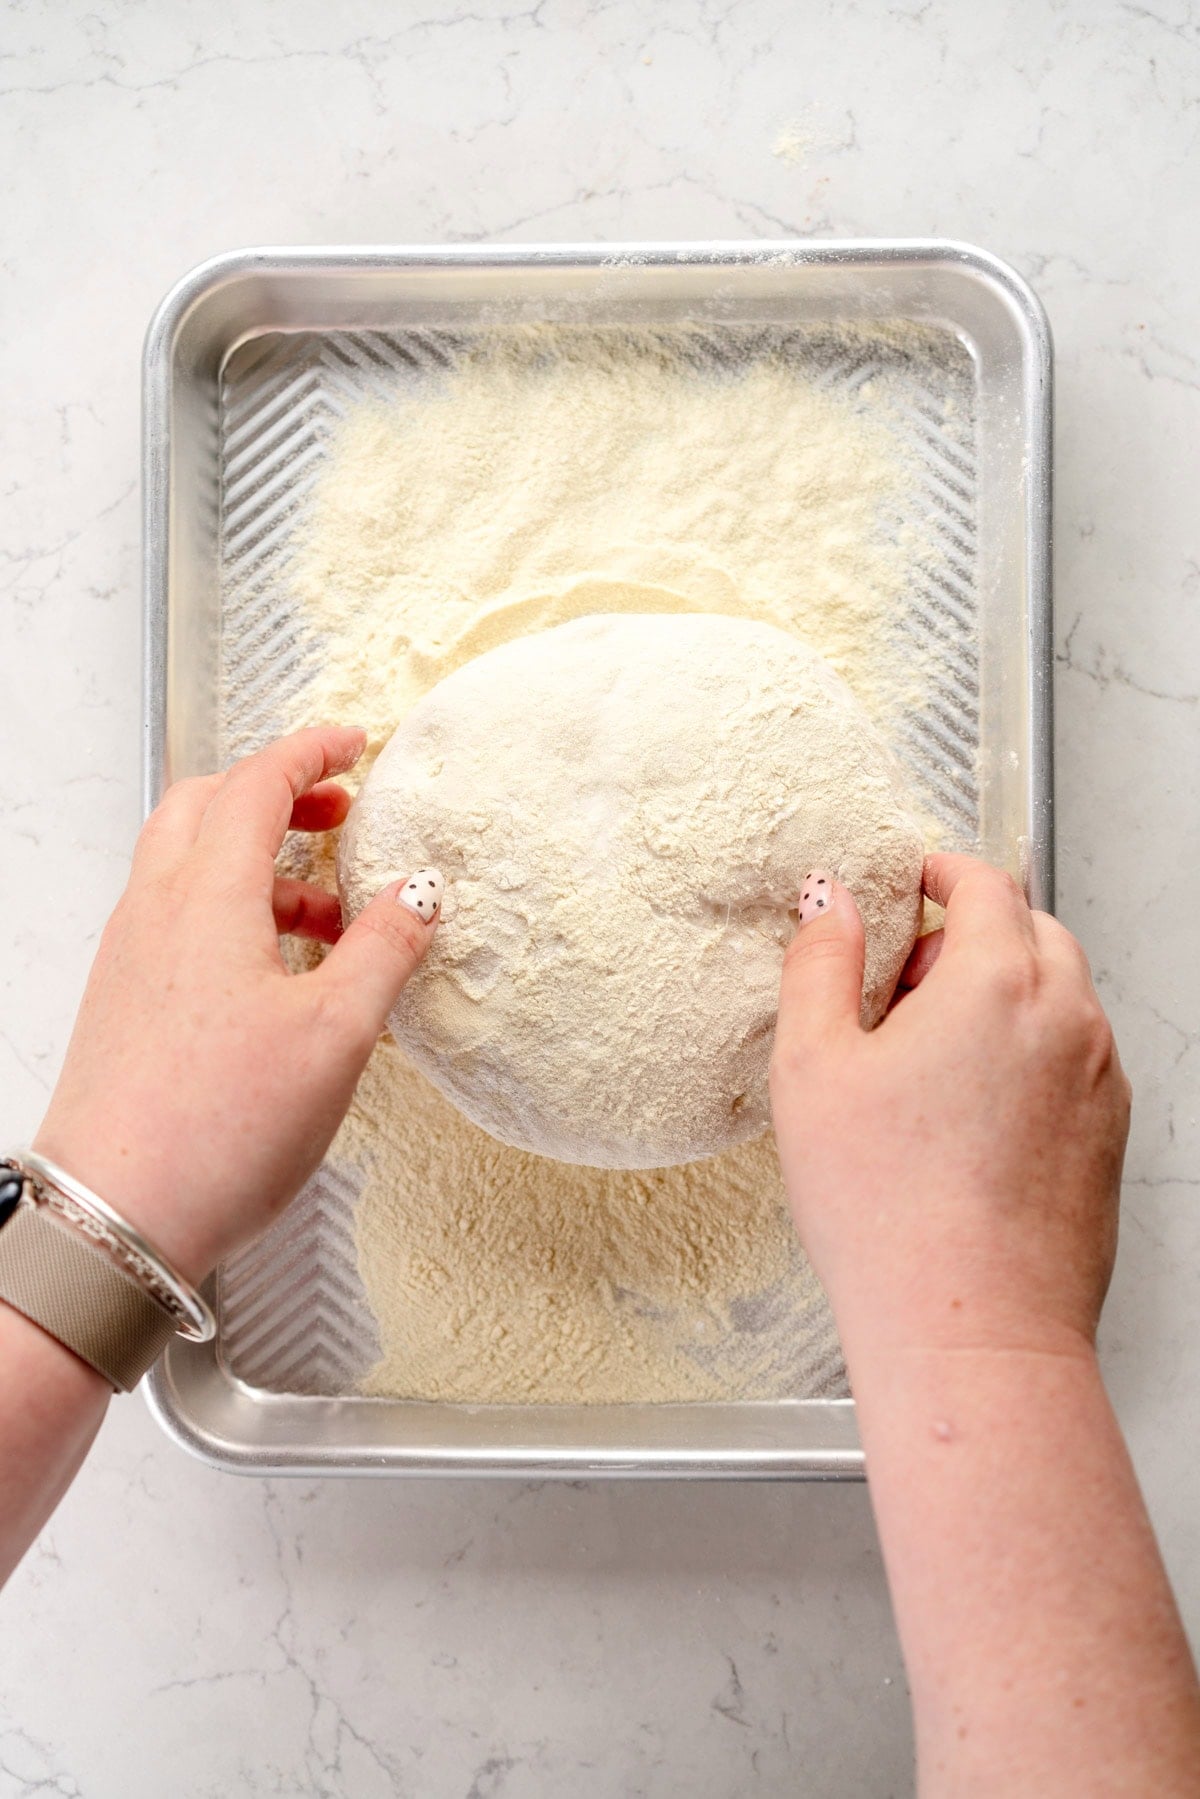
- Transfer the dough to the work surface, adding more semolina if needed. Using your fingers, press in a circle around the edge of the pizza, leaving about a 1-2cm edge. Press down the middle of the ball of dough to gently flatten it off.
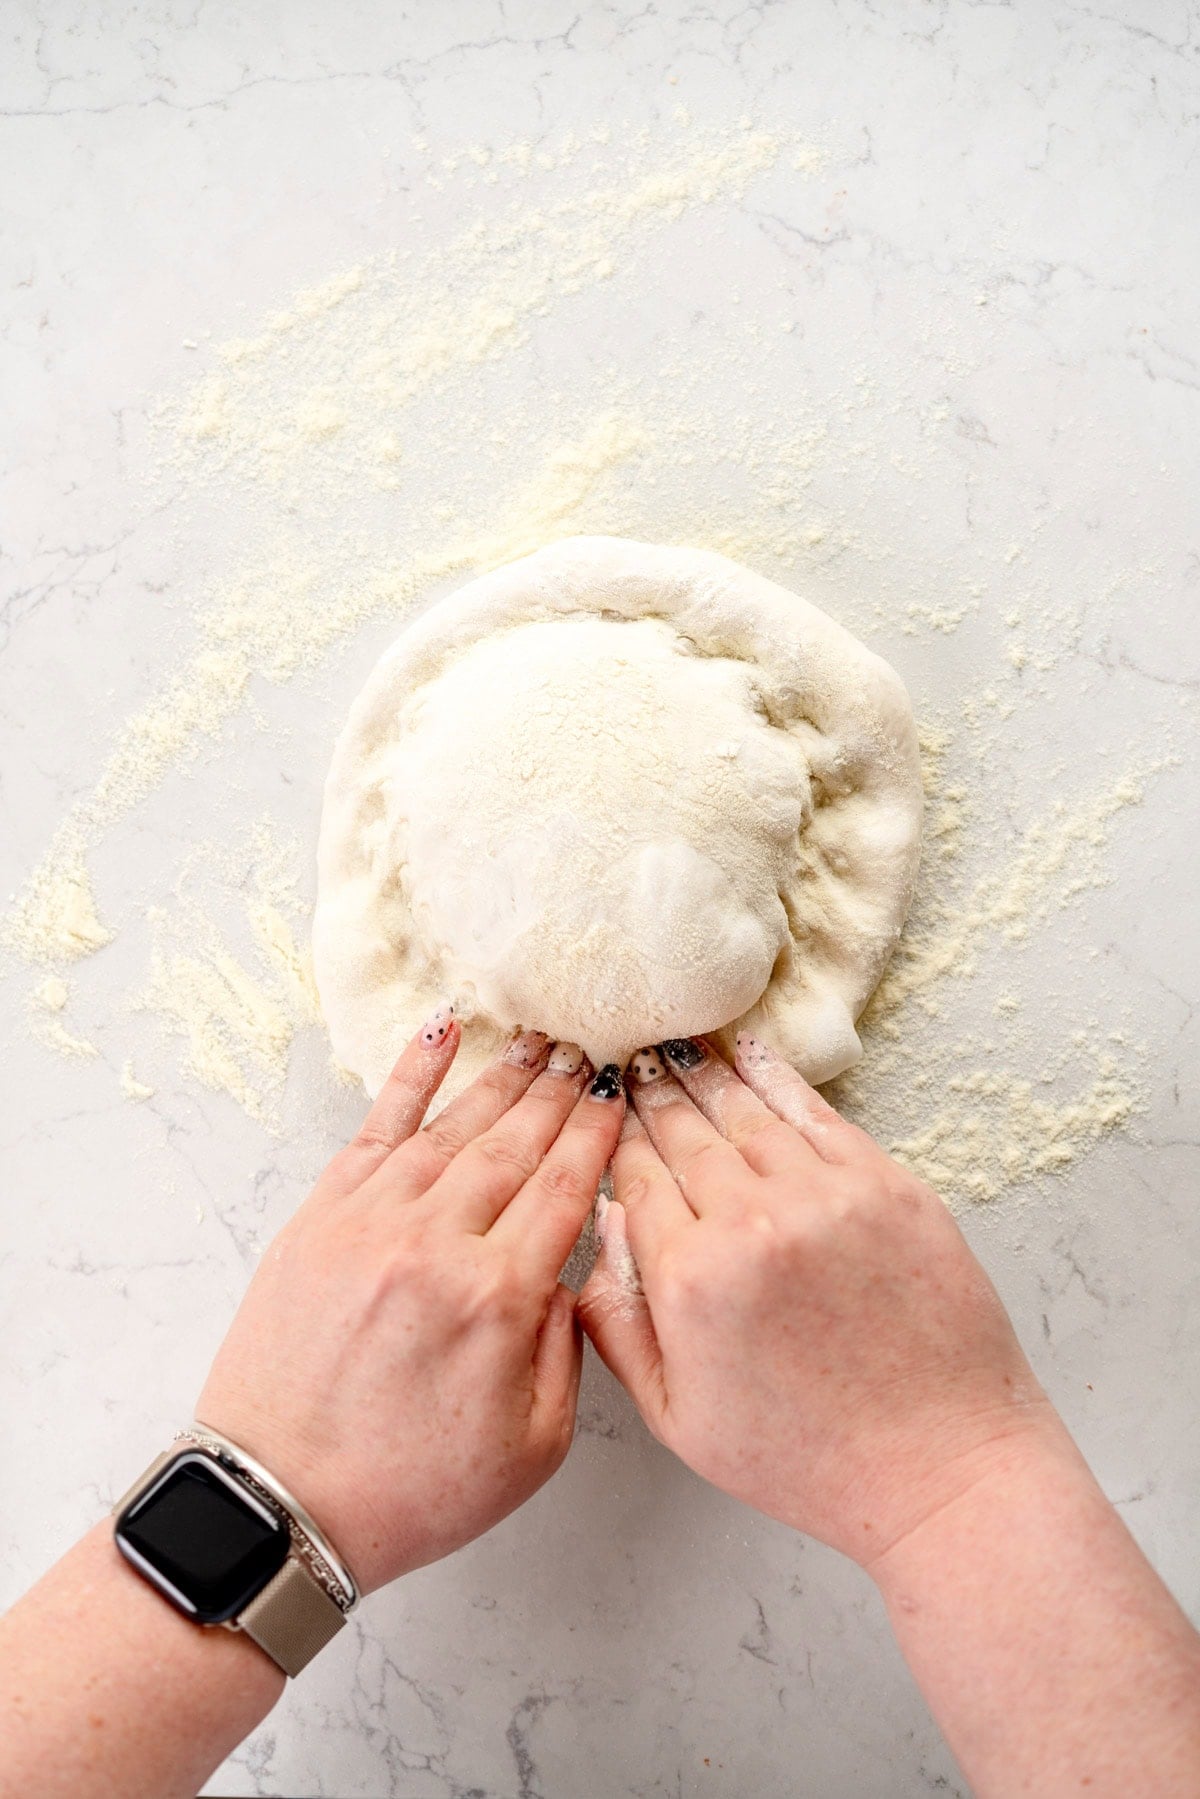
- There are lots of ways to stretch pizza but I like to use what I call the 'steering wheel' method - place one hand on the middle of the dough and using the other hand, gently grab the edge of the dough and stretch it out slightly, then turn the dough about 45°. Repeat, going around the edge of the dough 2-3 times until it has stretched out nicely.
- If you would like to, you can carefully pick the dough up and holding it by the edges, move your hands around the sides to use gravity to help stretch the dough further. You can also place it over the backs of your hands to gently stretch it out. This takes practice and you will get better at it with the more pizza that you make.
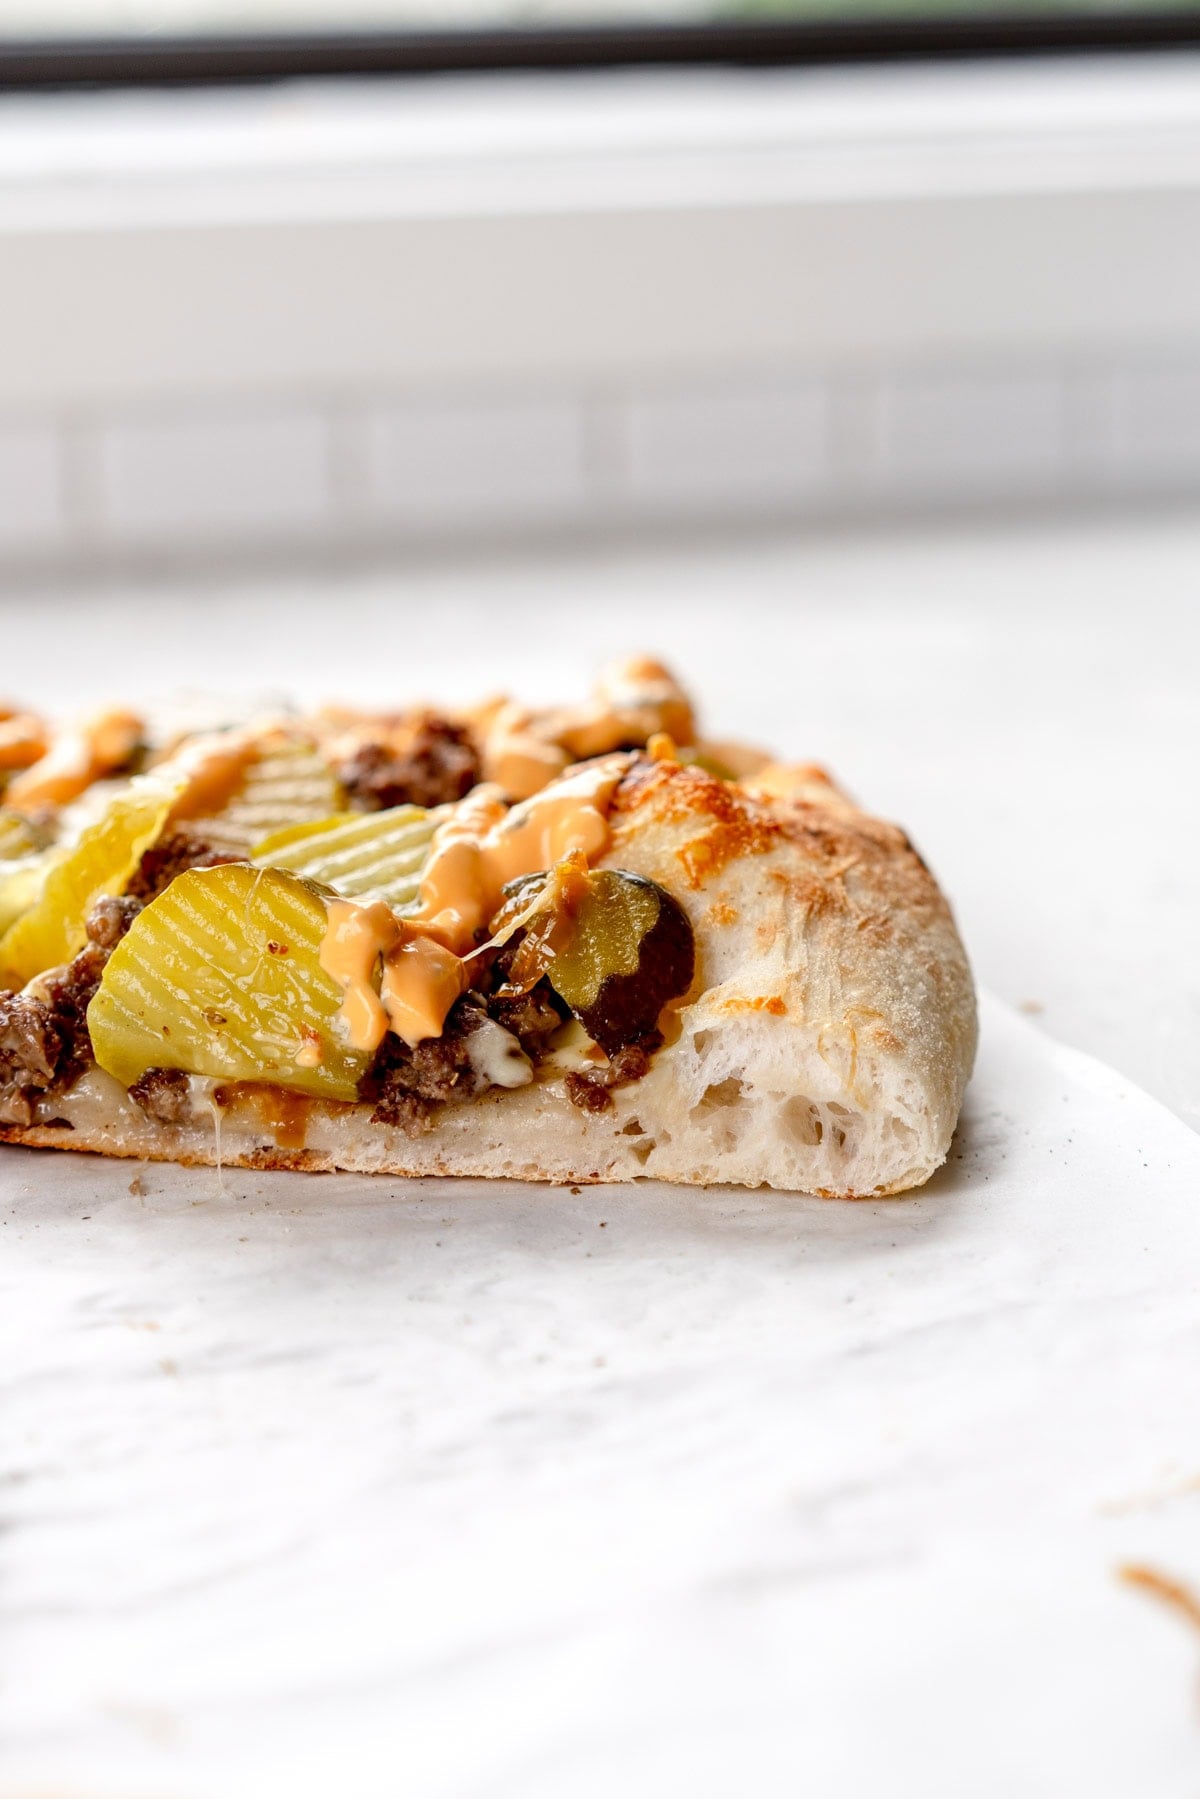
- You are aiming for a circle of dough that is 12-13" (30-33cm) in diameter, and has a slightly thicker edge.
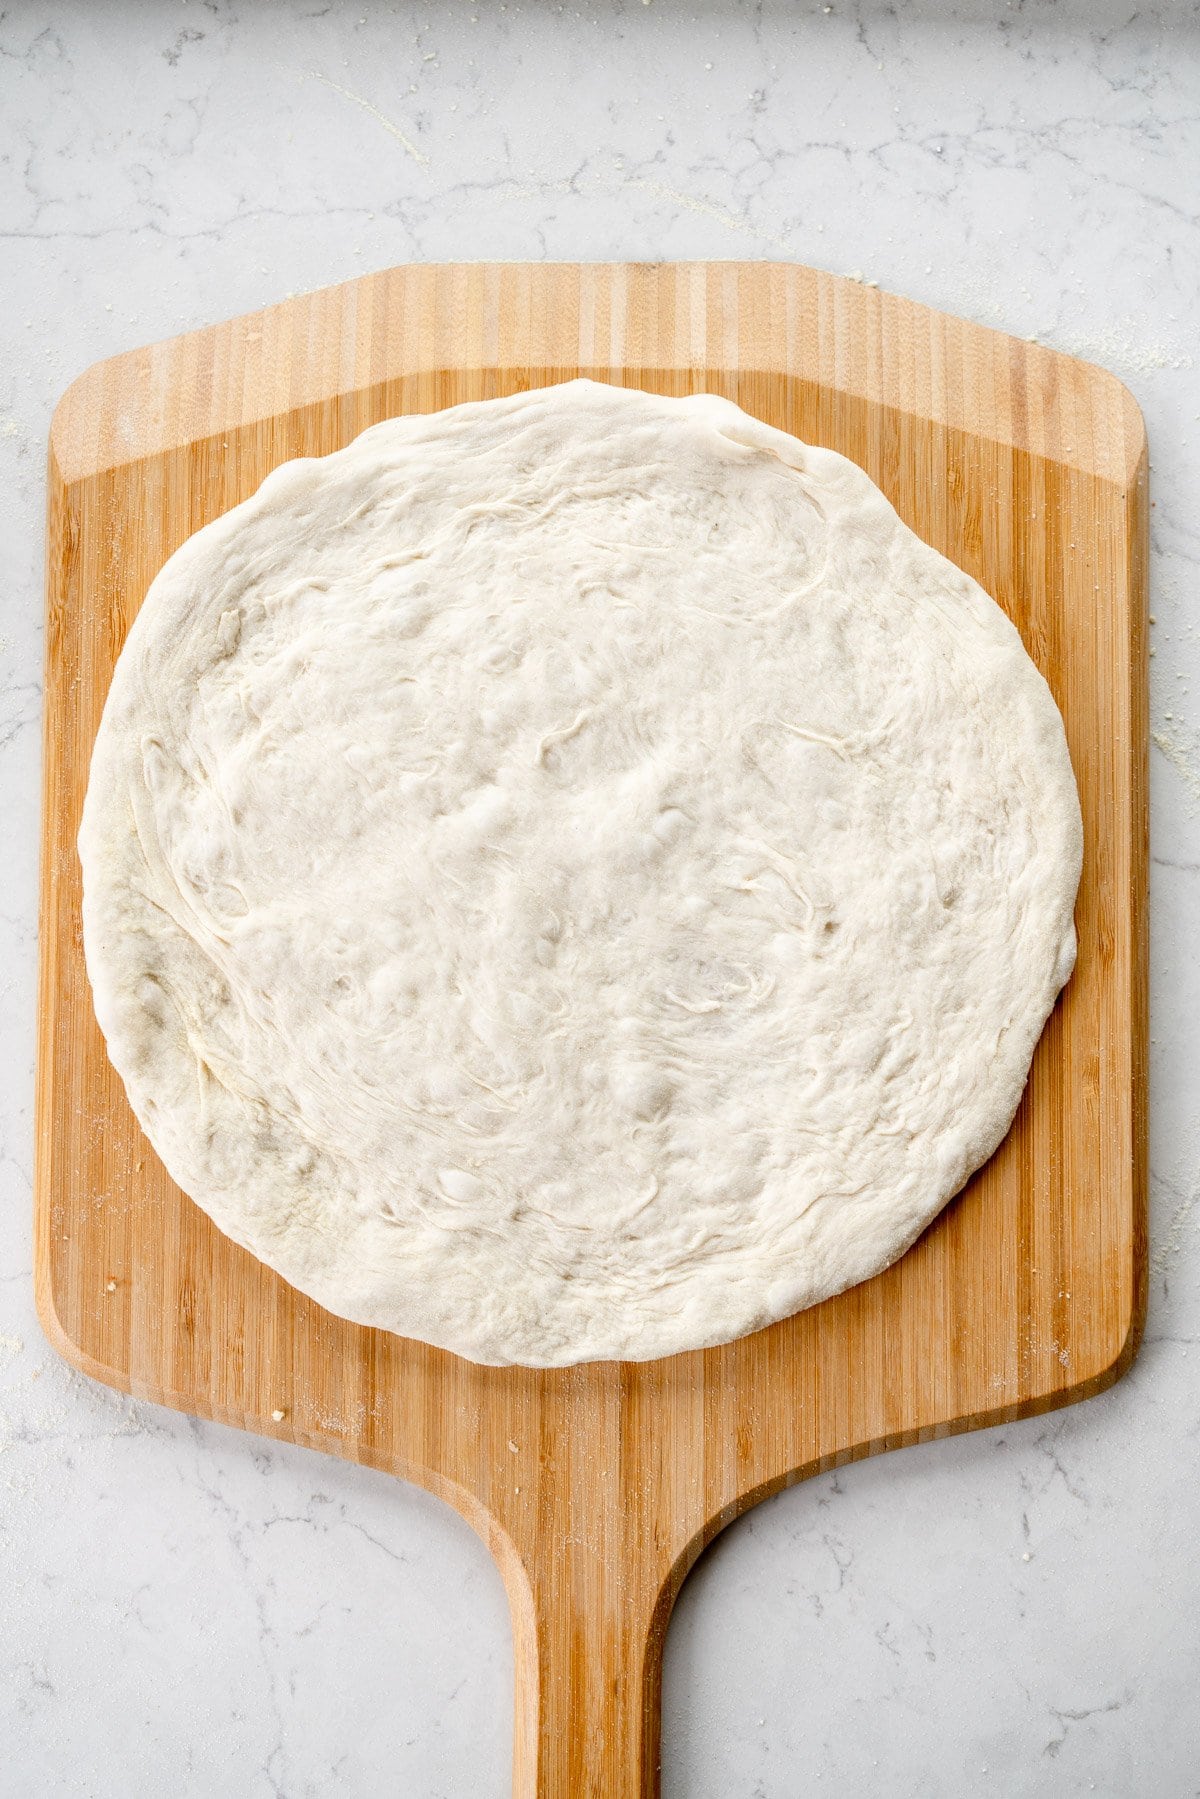
- Transfer the pizza dough to your pizza peel, giving it a little wiggle to make sure that there are no stuck spots. As you top the pizza, give it a little wiggle every now and then too to ensure that it is not stuck to the peel.
- Top and bake using one of the below methods.
TO BAKE USING A PIZZA OVEN
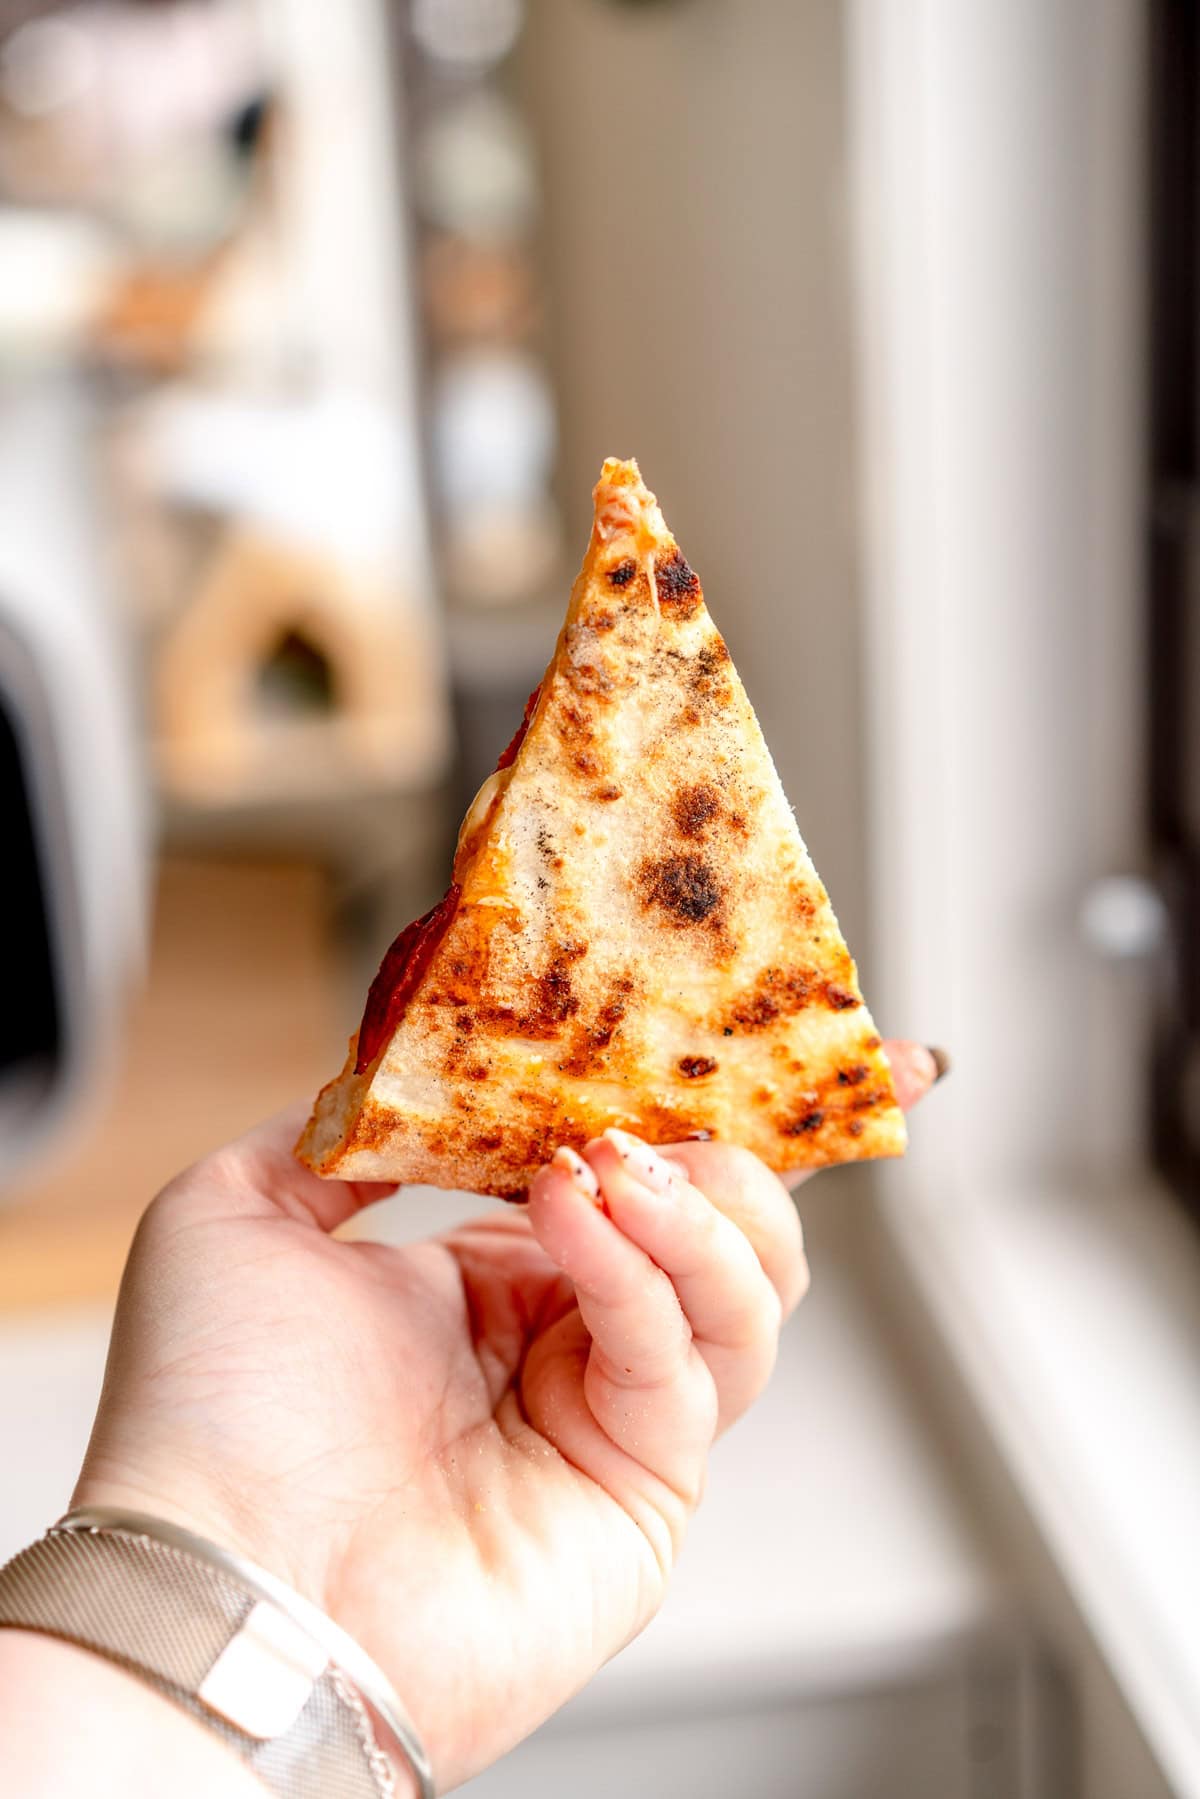
- Top the pizza as desired. Transfer using the pizza peel to the pizza oven and bake according to the manufacturer's instructions - my dough usually takes about 2-3 minutes in a gas fired oven, or 4 minutes in an electric pizza oven. Again, this will take some practice. Once baked, finish as desired.
TO BAKE USING A BAKING STEEL
- An hour before you want to bake the pizza, place a baking steel or pizza stone into the oven. I prefer to use a baking steel as they are much more durable. Preheat the oven to 500°f / 260°c or as high as your oven will go if it will not reach that temperature.
- Shape and top the pizza as instructed in the shaping section. Using the peel (or if you don't have a peel, the back of a sheet pan will work but you have to be very careful), wiggle the peel to transfer the pizza to the baking steel.
- Bake the pizza for about 5-6 minutes until bubbly and golden brown, and you are happy with the colouring of the crust on the bottom of the pizza. Use the peel to remove the pizza from the oven.
- If you are baking another pizza, make sure that you give the steel enough time to heat up again before cooking your next pizza.
TO BAKE IN THE OVEN.
- About an hour before you are going to bake your pizza, preheat the oven to 500°f / 260°c or however high your oven will go.
- Shape and top the pizza as instructed in the shaping section. You can top the pizza on the sheet pan you are going to bake it on, either directly on the baking sheet or on some parchment paper. While you are shaping the pizza, if you have one, preheat a second baking sheet that stacks with the one with the pizza on it in the oven for about 10 minutes - this helps with the initial burst of heat.
- Top the pizza as desired, then transfer to the oven. Bake for about 15 minutes, until the crust is brown and the cheese and toppings are bubbly.
Notes
Yes, I am asking you to weigh your yeast. I use an Ooni Scale (it is linked in my Pizza equipment page) which is amazing and has both a small and a large scale on it which is perfect for weighing yeast. If your scale is not as accurate, you can use just over ¼ teaspoon of yeast.
All of the equipment that I use to make Pizza is linked in my pizza equipment page. Please note that this is not necessary, but it is helpful to have! The main thing that is helpful to have is a pizza peel, however you can easily use the back of a sheet pan to transfer your pizza. I made these pizzas in the Ooni Volt 2 Electric Pizza Oven, we also have a Koda 2 Pro Gas Powered Pizza Oven.
To make same day pizza: The quantities are the same, except use 2.5g of instant yeast. Once the dough has mixed, skip the first rise at room temperature and ball the dough straight from the mixer. Place into a container such as a lidded tray or tupperware dusted with rice flour and semolina. Rise at room temperature for 3-4 hours, until puffy and when lightly pressed with a finger, an indentation is left that slowly springs back. You can also make this version overnight - once balled up and in the container, place into the fridge for up to 24 hours, then remove from the fridge about an hour before you want to make pizza.
I use semolina flour for dusting my dough as it is coarser than regular flour, and doesn't get absorbed as much by the dough. It acts as 'ball bearings' on the dough, allowing it to easily be moved around on the work surface or the peel.
What flour should I use to make Pizza Dough?
There are a few options here. I often use 00 flour, which is finely ground and 'strong' (so it is high in protein). This is a common flour used for pizza making, I like the brand 'caputo' but there are a lot around online or in specialty stores. Bread flour also works great - I have used bread flour and 00 flour interchangeably. Look for one with a high protein content, which means that it will be a nice strong flour and make a lovely stretchy but chewy dough.
Freezing Pizza Dough.
I don't do this often - if I have extra pizza dough I usually just bake it off and then have the pizza for lunch the next day or as leftovers, however I know that people do like to freeze their pizza dough. To do this, freeze after the first room temperature rise when the dough is balled up. To freeze, place the dough on a parchment paper lined sheet pan, then freeze uncovered until solid, about an hour. This helps keep it in shape. Once it is frozen, transfer each dough ball to a ziploc bag and squeeze the air out. Freeze for up to a month. To use from frozen, remove from the freezer and allow to defrost in the fridge overnight, then take out and allow to come to room temperature and puff up before using - this may take a few hours. I have also tested freezing dough after the second room temperature rise but found that the result from the defrosted dough wasn't as nice.
Comments
caribou says
Thanks so much for all the work you put into developing this recipe.
It works beautifully and the info in the post is incredibly helpful.
Kate says
SO GOOD! I made the same version and cooked on pizza stones in the oven. And I think it was the best pizza dough I've made (no surprises there). Perfect hydration and made the dough a delight to work with 😍😍😁
Kelly says
We have had homemade family pizza night for 8 years now and the whole time I’ve been looking for THE RECIPE. I’ve found it with this one. It’s easy to make, easy to work with, and tastes incredible. Plus with her detailed instructions it’s the first time I’ve managed a perfectly round pizza after all this time 😂 thank you so much for this recipe!!!
Katie says
Chefs kiss! The recipe was super easy to follow, love all the nerdy details in the notes. I cooked in the oven and it worked perfectly. Well and truly worth the wait.
Nakita says
Omg! Yay, I’ve been waiting for this recipe forever and I’m so excited. Everything I make of yours works out so well. What a fantastic Christmas present - thanks Erin 🤩
Kate says
This was an amazing recipe, we have never managed to get pizza dough how we want it in our Ooni oven until now, will be using this recipe always! Thank you ☺️
Lena says
The recipe looks amazing and I can't wait to try it 😉
Can I use this dough to make deep dish pizzas?
Erin Clarkson says
Yay! I prefer something with a little more hydration for a pan pizza - closer to 68% so you can just adjust the amount of water! I have a pan pizza recipe coming soon 🙂
Lena says
Oh great! So I think I'll for the new recipe 😉
Thanks
Vanessa says
I made the overnight version in readiness for my Ooni Volt oven arrival. Followed the recipe exactly and it made the most amazing pizzas first time - leopard crust, chewy but airy - blown away! Thanks so much for the detailed instructions and recipe - this will be on repeat for the foreseeable future.
Rachel says
Can't wait to try this! Would High Grade flour be suitable for this recipe?
Erin Clarkson says
Hi, yes high grade will work great (it is another name for bread flour!)
Hannah says
This is easily the best pizza dough recipe I've ever made - so simple and makes exactly the kind of pizza I like. We were getting ready to start faffing around with sourdough to get the right crust but I don't think we need to bother now.
Emma says
So good! We got a pizza oven for Christmas and made this dough for the first time on boxing day - it was perfect. Cloudy Kitchen never fails for me 👌
Jordan says
This is the perfect pizza dough recipe! We made it last night for a NYE pizza party! My scale doesn’t have decimals so I rounded up a little and I was too lazy to go to the store so used Canadian all purpose flour and it worked beautifully! So easy to work with, rice flour was a great tip! And for ease of making pizza for a crowd we par baked the crusts for about 30 seconds in the wood oven earlier in the afternoon then topped them and baked them in the wood oven that evening. Highly recommend for a gang!
Evie says
This dough was perfect! Made it the day before and the only difference is that I lightly oiled my dough portions before popping in the fridge (and then didn’t use flour to shape). Perfectly browned, good structure and that nice chewy but light texture. Thank you!
Gill says
Just wanted to drop by and say thanks! We have been using an Ooni pro for 5 years now, sticking to a fail safe Jamie Oliver recipe (apart from a try of a sourdough pizza dough which was a bit of a disaster!)
This year, for our annual pizza night, I decided to give your recipe a try as I know how much you trial, test and tweak your recipes and I have never had anything other than great results from your recipes.
Well….I can confirm your testing was worth it! It worked fabulously! It was easy to work with, was prepped the day before for ease and tasted delicious. I had to tweak rising timings etc a little as I am in Scotland and my ‘room temperature’ is somewhat lower than most kitchens.
Defo one for repeating!
Jo Cutts says
So good every time! Thank you for all the work you put in developing this recipe.
Beth says
Fool proof by name and fool proof by nature. The easiest to work with dough I've ever experienced.
Nadine says
Made this yesterday for dinner tonight. So easy to make and the dough was beautiful to work with. Made delicious pizzas in the Ooni and I'm looking forward to making more!
M says
This is *THE* pizza recipe. Out of many others I have tried, none gave me such versatile, and... indeed foolproof dough. I did it many times in all possible ways - baked on the same day or day after making it, or ever 4 days after (because I forgot about it), measured perfectly or done with more-or-less precise spons and cups, made into thin italian-style pizza or into a thick fluffy one. It works every single time. Thank you for this incredible recipe!
Julia Madrid says
I’ve made this dough twice and it is just amazing! Super light, chewy, and easy to follow. Making it in the stand mixer takes the hard work out of it. I’ve kept in the fridge for 2 days and 3 days and honestly, it truly is foolproof! Will make again and again!
Tessa Huecksteadt says
Holy pizza Batman!! This is the best and easiest pizza dough ever. The crisp on it is incredible and I could almost just eat the crust with nothing on it because of the flavor. My boyfriend is quite the pizza skeptic (from NY) and said this is the top 5 pizza’s he’s ever had. It’s also such a foolproof, friendly dough to shape. I took it and made “heart shapes” and it shaped wonderfully. Thank you thank you thank you for this recipe and all the tips and tricks
Julie says
Hello, would surebake active yeast work with this or does it need to be instant yeast? Thank you!
Erin Clarkson says
Hi, active yeast will work, but not surebake.
Rachel says
This is a fabulous recipe - cooked in our wood fired ooni - best we’ve ever made! Thanks for such a great recipe with such clear instructions.
Sus Jenkin says
Absolutely fab recipe, super easy to follow and delicious dough. I unfortunately can't review as best as possible because I don't have a pizza oven..... Yet! I will be back to review when I do. For now I can confirm the results are excellent even in a basic bitch oven, as good as you can get without those high temps.
Julie says
Thank you for sharing this recipe with us. Have tried lots of different recipes to use in our pizza oven and this one was great! Will be my new go to recipe.
emma says
hands down the best pizza dough recipe out there. I've tried many but this is by far my favourte!! Thank you Erin x
Melody says
Yum! This is the best pizza dough I've ever made. It was perfectly crisp on the outside but also light and fluffy. We cooked it on a pizza stone in our Webber BBQ and we've never had them come out as good as this. My new go to dough for sure!
Brett Cross says
I just made your iced buns recipe and they are amazing! I plan to make them regularly. For this recipe I'm wondering about the 5mg olive oil in it? I've found cooking in a pizza oven that the oil in the dough can burn at high temperatures (it took me a while to work out why the bottoms were too charred with that strange burnt oil flavour) but you have an ooni and haven't found any problems with including it? I'm presuming you experimented without the oil but found it worked better with it? I may have just been putting too much in previously.
Erin Clarkson says
Hi, no I found that it was totally fine in it and helps with the browning! You can always leave it out if you're concerned!
Michelle says
This is by far the best pizza crust I have ever made. The dough was amazing to work with, the information in the blog post so helpful to guide me in the process, and the crust tasted incredible. I used the same day option but next time I'll make the dough the night before. Thank you Erin for another amazing recipe and thorough, easy to follow instructions!
Ritisha Khatri says
Great recipe! I’ve tried a bunch of different recipes and this one turned out really well. Thanks Erin!
Monica Gray says
I am so delighted with this recipe! Came out beautifully--I did the overnight, and yum. Easy and not messy. Best of all, delicious.Thank you
Daneen Avendano says
Epic fail. I didn’t even make it to fully kneading the dough by hand. The dough was so soupy and never developed any tension. Had to toss it out.
Erin Clarkson says
So sorry it didn't work for you - did you use the right kind of flour?
Daneen Avendano says
Yes, the flour was correct, but I think it may have been the yeast. I may have used active dry vs. instant. I will give it another try.
Erin Clarkson says
The yeast wouldn't have made a difference at this point - did you add extra liquid? Some flours are slightly more thirsty than others so you can try adding a little more if it is really wet. It does come together! I have made it both by hand and in the mixer loads
Carlos Danger says
Thank you for this recipe. My family and I are very pleased with the texture of the dough, and the structure of the crust. As the chef, I appreciate that I don't have to fiddle around to get the temperature of the water just right, even though I'm making the crusts the same day as the pizzas.
I use 500 grams of flour with everything else scaled up, which results in 4 crusts of about 200 grams, which we find is ideal for personal sized pizzas. There are a couple of bonuses to this: 1) most 00 flour I find comes in 1kg packages, so one package covers two pizza nights, and; 2) the salt scales up nicely to two rounded tsp and the yeast rounds up nicely to one rounded tsp.