
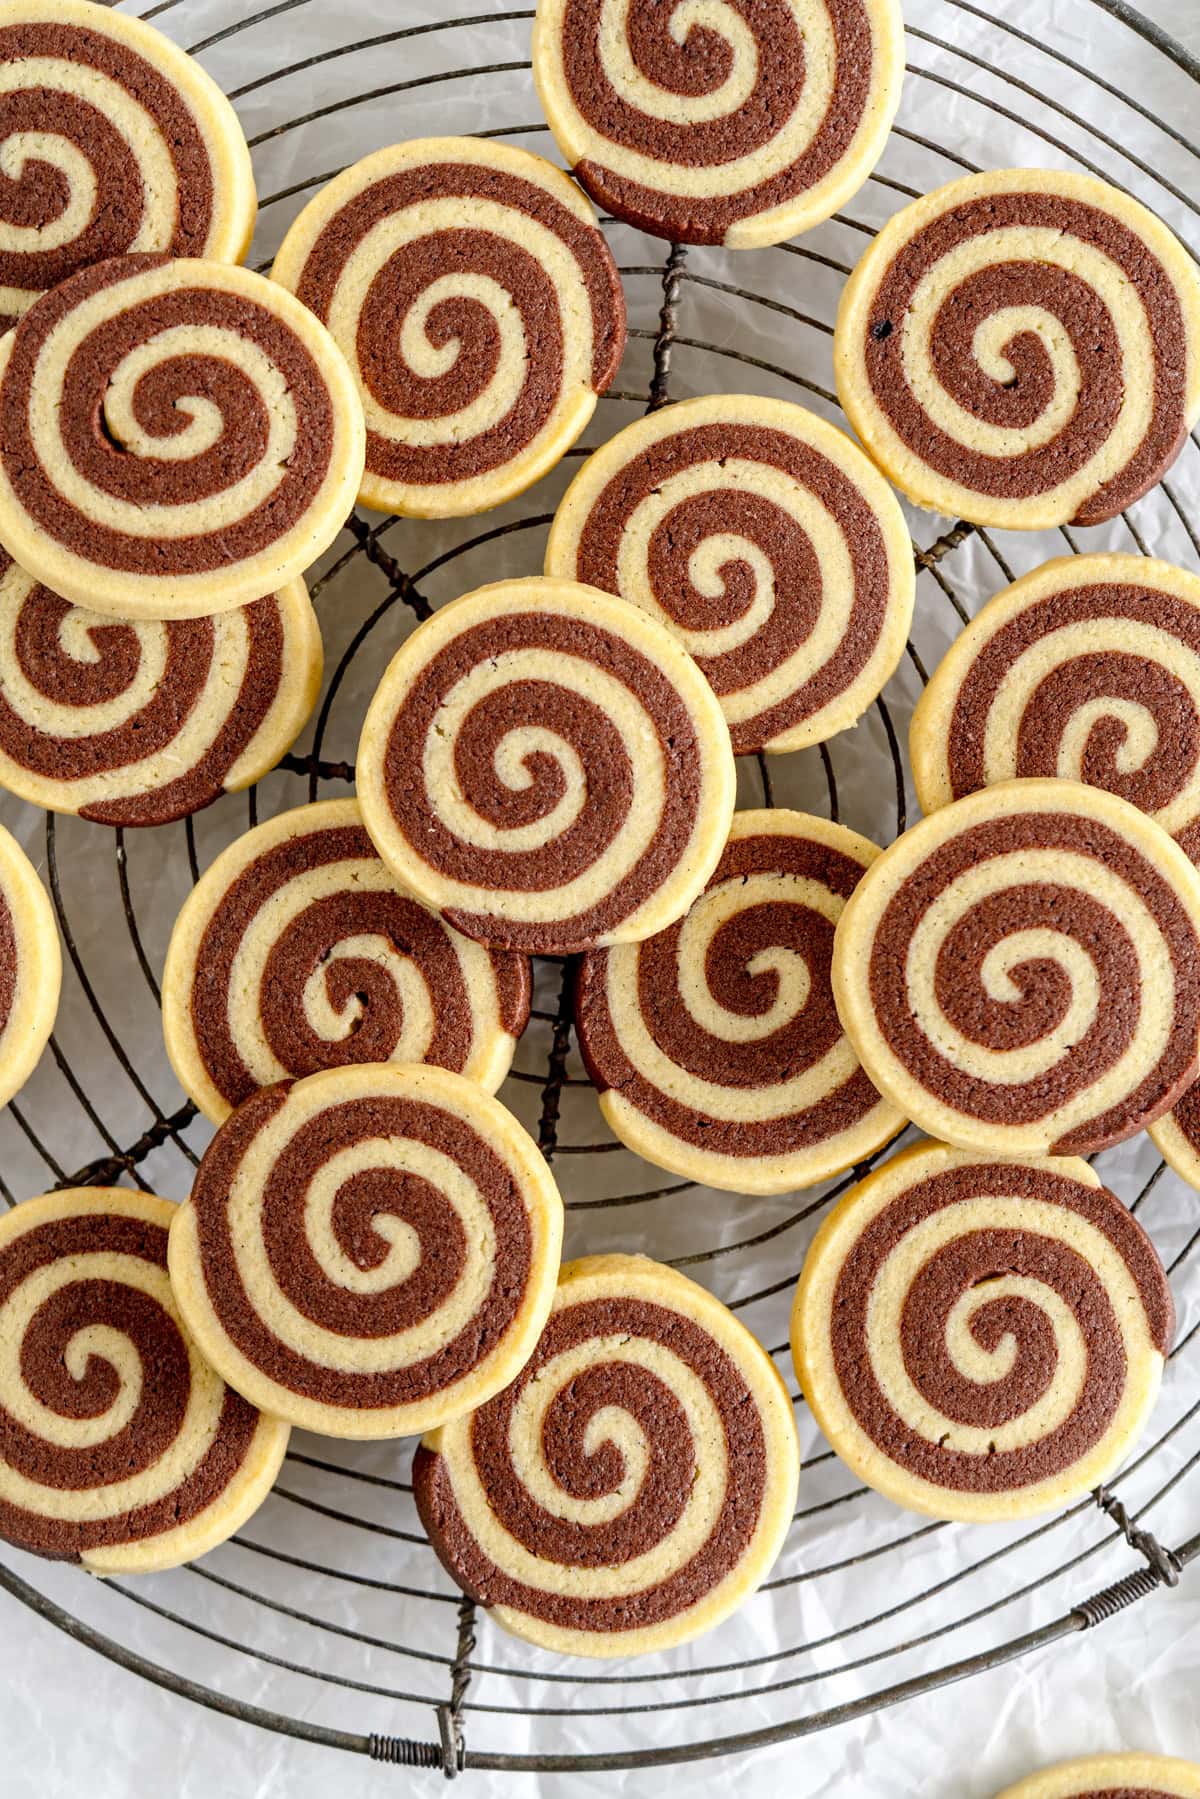
These pinwheel cookies look fancy, but I promise with that my easy guide with a template will walk you through every step of the way. Chocolate and vanilla cookie doughs are rolled together to form a swirly pinwheel, then sliced and baked into the perfect festive cookies! Check out my step-by-step photos where I explain every step! I have also included notes on how to use the same dough to make checkerboard cookies and zig zag cookies.
Hi hi! I am just popping in to share this pinwheel cookie recipe with you! I made these what felt like a million times to get them just right and to make sure that this recipe was totally foolproof and I can hold your hand every step of the way.
Other recipes I read were a little too vague for my liking, so I came up with a super easy template to use to make your life a lot easier - a piece of printer paper!
This makes the process super streamlined and much easier than having to measure and re-measure dough. We make two flavours from one dough - a vanilla and a chocolate, then stack them up and layer them for the most perfect pinwheel cookie.
These cookies are buttery, soft and chewy, and just so delicious - they taste good as well as looking amazing.
This recipe also includes notes on how to make checkerboard cookies and super cute zig zag cookies!

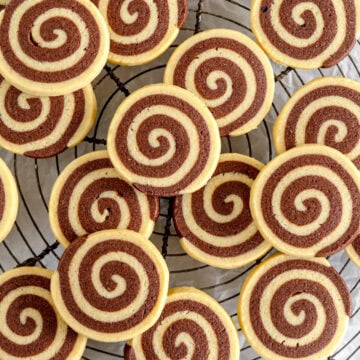
What are Pinwheel Cookies?
Pinwheel cookies are essentially a sugar cookie, made up of two different flavoured dough. I have kept mine classic and riffed off of my classic sugar cookie dough, adding in some cocoa to half for a chocolate swirl.
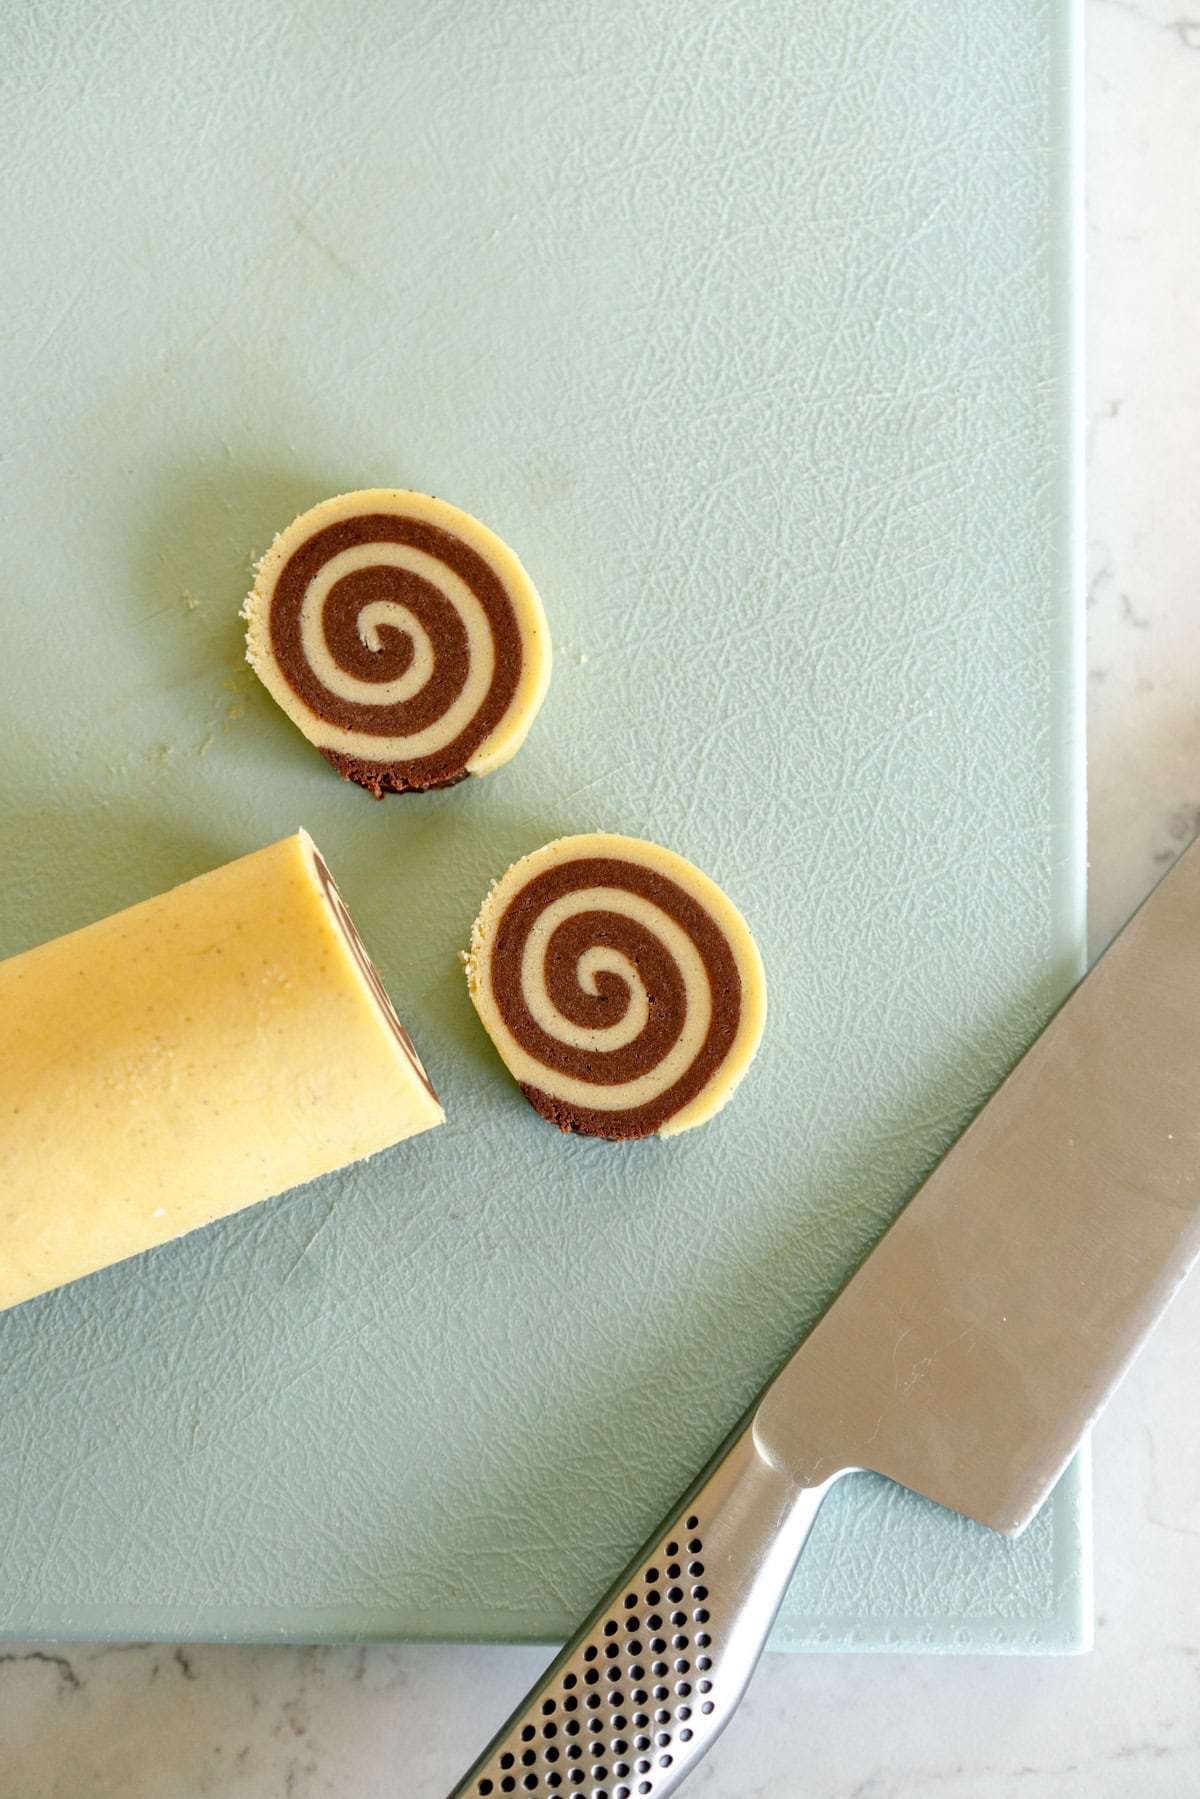
You make the doughs, roll them out, then stack them up and roll them up into a log. When you slice into them you reveal the spiral inside.
These look a little intimidating but I have tried to break down the steps as much as possible in order to set you up for success!
This recipe makes about 24 cookies but it would be very easy to double and make extra cookies while you are doing the process - the sliced unbaked cookies can be stored in the freezer for months before needing to be baked, giving you fancy cookies. on hand at all times!
I have left mine plain on the outside, but feel free to roll them in sprinkles or crunchy sugar, or dip in chocolate when they are baked.

How to make two cookie doughs from one batch
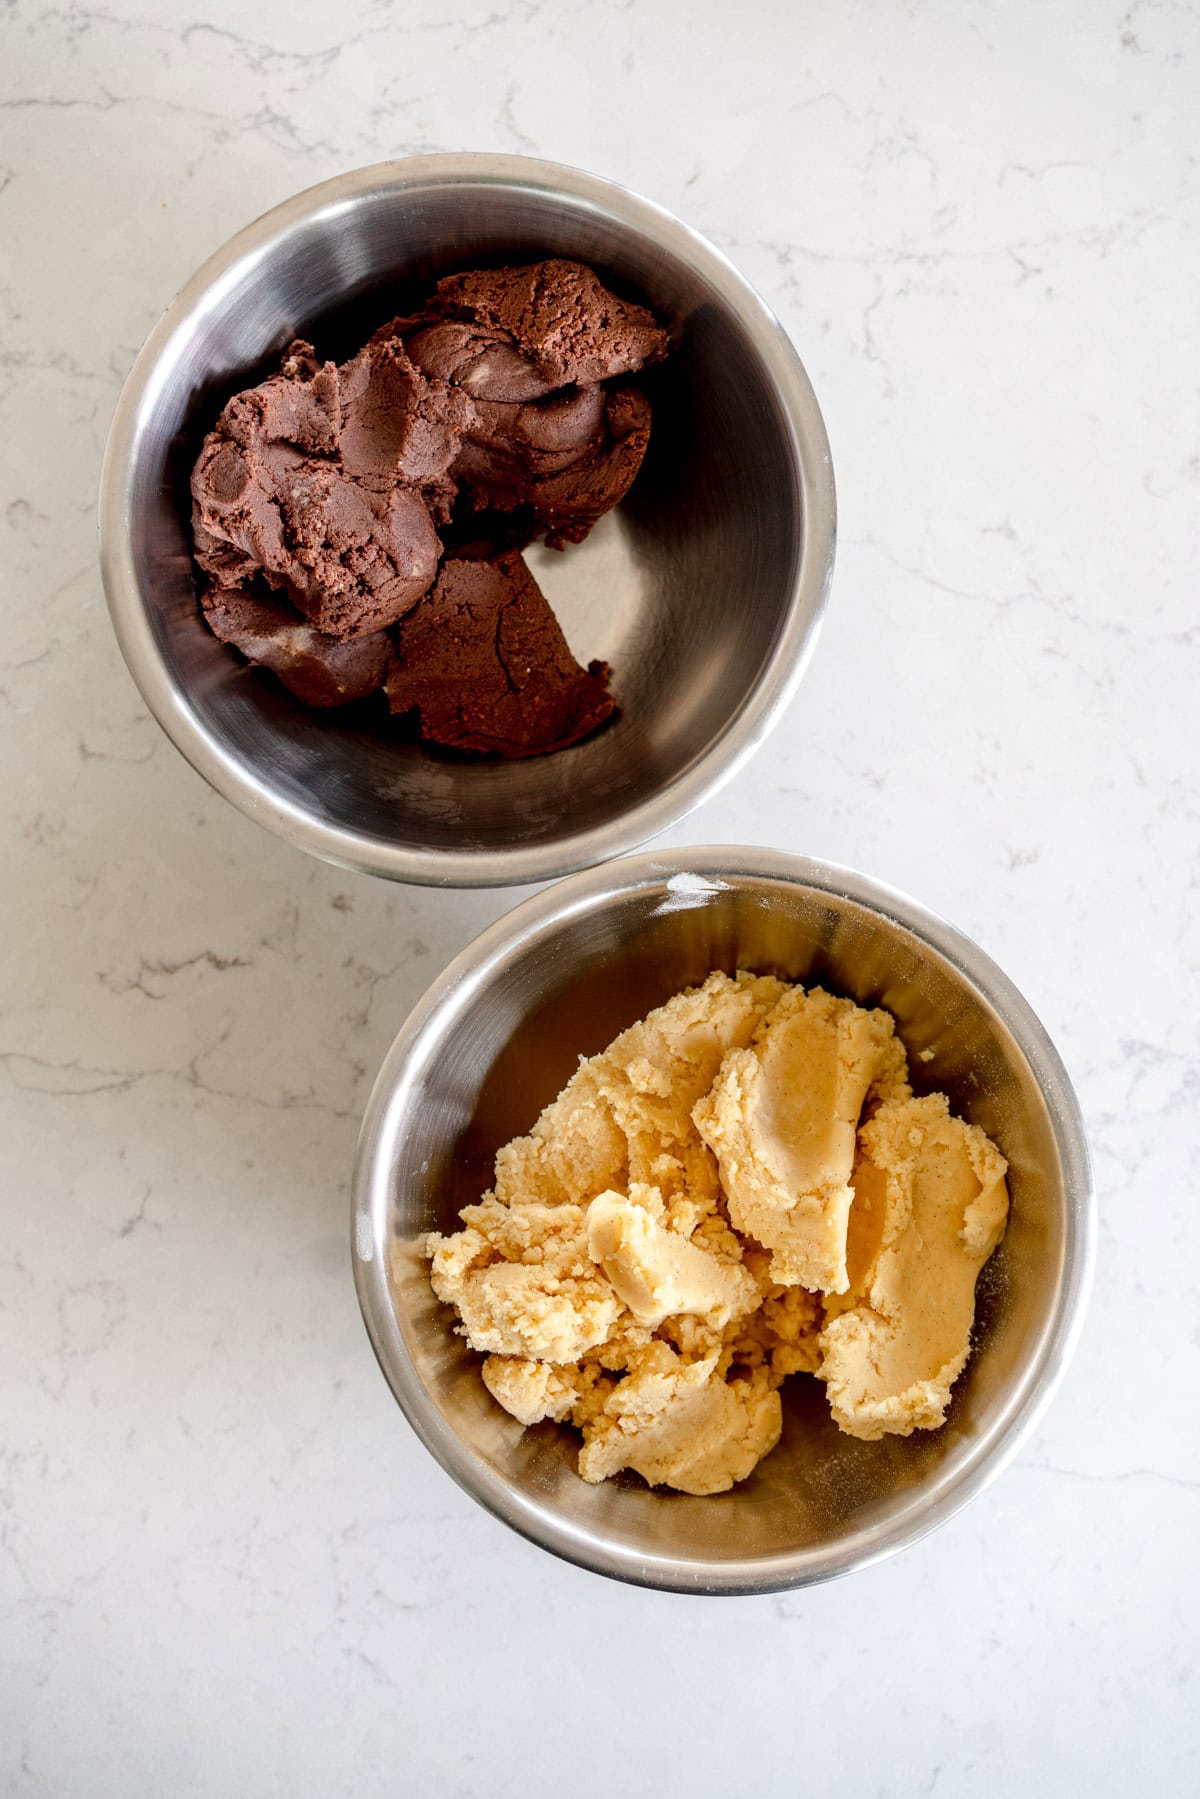
This is a super easy method - you mix up the vanilla sugar cookie dough, then remove half and set aside. Cocoa powder is then added to the remainder of the dough and mixed to give a chocolate dough.
This is where a scale is especially important - you can just weigh out half of the dough directly into a bowl and then add the cocoa powder to the remainder of the dough.
I do this step in my stand mixer, but you can also do it in a bowl with an electric hand mixer.
Step by step guide to pinwheel cookies
I promise this isn't as hard as it looks. Rolling out cookie dough can be super easy with a few little sneaky tricks - I'm gonna share all of them with you.
How to roll out dough evenly
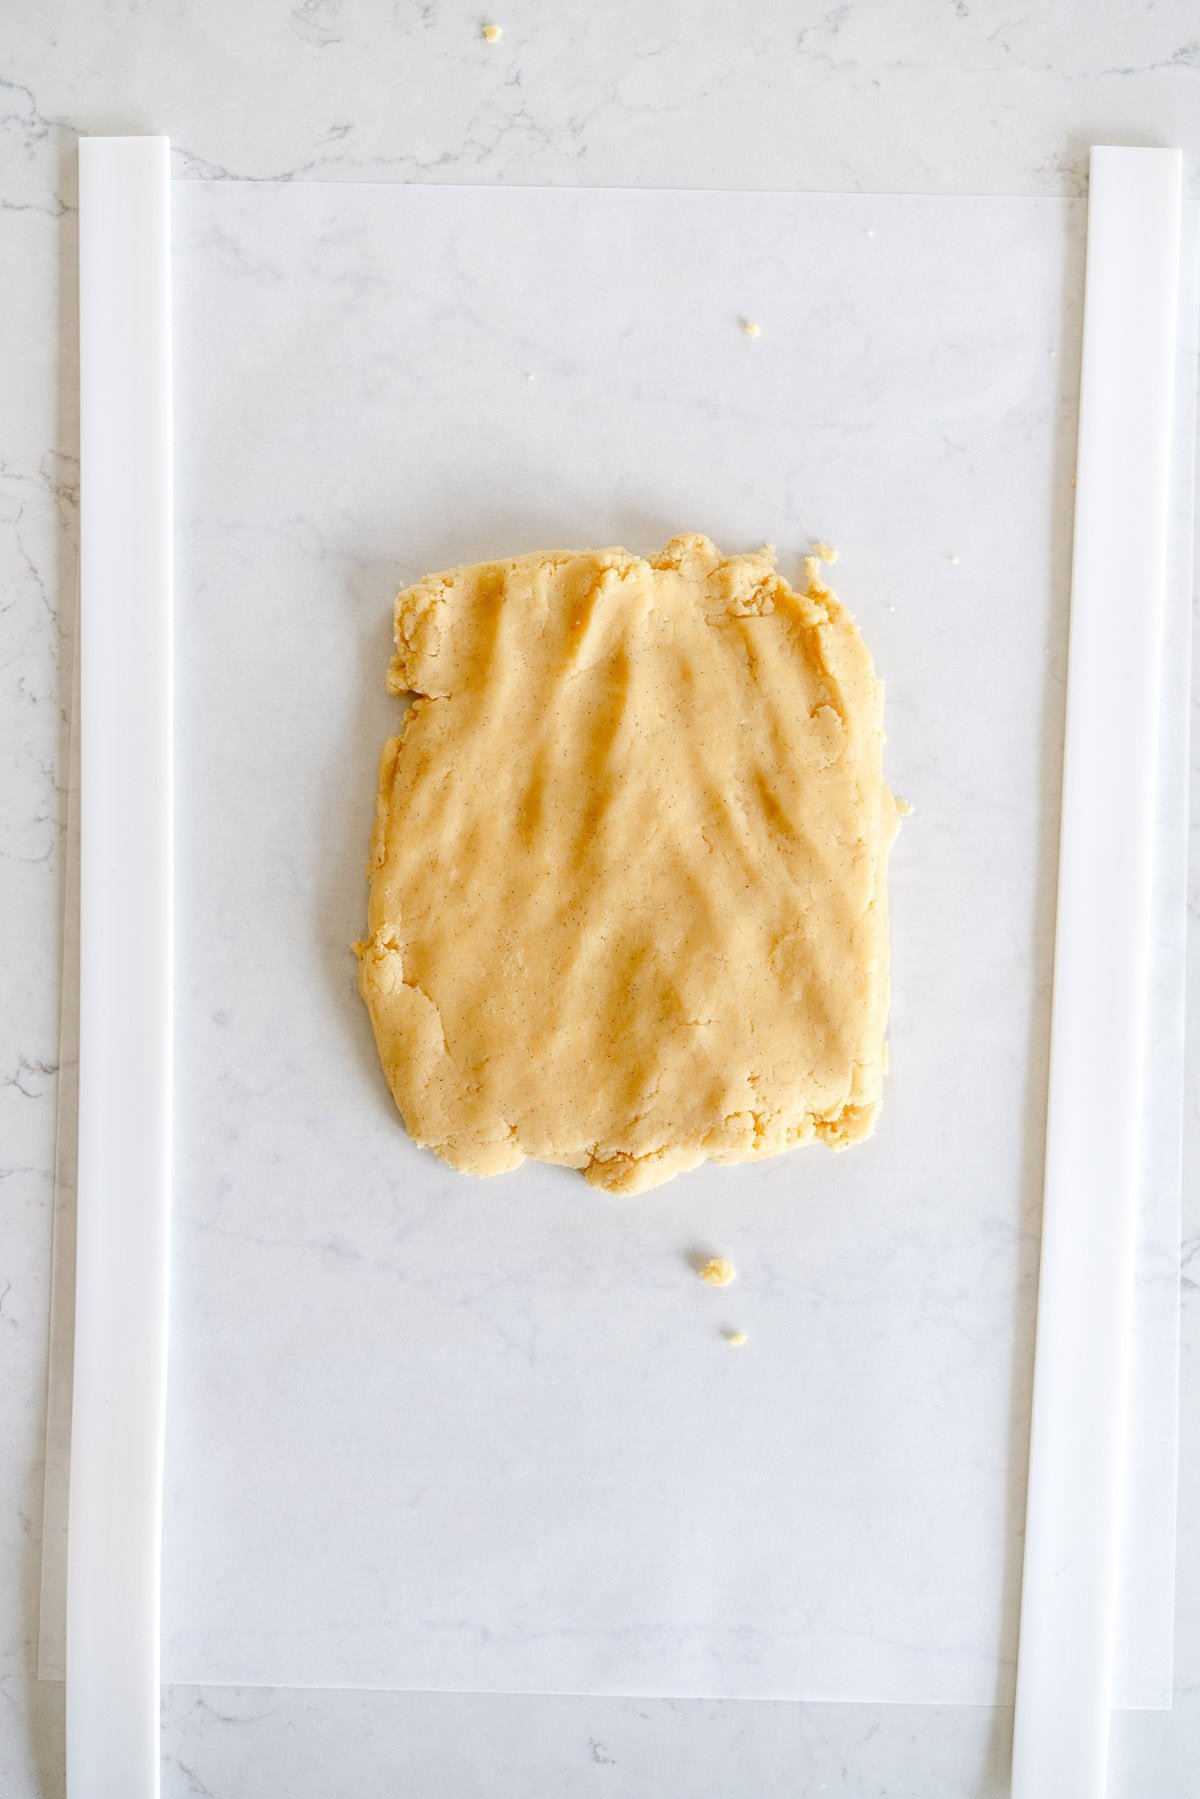
The best way to roll out dough nice and evenly is to do it between two pieces of parchment paper before it is chilled. This means that it is super easy to roll out, and you don't have the issue of trying to roll out chilled dough which will crack on you at any given opportunity.
I like to use rolling pin guides to roll out my dough - alternatively you can use knitting needles or dowel of the right diameter. I use 4mm / 0.16" guides for this recipe. If you don't have guides that is fine as we are using a template to know exactly how big to roll the dough.
How to get it the right size - use a template!
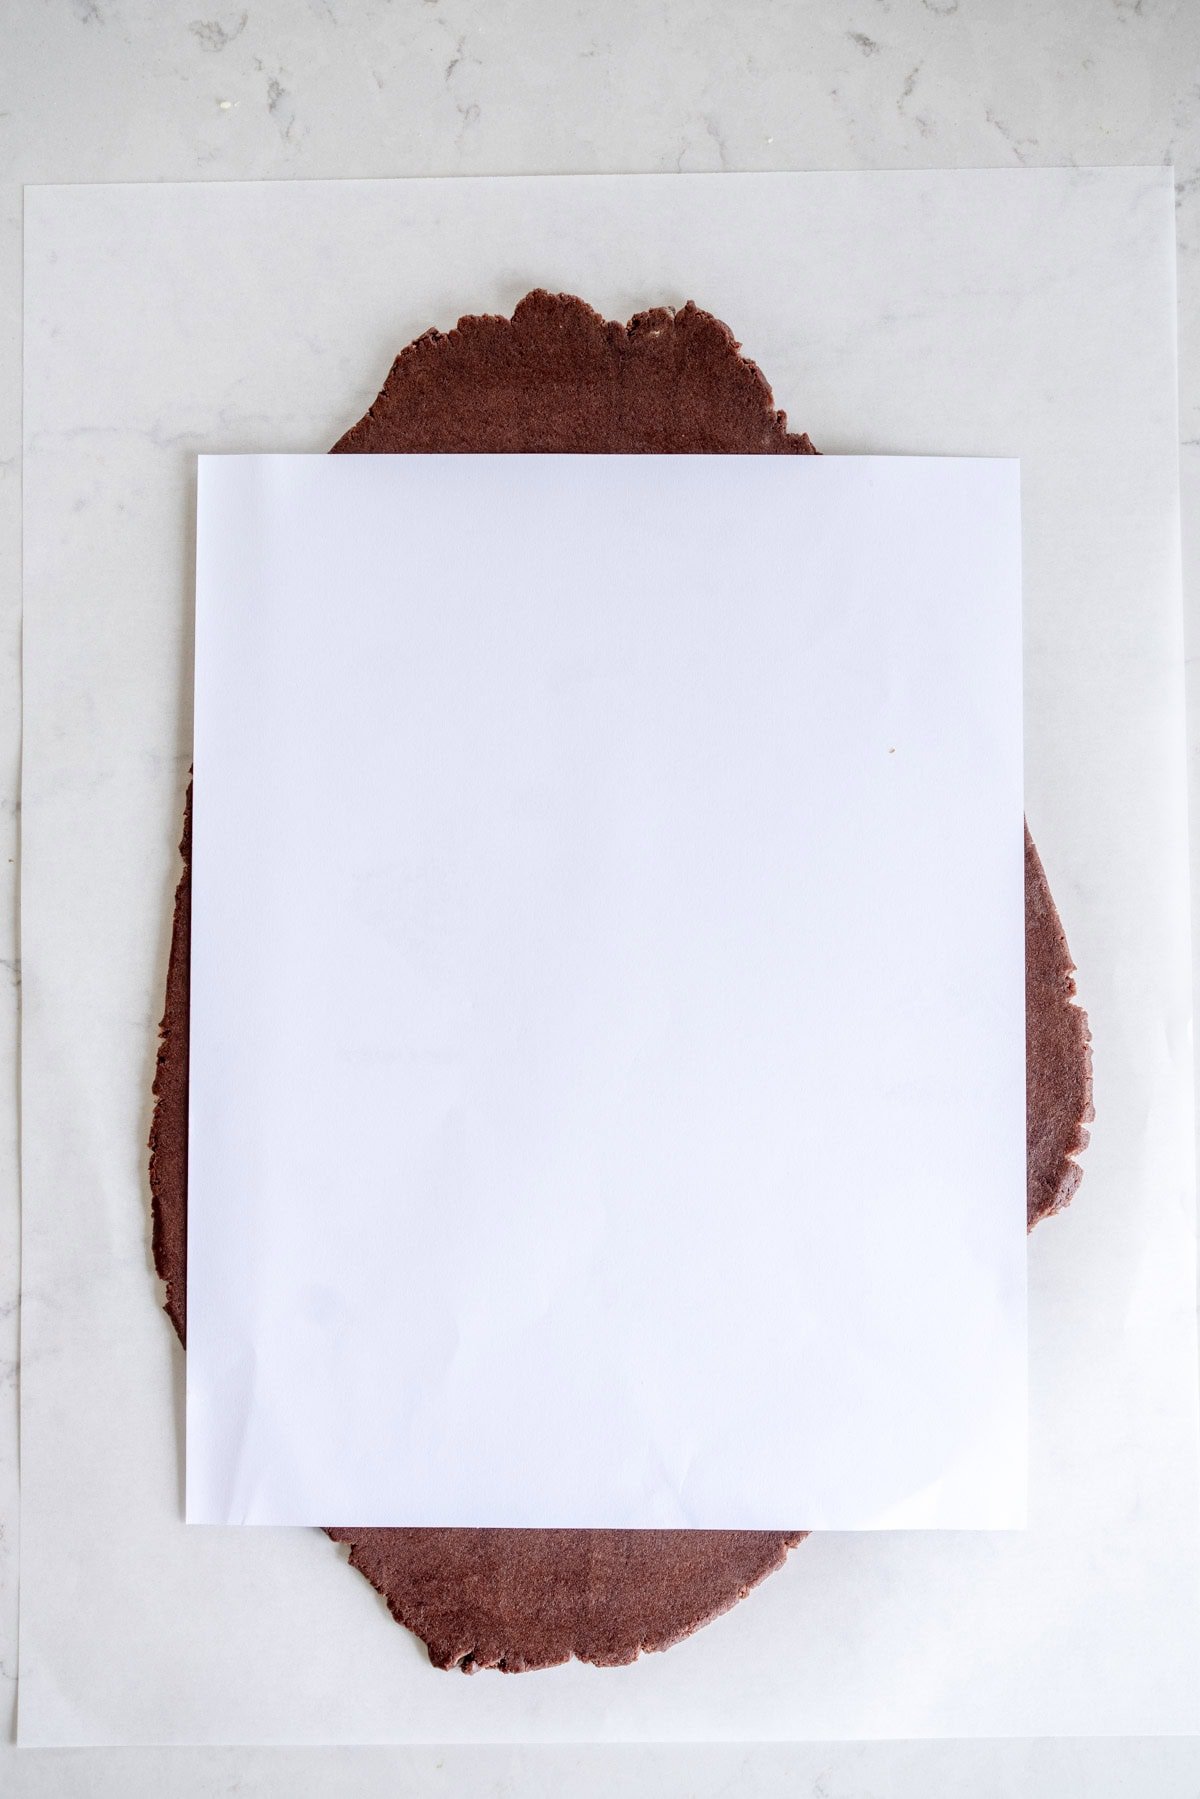
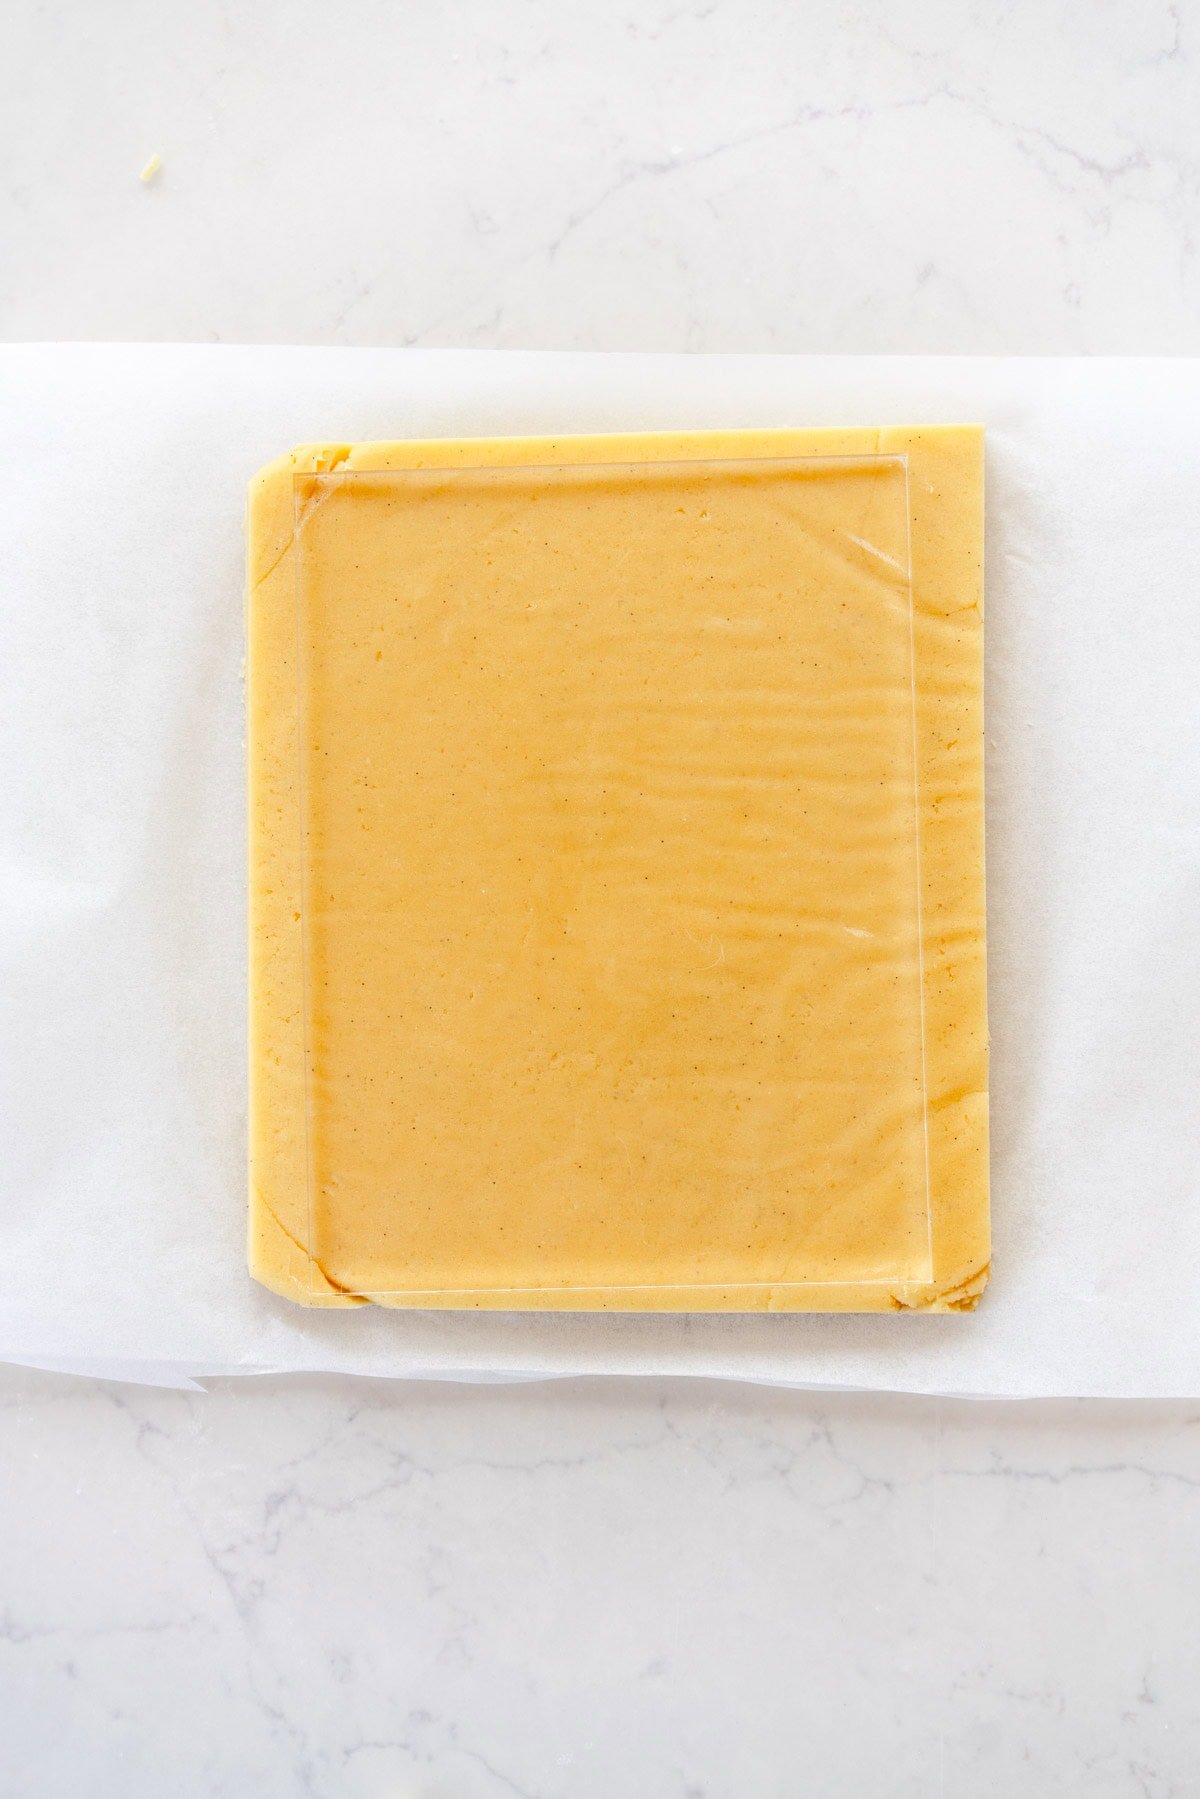
I made these a ton of times during testing, trying all kinds of different options for the dimensions of the dough to give the easiest way to roll out the dough. I was going to make a template then realised that I could just use a simple thing most of us have in our house - a piece of A4 / Printer paper!
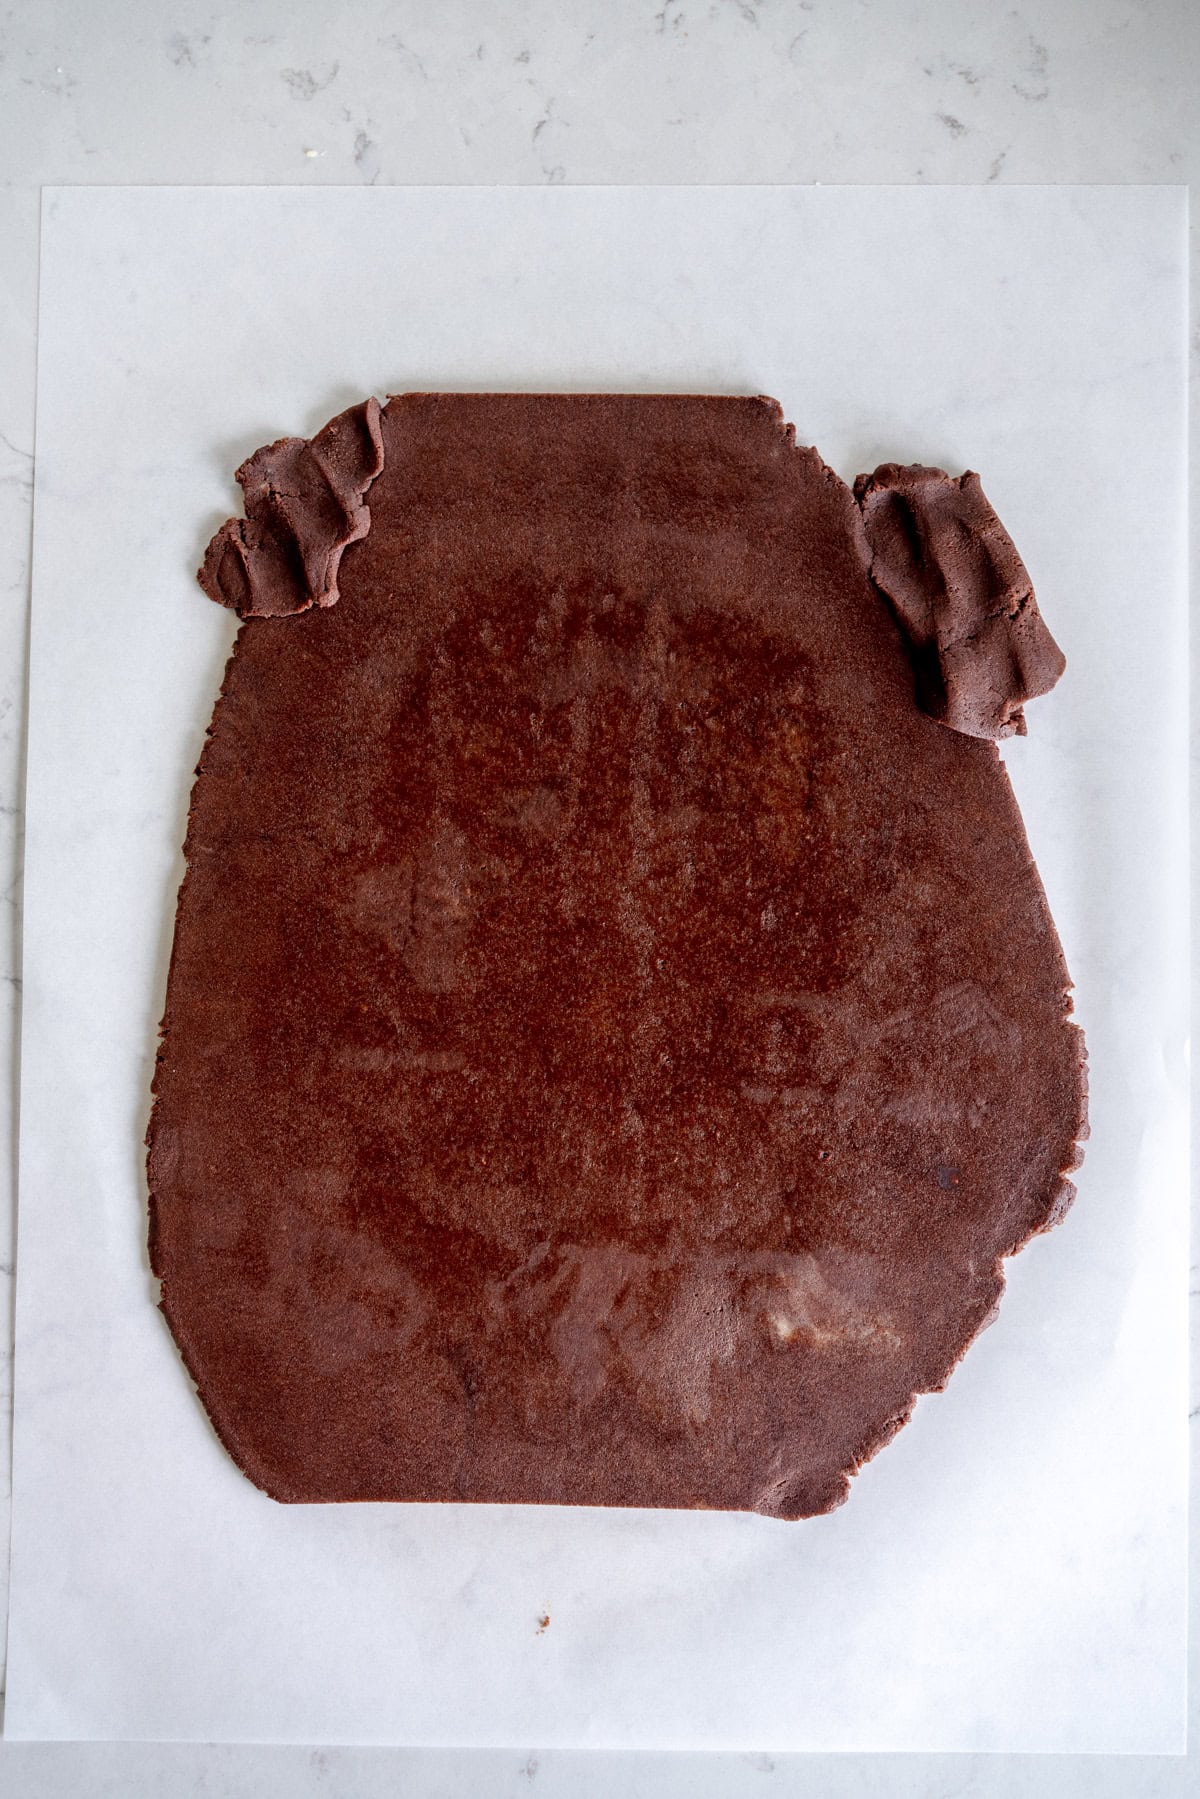
Use the paper as a guide to know how big to roll out your dough - you want just a little extending around the edge as once it has been frozen you will use the paper to cut the dough to size.
I like to do an initial roll-out, then use the paper as a guide, removing pieces where the dough is wonky and placing them where needed to get it to the right size. You can just place the piece where it needs to go and cover with the parchment and re-roll, and it will patch itself on.

Freeze your dough for 20 minutes then trim to the correct size
Once you have rolled the dough out, transfer it between the parchment paper to the freezer. When I was testing this recipe I found that trying to flop a piece of dough onto another piece and make sure that they aligned properly was hard and stressful. We don't do hard and stressful here, so freezing the dough makes it solid and super easy to work with and get nice clean cuts.
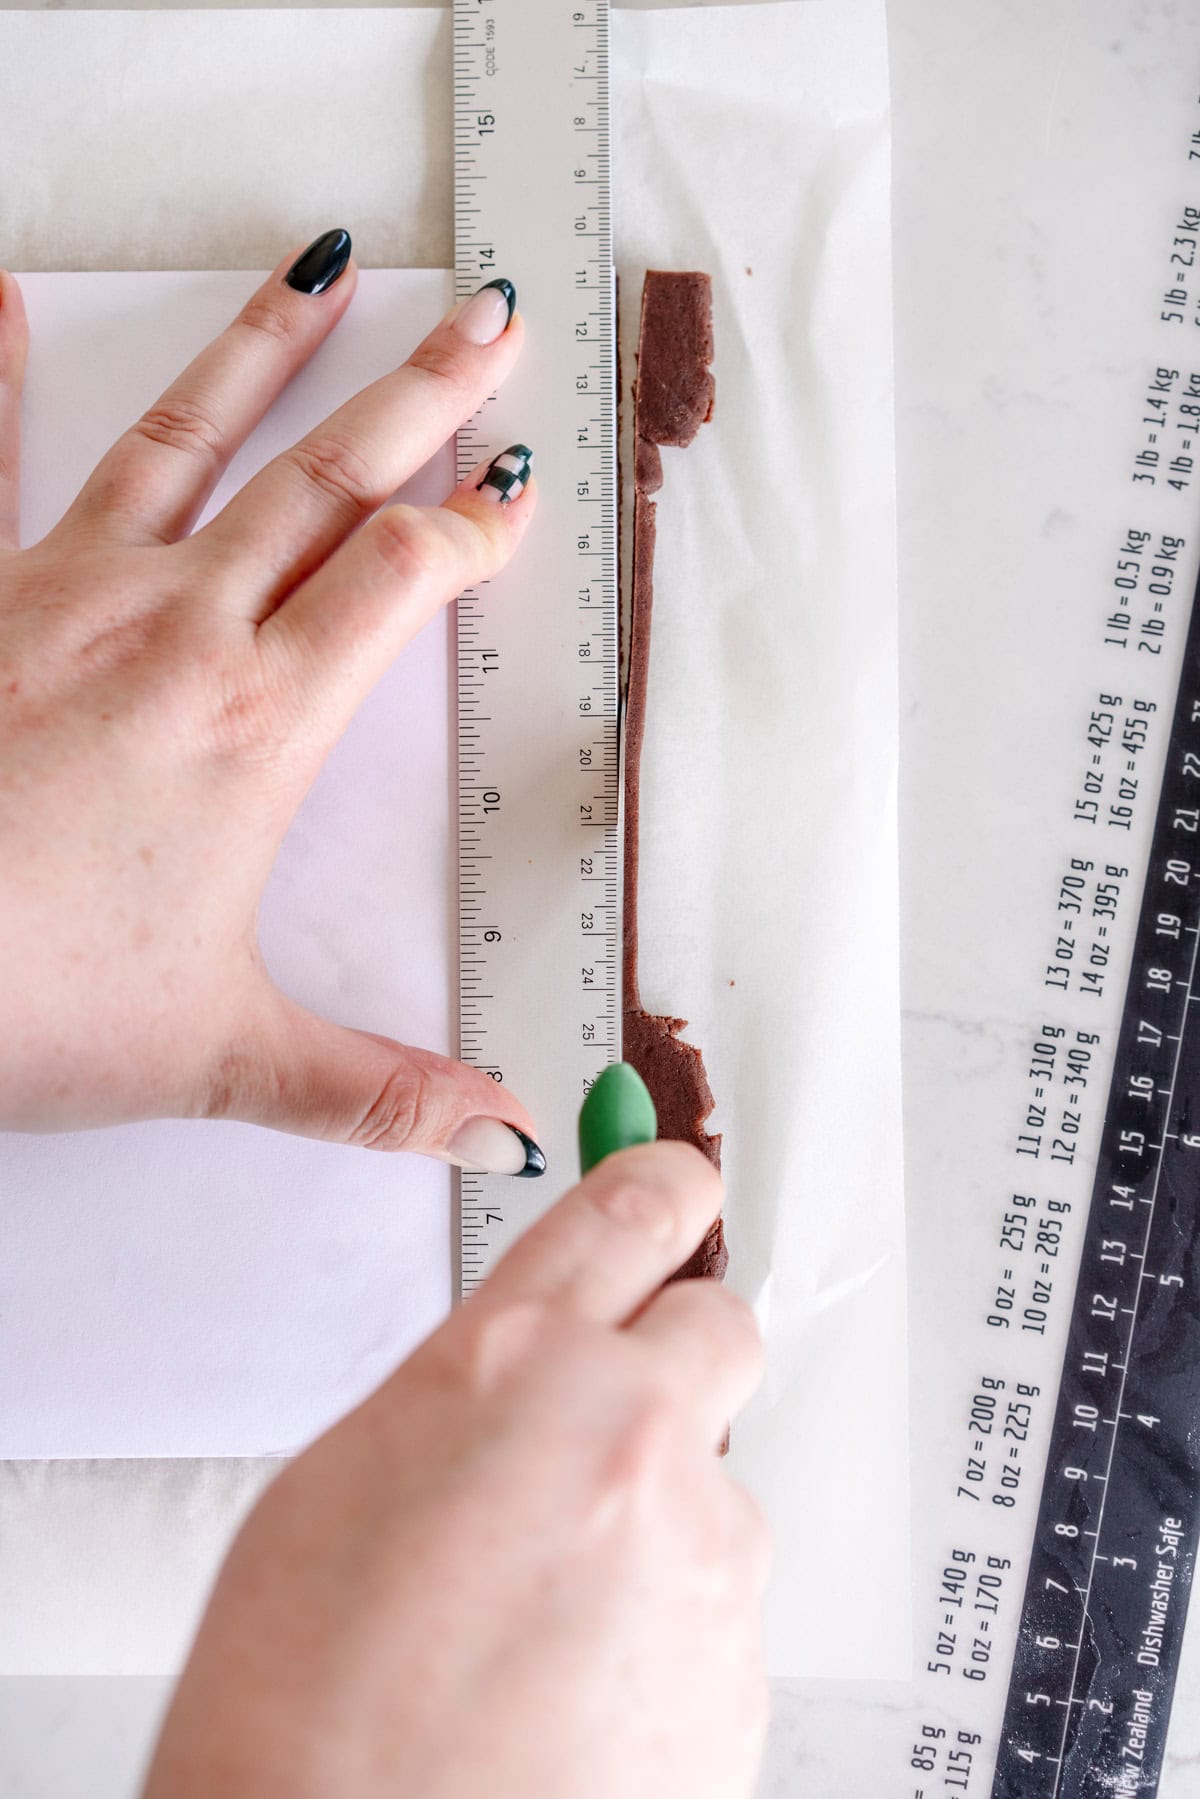
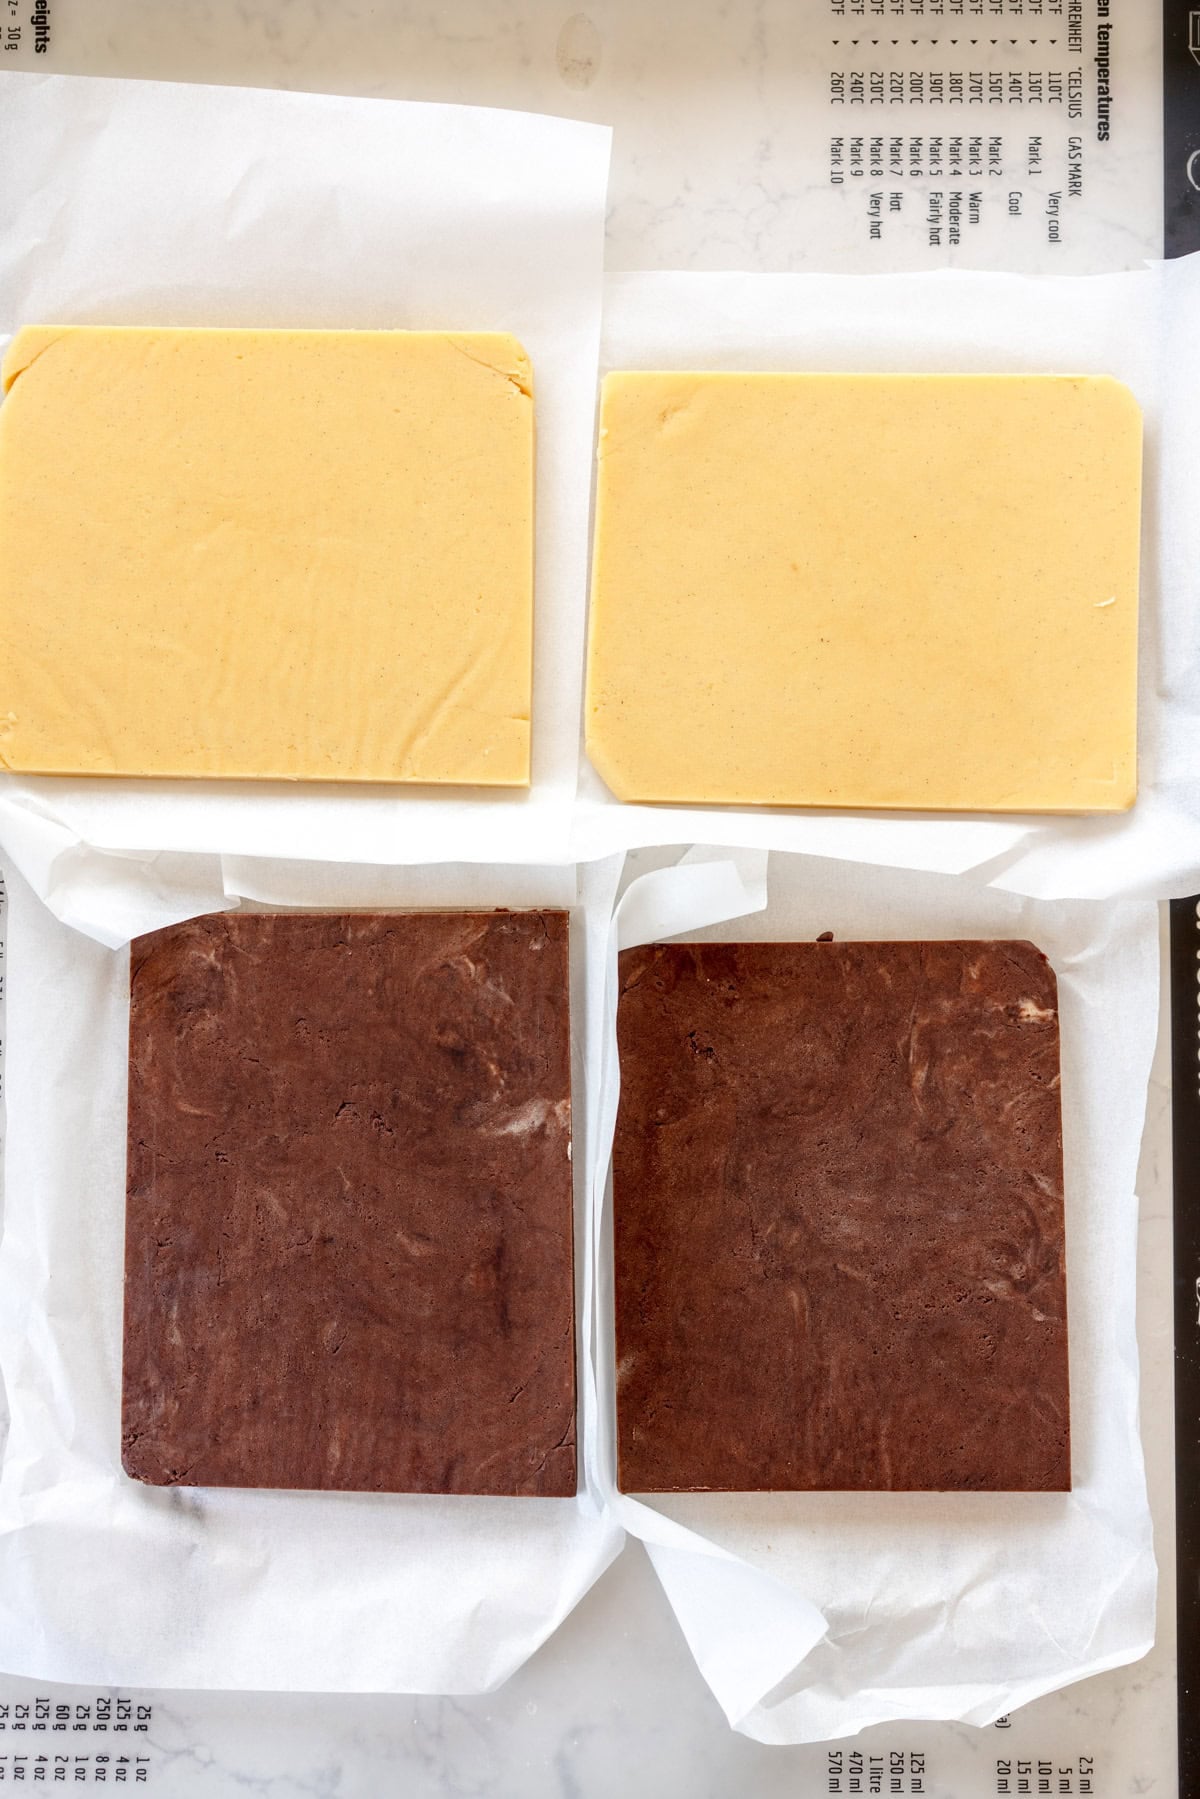
Remove the top piece of parchment, then use a ruler and your piece of printer paper as a guide and cut the dough into a nice neat rectangle the same size as the piece of paper. Repeat this with both pieces of dough - if at any point they are getting too warm, just pop them back into the freezer.
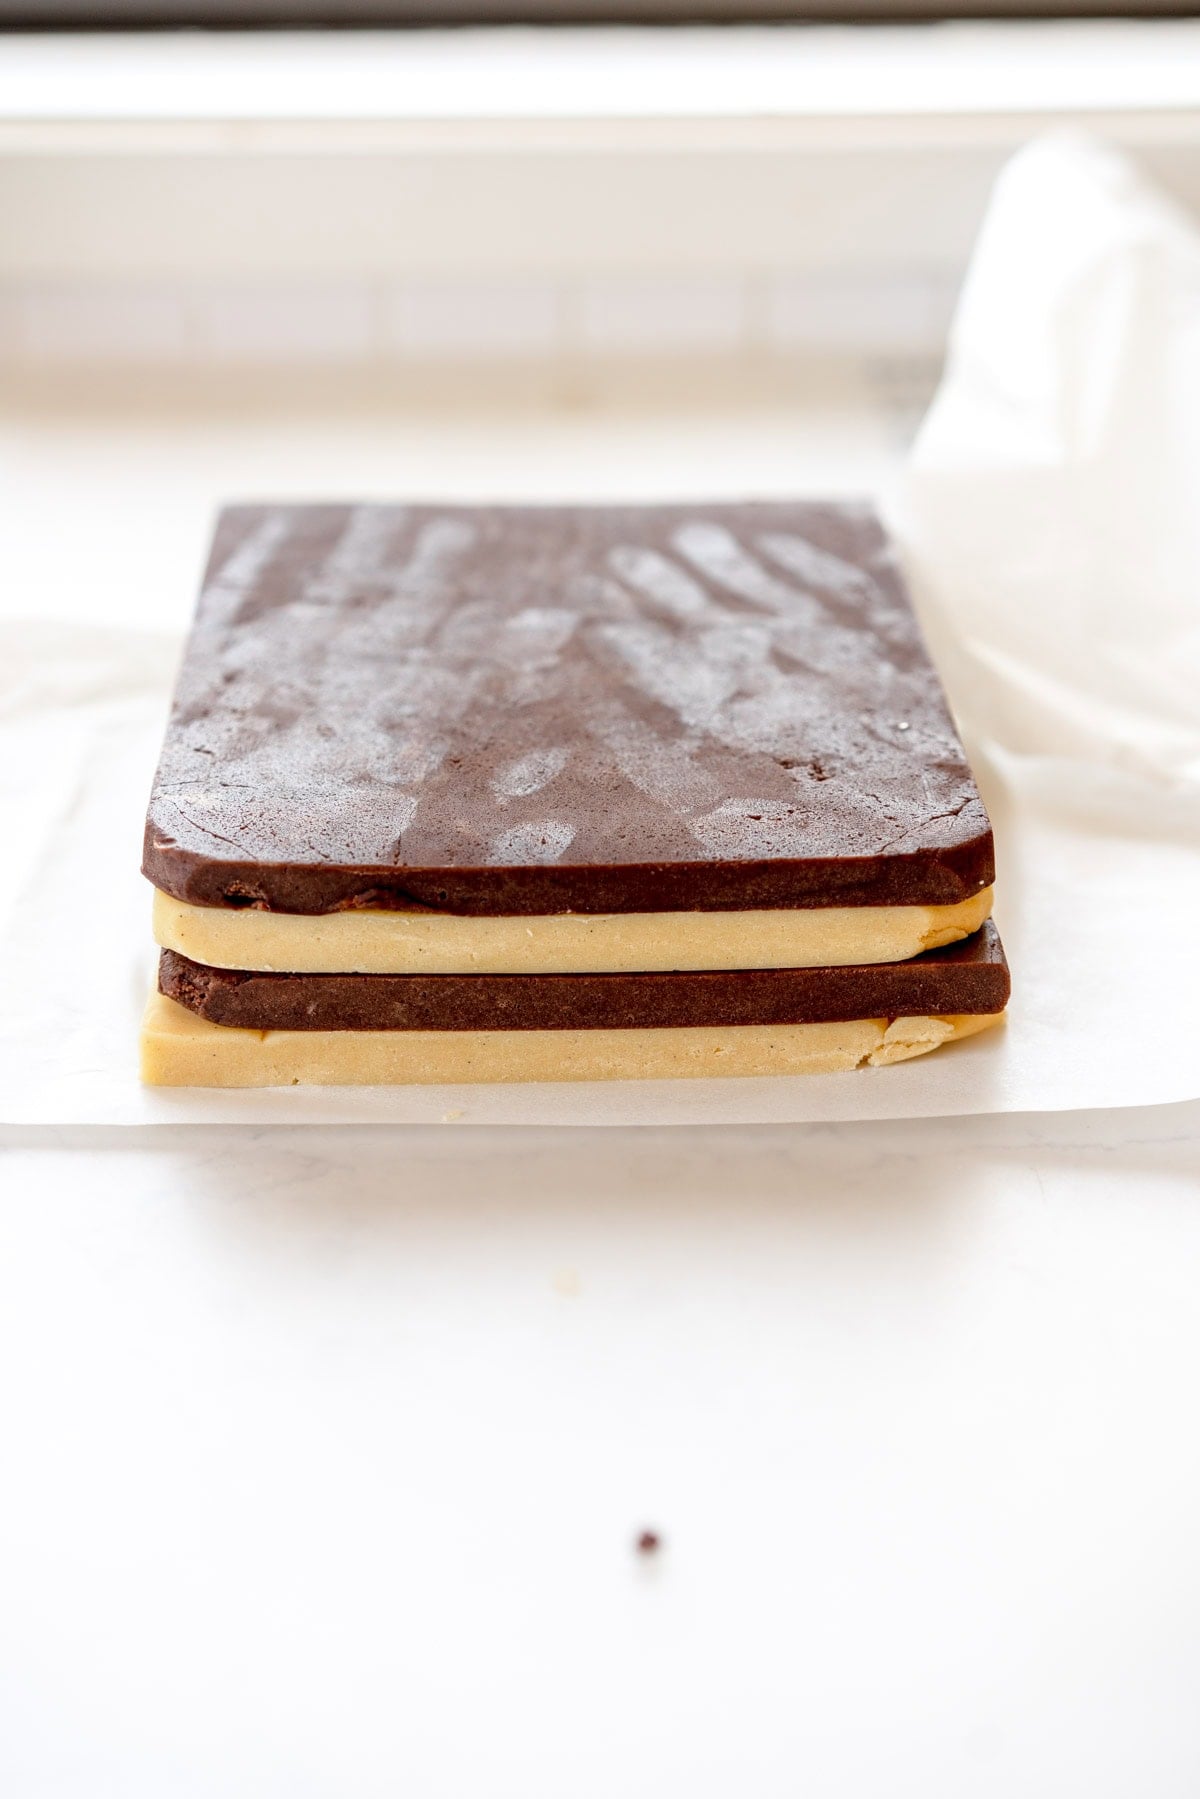
Stack up doughs
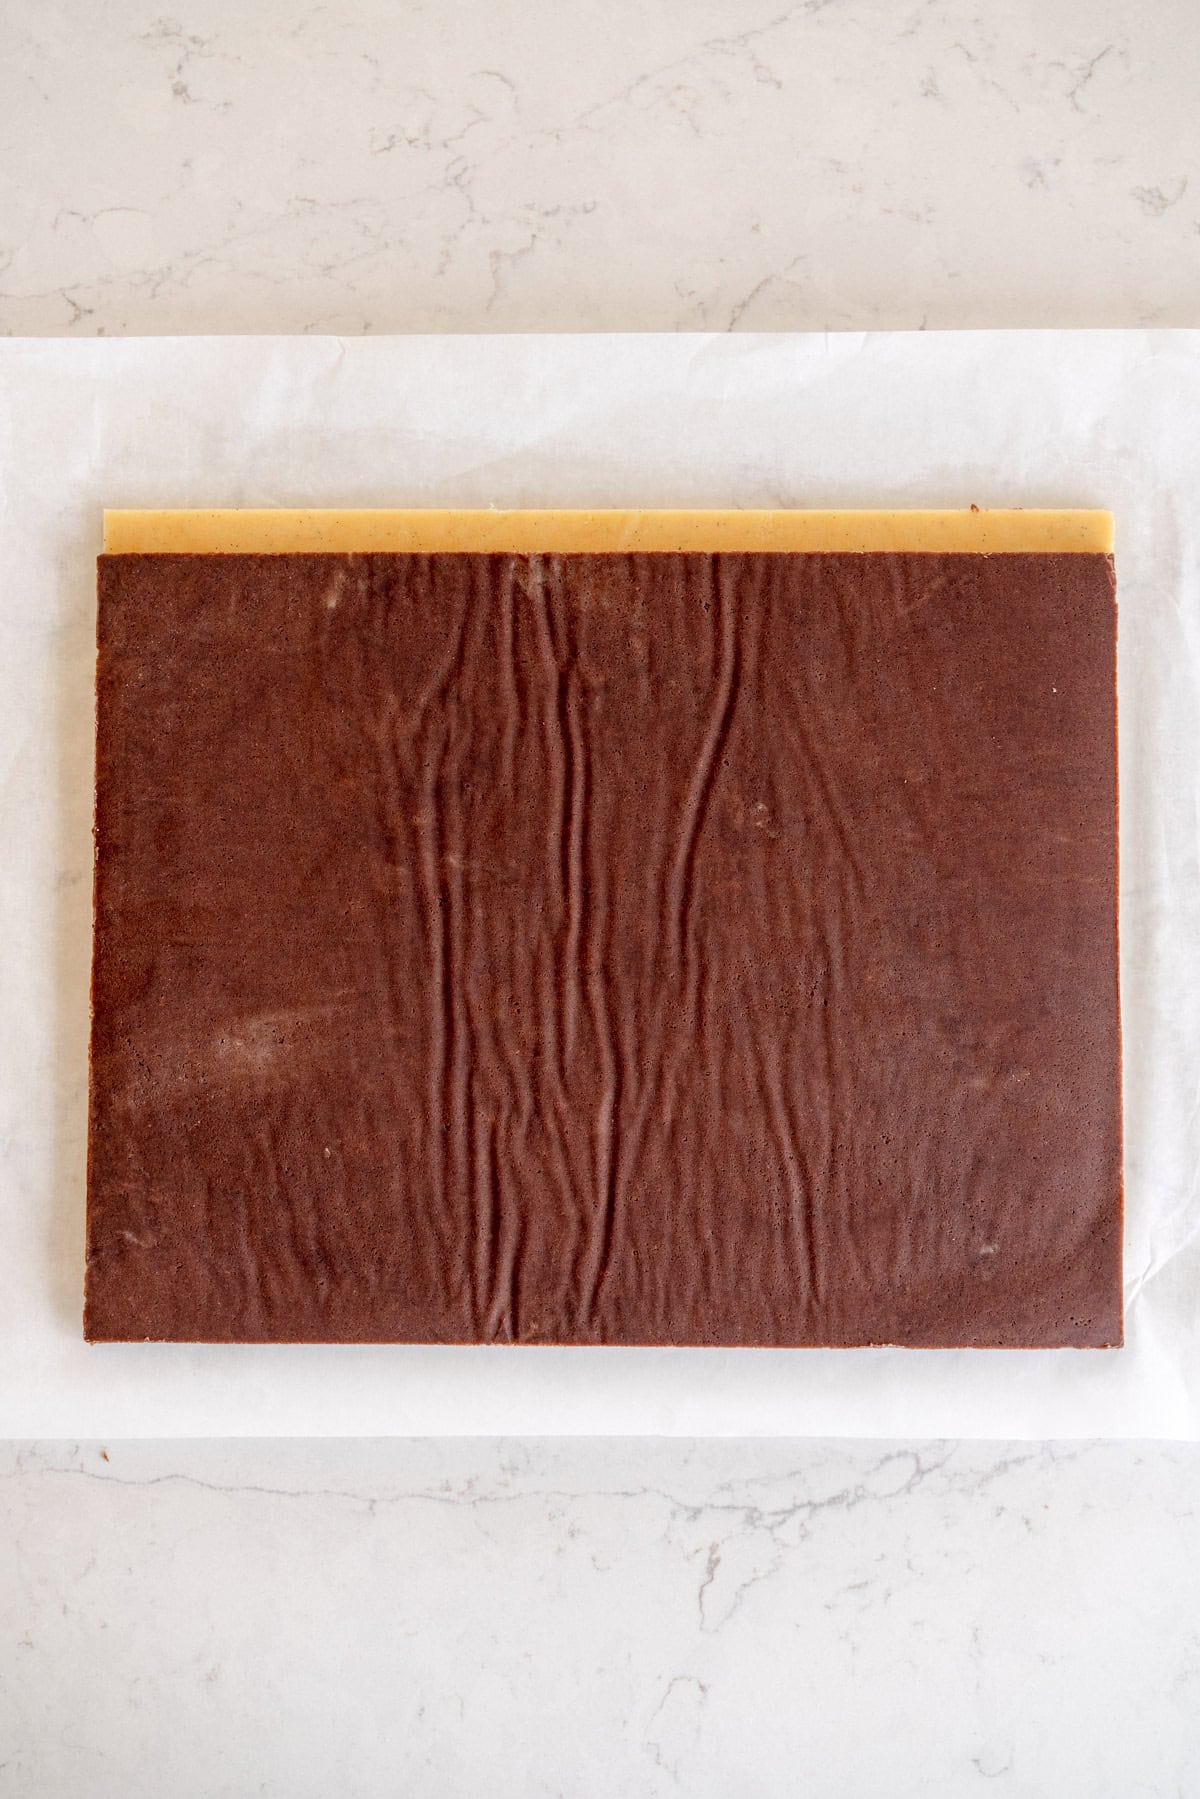
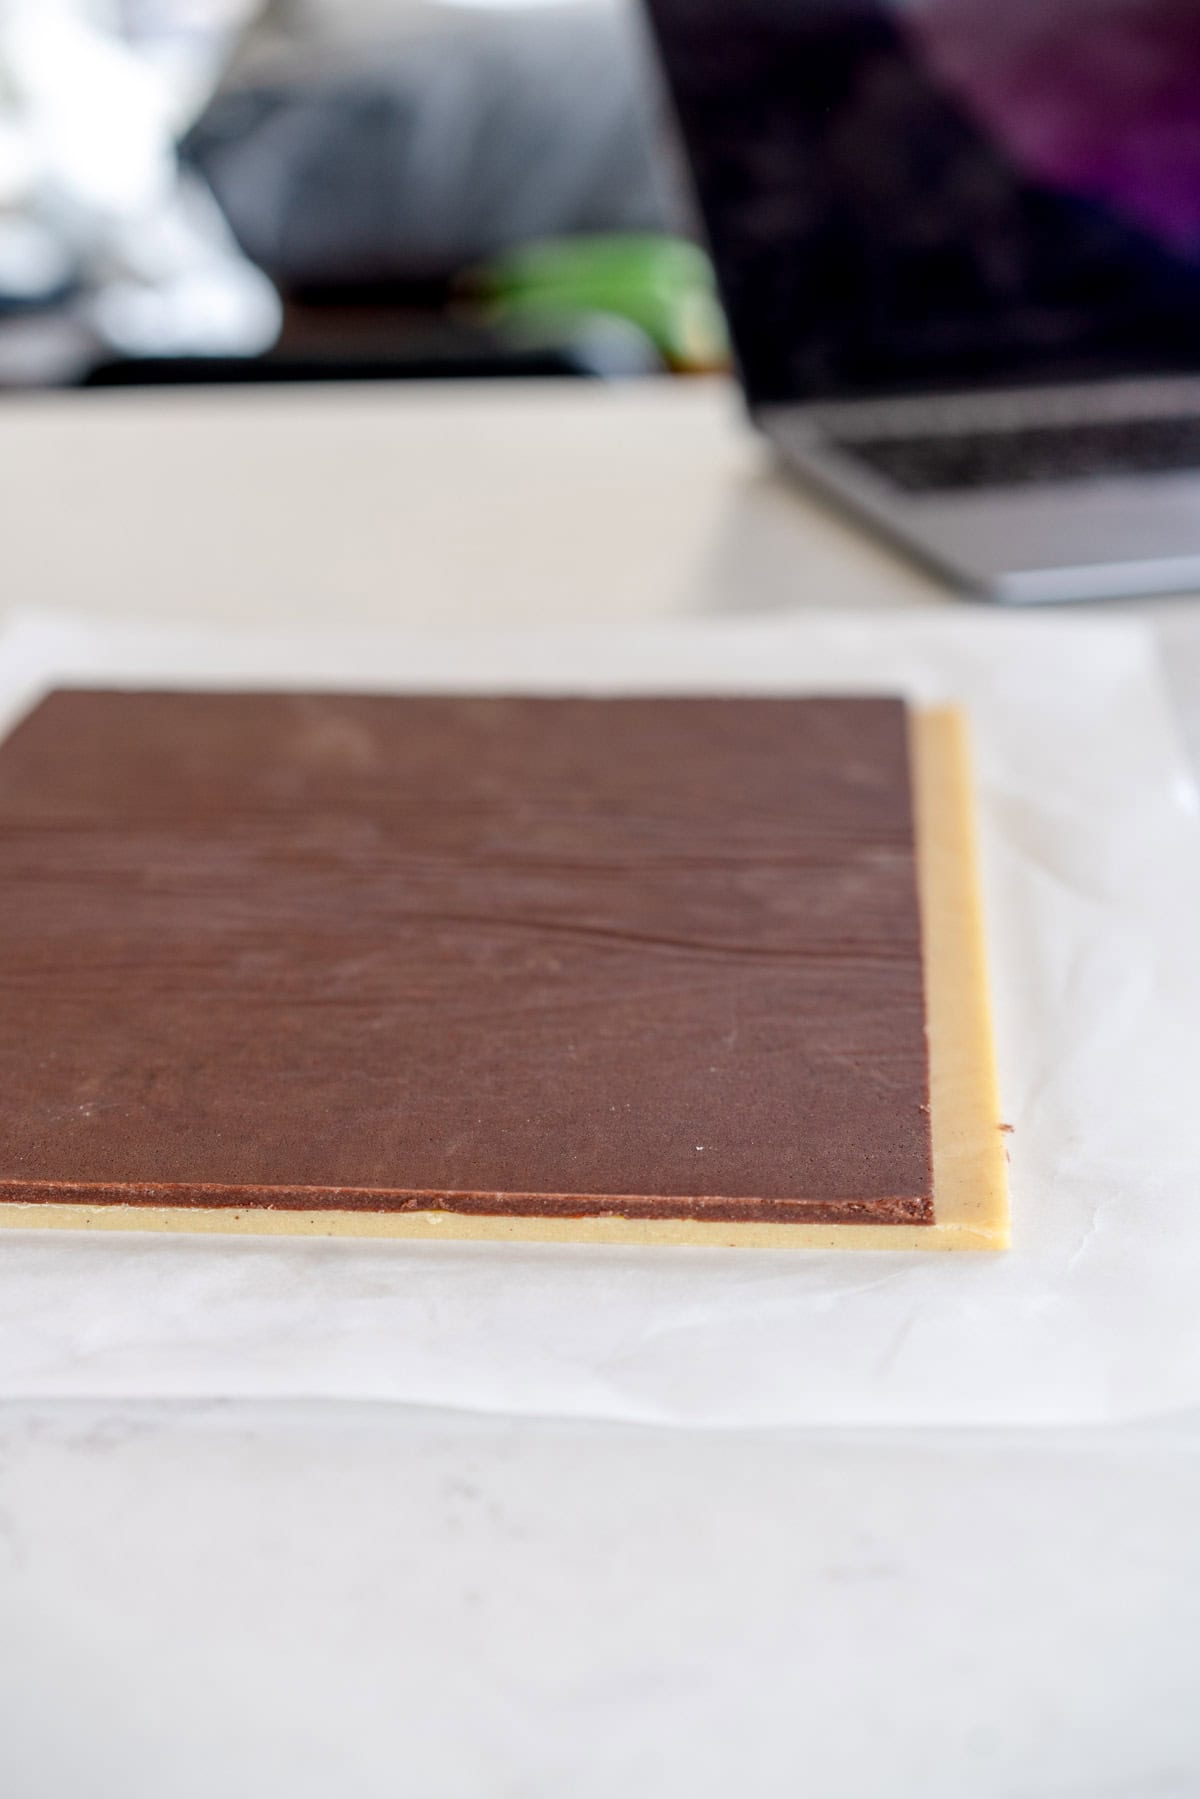
This is where having frozen dough really helps - remove the parchment from both sides of the chocolate dough, and place it on top of the vanilla dough, leaving about a 1cm gap along the long side - this is to help start the spiral to get a nice neat pinwheel.
Leave the dough to stand here for 5-10 minutes until it is nice and pliable. Do not try and roll it if the dough is too cold as you end up with a huge hole in the middle of your roll of dough and it is so sad.
Roll up your log of dough
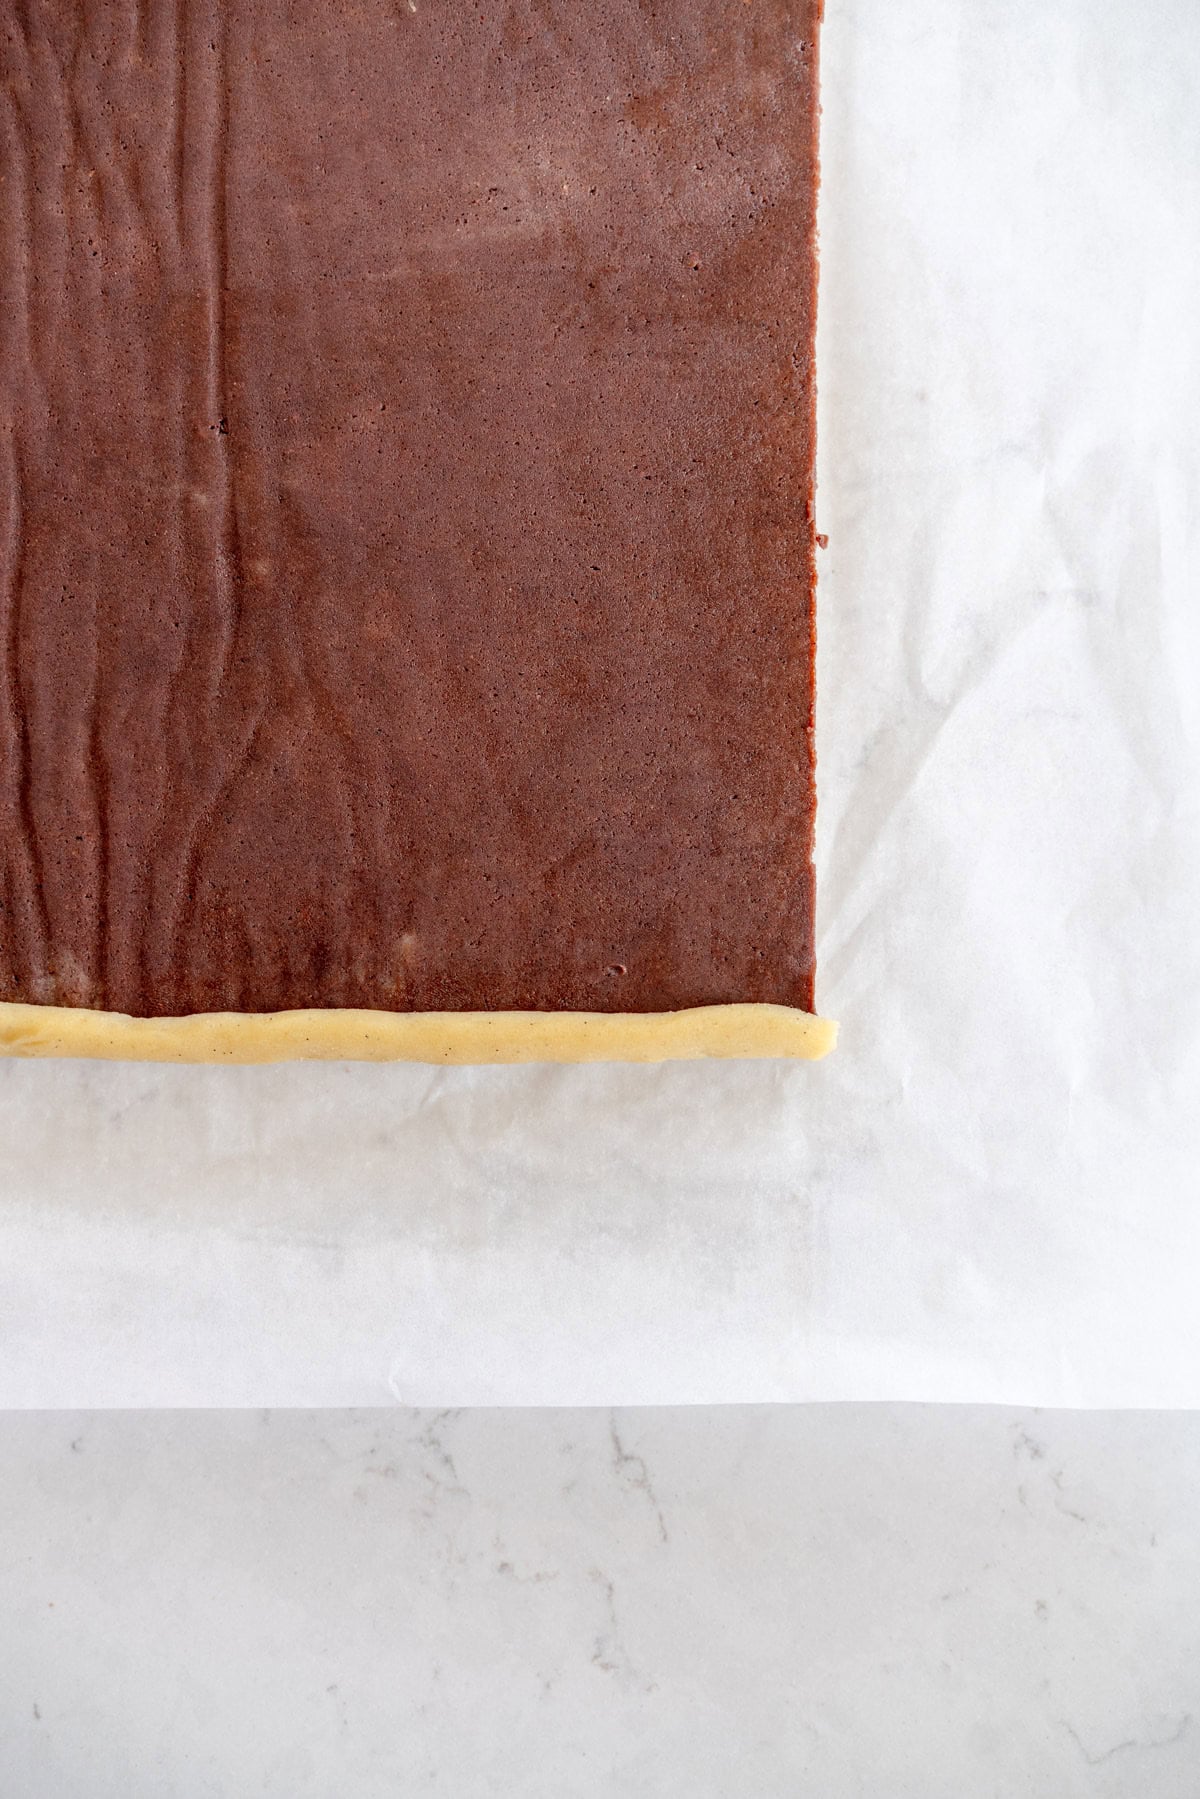
Starting with the vanilla overhanging dough, carefully fold it over the edge of the chocolate dough, as shown in the image below. You can use the parchment paper to help get things started if needed.
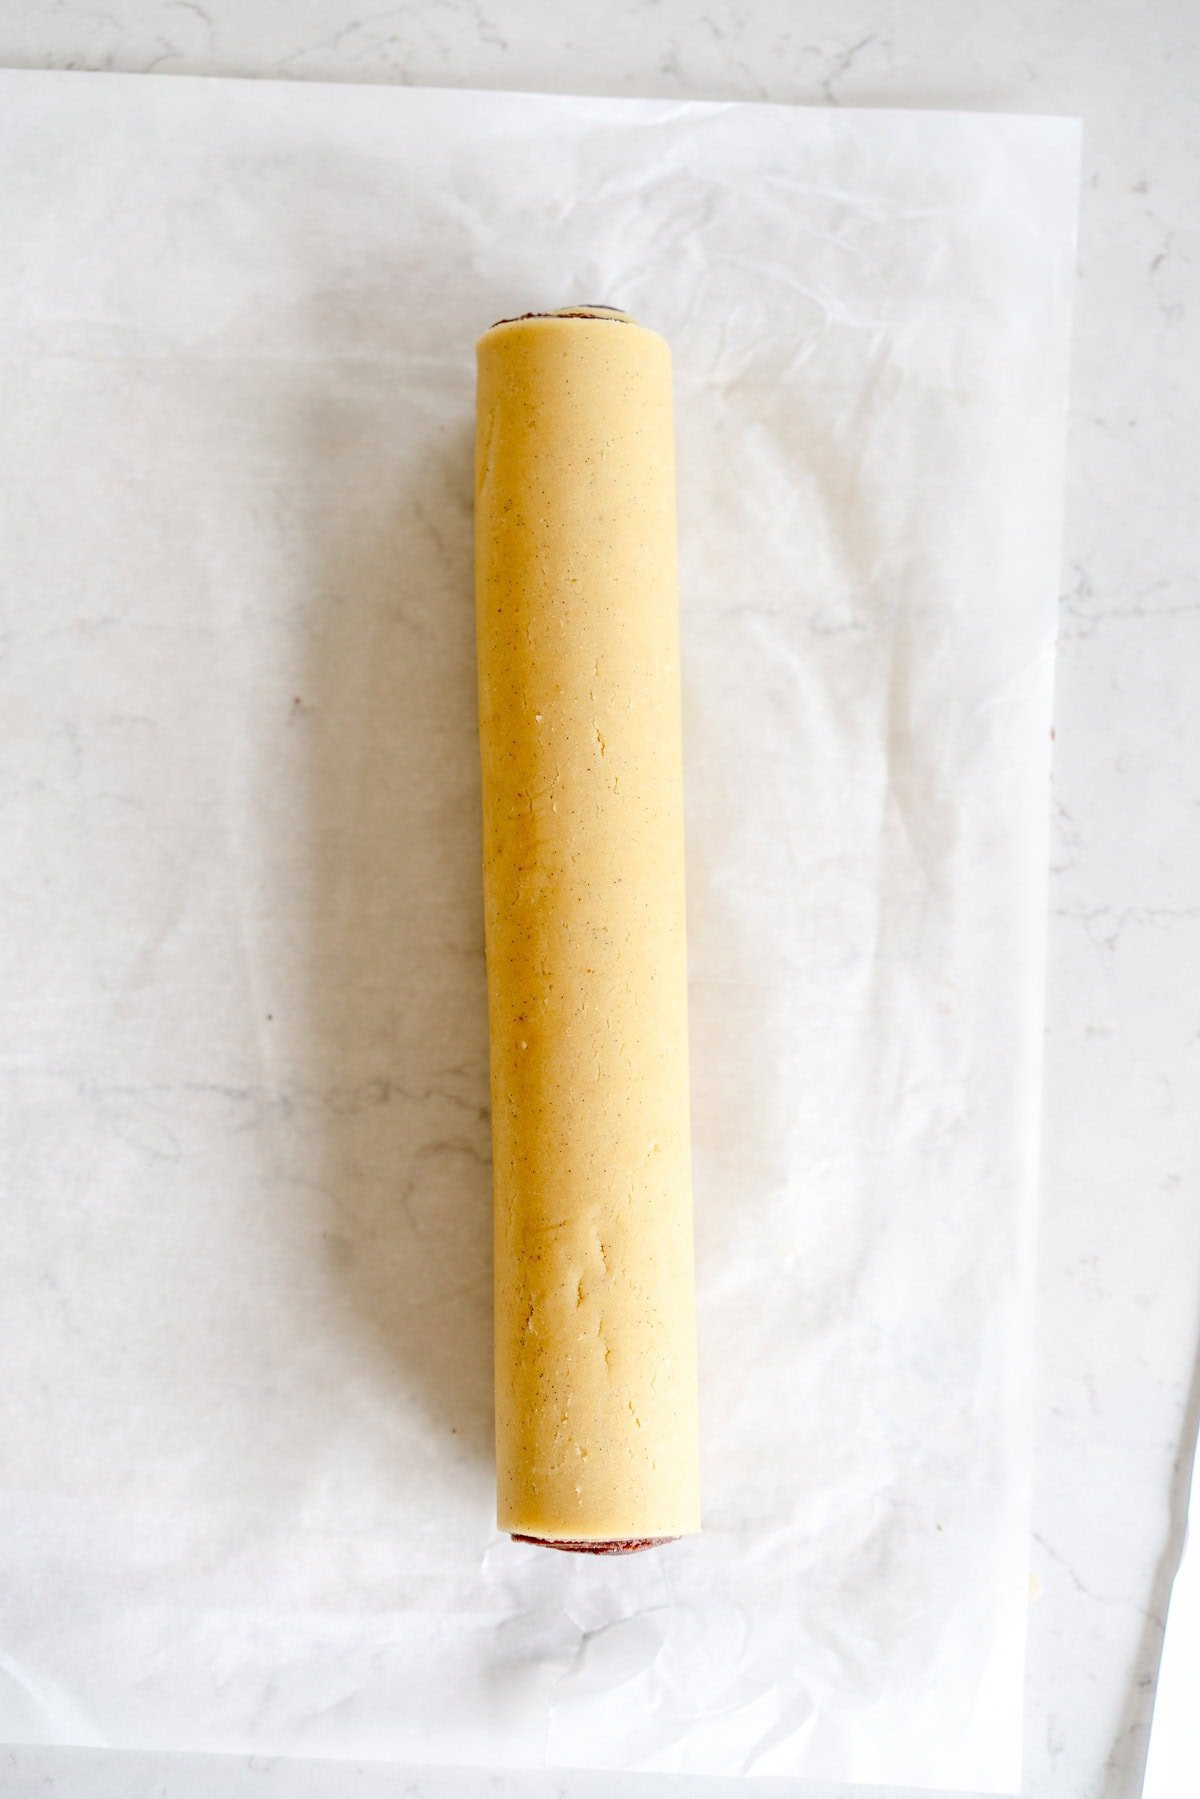
Then, carefully roll up the log of dough into a tight sausage. I find to get started, working my way along the length of the dough to get the roll started is the best way. Make sure you are not rolling up any big air bubbles and the roll is nice and tight.
If the dough starts to crack, just patch it back together carefully with your fingers. Gently roll the log of dough on your surface to help seal the edge, then wrap tightly in plastic wrap. Chill for at least 2 hours but up to a few days.
Alternative Patterns
The best thing about this dough is that it can be made into a bunch of different configurations. Here are some I have tried, the notes for all of these are in the recipe notes in the recipe card.
Checkerboard Cookies:
This recipe uses the same dough, but I found that it was easier to double the recipe so you get three logs of dough. You will have some offcuts (I figured it was better to have offcuts than to not have enough dough), which you can press together, roll out, chill, and cut out super cute marble look cookies.
I tried making checkerboard cookies both ways - cutting strips and pressing them together and then making slabs of dough that you cut into slices and arrange, and found that the second method worked much better as the individual logs gave cracks on the tops of the cookies.
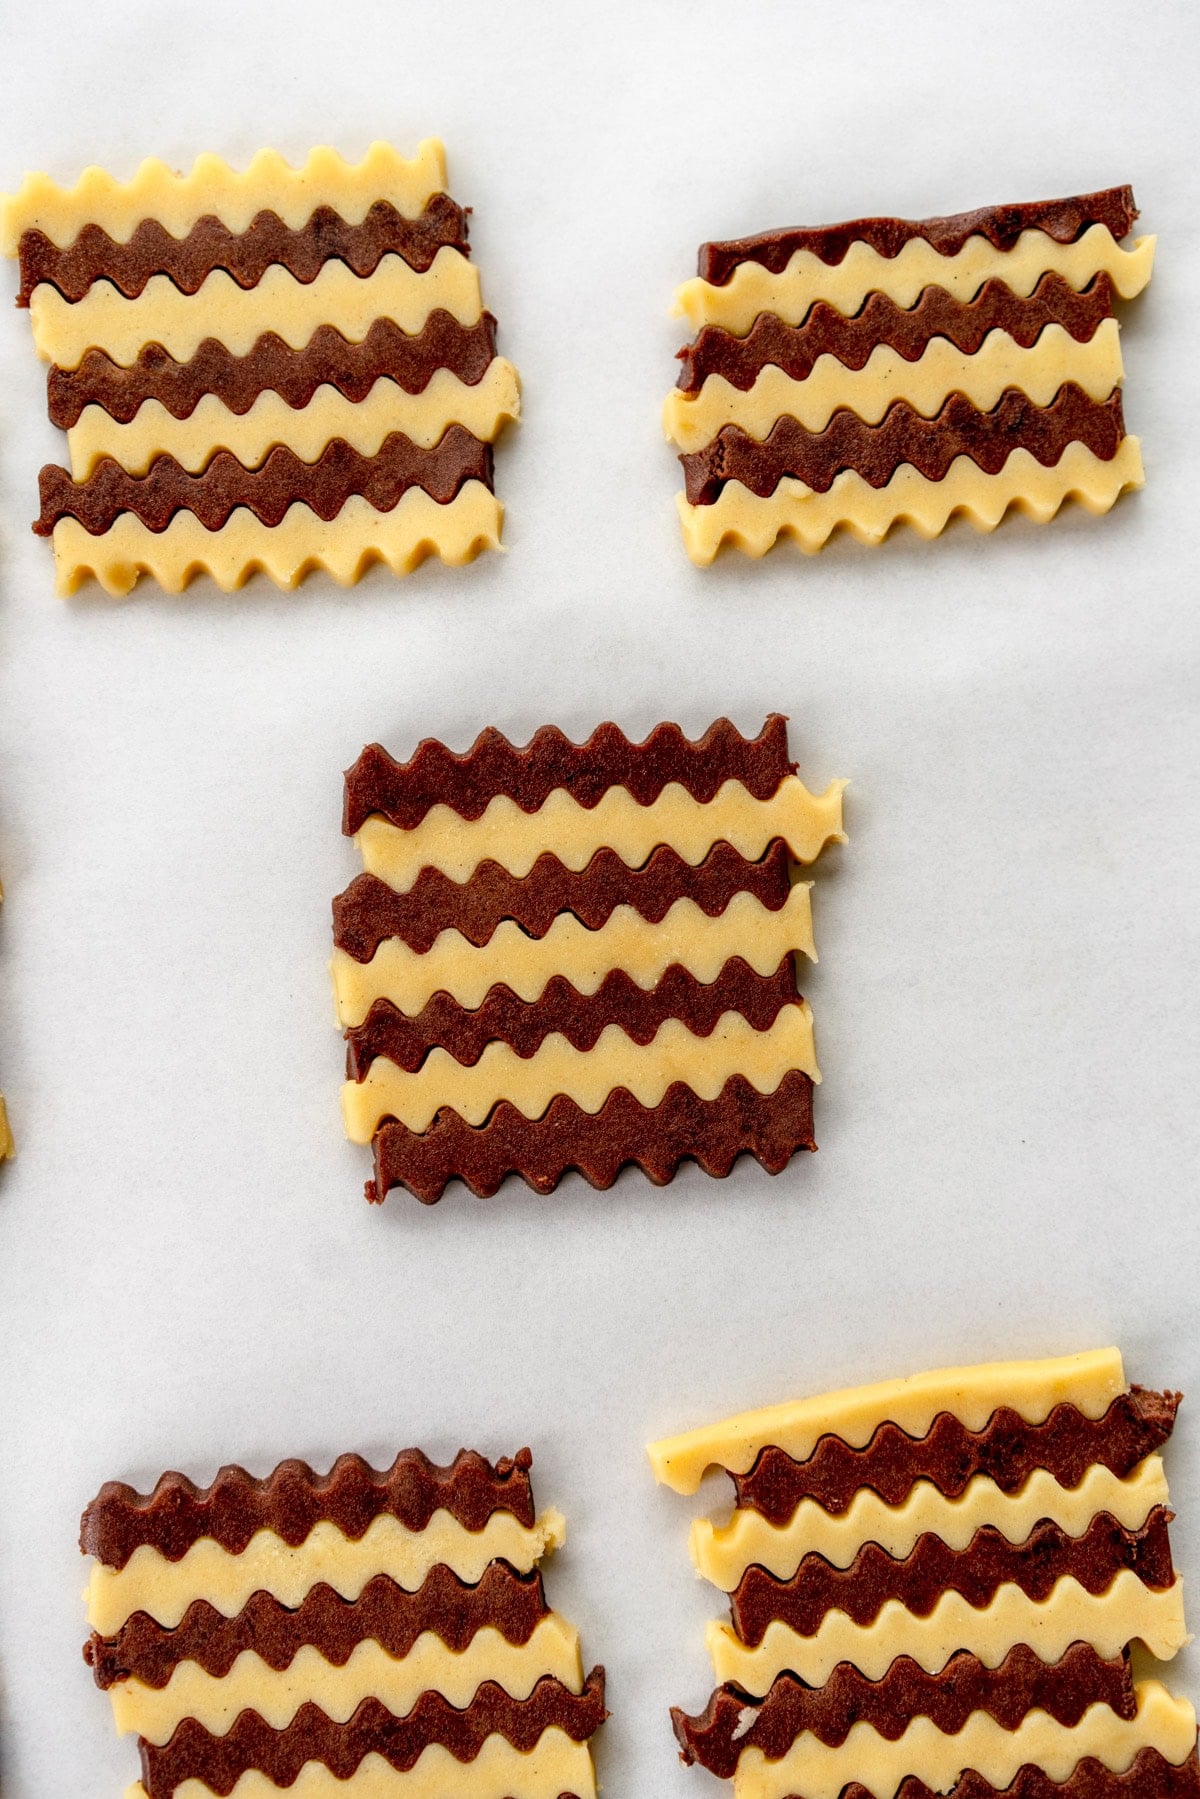
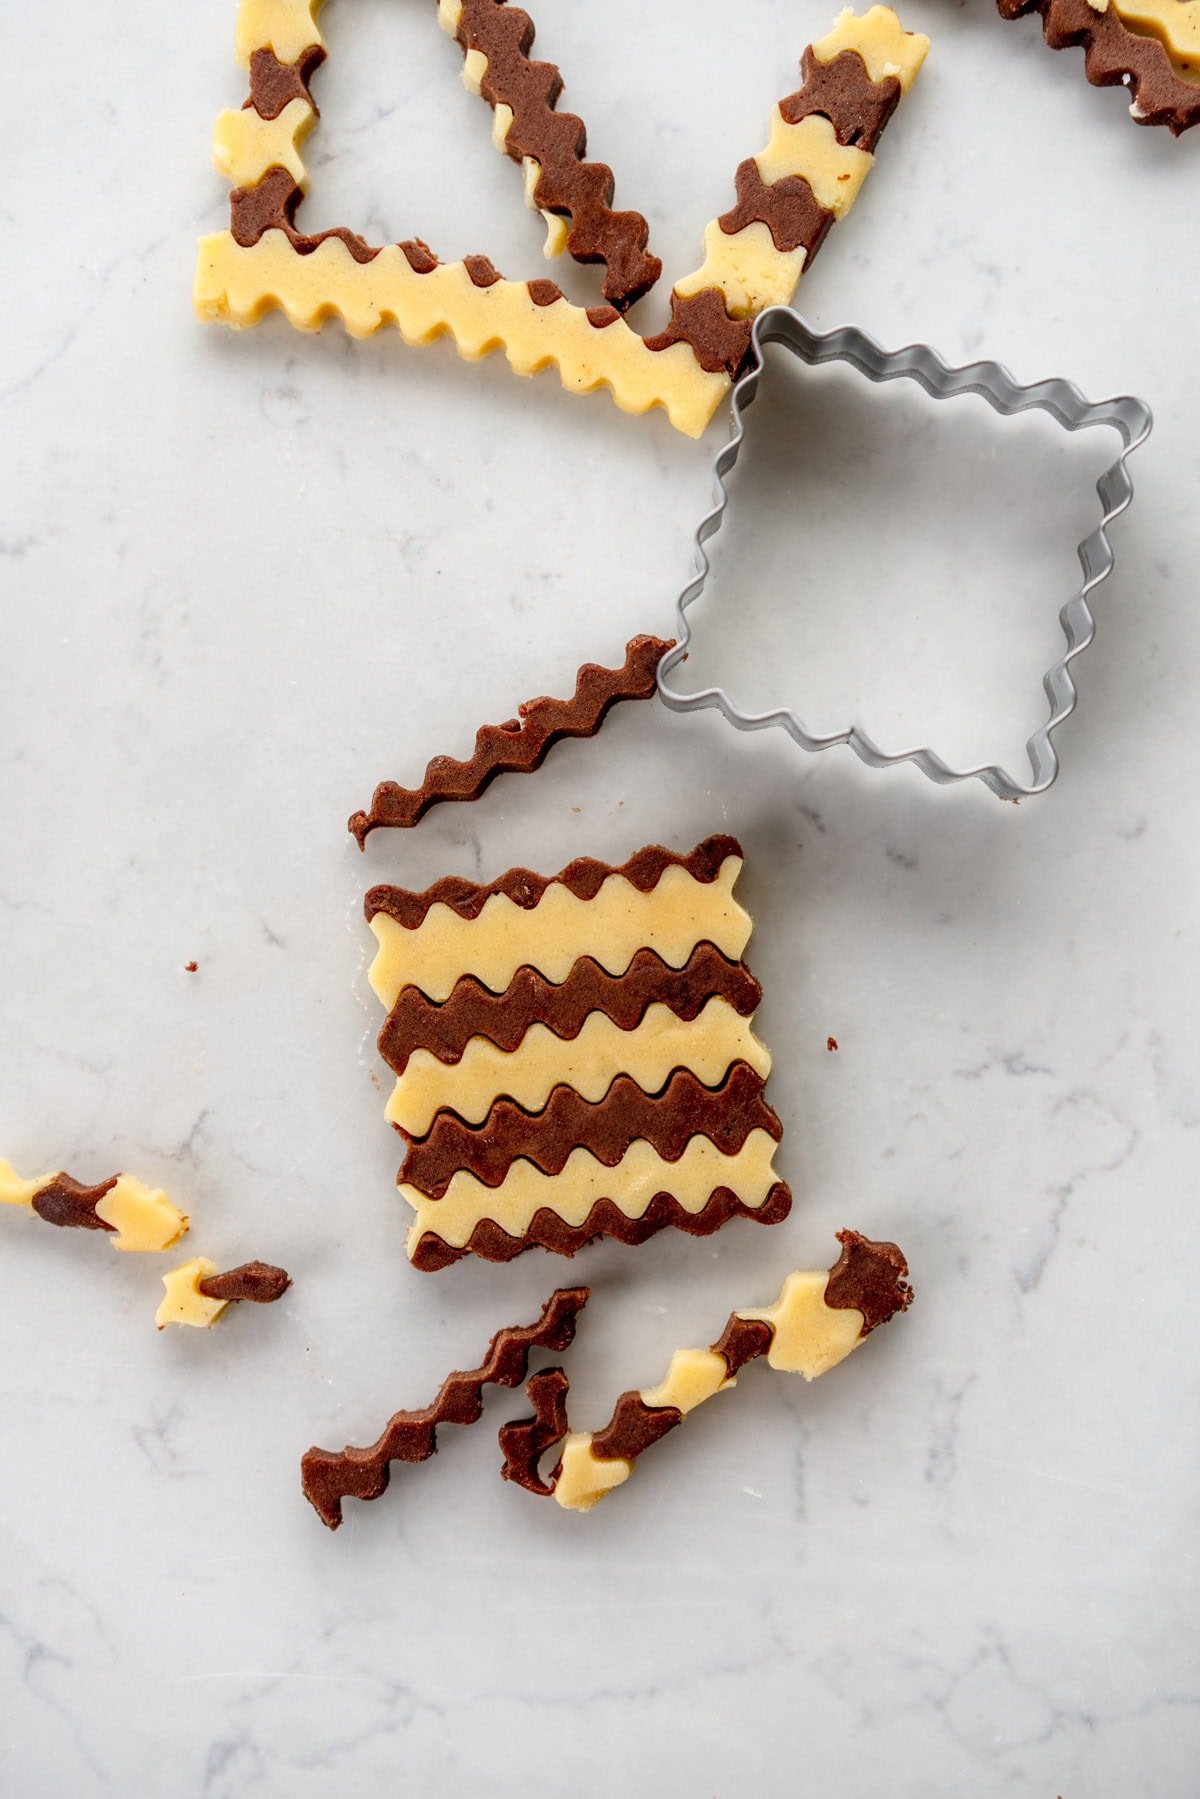
Zigzag cookies using a crinkle cutter:

❤️ Made this recipe and love it? ❤️
I would LOVE for you to leave me a review and star rating below to let me know how you liked it! Also, please make sure to tag me on Instagram!
Answers to your baking questions
Over the years, many of you have asked me questions about:
- baking in grams
- adjusting oven temperatures
- what kind of salt to use
- and many more!
I've curated and answered them all for your easy reference in this frequently asked questions post!
Super Cute Pinwheel Cookies (With Template!)
- Prep Time: 45 minutes
- Cook Time: 20 minutes
- Total Time: 3 hours
- Yield: 24 servings 1x
- Category: Cookies
- Method: Baking
- Cuisine: American
Description
These pinwheel cookies look fancy, but I promise with that my easy guide with a template will walk you through every step of the way. Chocolate and vanilla cookie doughs are rolled together to form a swirly pinwheel, then sliced and baked into the perfect festive cookies!
Ingredients
- 170g unsalted butter, at room temperature
- 180g granulated sugar
- 1 tsp vanilla bean paste or extract
- 1 large egg (50g not including the shell), at room temperature
- 310g all-purpose flour
- ½ tsp kosher salt (use less if you are using regular salt and omit if you are using salted butter)
- ¼ tsp baking powder
- 15g dutch process or regular cocoa, sifted
Instructions
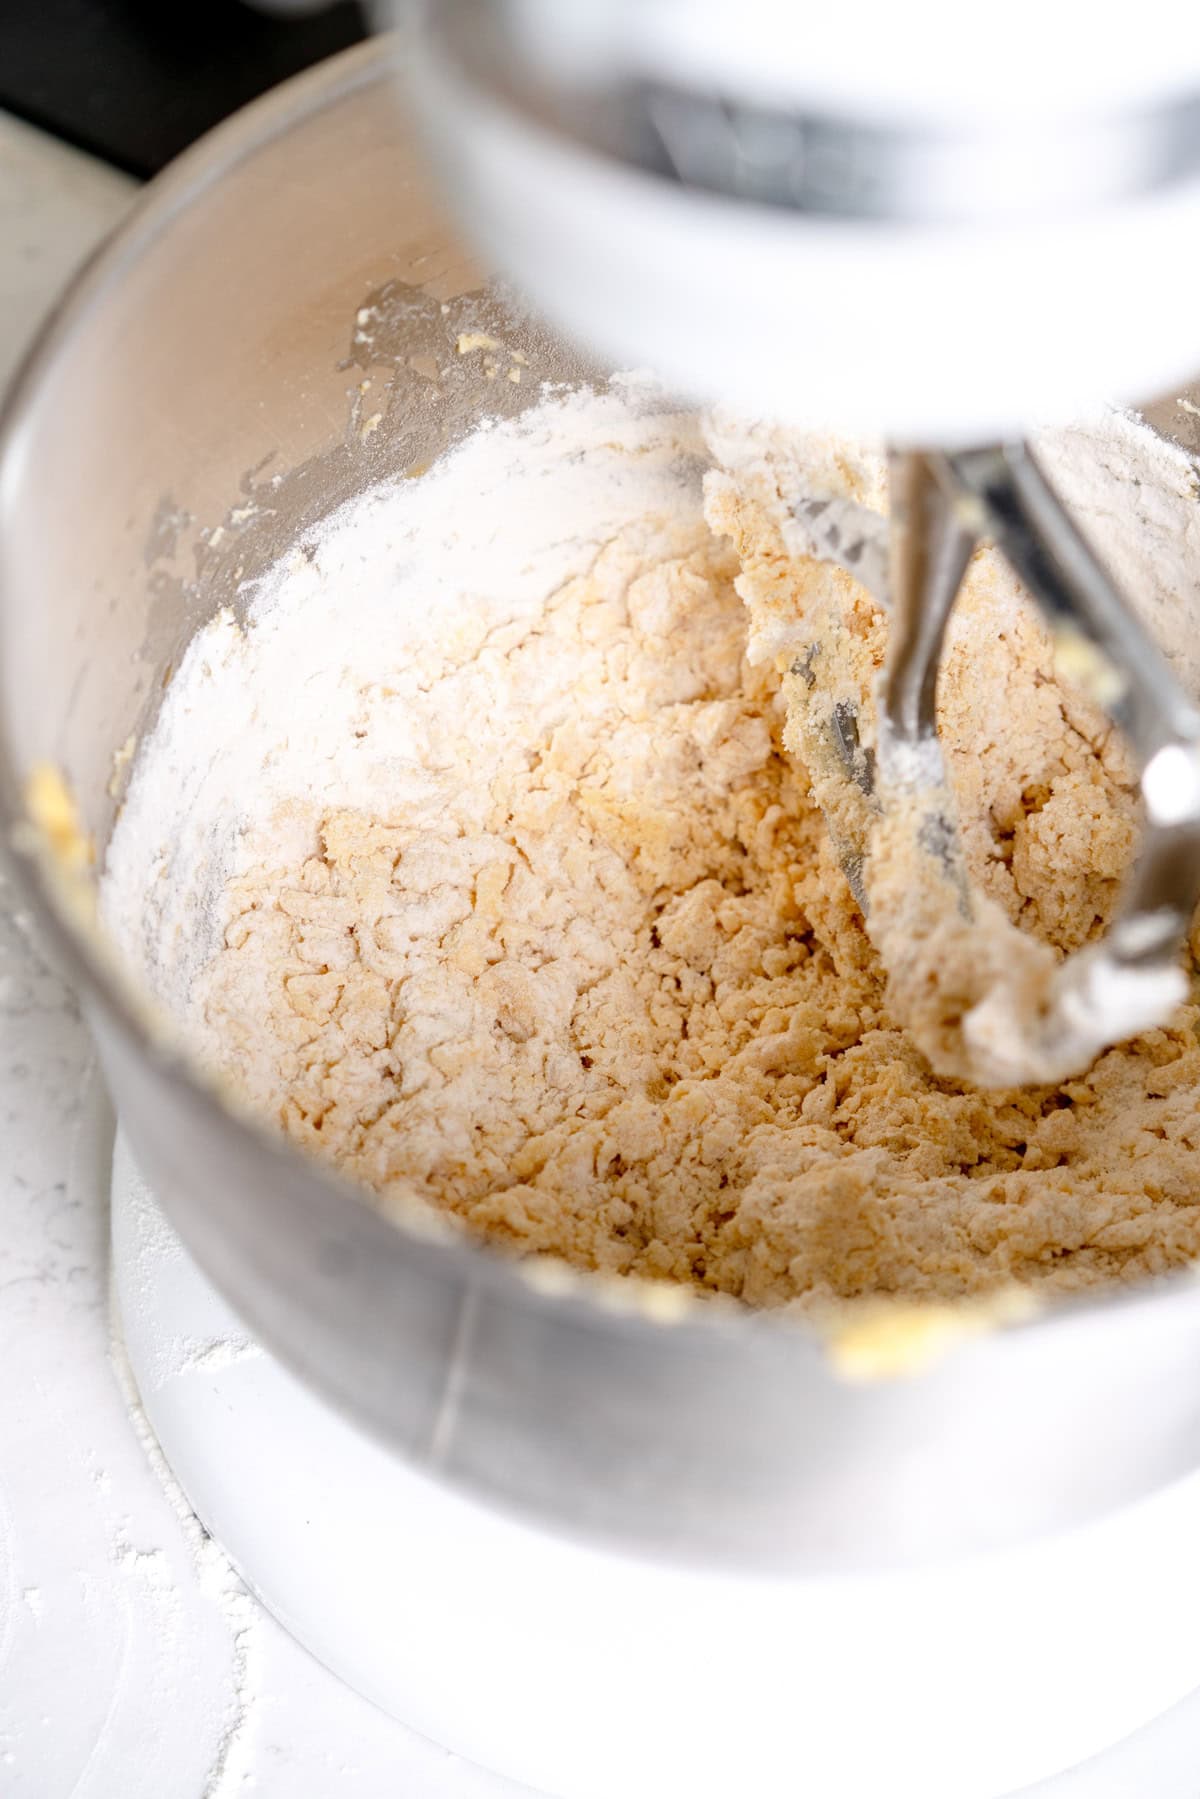
- In the bowl of a stand mixer fitted with the paddle attachment, combine the butter, sugar, and vanilla. Cream on medium to high speed until light and fluffy, scraping down the bowl once or twice during the process. Alternatively this can be done in a bowl with a handheld electric mixer.
- Add the egg and mix well to combine.
- Add in the flour, salt, and baking powder, and mix until a dough forms.
- Remove 360g of the dough and set aside in a small bowl. Note if you are doubling the dough recipe this number does not scale when using the scaling button, so remove 700g of the dough and add 30g cocoa to the remaining.
- Add the cocoa to the remaining dough in the mixer, and mix to combine until the cocoa is incorporated.
- Working with one colour of dough at a time, take the dough and place on a a piece of parchment paper. Top with another piece of parchment paper. Roll out to a thickness of 4mm (0.16"), using a piece of A4 printer paper as a guide (see notes below on sizing). You want the dough to be big enough that you can cut around the piece of paper in the next step - take pieces off any areas that stick out and place them in areas that need them, then keep rolling - they patch themselves to the dough.
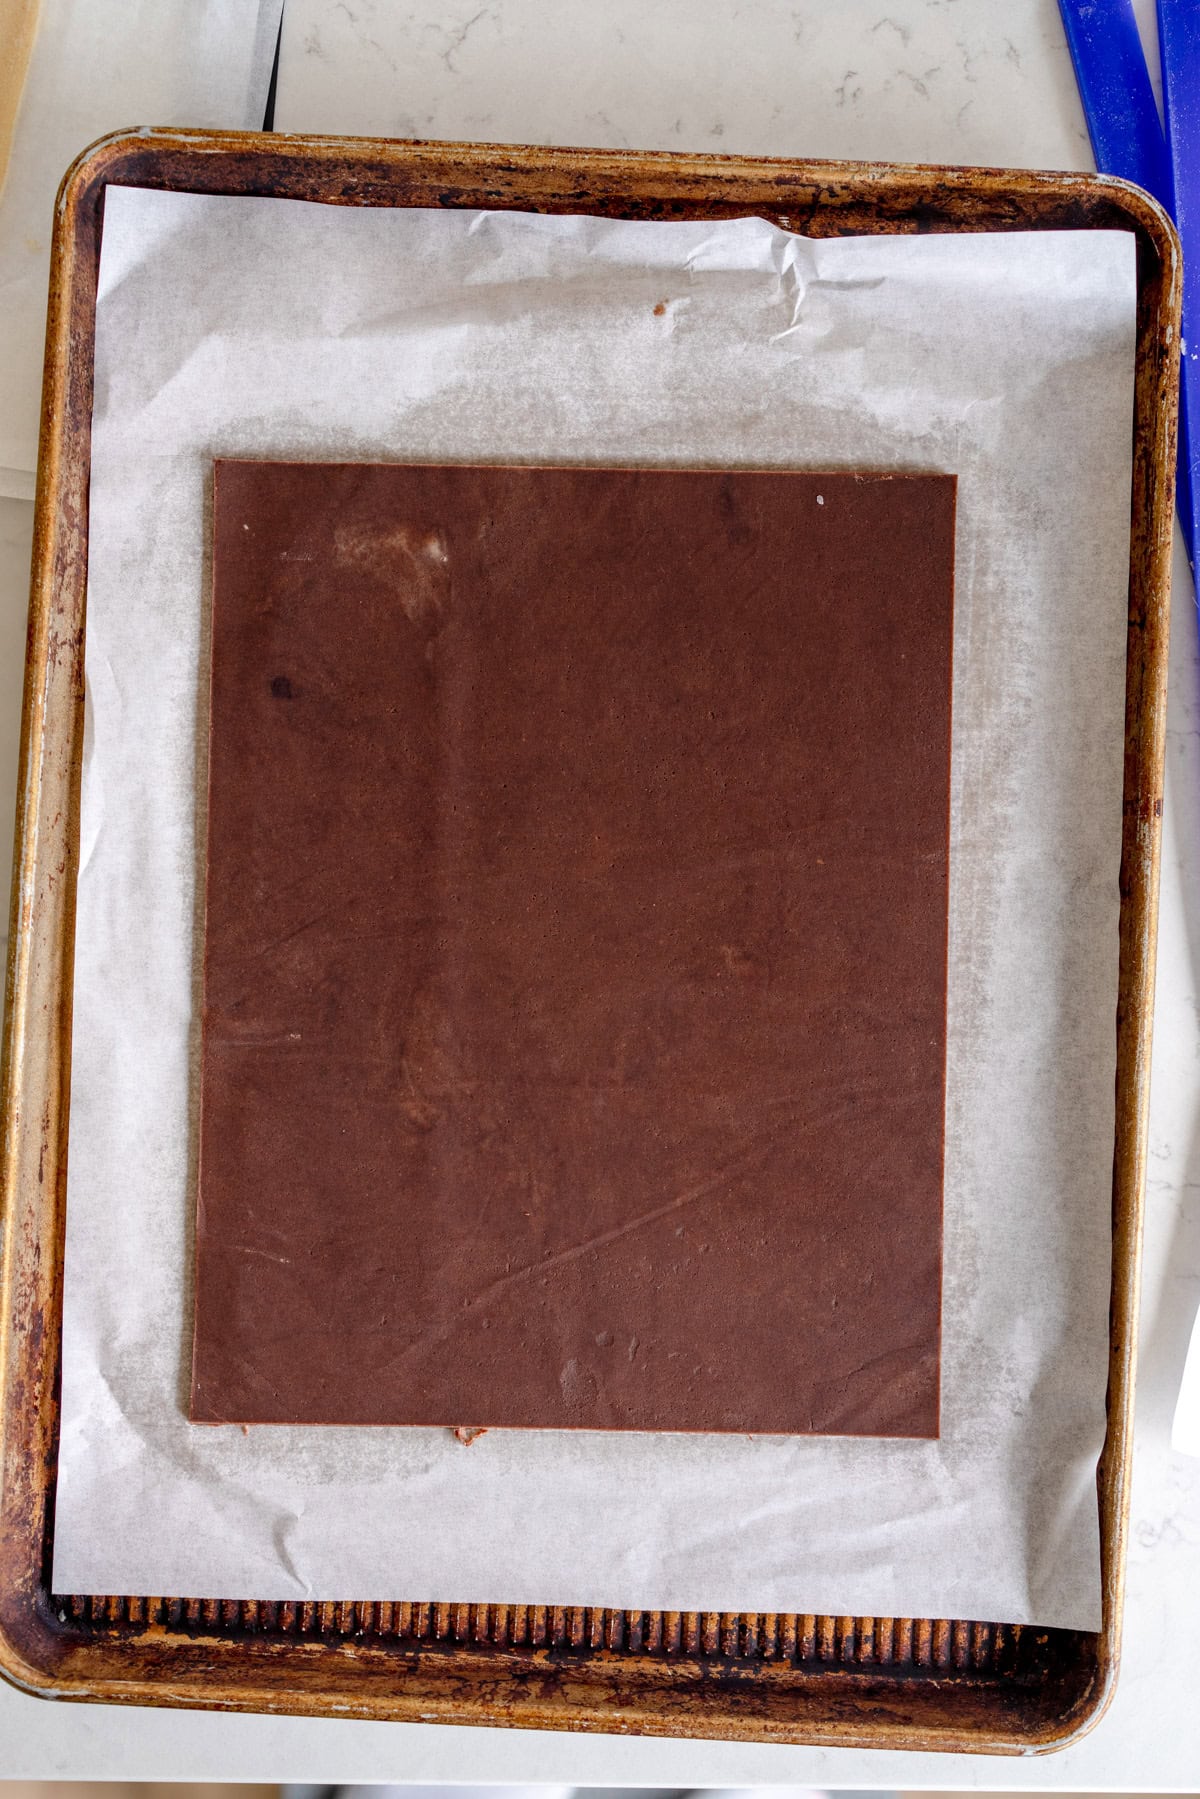
- Once the dough is the right size, transfer it to a baking sheet and repeat with the other piece of dough.
- Transfer the dough, still on the baking sheet and between the parchment paper, to the freezer and freeze for 20 minutes - you want it to be fully solid.
- Remove from the freezer and remove the top sheet of parchment paper from the first piece of dough. Use the piece of printer paper as your template and use a ruler to cut the dough to exactly the size of the piece of paper. Do the same with the other flavour of dough. If at any time they are getting warm, transfer them back to the freezer (make sure if you are stacking them there is a piece of parchment between them.
- Once you have cut out the dough to the size of the piece of paper, freeze both pieces again for another 5 minutes.
- Loosen each piece carefully from the bottom piece of parchment - leave the vanilla dough on the parchment paper.
- Carefully place the chocolate dough on top of the vanilla dough, leaving about 1cm of vanilla dough for overlap along the long edge (see images in blog post). Gently press the dough together to make sure that there are no air bubbles.
- Leave to stand for 5-10 minutes until the dough is soft enough to roll up - if it is too cold it will be hard to roll.
- To roll up the pinwheel cookies, starting with the long edge, carefully fold the overlapping vanilla edge of the dough over the edge of the chocolate dough - pull the parchment paper up to help it adhere if you need. Continue to tightly roll the dough up into a roll. If the vanilla dough cracks, just use your fingers to patch it up. Once you have a log of dough, gently roll it back and forth a few times to make sure that it is nicely sealed.
- Tightly wrap the log of dough in plastic wrap, and then chill for at least 2 hours or up to 5 days. I like to place mine inside a piece of PVC pipe, or you can use a paper towel roll cut in half to rest the dough in to help it not get a flat edge.
- When you are ready to bake the cookies, preheat the oven to 330°f / 165°c. Line 1-2 baking sheets with parchment paper.
- Remove the log of dough from the fridge. Unwrap and place onto a cutting board. Using a sharp knife, slice off the end of the dough to reveal the spiral inside.
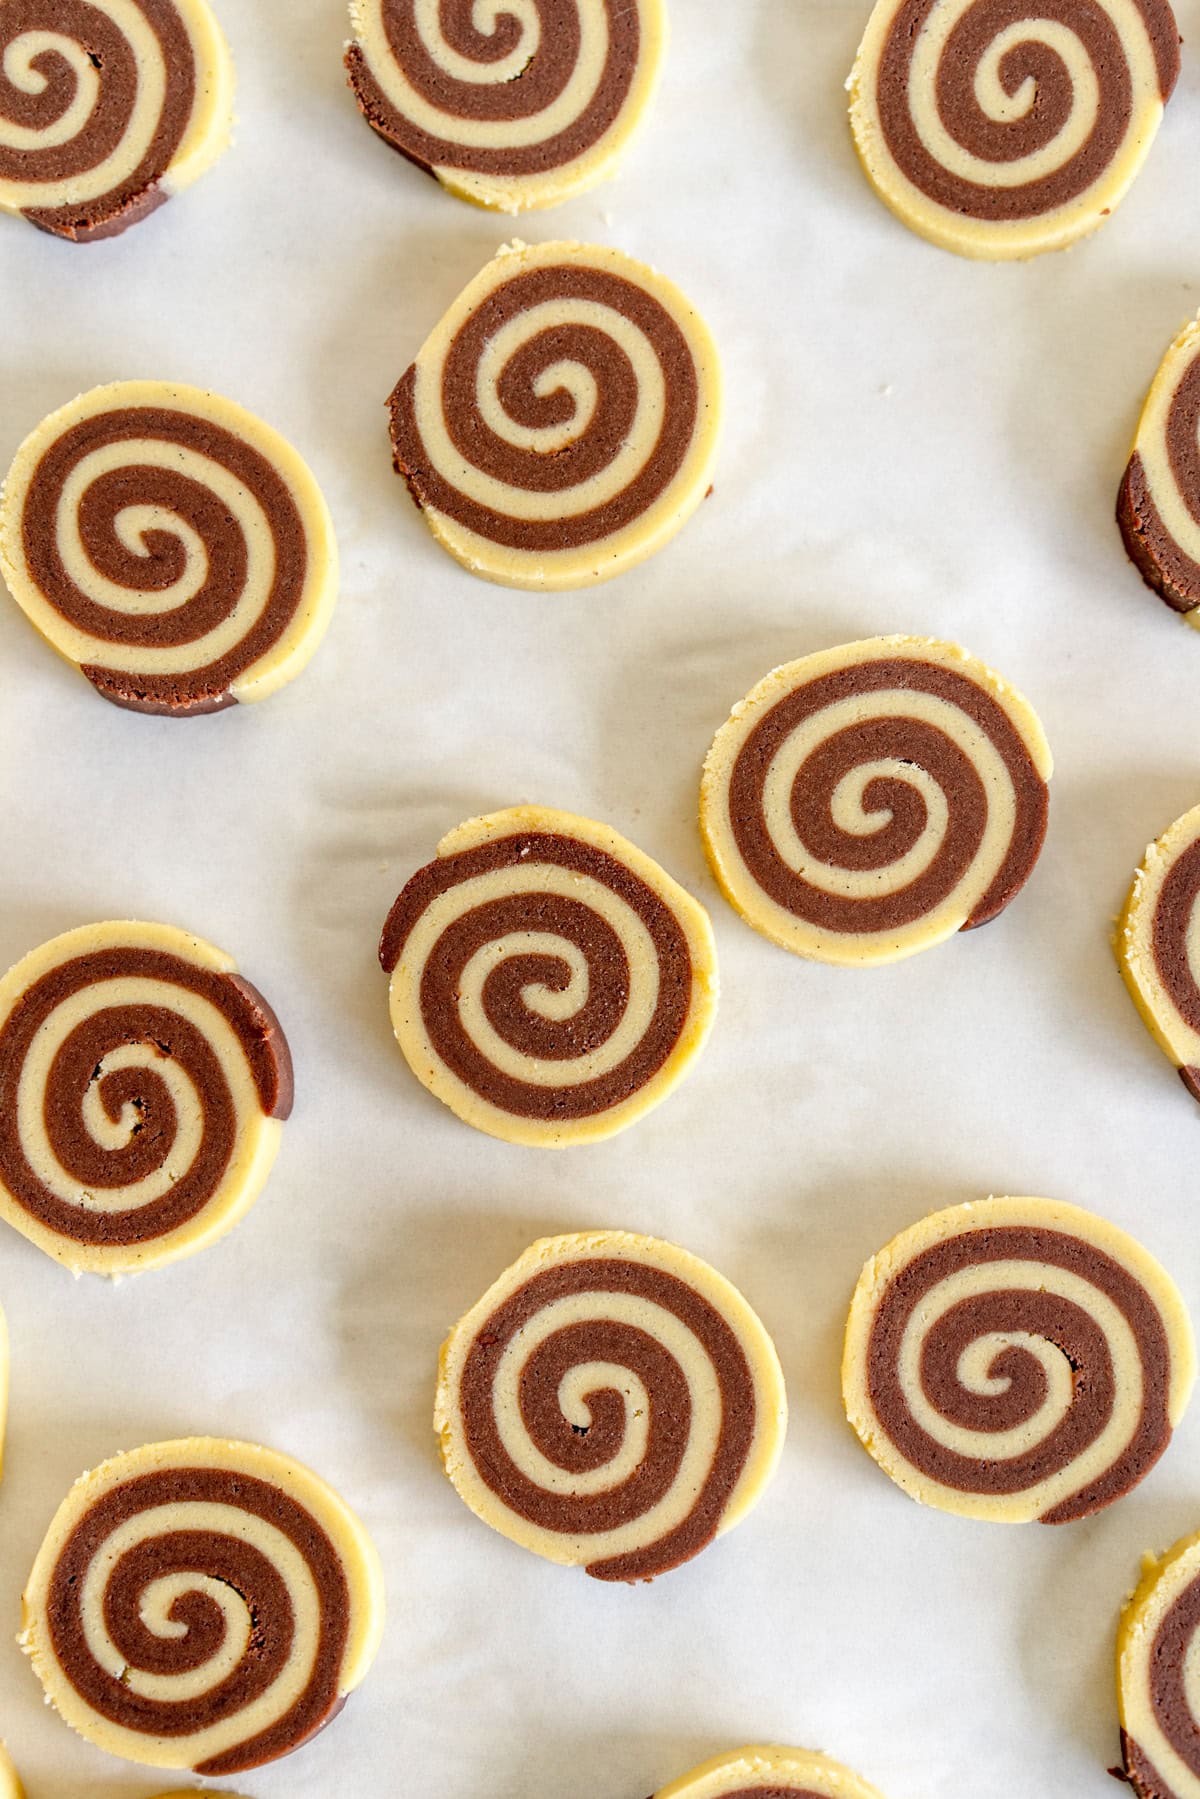
- Slice the log of dough into cookies approximately 1 cm thick. Arrange on the sheet pan / sheet pans (I can fit a whole batch on one pan but you may not be able to depending on how thick you cut them and how big your pan is).
- Transfer the cut cookies to the freezer and freeze for 10 minutes.
- Bake the cookies for 15-16 minutes, until the edges and middles are set and the edges are starting to go a little golden brown.
- Remove from the oven and leave the cookies to cool on the pan for 10 minutes before transferring to a wire rack to cool completely.
- Store cookies in an airtight container at room temperature for up to a week.
Notes
To make checkerboard cookies:
This makes three logs of dough. Double the dough recipe - remove 700g of dough (this number does not double when you use the scaling button just FYI), and make half cocoa flavoured. Divide the dough again so that you have four portions - two vanilla and two cocoa. Cut yourself a template that is a 16x12cm rectangle from parchment paper. (I do not have the inches sorry but US rulers should have cm on them)
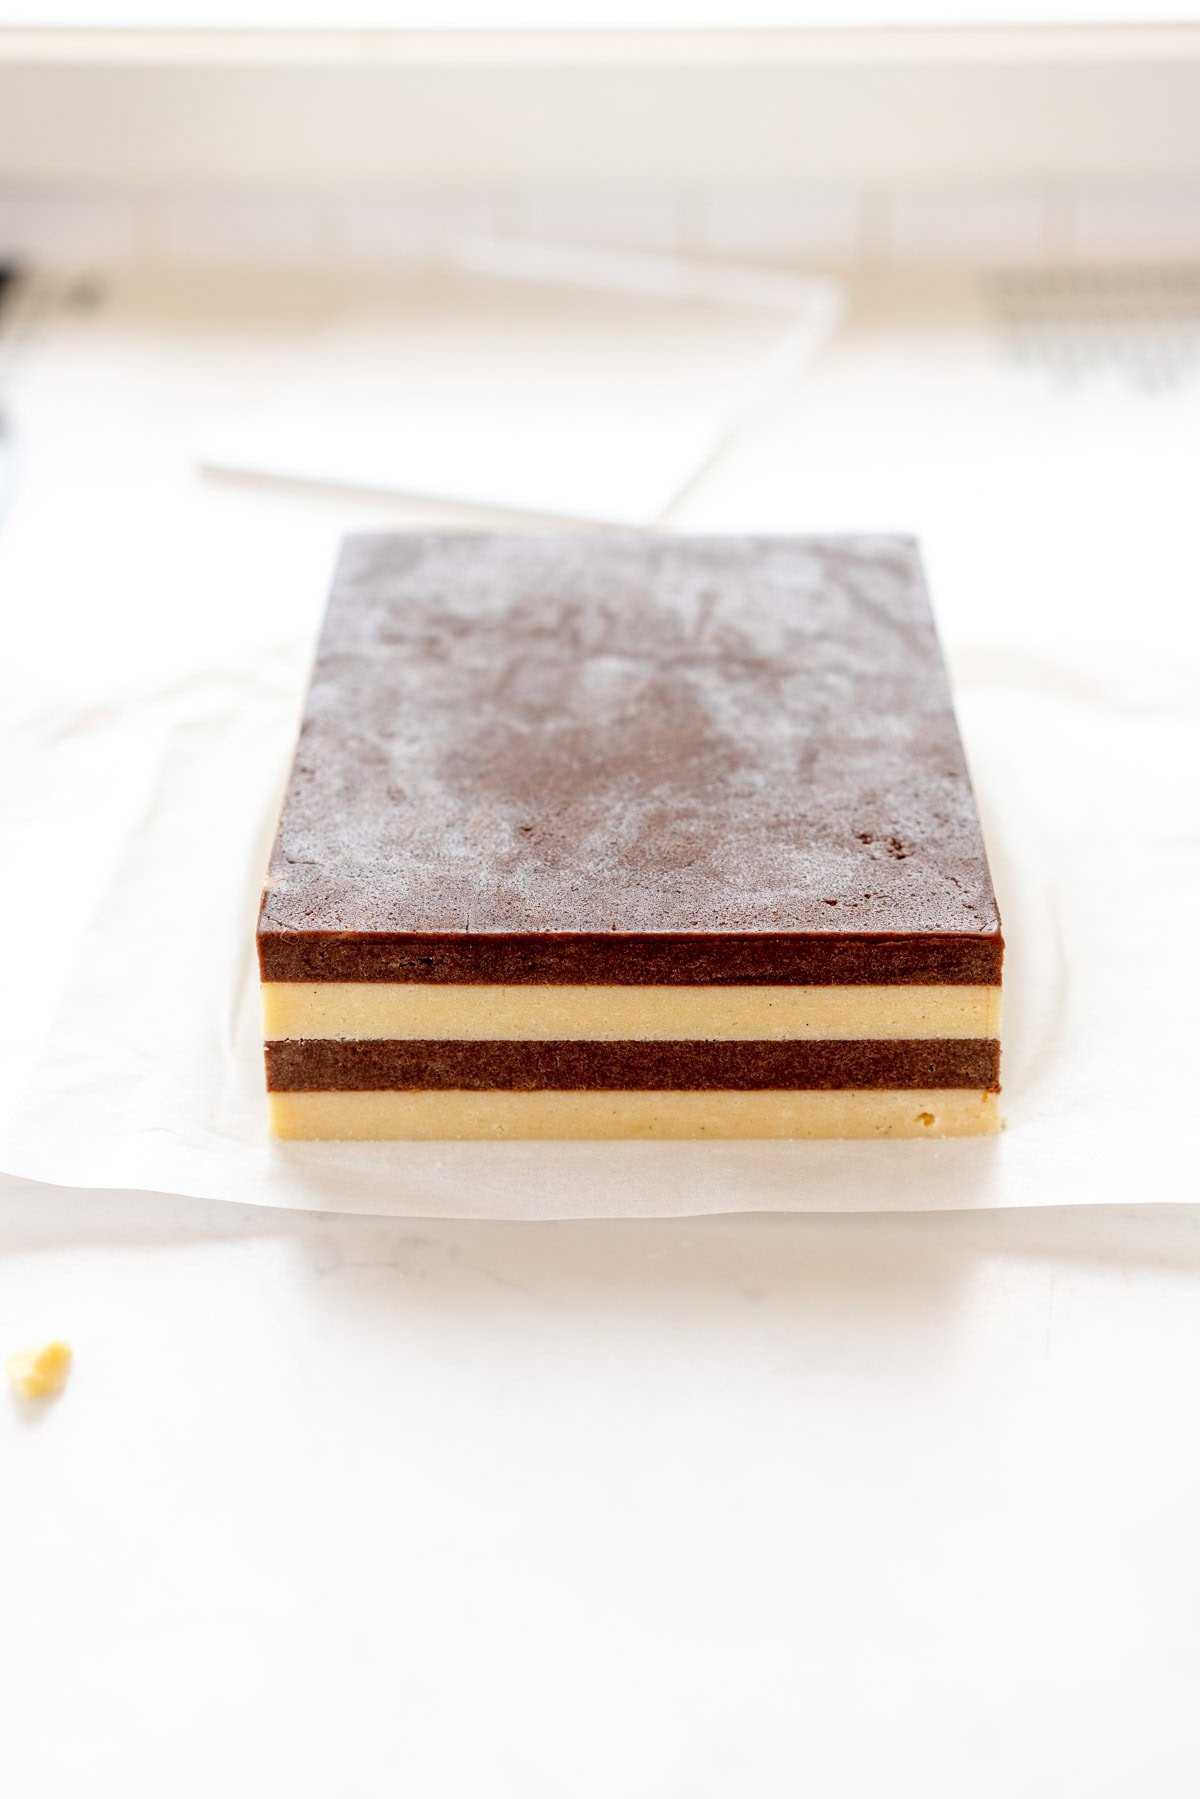
Roll each piece of dough out between two pieces of parchment paper until it is 1cm thick, and slightly larger than your template. Stack the doughs on a sheet pan and freeze, still between the parchment, for 20-30 minutes until totally solid. Remove from the freezer and trim down the doughs so there is about 1cm extending from the sides of the template (it is fine if this is not exact, you are just trimming them down to an approximate size). Stack up the dough, alternating vanilla and chocolate, and press down gently.
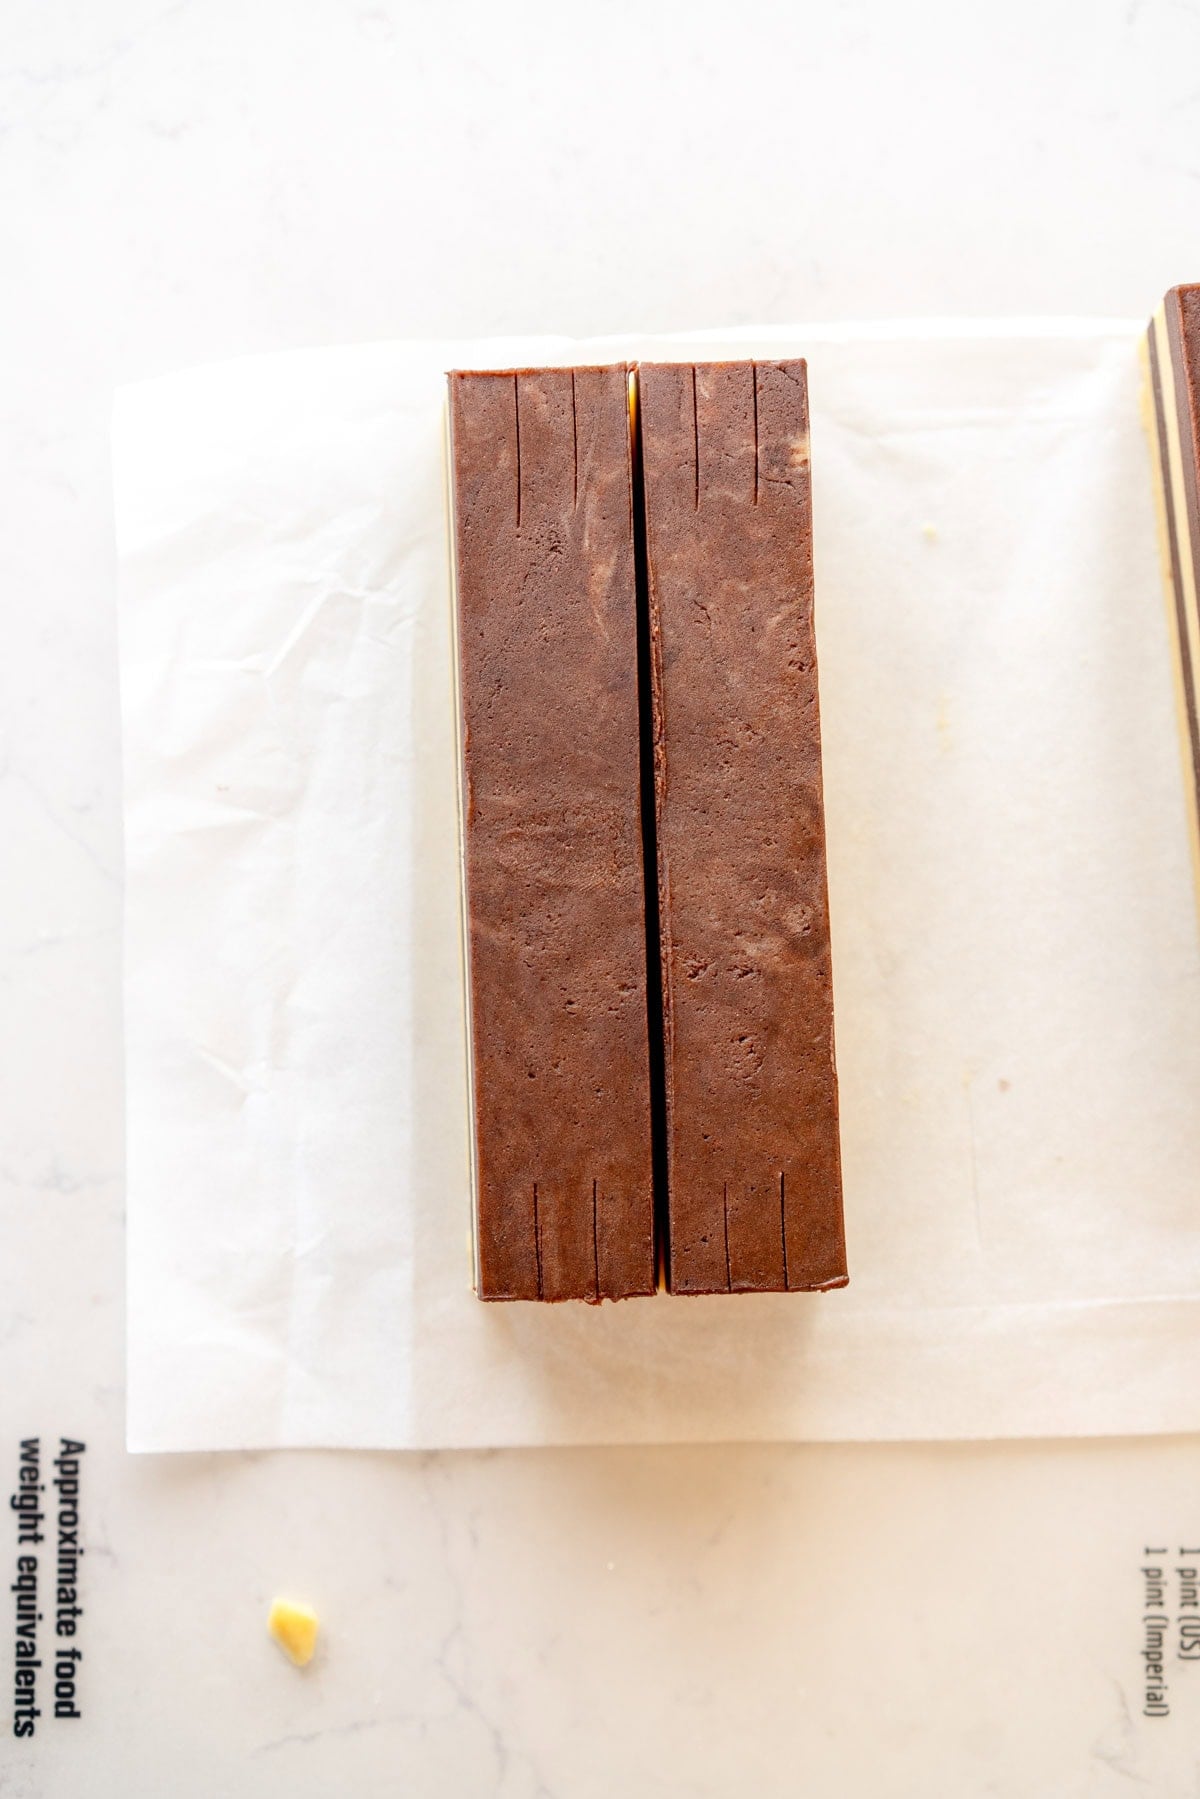
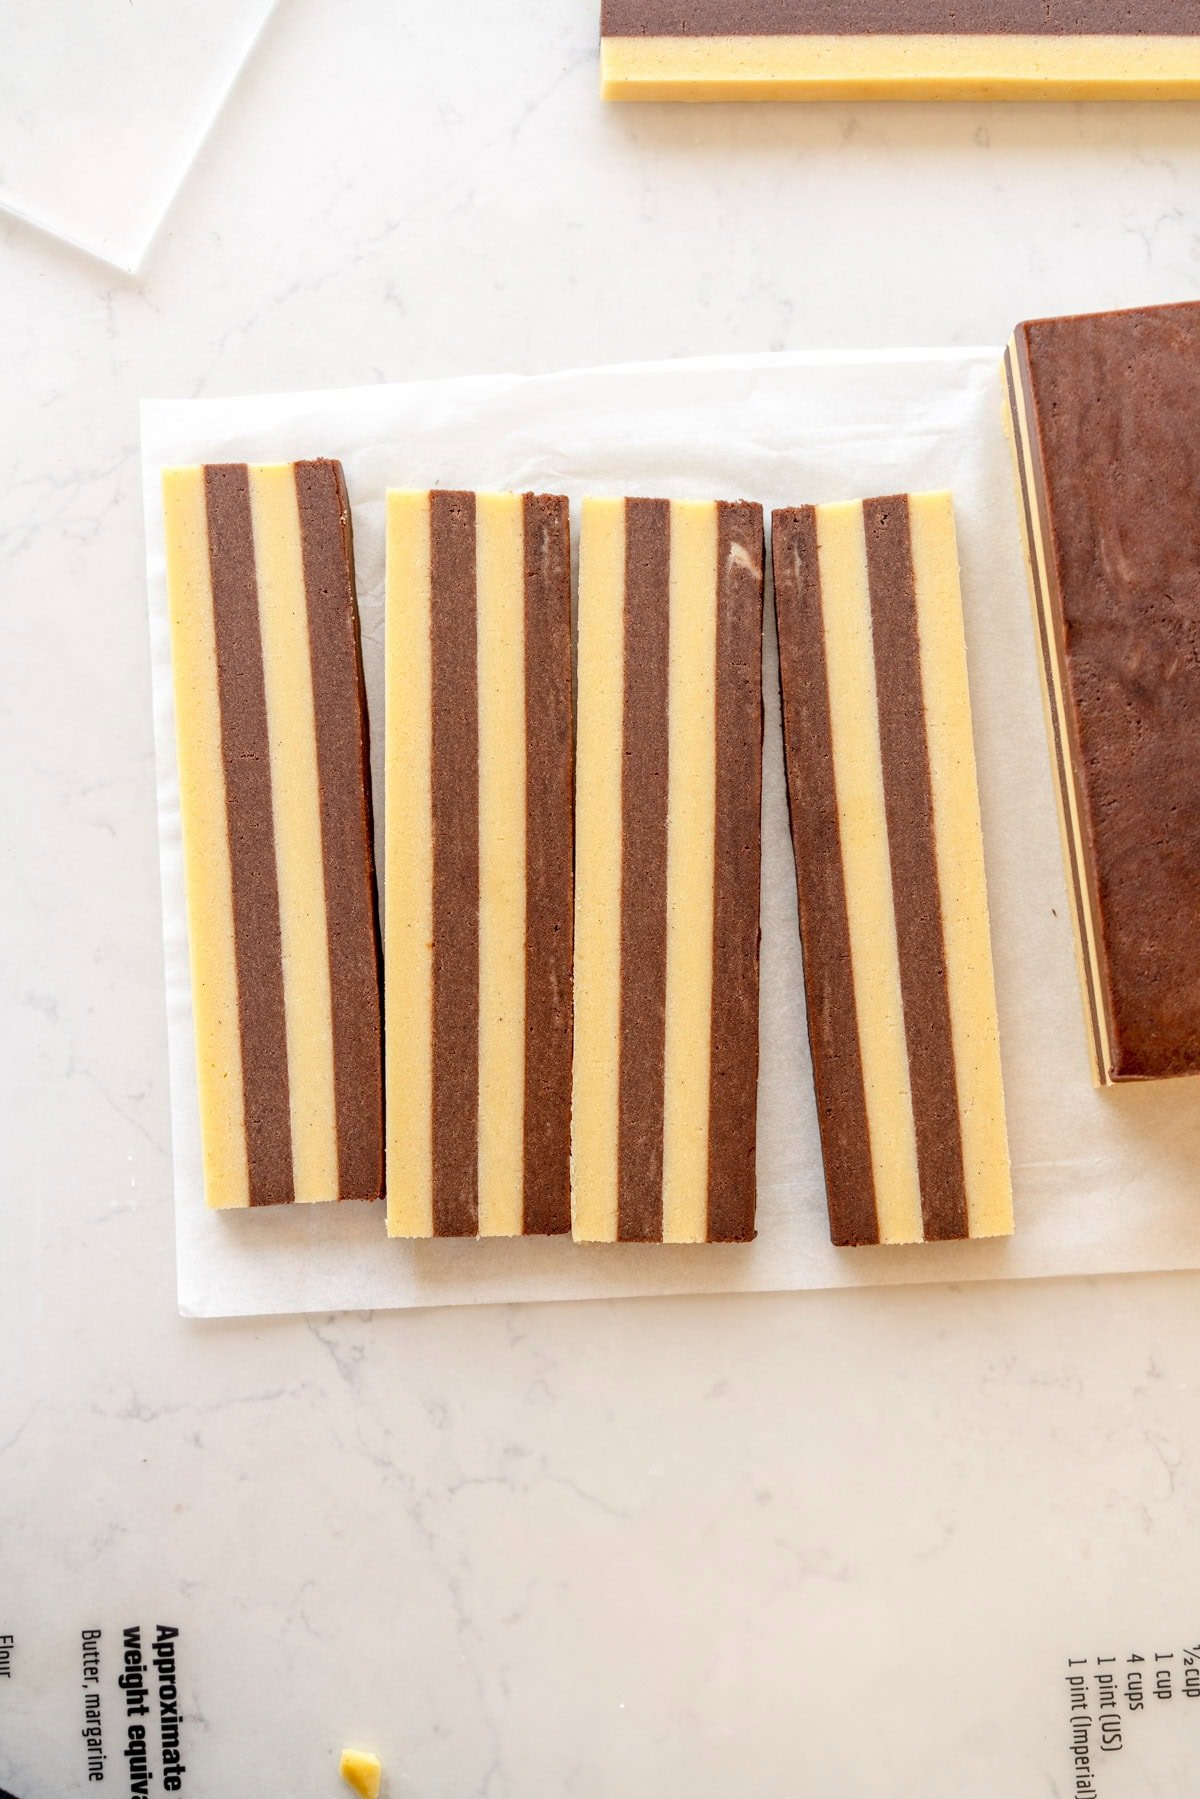
Using your template, measure and cut the dough block into a 12x16cm rectangle using a sharp knife (I like to score the cut first so I have a place to put my knife blade), then cut down the middle so that you have two blocks of dough measuring 6x16cm. Cut each block of dough into 1cm wide x16cm long planks, revealing the striped pattern. You should now have 12 planks of dough - you use 4 to make each log of dough.
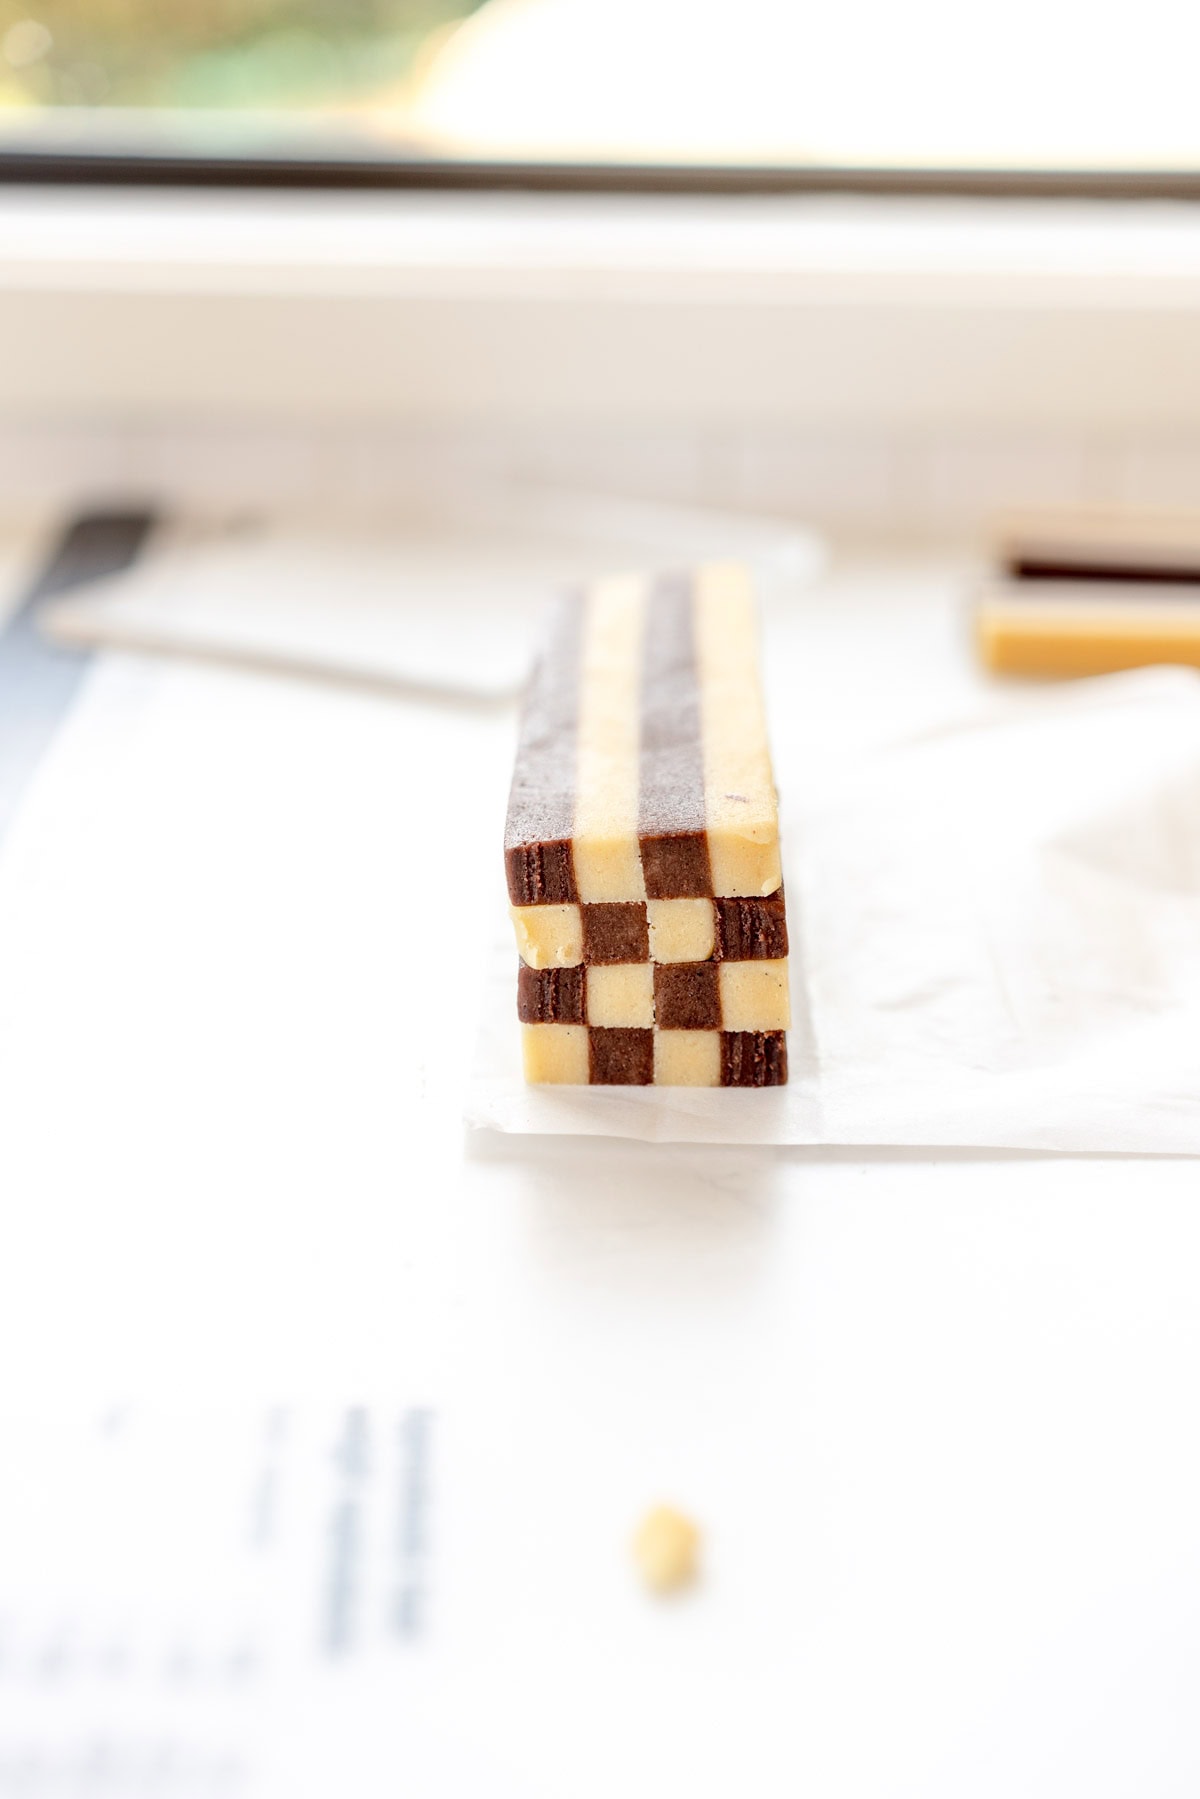
Stack up the dough planks - arrange one on a piece of parchment paper then place a second on top, flipping it so that a chocolate stripe sits over a vanilla stripe. Place the third piece the opposite way, and flip again for the top piece. Repeat with the other pieces until you have 3 logs of dough.
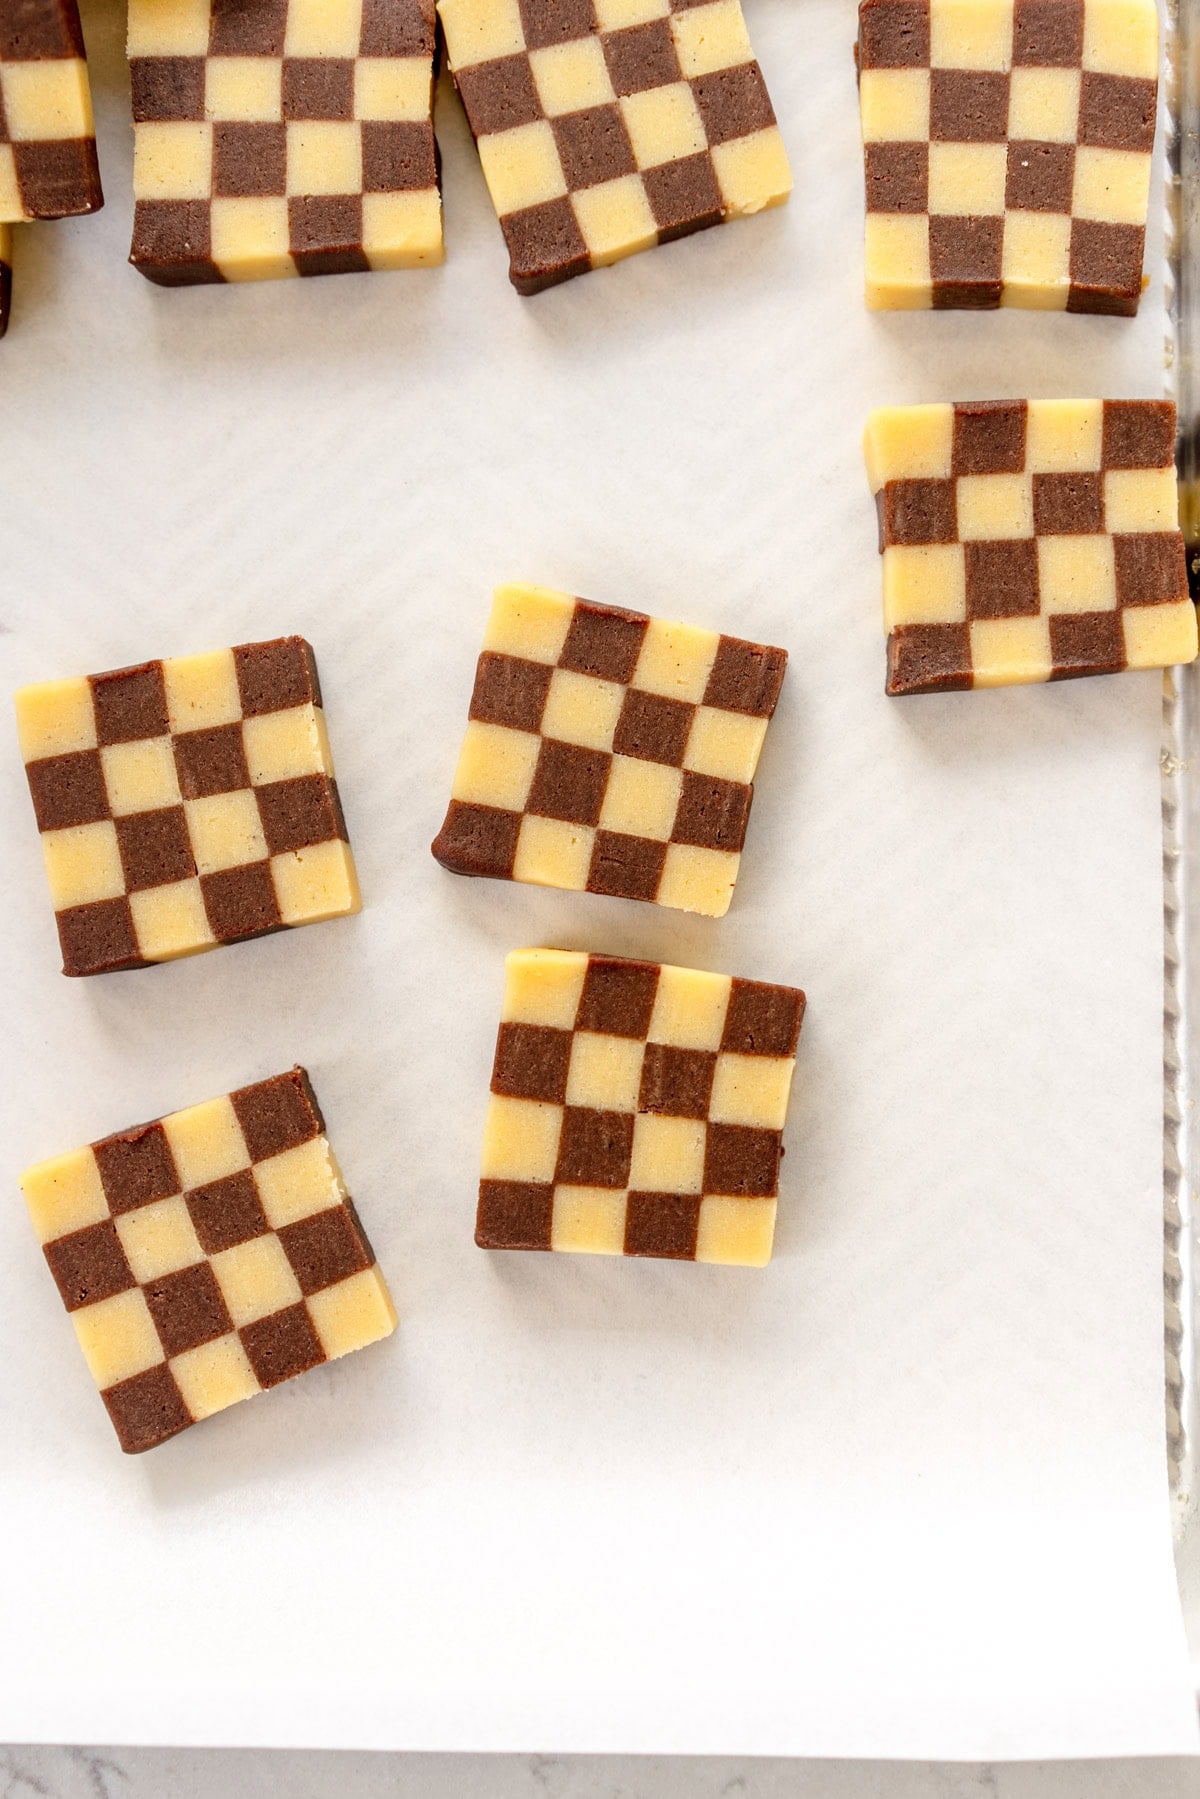
Wrap the logs of dough tightly in plastic wrap and chill for at least 2 hours. Slice the logs of dough into cookies 1cm thick (if your checkerboard is a little wonky you can squish it back into shape), then bake as written in the pinwheel cookie recipe - I used two pans as it makes more cookies.
Note: I didn't try this but will next time - I found that it was quite hard to cut nice even planks of dough and I was off on an angle each time but it was always off the same angle, so once you cut the block of dough into two pieces, you could flip the second piece so that it has the vanilla side facing up intstead of chocolate, so if your cutting is a bit wonky, the planks of dough should even each other out when placed together.
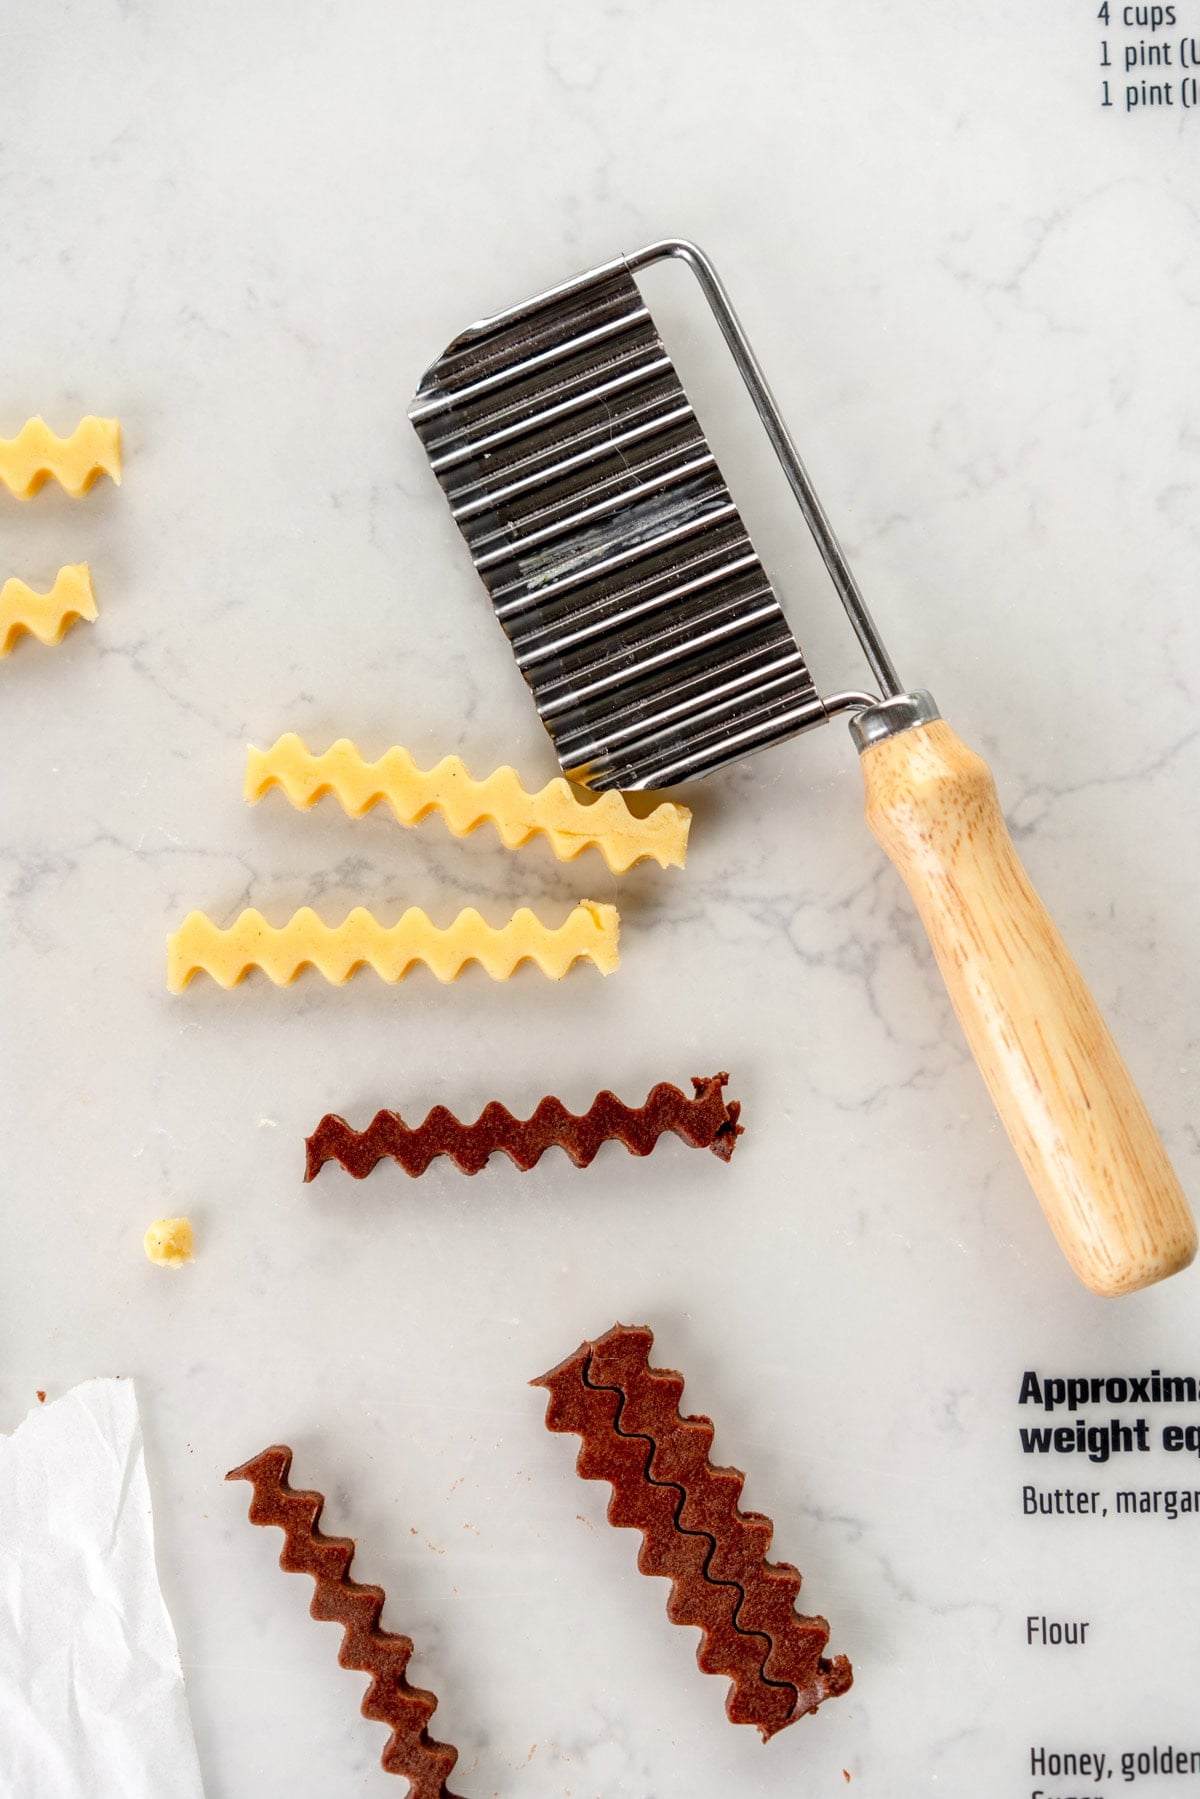
To make Zigzag cookies:
Make the dough as directed, then roll each flavour out between two pieces of parchment paper to 6mm thick. Chill at least 2 hours. Cut the dough into strips as wide as your cutter - I work with a little bit at a time and keep the rest in the fridge. Using a crinkle cutter (I used one designed for making crinkle cut fries), cut strips of the dough, and arrange them together on a sheet pan. Press gently together and smooth down by covering each with a piece of parchment paper and smoothing with your fingers. I did lots of little squares of the pattern. Chill the dough for at least 30 minutes to firm up. Cut shapes from the patterned dough. Freeze and bake as directed in the pinwheel recipe. Press the dough offcuts together and roll to 6mm thickness, then chill and cut out cookies. Repeat the freezing and baking process to bake these off. You can also use patterned cutters for this - I used cat ones - I have this set and this set.
To make heart cookies:
I made a double batch of the dough then divided it into three - I did half (700g) plain, a quarter (350g) I added red food colouring to (I used the oil based one from colour mill) and then the other quarter I added 15g black cocoa to. I rolled out between parchment as above for the zigzag cookies, then froze the dough and used a heart shaped plunger cutter to cut out pieces, and filled the holes in with cut outs from the other doughs. I repeated with all three doughs, then chilled them and cut out circles using a scalloped cutter. Freeze and bake as directed in the pinwheel cookie recipe.
If you are scaling the recipe please note that you will have to manually scale values within the method - eg remove 700g of the vanilla cookie dough if you are making a double mix.
Printer paper is a slightly different size depending on what country you are from - a piece of letter paper / A4 printer paper will work great! (approx 8x11" / 20x28cm) - A4 is a slightly different size but will work fine.
Can this recipe be scaled? Yes - it is not too much more effort to make two logs of dough so if you wanted to, you could easily double it, especially because the cookies freeze so well. Do not try and work out how to change the size of the rectangle - just make a double batch of dough then divide into two pieces of chocolate and two vanilla and make two separate logs of dough.
How to chill round logs of dough so they don't get a flat side - I use a sneaky little trick here - I chill my dough in a PVC pipe! I just got a little length of it from the hardware store, and it works perfectly for keeping the log of dough in in the fridge so that it does not get a flat side from sitting on a shelf. This is a totally optional step - you could also use a paper towel roll cut in half.
Can Pinwheel Cookies be made ahead of time? Yes - this is a great recipe to make ahead of time. The rolls of dough can be made up to 5 days in advance, or you can freeze the sliced cookies - they bake from frozen already so there are no extra instructions for baking from frozen. To store in the freezer, slice the cookies, freeze until solid on a sheet pan, then transfer to an airtight container in the freezer for up to 3 months.
How do you store pinwheel cookies? Store pinwheel cookies in an airtight container. They are a soft and chewy cookie, and will keep well for about a week.
Comments
Caribou says
Recipe works perfectly 🙂
Lizzie says
Made this recipe and it was very reliable and made dough of a great consistency. We actually made it into 6 different colours because the kids wanted to make “unicorn poop” and it worked a treat!
Anna Rew says
Loved this recipe! I didn’t have the PVC piping so rolled the log in a bamboo sushi mat before putting in the freezer to keep the shape
Louise Havill says
Delicious, made today with a toddler! She's excited for swirly whirly cookies. Not quite perfect as we went a little rogue with the toddler at the end with the final couple steps.
Amy says
Hi Erin, I have many of your recipes in my collection, and downloaded this one to add another version of pinwheel cookies. Mainly, I want to know how to roll them tightly. I’ve learned to add a roll of either chocolate or vanilla at the beginning of the roll, because otherwise I could never get the roll tight enough.
As you can see, I’ve made these into a wide variety of patterns. I used Cook’s Illustrated recipe for Checkerboard Icebox cookies, and got the pattern ideas from a vintage British cookbook, “Wacky Cakes and Kooky Cookies”.
I NEVER make them exactly the same—that is, it never occurred to me that they all should be uniform. One roll will be fatter, the next skinnier. Within any given roll, some cookies will look perfectly circular and others won’t. I don’t have room in the freezer, so I refrigerate them at several different points in the process. My rolls and squares always stay as I make them—I don’t have trouble with flattened sides. I don’t even use chopsticks to make my dough depth consistent, although I do think it’s a good idea. It’s just that these cookies are much easier when one forgets about perfection. The patterns of each cookie (plus the low-sugar deliciousness) mean that having each cookie slightly different is part of the charm and surprise.
I’m going to try your dough—I usually make at least 2x both vanilla & choc (4x total), and making that much will help me see whether it behaves the same way as what I’m used to. Remember, I’m still trying to figure out how to make that roll tighter!
Thank you! Amy
Paola says
Made it and loved it! do you think this would be a good alternative to a nut free lintzer base? Especially the chocolate one.
Erin Clarkson says
Hi! Yes it will work great as a cut-out cookie!
Madeline says
Yuum, my Nana made biscuits like these when I was a girl and I've been searching nostalgically for a recipe ever since. These hit the spot! Always love your work, Erin ♡ I'm forever telling people you're my favourite recipe creator on the internet!
1000043825
1000043840
CJ says
Wonderful recipe that works exactly as written. I’ve tried to make pinwheels at least three times and failed miserable every time except for this one! follow the instructions carefully and be patient 🙂 Thank you Erin!
Siena says
These are delicious! They also worked perfectly at high altitude (7,000 ft)!
Jen says
I made these on Valentine’s Day and it was so much fun! They turned out so pretty, and they taste delicious! Everyone was incredibly impressed. Will definitely make again!
Erin Clarkson says
still cracking up at just how enormous the container of cookie cutters you have is! You did warn me hahahaha. They came out so beautiful x