

This homemade peach pie recipe has a simple peach pie filling, surrounded by an easy, flaky pie crust. Peach slab pie is the perfect summer dessert - this pie can be made with fresh or frozen peaches.

Table of contents


Homemade Peach Pie
Hi! I hope you are keeping well. Just popping in to share this super easy peach pie recipe. One of my favourite things to do with peaches aside from eating them fresh is to turn them into a pie. I have a bunch of fruit pie recipes on my site, and this easy peach pie has to be one of my favourites.
Homemade pies are one of my favourite things to bake, which is funny seeing as fruit pies aren’t super popular in New Zealand. I love how relaxing they are to make, that the homemade pie crust can be made ahead, and that you don’t need any fancy ingredients. All you need is some baking staples and your fruit for your filling! Pies can be made ahead and frozen, or baked ahead of time and re-heated. They can also be served at room temperature, making them the perfect versatile summer dessert.

Peach Pie Filling
This peach pie recipe has a super simple fresh peach pie filling, which comes together quickly. I like to use fresh peaches for my pie filling, but this can also be made with frozen peaches if you like. The filling is super simple. I like to prepare my peaches, then quickly combine the ingredients for the filling after I have rolled out the top crust and bottom crust for the pie.
When you are making homemade pie filling, it is important to combine the cornstarch with the sugar before tossing with the fruit. This ensures that there aren't any lumps in the starch, which could give you lumps in your pie filling!
How to make peach pie using frozen peaches
This recipe for peach pie works great with fresh or frozen peaches. To use frozen peaches, you will want to defrost them before using - I find the quickest way to do this is to spread them out on a sheet pan and defrost at room temperature, or you can defrost in a container overnight in the fridge.
Choose frozen peach segments for pie, and make sure that you drain peaches from any excess liquid before using.

How to Peel Peaches
I peeled my peaches for this peach pie because I prefer them that way. To do this, you use a large pot of boiling water. Set up a large bowl with ice water. Score an x in the bottom of each peach, and boil them, 3 or 4 at a time, for 30 to 45 seconds. Remove using a slotted spoon and transfer to the ice bath. The skins should slip off. Non-peeled peaches are fine too - this process is a little more labour intensive, but I think it’s worth it (and it’s pretty satisfying!)
Easy Homemade Pie Crust
I use my go to homemade pie crust recipe for this peach pie - you can read all my tips and tricks on how to make the best pie crust in my pie crust post.
A slab pie has a high filling to pie crust ratio (the best), which means that it does require a higher quantity of dough than a regular double crust pie. I find that it is best to make two batches of the dough rather than one big one.
It can be hard to know when the dough is properly hydrated with a bigger batch, so you will need to make two batches of the dough that is listed in the recipe. However, you will only need one quantity of the water mixture (water, apple cider vinegar and ice). It will be enough to hydrate both of the doughs.

How to assemble a pie
This is the order I do things in when I am making a pie like this. It may seem trivial, but I think that it is helpful to explain why I do things in the order that I do! Otherwise you may end up with pie dough that is too warm to work with, and a soggy pie filling.
- Make the pie crust. I like to do this the night before if I can, but it will need at least two hours in the fridge before using if you are doing it on the same day. You can also make your pie crust ahead and freeze it - there are notes in my how to make pie crust post.
- Roll out the crusts. I roll out the bottom crust first - if there is a lot of overhang you can trim this back slightly and use the offcuts for more lattice strips or pie stamps. Fit the bottom crust to your pan and place in the fridge to give it a kick start at firming up.
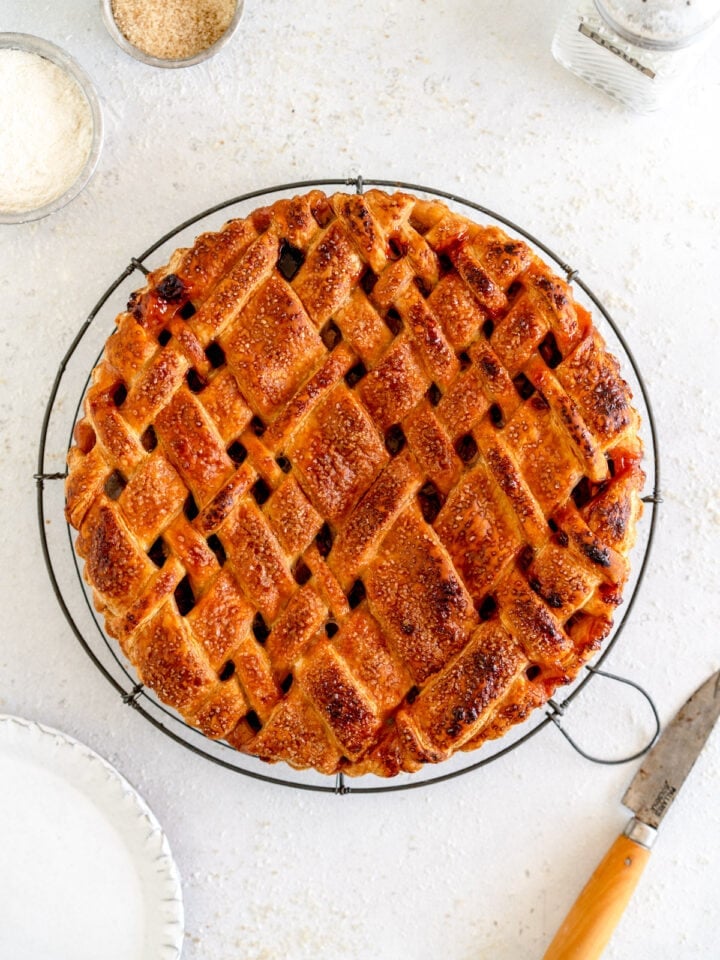
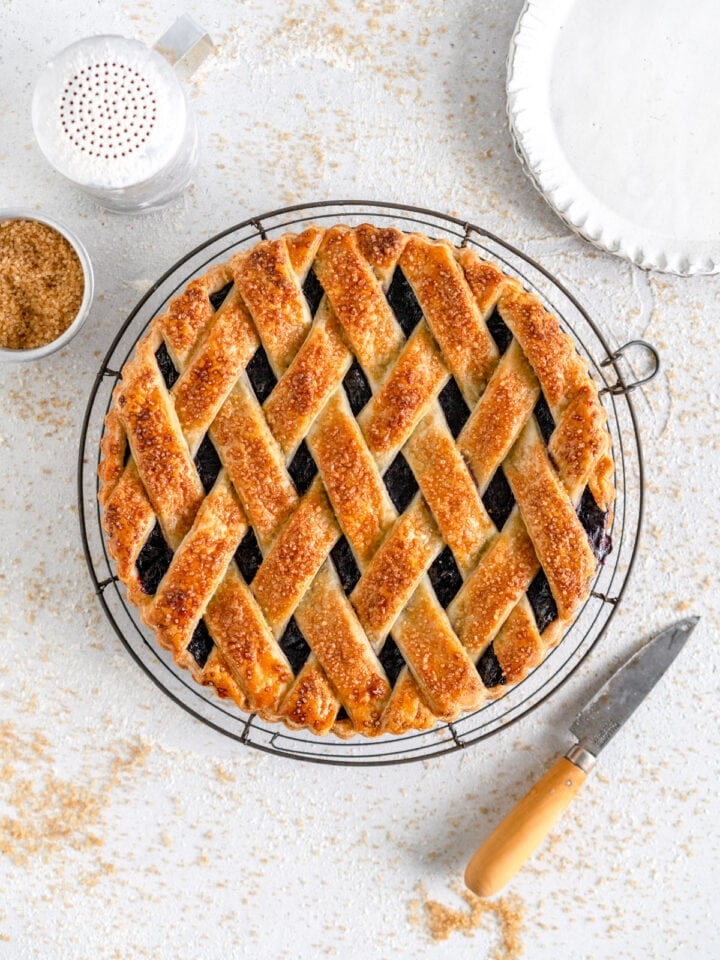
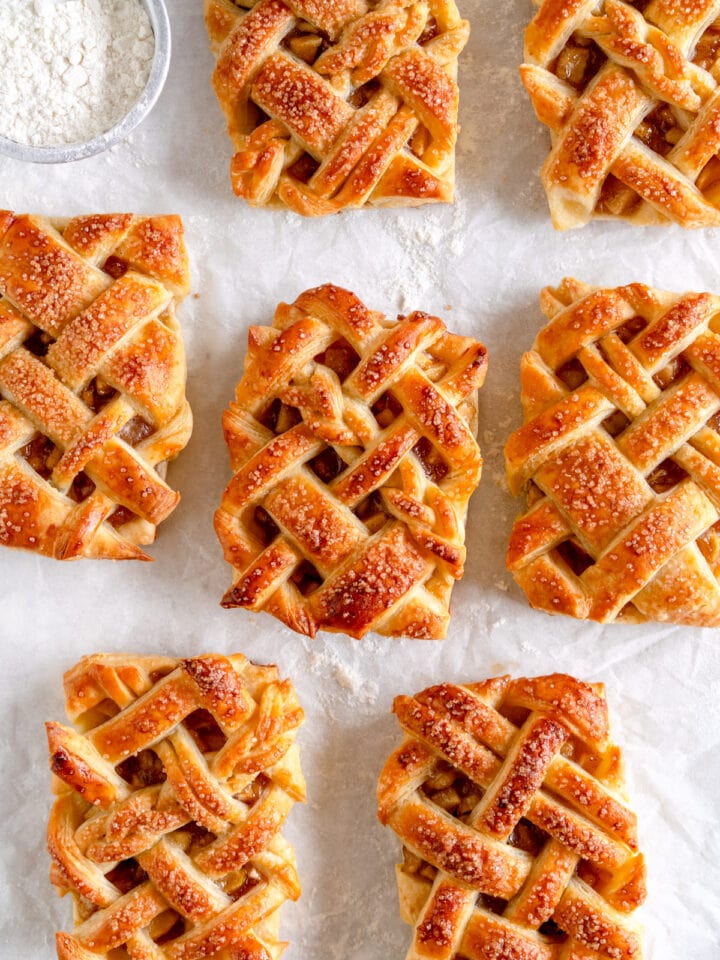
- Roll out the top crust. I like to start my pies with the lattice strips already cut - seeing how many I have to start off with helps me decide spacing of the lattice on the pie, and also I know if I will need extra offcuts rolled out to make more lattice strips. I roll it all out, and cut the lattice strips and place them onto a parchment paper lined sheet pan and pop them into the fridge until I am ready.
- Make the filling. I usually make the peach pie filling just before it goes into the pie crust lined pan, so that it doesn't get too soggy in the bowl.
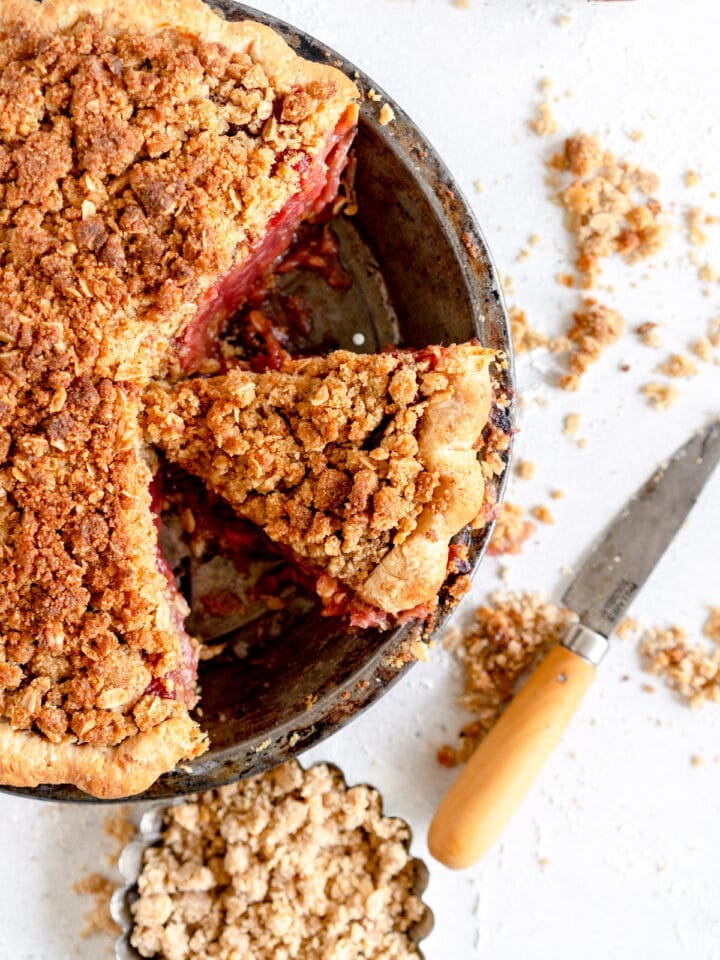
- Assemble the slab pie. Now is the fun part - the lattice. Having your strips already cut means that they have had some time to chill down a little which should make latticing your pie a little easier. If you are worried your pie crust is getting too warm at any point, just pop the whole thing into the fridge. I did a lattice using different sized strips and then used some pie stamps to make shapes from the leftover crust, but you can make it as intricate or as simple as you like - it will all taste delicious.
- Chill. Give your pie at least 30 minutes to chill in the fridge to let the pie crust chill back down. Cold pie crust plus hot oven = nice flaky pie crust when the butter in the crust creates steam, giving you layers. Chilling both your bottom crust and your lattice strips as you are assembling them also gives you a nice head start on this. If you have the time for it, I like to chill my pie for about an hour before baking.

How to Peel Peaches
I peeled my peaches for this because I prefer them that way for pie. To do this, you use a large pot of boiling water. Set up a large bowl with ice water. Score an x in the bottom of each peach, and boil them, 3 or 4 at a time, for 30 to 45 seconds. Remove using a slotted spoon and transfer to the ice bath. The skins should slip off. Non-peeled peaches are fine too - this process is a little more labour intensive, but I think it’s worth it (and it’s pretty satisfying!)
FAQ for Peach Pie
How to freeze a pie
Fruit pies freeze super well! You can either freeze them baked or unbaked - I like to place it uncovered in the freezer and freeze until solid, then wrap tightly and return to the freezer. If you have frozen it unbaked, you can bake it directly from frozen, you will just need to add some more time on to ensure the pastry is cooked through. To reheat a baked frozen pie, leave to thaw at room temperature for about an hour and a half, and then bake at 375°f / 190°c until warmed through. This is great for leftovers or if you want to make the pie while peaches are in season and store for another time.
What pan size did you use?
I used a quarter sheet pan for this pie, which is 9"x13". You want something relatively shallow.
How did you make cut outs on the top of the pie?
I used the leftover scraps from the pie dough to cut out the shapes for the top of the pie with pie stamps. You can just gather your scraps and press them together, then roll out and freeze for about 10-15 minutes before stamping out your desired shapes. Alternatively you can finish the pie with a crimped edge.

For more pie recipes, check out:
❤️ Made this recipe and love it? ❤️
I would LOVE for you to leave me a review and star rating below to let me know how you liked it! Also, please make sure to tag me on Instagram!
Answers to your baking questions
Over the years, many of you have asked me questions about:
- baking in grams
- adjusting oven temperatures
- what kind of salt to use
- and many more!
I've curated and answered them all for your easy reference in this frequently asked questions post!
Recipe for Peach Slab Pie
Print Peach Pie
- Prep Time: 1 hour
- Cook Time: 1 hour 5 minutes
- Total Time: 4 hours
- Yield: 16 servings 1x
- Category: Pie
- Method: Baking
- Cuisine: American
Description
This homemade peach pie has a simple peach pie filling, surrounded by an easy, flaky pie crust. Peach slab pie is the perfect summer dessert - this pie can be made with fresh or frozen peaches.
Ingredients
Pie Dough (Make this quantity twice to give you two rectangles of dough - see tips)
- 540g All-purpose flour
- Pinch of salt
- 15g granulated sugar
- 345g cold unsalted butter, cut into cubes
- 240g cold water
- 1 cup ice
- 60g apple cider vinegar
Peach Pie Filling
- 4.5lbs (2kg) fresh peaches, peeled, de-stoned, and cut into eighths (see notes for peeling)
- 65g corn starch
- 100g granulated sugar
- 100g light or dark brown sugar
- ½ tsp salt
- Egg wash - 1 egg whisked with 1 tablespoon water
- Raw / turbinado sugar to finish (optional)
Instructions
PIE DOUGH
- Place flour, sugar and salt into a large bowl. Cut butter into chunks, and add to the flour. Toss lightly to coat.
- Working quickly, using a pastry blender or your thumb and fingers, cut the butter into the flour mixture until there are only large pea-sized chunks left. You want a few lumps of butter remaining to keep the pastry nice and tender.
- Combine ice, water and cider vinegar in a bowl. Sprinkle a few tablespoons of the ice water into the flour and butter mixture, and using a stiff spatula or your hands, mix in well. Continue adding water a tablespoon at a time ( I usually start with about 180g liquid, mix that in, then go from there and add additional liquid as needed) until you have a dough that holds together well, but is not too wet.
- Squeeze together with your fingertips to make a homogenous dough. Shape into a rectangle, Rest in the fridge for one hour.
- Repeat the process and make a second batch to give you two rectangles of dough - one for the bottom crust, and one for the top lattice.
- Work with one piece of dough at a time. Roll out the dough on a floured surface into a rectangle, fold it in thirds like a letter, then roll again and repeat the folding. Repeat this process one more time. Shape back into a rectangle. Rewrap tightly in plastic. Repeat the folding process with the second piece of pie dough. Rest the pie dough for at least two hours, or preferably overnight, before using. Store pie crust in the fridge for up to 3 days, or in the freezer for up to 3 months.
PIE ASSEMBLY AND BAKING
- Have a quarter sheet pan (9" x 13" baking sheet) ready.
- On a lightly floured surface, roll one of the rectangles of dough into a shape slightly larger than your sheet pan. You want it to be approximately ⅛ inch (3mm) in thickness. Line the pan, leaving the extra dough overhanging. Trim the dough so there is about 1 inch overlapping the edge of your dish.
- Place in the fridge while you prepare the filling and lattice. Wrap any offcuts of dough in plastic wrap and place in the fridge until needed.
- Roll out the second piece of dough, and cut lattice strips - you can lattice any way that you like, I did strips of different widths and made two braids. Place cut out lattice pieces on a baking sheet lined with parchment paper and refrigerate until needed.
- Place the peaches in a large bowl. In a smaller bowl, combine the corn starch, sugar, light brown sugar and salt, and mix until there are no lumps. Add to the peaches and toss well to combine. Transfer to the pie crust lined sheet pan. Top with lattice strips. Trim back any overhanging pastry, and either crimp the edge or add on cut out pieces made from the scraps (see notes), fixing down with a little egg wash.
- Transfer the pie to the fridge for at least 30 minutes.
- While the pie is resting in the fridge, preheat the oven to 425˚f/ 220˚c. Place a baking tray on the bottom rack of the oven. Brush the pie with eggwash and sprinkle generously with sugar. Place on the baking tray and bake for 20 minutes, or until the pastry has set and is beginning to go golden.
- Reduce the oven temperature 375˚f / 190˚c, return the pie to the oven, and bake until the pastry is deeply golden and the filling is bubbling, 45 to 50 minutes, tenting the edges with foil if needed.
- Remove the pie from the oven and allow to cool to room temperature (this allows the filling to set). Serve at room temperature or slightly warmed.
- Store pie leftovers lightly covered at room temperature (or see notes for freezing).
Notes
I find that it is best to make two batches of the dough rather than one big one, as it can be hard to know when the dough is properly hydrated with a bigger batch, so you will need to make two batches of the dough listed in the recipe. You will only need one quantity of the water mixture (water, apple cider vinegar and ice) - that is enough to hydrate both of the doughs.
Comments
Adrianne says
Made this last week and it was excellent! I cooked about five minutes less than advised since the top was browning. Also, the dough recipe made a lot of extra so I froze rounds for future hand pies. Thanks, Erin!
Julia says
Can you use tinned peaches? Would there be any extra step? Thanks
Erin Clarkson says
I haven't tried sorry! Tinned peaches are sweetened and soaked in syrup so it would mess with the filling I think
Caiti says
Hi Erin! I was recently diagnosed with a corn allergy. Have you any experience with using arrowroot as a substitute for cornstarch? If not, I may still try and report back. 🙂 Thanks!