
This apple hand pie recipe has a unique twist to it - it has a sharp cheddar pie dough. Adding finely grated cheese to pie crust is an amazing way to add a super subtle but crazy delicious twist on a classic apple pie. Lattice instructions plus visual guidance included!

Hi hi! Just popping in to share the recipe for these Apple Hand Pies! Hand pies are basically a mini, handheld pie, and I love making them. These apple hand pies have an easy precooked apple pie filling, which I also use in my easy apple pie recipe, and a sharp cheddar pie dough, which is a super fun twist on a regular homemade pie dough recipe. Just trust me on this one.
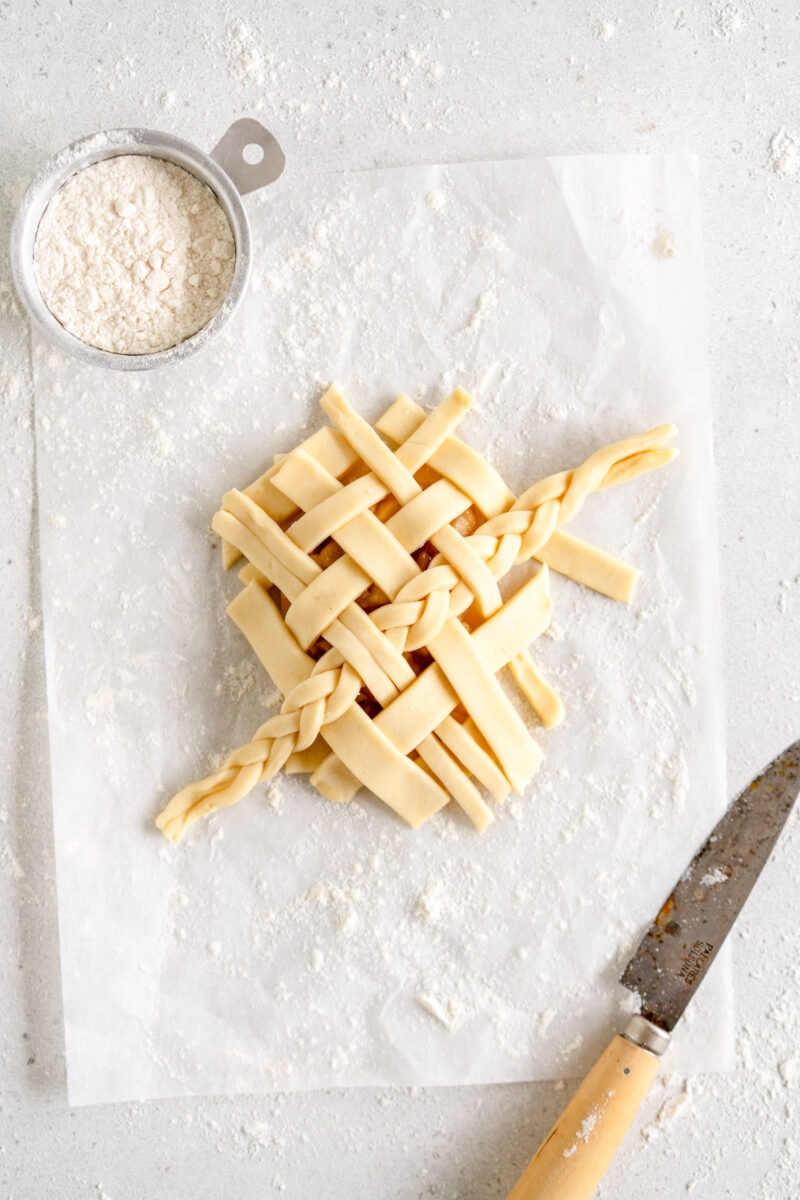
These apple hand pies are super flaky, and can be finished any way that you like. I went for a braided lattice of varying thicknesses, which I think looks so cute all baked up! There is a visual guide in the post but feel free to keep it super simple too.
These are different from a turnover in that they have a top and bottom, whereas a turnover is made from one piece of pastry that is folded (or turned) over to form the shape. This recipe makes 10 super delicious apple hand pies but you can absolutely scale the recipe too.


Apple Cheddar Pie
This apple hand pie recipe has a slightly unique twist to it - it has a sharp cheddar pie dough. Adding cheese to pie crust is an amazing way to add a super subtle but crazy delicious flavour to your crust. It is as simple as adding some freshly grated sharp cheese such as a sharp cheddar or an aged havarti to your pie dough when you combine the dry ingredients.
The cheese needs to be finely grated so that it incorporates into the pie dough, but it adds an amazing depth of flavour. You may be thinking to yourself 'apple and cheese?! no thank you!' but I just need you to trust me on this one. It's so, so good. The slightly savoury flaky pie crust against the sweet precooked apple filling and then the crunchy sugar on the top is just the best thing ever. I hope you love it as much as I do!
When you are choosing a cheese to use in your cheesy pie dough, you want to go for something firm and aged. You could use a sharp cheddar, or I made these with an aged havarti and it was amazing. You could also incorporate some parmesan, or something like a manchego would be so good too.
Make sure that it is freshly grated. I use the smaller holes on a box grater to grate the cheese just as I am combining the dry ingredients for the pie.

Precooked Apple Pie Filling
These apple hand pies use a precooked apple pie filling, which I borrowed from this apple butterscotch pie that comes from Erin's Pie Book. Using a precooked filling is super beneficial for a few reasons. It takes the guesswork out of the filling. By precooking your filling, you know how thick it is going to be before it goes into the oven, so you don't have to worry about it not thickening up enough in the oven.
This is especially important for something like a hand pie. It also stops it going everywhere in the oven. The precooking of the apple means that the filling is easy to work with, and is a necessary step for a hand pie, as these only bake for 25 minutes, which would not be enough time to cook the apple filling and also get a beautiful flaky crust. The precooked filling is super easy to make:
- Combine melted butter, apples, brown sugar, cinnamon and salt in a pan and cook until the sugar and butter have melted and the apples have started to soften.
- While that is cooking, combine the flour and sugar in a bowl. This removes any lumps from the flour to prevent any lumps in your filling.
- Add the flour mixture to the pot and cook until it thickens.
- Transfer to a pan and leave to cool until you are ready to assemble. To cool it down fast, spread it onto a sheet pan, which increases the surface area and helps it to cool quickly.

How to make easy to work with Pie Dough
I use a little tip that my baking bestie Erin Mcdowell taught me - to laminate my pie dough after making it but before rolling it out for use. What this does it pops a few layers within the pie dough. This makes it homogenous and easy to work with but also still nice and flaky. So you get the best of both worlds - flaky AF pie dough which is super easy to work with. This is especially helpful for something like these apple hand pies which have a more intricate lattice. Here's how you do this:
- Make your pie dough - For this recipe I make the dough then form it into a rectangle. Then I wrap tightly in plastic and chill for only an hour. This gives the butter time to chill down enough that it won't melt everywhere when you roll it out.
- Roll out and perform turn 1 - Roll the dough into a large rectangle on a lightly floured surface. Then brush off any excess flour and perform a letter fold - where you fold it like a business letter.
- Perform turns 2 and 3 - Repeat the process again two more times. Your dough should be super homogenous at this point!
- Shape - At this point I shape the dough into the general shape I am going to need when rolling it out. In the case of these apple hand pies I just shape into a big rectangle and then wrap tightly.
- Chill again - Either chill your dough for at least 2 hours or overnight, or freeze for another time.
See all the tips and tricks for pie crust in my post: How to make Pie Crust.


How to Lattice a Hand Pie
There are a few ways to finish off these apple hand pies. I went for the super extra method because I have zero chill, but you can do whatever you like. I suggest cutting all your bottom pieces at once and then cutting all your top strips so you can just sit and assemble the pies.
A super cute way to lattice these apple hand pies is use strips of varying widths. This way you can trim edges and use up excess dough as you need without it being super obvious. Here's how I latticed these apple hand pies:
- Lay down all the strips going in one direction. They will extend over the edges, if any are super long then you can trim them and keep the strip for another lattice.
- Add the strips going the opposite direction one at a time. To do this you lift up every second strip - so 1,3,5,7, then lay down your strip. Fold them back down then fold up the alternate strips - 2,4,6,8 etc.
- Once your lattice is done, carefully trim the edges with a sharp knife so that they are nice and clean, then transfer the apple hand pie to a baking sheet.
If you didn't want to do an intricate lattice you could just make super wide strips and use those to cover the pie.


Tips for a clean lattice on a pie
There are a few things that really make a difference when making a nice, clean lattice on a pie. They may all seem like small details, but when you are making something fiddly like a pie lattice the details really matter.
- Keep things cold. If you're worried your pie dough is getting too hard to work with, just throw it into the fridge for a bit to let it firm up.
- Use a ruler. I use a ruler and a pastry wheel when I am cutting pie dough, and it really helps to keep things nice and tidy.
- Have a plan. Work out your basic design before you start - with these I kept them all with an angled lattice. You can pick a general theme and go from there, it just helps to have an idea in your head.
- Make all your decorations first. I always make the braids first as they need 'fresh' dough (they aren't as clean made from scraps), and put them on a parchment lined tray and store in the fridge until I need them.
How to use up extra pie dough scraps
With any pie, but particularly one with lots of different pieces of dough like these apple hand pies, you will have scraps leftover. These are perfectly fine to use. They may not be quite as flaky as the dough that has only been rolled out once, but they work just fine.
To use up pie scraps, just gather them up as you have them, and gently press them back together. Wrap them in plastic and pop into the fridge for about 15 minutes to firm up slightly, then you can roll them out and use them.
This apple hand pie recipe makes 10 hand pies, but you will have a tiny bit of filling and pastry leftover. If you wanted to, you could probably get an extra two pies out of the leftovers.

FAQ for Apple Hand Pies
What tools and equipment do you use?
You can see a full list of all the tools I use here
Can Apple Hand Pies be made ahead of time?
I haven't tried it, but you can likely freeze these before you bake them. Alternatively you can assemble them and leave lightly covered in the fridge overnight and bake off the next day.
What are the best apples for making apple pie?
I used a mix here of braeburn and granny smith. I like the variation in flavour and texture. Just grab a mix of things that you like.
How big should I roll the piece of dough used for the bottom rectangles of the hand pies?
I roll it out so that it is at least 20cmx35cm (about 8"x14"). This way you can cut two rows of five rectangles measuring 7cmx10cm (about 3"x4"). Aim to go slightly larger than that though so you can get a nice clean rectangle that is 20cmx35cm and cut your pieces from that.
How do you stop apple hand pies from going soggy
Store apple hand pies in an airtight container either in the fridge or at room temperature. They will soften over time, but to refresh and re crisp up the pastry, refresh them in a 350°f / 180°c oven for about 15 minutes to reheat and crisp up the pastry.

❤️ Made this recipe and love it? ❤️
I would LOVE for you to leave me a review and star rating below to let me know how you liked it! Also, please make sure to tag me on Instagram!
Answers to your baking questions
Over the years, many of you have asked me questions about:
- baking in grams
- adjusting oven temperatures
- what kind of salt to use
- and many more!
I've curated and answered them all for your easy reference in this frequently asked questions post!
Recipe For Apple Hand Pies
Print
How to make Flaky Apple Hand Pies
- Prep Time: 90 minutes
- Cook Time: 30 minutes
- Total Time: 4 hours
- Yield: 10 servings 1x
- Category: Pies
- Method: Baking
- Cuisine: American
Description
This apple hand pie recipe has a unique twist to it - it has a sharp cheddar pie dough. Adding finely grated cheese to pie crust is an amazing way to add a super subtle but crazy delicious twist on a classic apple pie. Lattice instructions plus visual guidance included!
Ingredients
Pie Dough
- 470g all-purpose flour
- Pinch of Salt
- 125g sharp cheese such as sharp cheddar or aged havarti, finely grated
- 280g cold unsalted butter, cut into cubes
- 240g cold water
- 1 cup ice
- 60g Apple cider vinegar
Apple Filling
- 40g unsalted butter
- 600g peeled and diced apple (weight is of diced apple, not whole fruit)
- 1 tsp vanilla extract
- 150g light or dark brown sugar
- 1 tsp apple pie spice or ground cinnamon
- pinch of salt
- 45g granulated sugar
- 40g all-purpose flour
To finish
- Egg wash - 1 egg whisked with about 1 tablespoon of water
- Raw / Demerara sugar for sprinkling (optional)
Instructions
PIE DOUGH
- Place flour, salt, and freshly grated cheese into a large bowl. Mix to combine. Cut butter into chunks, and add to the flour. Toss lightly to coat.
- Working quickly, using a pastry blender or your fingers, cut the butter into the flour mixture until there are only large pea-sized chunks left. You want a few lumps of butter remaining to keep the pastry nice and tender.
- Combine ice, water and cider vinegar in a bowl. Sprinkle a few tablespoons of the ice water into the flour and butter mixture, and using a stiff spatula or your hands, mix in well. Continue adding water a tablespoon at a time ( I usually start with about 180g liquid, mix that in, then go from there and add additional liquid as needed) until you have a dough that holds together well, but is not too wet.
- Squeeze together with your fingertips to make a homogenous dough. Shape into a rectangle, Rest in the fridge for one hour.
- Roll out the dough on a floured surface into a rectangle, fold it in thirds like a letter, then roll again and repeat the folding. Repeat this process one more time. Shape into a rectangle.
- Wrap tightly in plastic, then leave to chill in the fridge for at least 2 hours, or up to overnight.
APPLE FILLING
- Place the butter into a medium pan. Add the apple, vanilla, brown sugar, cinnamon and salt, and cook over medium heat, stirring frequently, until the butter and sugar has melted. Continue to cook for 3-4 minutes until the apple has softened slightly.
- Combine the sugar and flour in a bowl. Add to the apple mixture and cook, stirring constantly, until the mixture has thickened up.
- Transfer to a sheet pan and leave to cool uncovered at room temperature.
ASSEMBLY
- Remove the pie dough from the fridge and divide into two pieces. Wrap one piece up and place back into the fridge until ready to use.
- On a lightly floured surface, roll out the other piece of pie dough into a large rectangle, approximately 25cmx40cm (10x15"). This ensures you have enough room to cleanly cut out 10 rectangles.
- Using a ruler and a pastry wheel, cut out 10 rectangles, each measuring 7cmx10cm (3"x4"). Transfer to a parchment paper lined baking sheet and place in the fridge until ready to use.
- Roll out the remaining piece of dough into a large rectangle (or you can do this in sections if that is easier). Aim for about the same thickness as the first piece. Cut lattice strips as desired - you want to make sure that some of them are at least 15cm long if you are making an angled lattice like I did, to ensure they are long enough to fit. Place your prepared lattice strips onto a parchment paper lined sheet pan and place into the fridge.
- Squish any scraps back together and place into the fridge until ready to use.
- To assemble the hand pies, I find that it is easiest to work with one at a time. Take a rectangle of pie dough and place it on your work surface (you can lightly flour it or use a piece of parchment). Spread with a little of the apple filling, leaving a space around edges (see image in blog post).
- Top with strips of dough all going the same direction (see images), then lattice with the strips going in the opposite direction. Lattice however you like. I find that if there is a lot of overhang on a strip, I can cut it and use it in a different part of the hand pie where a shorter strip of dough is needed.
- To finish, take a sharp knife and carefully cut around the border of the pie so that the lattice is flush with the bottom piece of dough. This should create enough of a seal.
- Carefully lift up your hand pie and place it on a parchment paper lined baking sheet in the fridge.
- Repeat the process with the rest of the pies until you have latticed them all. Use scrap dough to make more lattices if needed. You may have a little filling and pastry left over - feel free to make this into a few more hand pies!
- Once all the pies are done, leave them to chill in the fridge for at least 30 minutes to allow the pastry to firm up. While the pies are chilling, preheat the oven to 375°f /190°c.
- Brush the tops of the pies with egg wash and sprinkle with sugar if desired. Bake the hand pies for 20 to 25 minutes, until the pastry is deeply golden. Remove from the oven and allow to cool slightly on the pan then transfer to a wire rack to cool completely.
- Serve at room temperature or slightly warm. Store leftovers lightly covered at room temperature. Refresh briefly before eating if desired.
Notes
Apple filling from 'the book on pie' by Erin McDowell
Comments
Stacy says
These will be perfect for Thanksgiving! Thanks so much!
Caribou says
Thanks, as always for all the detail in this post. The recipe is delicious and works perfectly 🙂
Janessa says
Made these for thanksgiving, it is absolutely ridiculous how good they taste!! Savory and sweet and sooo good. I’m not very experienced with pastry and thought I screwed it up initially, but it turned out lovely after rolling and folding, and was so easy to work with. They were very popular after dinner, and I will definitely be making them again soon!
Rebecca W says
Made these for Thanksgiving and everyone loved them. It was my first time making my own pie dough and doing the fancy lattice tops, but your directions were great.
Hannah says
Still in the oven but they seem to be leaking. Is that my butter? Was the dough not chilled enough? Or maybe the oil from the cheese? I used an aged white cheddar. Maybe they will still turn out alright 🙏🏼🤣
Erin Clarkson says
Hi! How did they go? Butter leakage is usually due to how you make your pie dough, if your butter chunks were too big then it will leak in the oven!
Hannah says
They actually turned out fine and if I hadn’t looked in the the oven in the middle of them baking, I wouldn’t have noticed any leakage. Next time I’ll make my butter chunks a tad smaller just to be safe! Thanks! Very tasty 🥰
Erin Clarkson says
Ahhh good! I am queen of the mid-bake panic so you're all good! haha 🙂
Alicia C. says
I want to start by emphasizing that this pie crust recipe is truly the EASIEST and most forgiving pie dough recipe I have ever tried, and I’ve tried A LOT of recipes and every one has left me frustrated and made me give up and just buy store bought. From now on, this is my go-to pie crust recipe! Soooo flaky!!! It also has such a nice crunch to the outer layer and softness to the inner layer! 100% recommend this pie crust!
The filling is delicious as well! I wanted to eat a bunch before assembling, but held back.
The only thing I found difficult (and frustrating at times) that took some trial and error was the assembly and lattice work. Probably because I don’t work with pie dough often and am not fast at lattice work, it took A LOT of time to cut and assemble these (as in 2-3 hours) and I finally gave up and waited until the next day to finish the double batch I made. Also, the amount of pie filling to fill these with was trial and error as well through watching the videos on Instagram and here on the website. I may have missed a specific measurement for the filling in the directions, but from what I read, there was no instruction. From my trial and error, definitely fill them with more than you think you should. Mine also did not seal quell with just a sharp knife cut, so I went old style and did fork marks as well as wetted with my fingers between the lattice and the bottom layer, which worked very well.
Overall, the taste is spot on (as with all of the recipes I’ve tried off of cloudy kitchen) even with re-rolled dough finished two days later, but for a newbie to mini-pie making and homemade pie crust, I suggest starting with a single batch and making sure you have LOTS of time to trial and error your way through the assembly process. Definitely do one test hand pie before doing the rest of your batch!
Thanks Erin for yet another great recipe and don’t listen to the naysayers about using metric. There are some of us in the US who appreciate the metric system as well! 🙂 Happy baking!
Erin Clarkson says
Hi! So happy you loved! Thank you so much for the feedback - next time I make them I will measure the quantity of the filling so that I can add a note! Latticing is definitely something that takes practice, but at least it is very, very delicious practice! haha 🙂
Julia says
I'll never make apple pie another way. These are so cute and well worth the effort to make the lattice. The pastry with harvati is really good and not what you'd expect when you see a recipe with cheese in the pastry.
Sally says
Hi Erin! Love you and your blog. Could I use the Brioche dough from your Soft-Baked Apple Cinnamon Rolls to make these hand pies? (Only because I really want to attempt that dough) or do you recommend just using the dough recipe here without the cheddar?
Sam says
Used this pie crust recipe for my chicken pot pie last night and it was incredible! Thank you!!