
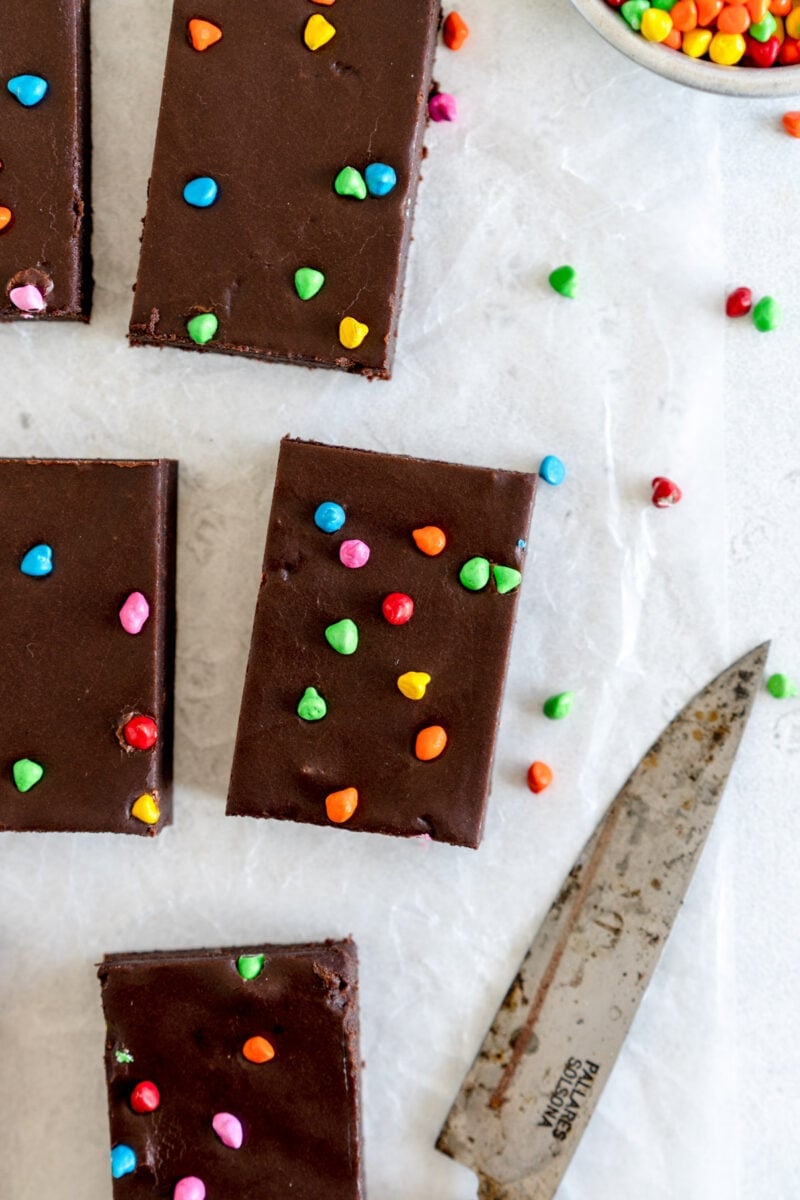
Homemade Cosmic Brownies have a fudgy brownie layer topped with a smooth chocolate icing and rainbow sprinkles. They are quick and easy to make, and are the perfect easy brownie recipe!
Hi hi! I am just popping in to share the recipe for homemade cosmic brownies with you! I love making homemade brownies, and once I got a great fudgy brownie recipe nailed, I started to play around with variations of it.
I love having one great back pocket recipe that is super versatile and this brownie recipe is certainly it. You can take the one recipe and make cheesecake brownies, brookies, brownie pie, and now these perfect homemade cosmic brownies!


What are Cosmic Brownies?
I didn't grow up eating cosmic brownies as a kid in New Zealand, but heard about them when I moved to the US. The original Cosmic Brownie is made by a brand called Little Debbie's, who make classic packaged treats. We tried them when we lived in New York and once we moved back to New Zealand I decided I should have a go at making a copycat cosmic brownie!
The original cosmic brownie is a chewy, fudgy brownie, topped with a thin layer of chocolate icing, and rainbow sprinkles. I took my favourite brownie recipe, and baked it in a 9"x13" pan rather than a 9" square, giving a much thinner brownie.
Once the brownie is baked, you add a simple chocolate icing, which comes out nice and smooth as it melts from the heat of the brownie. The whole thing is finished off with rainbow sprinkles, then goes in the fridge to chill until you are ready to serve. Super easy, and super delicious.

How to make Cosmic Brownies
Homemade Cosmic Brownies are super easy to make, and I love that the whole process can be done in one go, rather than having to wait for the brownie to cool before adding the icing.
- Make the brownie layer. This is a super easy brownie recipe, baked in a 9"x13" pan until just done. You don't want to over bake them so that they stay nice and fudgy.
- Make the Icing layer. While the brownie is baking, assemble your icing ingredients. You want to start mixing the icing together once the brownie is out of the oven so that the icing can go on while the brownie is hot. Some recipes use a chocolate ganache made from chocolate and heavy cream, but I went with a super easy icing instead!
- Add the icing. Transfer the icing to the hot brownie, and smooth out. The heat from the brownie will melt the icing, making it nice and smooth and flat.
- Add sprinkles. Add your sprinkles of choice to the top of the brownie.
- Refrigerate. This part is important - it is important both for letting the icing set but also allowing the brownie to chill down to be that perfect fudgy, chewy texture and rich chocolate flavor.
- Slice and enjoy! Remove the brownie from the pan and cut into pieces using a super sharp knife.
For all my tips and tricks on perfect fudgy brownies, check out my super easy brownie recipe

My Top Brownie Tips
- Get all my tips and tricks on how to get the perfect crinkly brownie top in my fudgy homemade brownie recipe.
- Plus, follow this easy Instagram video tutorial to cleanly cut homemade brownies!
Cosmic Brownie Sprinkles
The original Little Debbie's Cosmic Brownie has rainbow candies on the top that are basically candy coated chocolate chips.
I looked all over for these to find somewhere that ships them to New Zealand, and ended up getting them from a place in Australia. You could also use these rainbow chips, or you may be able to find them at craft stores. You could also use mini M&M, or the sprinkles of your choice!
How to avoid crinkly icing on your cosmic brownies
This is a strange thing to write a paragraph about, but I know a lot of you love attention to detail as much as I do. When I was testing this cosmic brownie recipe, I was having problems with the icing cracking as it cooled, or as I pulled the brownies out of the pan. There were a few reasons for this, and this is how I fixed them:
- The frosting was going on when the brownies were hot from the oven, causing the middle of the brownie to sink and the icing to crack when it cooled. Leaving them to sit for about 5 minutes meant that the brownie has time to set a little before the frosting goes on.
- The sprinkles were going on when the icing had just gone on, and so they sunk and made cracks. Leaving the icing to sit for 1-2 minutes after smoothing it on means the sprinkles sit on the surface.
- When I was testing, as I usually do, I was greasing the pan before adding the parchment paper to help the paper not wiggle when the brownie batter is added. This meant that when the cosmic brownies were chilled, it was hard to remove the paper from the pan, causing the icing to crack. Using an ungreased pan and parchment paper helped to fix this!

Frequently Asked Questions
What tools and equipment do you use?
You can find a full list of the tools and equipment I use on my products page
How do you store Cosmic Brownies?
Store cosmic brownies in an airtight container in the refrigerator for up to five days.
Can these be made gluten free?
I haven't tested it specifically but brownies generally are ok being made with a cup for cup gluten free flour replacement.
Can you freeze brownies?
I haven't tested freezing these brownies in particular, but if I was going to I would leave off the sprinkles, and place them in an airtight container in the freezer, then defrost either in the fridge or at room temperature.

❤️ Made this recipe and love it? ❤️
I would LOVE for you to leave me a review and star rating below to let me know how you liked it! Also, please make sure to tag me on Instagram!
Answers to your baking questions
Over the years, many of you have asked me questions about:
- baking in grams
- adjusting oven temperatures
- what kind of salt to use
- and many more!
I've curated and answered them all for your easy reference in this frequently asked questions post!

Cosmic Brownies
- Prep Time: 20 minutes
- Cook Time: 20 minutes
- Total Time: 40 minutes
- Yield: 16 servings 1x
- Category: Brownies
- Method: baking
- Cuisine: american
Description
Homemade Cosmic Brownies have a fudgy brownie layer topped with a smooth chocolate icing and rainbow sprinkles. They are quick and easy to make, and are the perfect easy brownie recipe!
Ingredients
Brownie
- 200g dark chocolate (I used 72%), coarsely chopped
- 180g unsalted butter, cold from the fridge is fine
- 15g dutch process cocoa powder, or regular unsweetened cocoa, sifted
- 3 large eggs (about 150g not including shells), at room temperature
- 200g caster sugar
- 100g light or dark brown sugar
- 2g (½ tsp) kosher salt
- ½ tsp vanilla extract or vanilla bean paste
- 100g all-purpose flour, sifted
Chocolate Icing
- 250g powdered sugar, sifted
- 25g cocoa powder (regular or Dutch Process is fine)
- pinch of salt
- 60g unsalted butter, cut into small pieces, at room temperature
- 40g boiling water
Rainbow Sprinkles of your choice to finish
Instructions
BROWNIE
- Preheat the oven to 350°f / 180°c. Line a 9”x13" (20cm x 30cm) pan with parchment paper, leaving a little extending up the sides of the pan to help remove the brownie. Please see notes for pan information.
- In a heatproof bowl over a pan of simmering water (make sure the bowl does not touch the water), combine the dark chocolate and butter. Heat, stirring frequently, until the chocolate and butter are melted and the mixture is smooth. Alternatively you can do this step in the microwave-safe bowl - microwave for 30 second increments, stirring well after each until the mixture is smooth and combined.
- Sift the cocoa powder over top of the chocolate and butter mixture and stir until well combined.
- In a large bowl, combine the eggs, granulated sugar, and brown sugar. Mix on medium to high speed with an electric handheld mixer for 2-3 minutes until the mixture has lightened and increased in volume. This step can also be done in a stand mixer using the whisk attachment.
- Add the chocolate mixture and mix to combine. Add the salt and vanilla and mix until incorporated.
- Add the flour and incorporate by hand until the mixture is smooth and does not have any lumps.
- Transfer the batter to the prepared pan, and tap the pan on the counter a few times to ensure there are no air bubbles. Leave to sit for a minute or two then bang again to ensure there are no bubbles.
- Bake the brownies for 18 to 20 minutes, checking after 15. You are looking for the edges and top of the brownie to be set, and when a skewer is inserted into the middle, it should come out with a few moist crumbs attached. You are best to lean toward under baking than over baking. While the brownie is baking, prepare the icing ingredients so you are ready to start making it when the brownie comes out of the oven.
- Remove the brownie from the oven and leave to stand for 5 minutes before starting making the icing.
CHOCOLATE ICING
- Sift together the powdered sugar, cocoa powder, and salt. Add the butter and mix until the butter is coated by the dry ingredients.
- Once the brownie has sat for 5 minutes, add the boiling water to the icing ingredients, and mix until the butter is melted and the icing is evenly combined. I like to start with a spatula and switch to a whisk to help the icing come together.
- Add the icing to the hot brownie, then carefully use an offset spatula or the back of a spoon to smooth the icing down. The heat from the brownie will melt the icing, helping it to smooth out.
- Once the icing is smooth, leave it to stand for 1-2 minutes, then add the sprinkles of your choice.
- Place the cosmic brownies in the fridge until completely chilled, a few hours or up to overnight.
- Remove from the pan using the parchment and slice into pieces using a sharp knife.
- Store in an airtight container in the fridge for up to 5 days.
Notes
I use a metal USA pan brand 9x13" pan. If you use a glass or ceramic pan, or one with rounded edges, you will need to likely adjust the bake time, as glass and ceramic do not conduct heat the same way as a metal pan does, and a rounded edge pan will be smaller than the pan that I used. Please make a note of this and adjust the bake time accordingly.
Comments
Claudia says
Had to bake something for my churchs cafe..chose these because..who doesn't like cosmic brownies??!
Got my baking scale out..my flour sister, my whisk..all the correct ingredients. Baked and frosted per the instructions to a T!! I don't know where i went wrong. They sit longer than 5 minutes at room temperature and they get really soft. Had to ask the ladies to make sure they stayed refrigerated until they were bought. Maybe too much butter in the mix? They were a hit, don't get me wrong! Everyone loved them. I just didn't like how they got really soft after sitting at room temperature for a few minutes 😐
Erin Clarkson says
Hi! Sorry to hear they didn't quite work out, is it possible that they weren't quite baked enough? If it is the brownie getting soft then that would be my guess for what might have gone wrong?
Laura says
These are the best brownies I have ever made! I made them for a Summer BBQ and for a family gathering and they just vanished !
Rachelle says
Yum!! I’ve never had cosmic brownies before and I’m not great at making brownies (always end up with a dry/cakey one), but this was delicious! I used a smaller pan and so it took ages to cook (my bad) but I think it has turned out pretty well. Thanks for the recipe!
Lex says
Saw this on Instagram and had to make it! Realised once I got all the ingredients ready that my scales had run out of battery. No worries, googled everything for approximate weight to cups/spoon measures & the brownie still worked out perfectly, couldn't recommend more. For those who review negatively about the measurements used, stop being so lazy!
Rachel Powell says
Great idea in theory. However, the bake time is completely wrong. I used the same exact temperature and pan and they took FOREVER to bake. 20 minutes isn’t nearly long enough. So when I took them out the middle was completely raw and runny still. Very frustrating, I recommend adjusting that. I had already added the frosting, and I should have checked the middle first. Regardless, with an updated recipe maybe this would be good. I just won’t use the recipe again.
Erin Clarkson says
Hi, it sounds like your oven temp might be off or something is going wrong as I have made them loads and the bake time is correct in my calibrated oven!
Maddy says
Love your recipes and am all for the accurate measurements! Huge fan but also had the same problem as others below. Baking time was triple and even then got sick of testing the baking and setting timers so chucked the icing on which then made it cave in the middle and all the raw mixture come out the sides 🙃 I’m so annoyed I just wasted half a block of butter. But maybe this recipe needs to be checked? I’m so sad lol
Erin Clarkson says
Hi, it sounds like your pan size was probably off or your oven isn't accurate. If you used a smaller pan, the mixture would have been thicker, so it would have taken longer to bake. Something has to have gone wrong on your end because even in a 9" square pan this mix bakes up thicker (it is my regular brownie recipe) and only takes about 25 minutes. So sorry they didn't work for you!
Erin Clarkson says
Hi! looping back here, I have just re-tested the recipe and the bake time is correct - I even got my husband to make them to cross check. Maybe if you used a ceramic or glass pan that could have been why they took longer to bake.
Erin says
These are so good! I can be a bit useless at following a recipe and always seem to make a few little adjustments. In this case, I used salted butter and left out the salt. I also used normal granulated sugar instead of caster sugar and it still turned out amazing. My measurements are always perfect though because we all know that weighing your ingredients means you get the same perfect results every time!
Amy says
This recipe doesn't have the correct bake time/temperature. I saw this recipe online and decided to try it (using a very new, calibrated oven) and followed the recipe exactly. After 20 minutes of bake time, the brownies are still raw inside.
Erin Clarkson says
Sorry they didn't work for you! Your pan may have been a little smaller than mine, which would have made the bake time a little longer.
Erin Clarkson says
Hi, I've just double tested this recipe and the bake time is definitely correct 🙂 If you used a ceramic or glass pan, this may have meant they take longer to bake than in the recipe, I used a metal pan.
Kimberly M. says
I made these tonight and they were great! I saw a few negative reviews and wasn't sure what to expect! The cooking time for me was 21 minutes. I did the toothpick method to ensure they were done and didn't solely rely on time. I know better lol My oven temp can fluctuate sometimes. I weighed everything exactly and they turned out perfectly!
Erin Clarkson says
yayyyy thank you so much!
S says
Hi!
My son has an egg allergy and I came across this recipe.
My husband loves cosmic brownies but always avoids getting them because they have eggs and he doesn’t want to not be able to share with him. Do you know of a replacement that would work?
Erin Clarkson says
I haven't tested anything sorry!
Charlotte McCallum says
I've failed a few times making brownies so my confidence was low but these turned out perfect! Very easy recipe but I'm still trying to find those beautiful sprinkles (lcm's).
Heather Laurie says
From someone who could never make brownies, this recipe is a hit. I love that it uses weights so that my kids can help bake it and I don't have to worry about the accuracy of what is going into it. So good that my youngest asked for birthday brownies instead of birthday cake!
Lucy says
So so good, I made it for my sons last day at preschool.
I didn’t read the pan size in the recipe properly and used a smaller one so needed to cook it for a bit longer, but it still turned out amazing.
Areta M says
Great recipe and even better brownies. Genius move to put them in a larger pan so the brownie and icing combo end up being the perfect thickness - I took this for a mum and bub group morning tea and they all went before I got the chance! I think next time I’d like to try with a ganache as I love ganache.. would you put it on while cool or still go with adding 5 mins after it’s out of the oven?
Erin Clarkson says
Hi! I would probably do the ganache once it was cooled? The warm brownie / icing combo is to melt the icing sugar in the frosting which ganache doesn't have. Please do let me know if you try it!
Jasmin says
This recipe is reliable and perfect. I've used all sorts of toppings. Done them with and without icing and they turn out perfectly every time.
Athena Welsh says
These were easy to make and so yummy! Had no issue with the cook time. Checked on them at 15 minutes and took them out at 18. I used a metal pan. The chocolate icing on top was perfect and I was able to find some sprinkles that looked "cosmic" at my local HEB. They tasted like a cross between fudge and a brownie! Addictive:D Thank you for the recipe, Erin!
Lesley says
This recipe is amazing! I doubled it for a half-sheet size for my very first farmers market this weekend and these flew off the shelf, and I had more than one customer reach out after and tell me it was the best brownie they'd ever had! Popping in the fridge to 'fudge up' (lol) really made for a nice dense texture, and I LOVE the frosting! Local cottage laws prevent me from being able to use certain ganaches and other frostings but this recipe passed the test and also looks so authentic with the deep color and shine as opposed to a more traditional cocoa-based buttercream.
Leslie says
10/10
I halved the recipe and baked in a metal 8x8 and they came out perfect in 20 minutes. Will be making again