

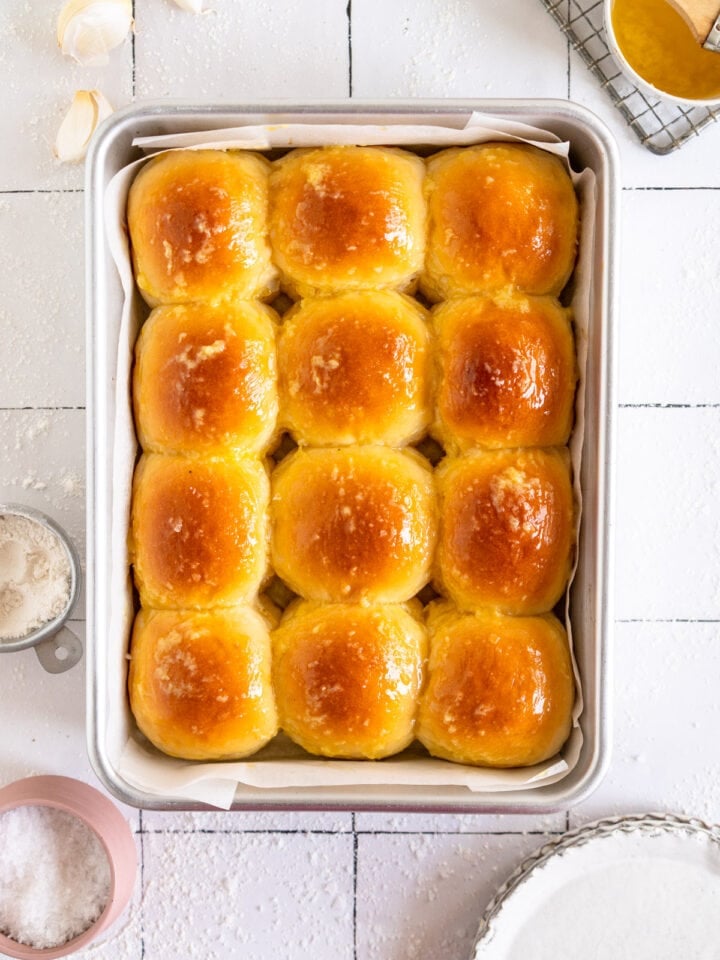
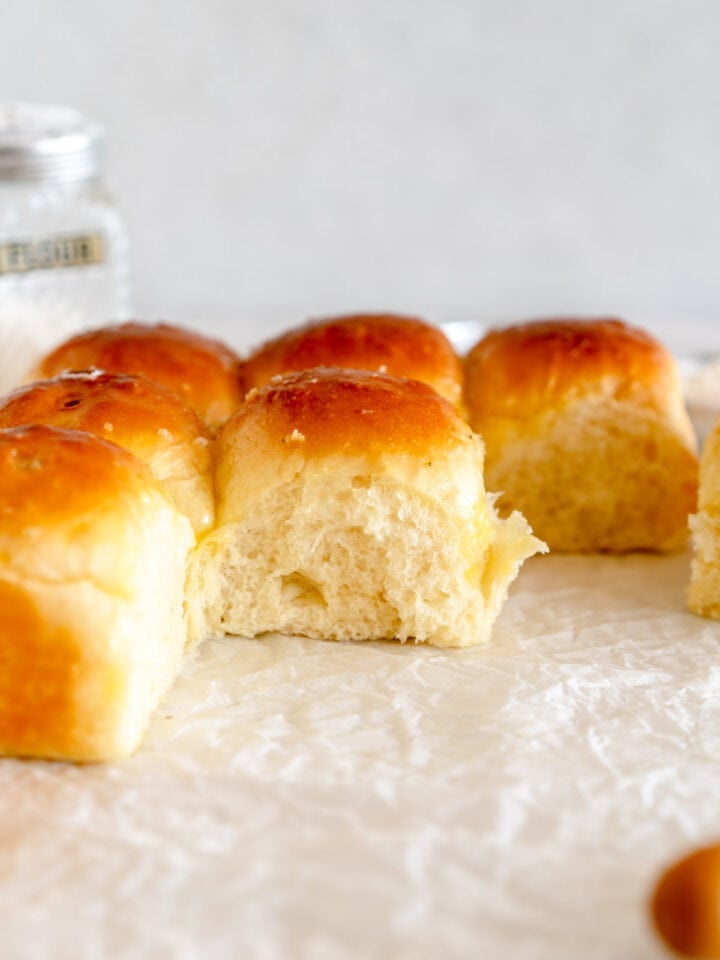
This delicious cheesy garlic bread recipe is made using Detroit-style pizza dough! The dough is no knead so it's super easy to make. While the recipe does need to rest in the refrigerator overnight, it's completely worth it - the result is ultra-cheesy and chewy homemade garlic bread that's the perfect accompaniment to any meal.

Hi hi! Just popping in to share the recipe for this Cheesy Garlic Bread! I tested and made this a bunch of times over the last few weeks, and I am just so excited to share the recipe with you. I love making delicious savoury bread recipes, and this cheesy garlic bread ticks all my boxes!
This Garlic Bread is the perfect accompaniment to any meal, and is especially good served alongside a lasagna or soup. It is perfectly cheesy and garlicky, and the dough is soft and chewy. The detroit style pizza dough has an overnight rest so you can prepare this ahead of time and have perfect homemade pizza dough garlic bread.
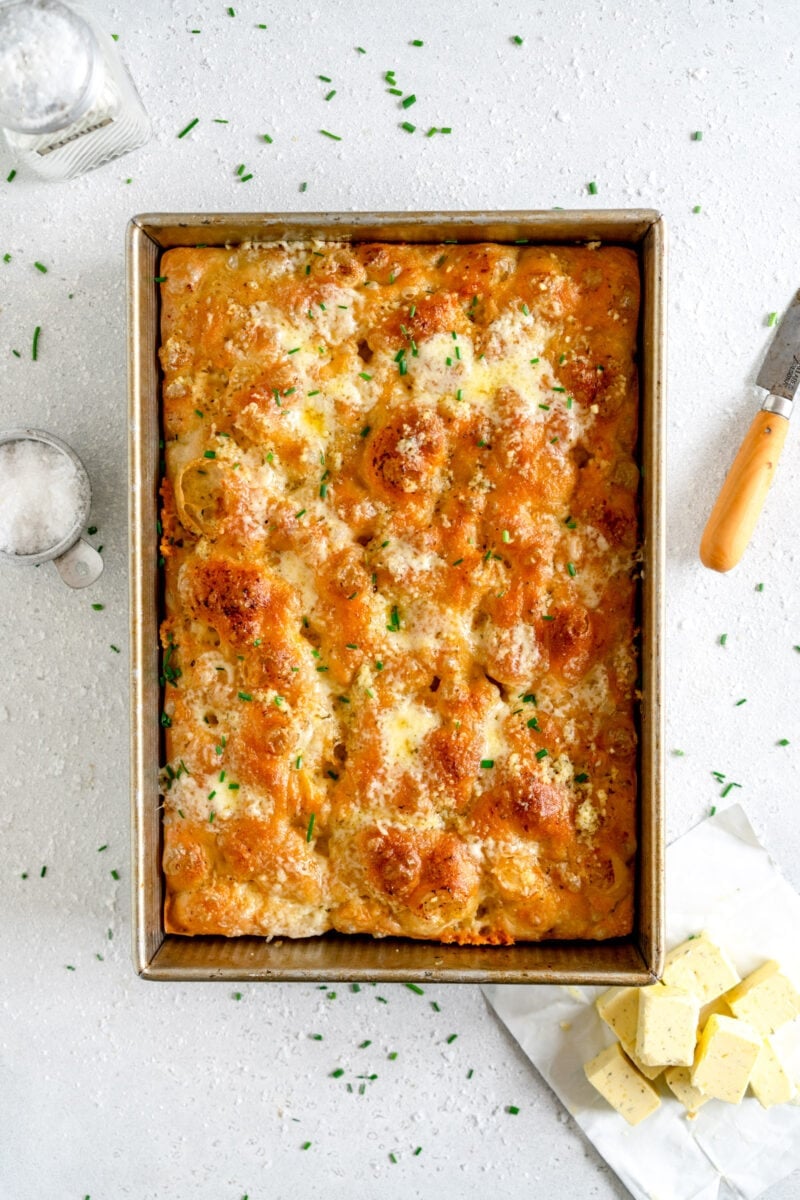
Detroit Style Pizza is a deep dish style pizza made in a square or rectangle baking pan. It generally has a thick layer of cheese that goes edge to edge in the pan, so when it bakes it has a crispy, cheesy crust. It is super easy to make and my no-knead garlic butter version comes together with very little effort. If you want to make individual garlic breads, my homemade garlic knots would be perfect for this!

Pizza dough garlic bread
This Cheesy Garlic Bread is made with a no knead Detroit Style Pizza Dough, which is a riff on my focaccia recipe. The dough has an overnight rise, then is left to rise again the next day. There are a few steps but the overall process is so worth it!
- Make the dough. The no knead detroit style pizza dough is made the night before, then left to rise overnight in the fridge.
- Turn the dough out into the pan. The dough gets turned out into an oiled pan, and is left to spread out. You dimple it outwards every 10-20 minutes.
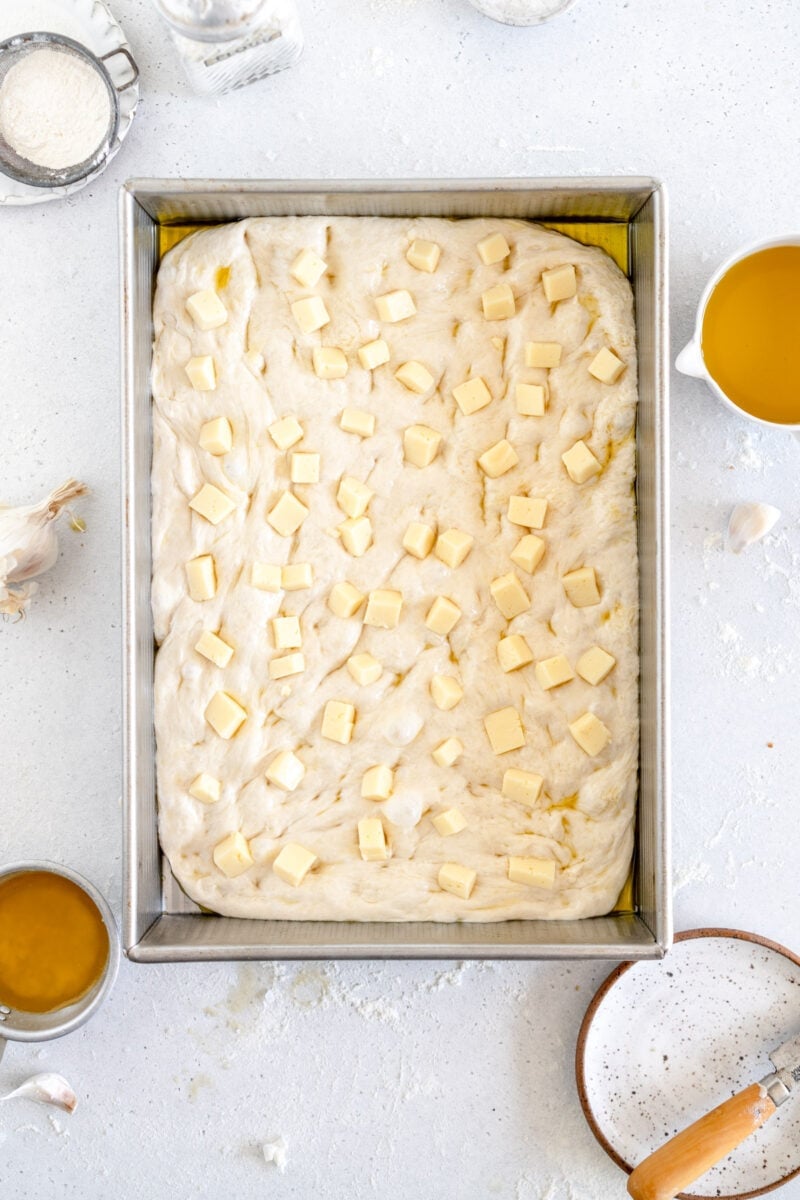
- Add the cheese. Chunks of cheese get dotted over the surface of the dough so that when it rises, it surrounds the cheese. This is what gives you melty pockets of cheese within the bread.
- Leave to rise. The garlic bread goes through its rising process - this takes 3-4 hours so make sure that you account for it.
- Bake. Once the dough is risen and puffy, pop it into the oven and bake until deep golden brown.
- Add Garlic and Cheese. Once the bread has baked, top with garlic butter and sprinkle with the rest of the cheese, and return to the oven until the cheese has gone nice and melty.
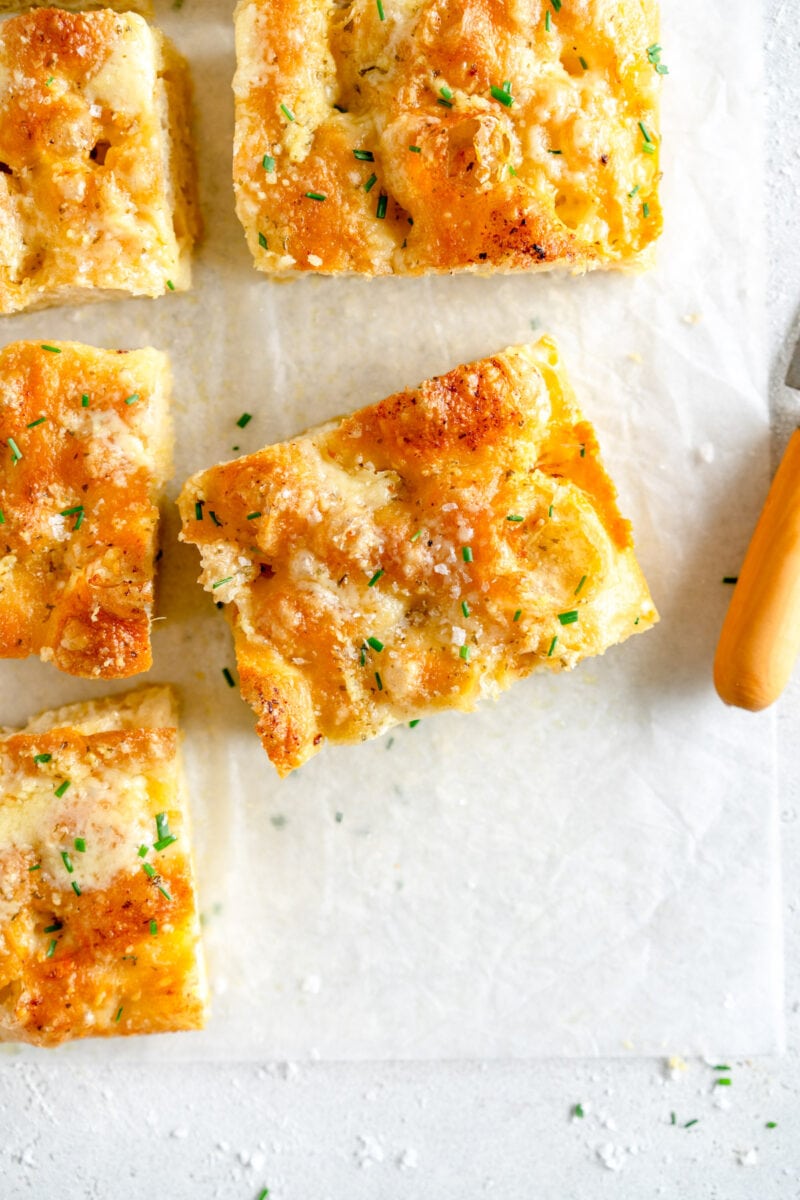
- Finish with Garlic Butter. Once the bread is done, finish with the rest of the garlic butter. You could also garnish with herbs such as parsley here! Slice into chunks and enjoy! I serve mine plain but you could also serve with some marinara sauce for dipping.
Adding cheese to pizza dough
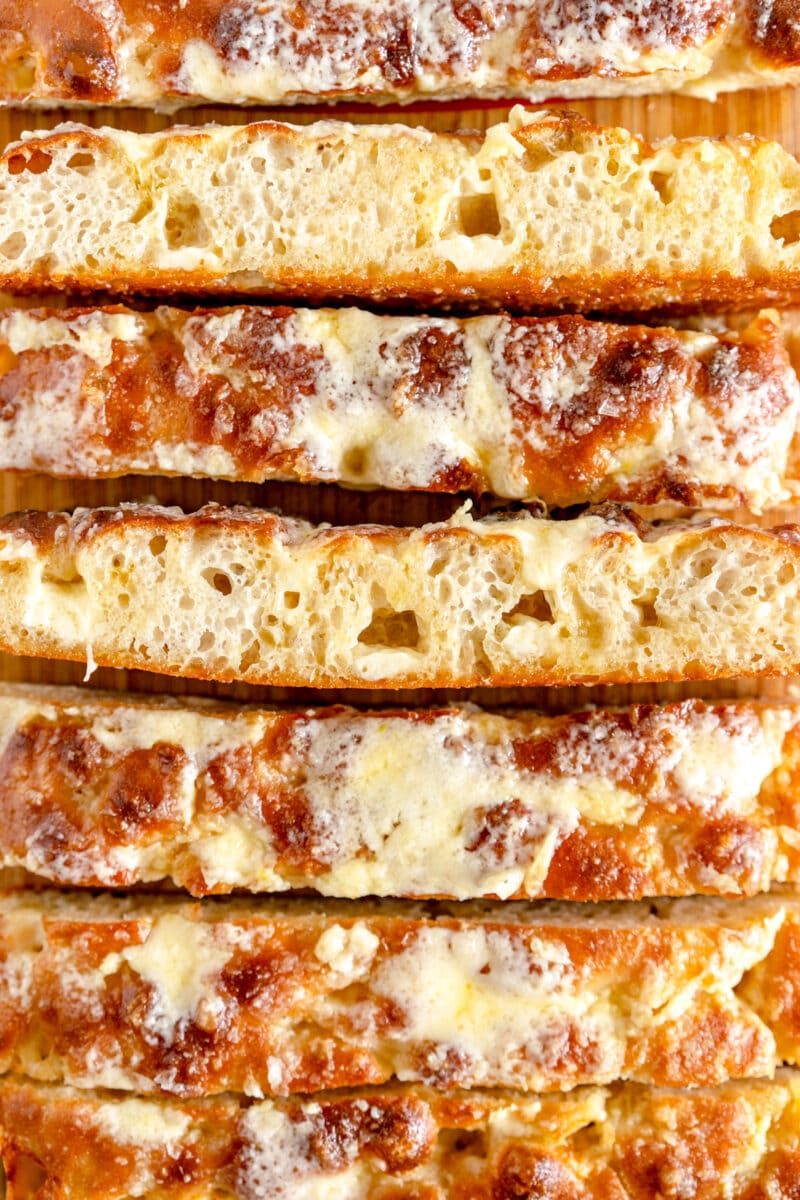
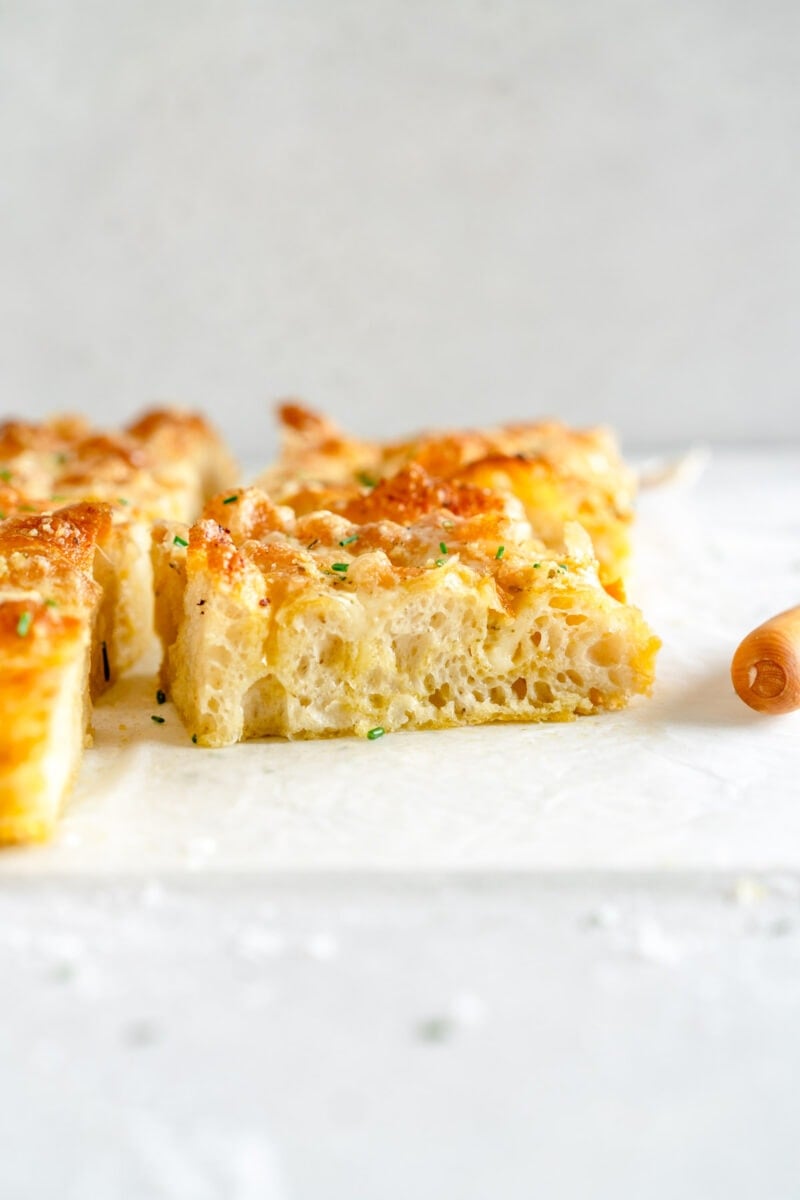
This Cheesy Garlic Bread made with pizza dough has cheese added two ways - risen in the dough itself and grated on the top. Once the dough has been added to the pan, chunks of cheese are dotted over the dough. When the cheese is added to the dough, as the dough rises it rises around the chunks of the cheese.
The result of this is pizza dough that is studded with chunks of cheese throughout. I borrowed this idea from Peter Reinhart's Detroit Style Pizza book. The chunks of cheese throughout are melty and delicious and go so well with the garlic butter.
How to make No Knead Pizza Dough
The process of making no knead pizza dough is almost identical to my method of making my no knead focaccia. Garlic bread made from homemade dough is next level delicious. I dropped the hydration on my dough (this is 84% whereas my focaccia is about 89%. I also used all bread flour as opposed to a mixture of bread and All Purpose flour like I use in the focaccia recipe. Using a high protein flour gives a much stronger bread that is slightly chewier and perfect for making this cheesy garlic bread.
- Combine all dry ingredients in a bowl. If you are using active dry yeast, see the FAQ for this.
- Add in oil and water and mix until you get a shaggy dough.
- Leave to sit for 5 minutes - this lets the dough start to hydrate properly.
- Perform three sets of stretch and folds, each 2 minutes apart, to build strength.
- Shape the dough into a ball and place into an oiled container to rise.
How to stretch and fold bread dough
While the dough doesn't require kneading I do get you to do a series of turns of the dough to build strength before it is left to rise. Stretch and folds are a sourdough technique and are a quick way to help develop gluten in the dough.
In this recipe, you do three sets of stretch and folds, with each set consisting of 16 folds (four times around the bowl with a fold every 90 degrees) The sets of stretch and folds are spaced two minutes apart. As you stretch and fold, you will notice the dough starting to smooth out and develop strength. Here is how you perform one set of stretch and folds:
- Wet your hands and remove the cover from the bowl.
- Take a section of the dough and stretch it up and fold it onto itself.
- Rotate the bowl 90° and repeat the process. Repeat this two more times until you have gone around the bowl.
- Do three more rounds of stretch and folds around the bowl (so each set will have 16 stretch and folds, or four trips around the bowl)
- Rest the dough for 2 minutes.
If this seems confusing, just know that you are performing three sets of 16 stretch and folds, spaced two minutes apart.
How to rise garlic bread
Once the dough is spread out in the pan, it needs 3-4 hours to rise until it is puffy and jiggy. Make sure you account for this. The time also depends on your environment, so make sure you go by your dough and not the time.
If you want to speed up the dough rising slightly, you can create a humid warm environment. I like to do this in the oven - I place an oven pan on the bottom of the oven or the bottom shelf (with the oven off), and fill it with boiling water. This makes the inside of the oven nice and warm and steamy which is the perfect environment for rising your dough. Make sure you leave a note that there is dough in the oven so you don't turn it on by mistake!
If at any point you are worried things are moving too quickly and you are not ready to bake your bread yet, the fridge is your friend when you are working with a yeasted dough. Just pop the whole pan back into the fridge to slow down the rising process and buy yourself some more time.
The best cheese to use for Garlic Bread Using Pizza Dough
You can use whatever cheese you like for this cheesy garlic bread, but I would ideally go for something mild and melty. I used Havarti (I used Castello Brand) which comes in a 200g block, which was perfect for this as I grated half and did half in the chunks to rise in the dough.
You could use a mozzarella or a mild cheddar here, or mix it up with what you like! Something that is a little soft and will get nice and soft in the oven is great. You could also finish with a grating of parmesan cheese.

Sample Schedule for Garlic Bread
The great thing about this no knead detroit style pizza dough I use for this Cheesy garlic bread is that it is super versatile. It needs about 12 hours in the fridge to rise, but you can leave it up to a few days. Sometimes I make a double of the dough and pop it into two separate containers. Then I can just bring some out and bake off as needed.
It is best to make the dough at least the night before you make the garlic bread. I usually make the pizza dough the night before. Then I start the rising process 5 hours before I want to bake the garlic bread.
If you want to do two rises in the fridge this should work too. You will need to take the time to let the dough settle in the pan and then add the cheese and cover with plastic wrap. Leave on the counter for about half an hour to kick start the rising process. Then place into the fridge overnight. The next day, pull the dough out from the fridge and leave to stand on the counter while the oven preheats. It may need a little more time to come back to room temperature and finish rising. Make sure that it is puffy and jiggly.
Small Batch Garlic Bread
If you would like to small batch this cheesy garlic bread, it will work great! I tested this loads with my Focaccia recipe. If you like, you can halve the recipe and bake it in either a 9"(23cm) round pan or an 8" (20cm) square. You could also make a full batch of the no knead pizza dough and divide it in two (deli containers work great for this), and bake half off at a time as a small batch. You will need half the cheese and half the garlic butter quantities, and it may take a little less time to rise.
Best pan for Garlic Bread
For this recipe you must use a nonstick metal baking pan. Do not try and make this recipe with glass. Glass is a very poor conductor of heat and so I do not recommend it for this recipe. Glass can also stick very badly. The high heat needed for the baking will not work with a glass dish and you will have sticking issues.
Anything that is non stick and made of metal will work well. If you are worried about sticking, you can butter the pan before you grease it. You can also divide the dough into two and do two 9" (23cm) rounds or two 8" (20cm) squares at once (or one of each) if you don't have a 9"x13" pan.

Frequently Asked Questions
What tools and Equipment do you use?
You can see a full list of all the tools I use here
What is Bread Flour?
Bread flour is flour which is higher in protein. It is referred to as high grade or strong flour if you are outside of the US! If you can't get bread flour this recipe should also work with all-purpose flour. The crust will just be a little softer.
Can I use a baking stone or steel?
I didn't have one here but if you wanted to make sure you get a really crispy bottom on your garlic bread, you can preheat the oven with a baking stone or pizza steel in there. I use one whenever I can when I am making detroit style pizza and it makes a big difference!
Can Garlic bread be made ahead of time?
This garlic bread is best eaten hot from the oven, but if you need to, you could try making it ahead. To do this, you could bake it until it is nearly done, but hold off on adding the garlic butter and grated cheese. Then when you are ready to serve it, cover with foil, then pop it back into the oven to warm up, then bring out and add the garlic butter and cheese, then bake again as per the recipe and add more garlic butter. This should warm up the bread and give the cheese a chance to melt.
Can you freeze garlic bread?
I don't think this would freeze well sorry!
Can I use active dry yeast?
Yes - but you will need to activate it in the lukewarm water and sugar first for 5 minutes until it goes foamy, then proceed with the recipe.
For more savoury baking recipes, check out:
❤️ Made this recipe and love it? ❤️
I would LOVE for you to leave me a review and star rating below to let me know how you liked it! Also, please make sure to tag me on Instagram!
Answers to your baking questions
Over the years, many of you have asked me questions about:
- baking in grams
- adjusting oven temperatures
- what kind of salt to use
- and many more!
I've curated and answered them all for your easy reference in this frequently asked questions post!

Cheesy Garlic Bread Made from Pizza Dough
- Prep Time: 1 hour
- Cook Time: 30 minutes
- Total Time: 16 hours
- Yield: 12 Servings 1x
- Category: Bread
- Method: Baking
- Cuisine: American
Description
This delicious cheesy garlic bread recipe is made using Detroit-style pizza dough! The dough is no knead so it's super easy to make. While the recipe does need to rest in the refrigerator overnight, it's completely worth it - the result is ultra-cheesy and chewy homemade garlic bread that's the perfect accompaniment to any meal.
Ingredients
No Knead Pizza Dough
- 4g (1 tsp) instant yeast (see FAQ for active dry yeast)
- 5g granulated sugar
- 7g salt
- 480g bread flour
- 16g good quality olive oil
- 405g water, lukewarm
- 200g soft, mild cheese such as havarti or mozzarella
- Additional oil for greasing bowl and pan
Garlic Butter
- 120g unsalted butter, cold from the fridge is fine
- 5-6 cloves garlic, finely minced or grated on a microplane
- Big pinch of Flaky Sea Salt such as Maldon (or a small pinch if you have used salted butter)
- Flaky Sea Salt such as Maldon to finish (optional)
Instructions
NO KNEAD DETROIT STYLE PIZZA DOUGH
- In a large bowl, combine the yeast, sugar, salt, and bread flour. Add the olive oil and water, and mix until a shaggy dough forms. Cover the bowl with a lid or plastic wrap and leave to stand for 5 minutes.
- Perform a set of stretch and folds on the dough. To do this, wet your hands, then take a section of the dough and stretch it up and fold it onto itself. Rotate the bowl 90° and repeat the process. Repeat this two more times until you have gone around the bowl, then do two more sets of stretch and folds around the bowl (a total of 16 stretch and folds). Cover the bowl with the tea towel and leave to sit for 2 minutes.
- Repeat the stretch and folding and resting process two more times, for a total of three sets of stretch and folds, each two minutes apart. The dough will start to strengthen as you do the turns.
- Turn the dough out onto a work surface and shape into a ball. Place into an oiled bowl and turn the dough over in the bowl to coat. Cover the bowl with plastic wrap or a lid (to make sure it doesn't dry out), then place in the fridge overnight, a minimum of 12 hours but up to 2 days.
ASSEMBLY
- Cut half the cheese you are using into small cubes. Grate the rest and place in a covered container in the fridge.
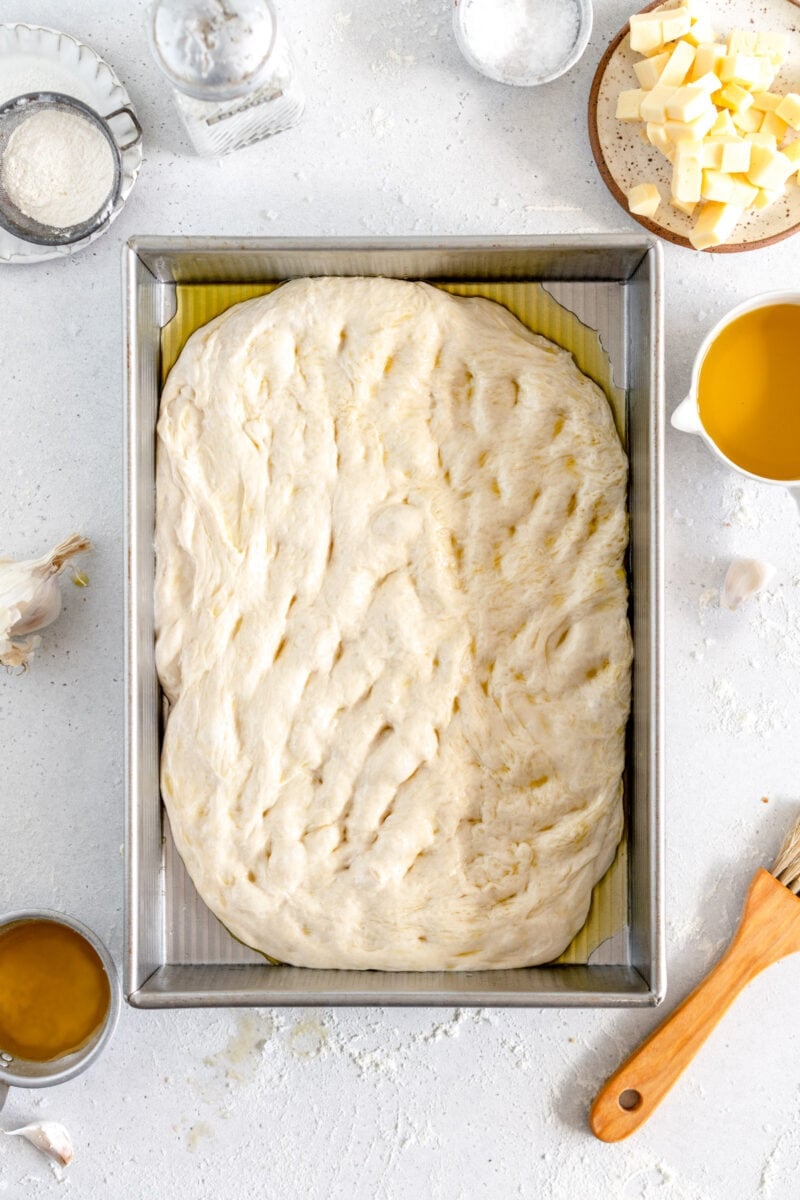
- About five hours before you want to serve your garlic bread, generously drizzle a 9"x13" (23cmx33cm) non stick baking pan with olive oil. Turn the risen dough out into the pan and turn it to fully coat it in the oil. Shape into a rough rectangle shape by pressing it down with your oiled fingers and tucking edges and corners in if needed. Cover and leave to sit for 10 minutes to relax.
- Gently spread the dough toward the edges of the pan using your oiled fingers. Cover and leave to sit for 15 minutes, then dimple again. Leave for a further 15 minutes and then repeat the dimpling process.
- Dot the surface of the dough with the cubes of cheese, arranging them so they are evenly spread out.
- Cover the pan with plastic wrap or a lid. If using plastic wrap stretch it tight so it does not touch the dough. Leave the dough to rise for 3-4 hours, until very puffy and jiggly. The dough will surround the cubes of cheese. If at any point you are worried about the dough rising too fast and you are not ready to bake, you can slow down the rising time by putting the pan of dough into the fridge.
- About 20 minutes before you are ready to bake, preheat the oven to 425°f / 220°c (conventional, not fan), and arrange a rack in the middle of the oven.
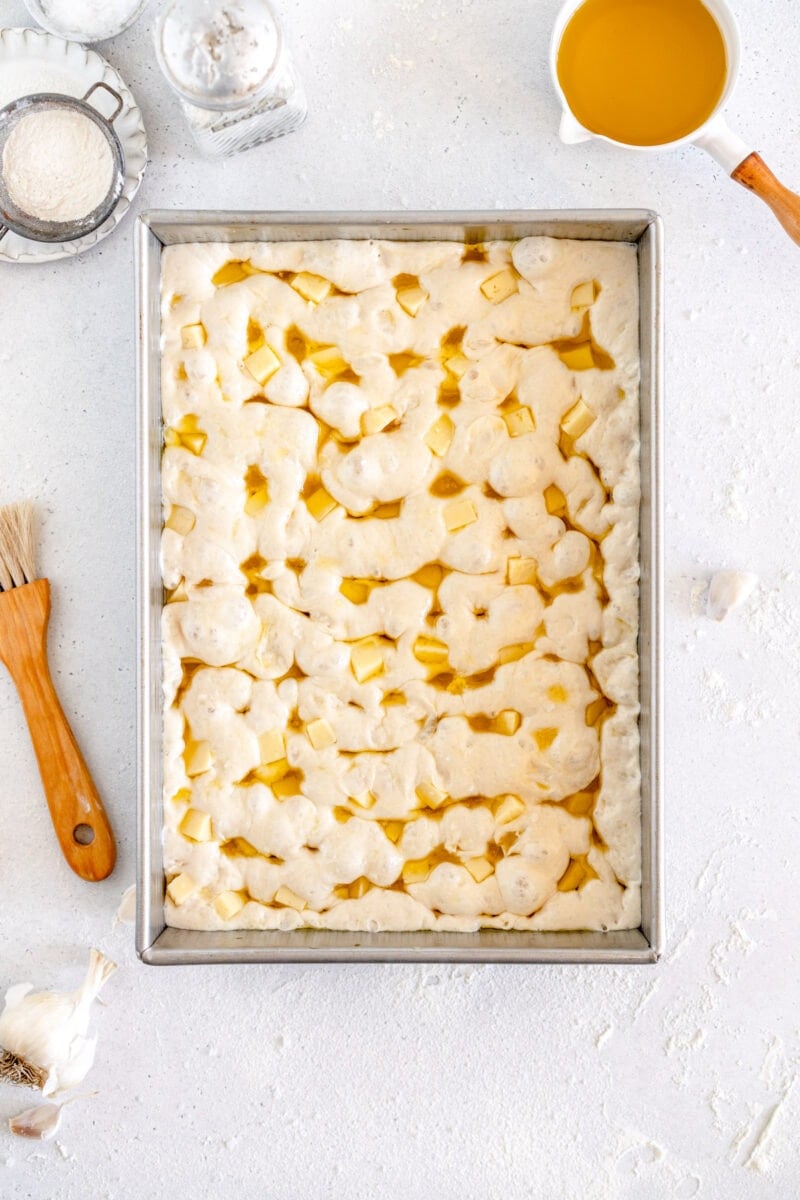
- Uncover the pan. drizzle the risen dough with a little olive oil and dimple gently with oiled fingers. If bubbles form just let them be - do not pop them.
- Bake the bread for 18-20 minutes, until deep golden brown. While the bread is baking, make the garlic butter and have ready alongside the grated cheese.
- Place the butter and garlic in a small saucepan. Place over medium low heat.
- Heat until the butter is melted, and then continue to heat for a further 1-2 minutes, stirring often, to help infuse the butter with the garlic and take the raw bite out of the garlic.
- Remove from the heat and add a big pinch of flaky sea salt (or kosher salt) and set aside until ready to use.
- When the bread is baked, remove from the oven and immediately brush with half of the garlic butter. Scatter the grated cheese over the surface of the bread, and return it to the oven for 2-3 minutes until the cheese has fully melted and started to bubble.
- Remove the bread from the oven and brush on the rest of the garlic butter. Finish with flaky sea salt.
- Transfer from the pan to a wire rack soon after baking to ensure that the bottom of the bread does not go soggy.
- Allow to cool slightly before slicing. Best served warm.
- Store leftovers lightly covered at room temperature. Re-warm before eating if desired.
Comments
Katie says
So delicious and so easy to make! I used plain tasty cheese with lurpak’s garlic butter and the result was amazing. The steps were so easy to follow and understand. Thank you for a great recipe!
meey says
Hi! I’ve been trying to do this recipe as it look so so good! But i get so confused with the stretch and folds part. I’ve been standing here reading the steps for more than 5mins and i still can’t seem to understand haha. Please it’d be lovely for you to explain further. I do know that it consists of 3 sets of 16 stretches and folds (correct me if i’m wrong), but when i read the steps, it says to repeat few more times etc. Hence i get confused once again. Haha. Help me as i’d love to try this amazing recipe . Thank you! X
Erin says
Hi! Sorry I noticed a typo in my recipe. So it goes 16 folds, rest 2 minutes, 16 folds, rest 2 minutes, 16 folds. That’s probably the easiest way to think about it! Each “set” is 4 times around the bowl (one north, south, east, west) so that’s where the 14 comes from.
meey says
Great! Now i understand the steps. Thank you so much! Hope mine will turn out good! xx
Keren says
Super easy to make -I halved it and made in an 8 inch square tin, but otherwise followed the recipe exactly and it came out great! A super cheesy, garlicky crust with a lovely fluffiness on the inside. Used the Castello Havarti cheese and it was perfect!
Elyse says
This is amazing! Super easy, ridiculously tasty, perfect crust on the top and chewy and soft inside with melty cheese pockets. Will become a weekly staple in my house! Thank you for sharing!!
Caribou says
so so good!
Ann says
Hi there,
Would I be able to turn it into a pizza?
Erin Clarkson says
Hi! It's pizza dough so you could!
stacy says
This was so good and so easy! I love the pan you linked to. It's perfect for this!
Sara says
I could eat this cheesy garlic bread all day long. I made this for a small dinner party the other day and we crushed the whole thing so fast. It’s so fluffy and cheesy and amazing! Cloudy Kitchen recipes are always my favorite!!
Brianna says
Honestly I’ve been salivating, waiting to make this since the recipe dropped. Incredibly easy to make! Instructions are clear and concise, and you end up with one of the most delicious focaccia/garlic bread recipes ever. (I added feta to mine, along side the Havarti, fantastic addition tbh)
Erin says
Yayyyy so happy you love!!
Melissa says
So delicious and easy to get going! I'm going to make this again and again with different cheese blends!
Allana says
This cheesy garlic bread is the bomb-dot-com !!! Disappeared very quickly in our house.
Louise says
I made this for my future mother in law, and needless to say I am now a favourite and this bread has been requested at every meet up! Beyond delicious.
Joe Ledword says
Is it possible to give 10 stars. Wow!
Benji stewart says
It tastes amazing! Hands down best cheesey garlic bread I've ever had!
Steve says
Great spin on a classic focaccia. I wouldn’t make it all the time but when you are in the mood for garlic bread this hits the spot.
Finn says
Super tasty! Absolutely loved this!
Geeta says
Absolutely loved by a large group of teenage boys and requested to make again.
Erin Clarkson says
I am so happy you love! Thank you so much for the lovely reviews xx
Kate says
So tasty and easy to make. The texture was beautifully chewy yet still fluffy and light. Will definitely make it again!
Libby says
Amazing! The dough is light and airy. The cheese melts nicely into it. Plus, bonus, it's super fun to watch the dough rise and engulf the cheese cubes. One word to the wise, when Erin says to oil the pan, take her seriously. I failed to oil mine enough and had to arm wrestle the finished loaf.
Margaret says
This is the best savory bread recipe I've come across in a while. I seriously can't stop eating it. I used havarti cheese and it was just perfect. Stop everything you're doing and go make this now!
Savannah says
So everything was going well until step seven when you mention to gently dimple again. The dough went from jiggly and bubbly and beautiful to totally deflated and not pretty. I think I should have just not touched it again… did I do something wrong? It reacted like punching dough down after a first rise. Still tasted yummy! Just not as pretty 😅
Erin Clarkson says
Hi! Sounds like it might have been over proofed a little if it deflated? Basically the yeast has given all it has so when you dimple it knocks all the air out of it. You could try rising for a wee bit less time next time 🙂
Steve says
10/10 - this garlic bread is some of the best garlic bread that I have ever eaten - let alone made myself!
Libby says
I always imagined focaccia (and focaccia like breads) were super difficult to make. Then I discovered this recipe. Erin makes it SO easy. The instructions are clear and simple to follow (as always). The bread is light and fluffy and deliciously garlicky. Bonus that this is one of those recipes that impresses people because they too think it's super tricky.
Erin Clarkson says
Hi! Eeee so happy you loved x
Jai says
Such an easy and fab recipe. The bread was pillowy soft and tasted amazing. This will be my go to from now on! Love it, thank you x
Anna says
I had already made some focaccia dough before I remembered this recipe, but I quickly pulled it up to use the rest of the cheesy, garlicky goodness this recipe provides. I love the melty pockets of cheese in the middle of the dough, as well as the flavor of the garlic and cheese topping. We had this with pasta and it was a huge hit! Plus Erin always takes the time to answer questions about her recipes, which I love. I especially love that her recipes are in grams.
Kate says
This bread is ridiculously good. Seriously the best cheesy garlic bread EVER.
Kassie Teal says
I want to eat this with breakfast, lunch & dinner. It is amazing & very low effort !
Anna Christensen says
Hi Erin!
I just finished making the dough for the first rise, and I'm a little unsure if I did it right- I've never made focaccia breads before, so I'm unsure what the dough should be like. Is it supposed to be super sticky? Mine was, and even when I tried to add some flour when I turned it out it was still a pretty sticky blob. I wonder if it could be I got my hands too wet and incorporated too much water when I did the folds? Or I'm at a higher altitude so maybe that made a difference? Or maybe it's fine and supposed to be super sticky, I'm just so unsure since I'm pretty unfamiliar with making breads. I'd love to know your thoughts and what (if anything) I should try different next time 🙂
Erin Clarkson says
Hi! No that is right - it's a super sticky dough as it's high hydration! I hope it turned out delicious!
Petra Bradley says
Hi Erin - just a question go out the yeast. I’ve got Edmonds Superbake dry active yeast which is like to use rather than instant yeast and I notice in the recipe you say to refer to your FAQ’s for information on how to use dry active yeast instead, but I just can’t seem to find that FAQ? I’ve checked the FAQ specific to the recipe on this page, and also your general FAQ and I can’t seem to find it? Am I looking in the wrong places?
Thanks,
Petra
Erin Clarkson says
Hi! no I probably just left it out by accident haha. Surebake yeast is different to active dry so it won't work in this recipe. It's got improver in it so works differently!
Linzi says
This is SERIOUSLY thee most delicious bread I have ever had! 100% becoming a staple in my house. Thank you so much for sharing your amazing recipe!
Jeff says
Would there be a way to incorporate sourdough starter? If so, how would I adjust the recipe?
Erin Clarkson says
Yes, follow the notes in my regular focaccia page!
carol says
Beautiful recipe. Made it the other day and could not stop eating. Made it with Italian olive oil from Costco, whole milk mozzarella from Trader Joe’s. I am so grateful that is this recipe is in grams, it is so much more accurate and easy to follow. Thank you Erin for making these recipes. Love them
My only question (sorry if you already answered this) is what kind of salt do you use, kosher salt like diamond crystal, table salt? Thank you in advance.
Erin Clarkson says
Hi! I'm a diamond crystal kosher salt girl!
Sus J says
This was absolutely fantastic to make, straightforward and bloody delicious. I used half the butter for the top (60g) with the same amount of garlic, because the price of butter in NZ at the moment is ridiculous - was still tasty asf.
I also froze some as a trial, and it was perfectly good upon thawing and reheating. I just cut it into portions first, wrapped 4 portions in a row in 2x tinfoil layers, and popped it in a plastic container in the freezer. I defrosted overnight before reheating. The tinfoil streamed the bread so it was still soft and moist (just take care with cheese stickage to the top of the foil).
This is simply a wonderful, decadent recipe which I highly recommend.