
This super cute chocolate layer cake is covered with a vanilla bean swiss meringue buttercream, and finished with homemade royal icing doughnut sprinkles.

Table of contents

Doughnut Sprinkle Cake
First of all, is it Donut, or is it Doughnut? I had a cheeky google, and it got my brain confused.
I hid inside all weekend because it was CRAZY hot. Apparently NYC is under some sort of 'heat dome'? Whatever that is, it sucks. Our neighbours a few apartments down from us have a pool, and I spent most of the weekend thinking up ways to introduce myself in a non-creepy way, and somehow come up with some sort of baking trade in return for the use of their pool. So far I am coming up with nothing, apart from perhaps flying Richards drone over there with a note... but even then that seems a little creepy. I guess we shall have to live with intense pool FOMO for the next little while.
Here is a cake, with little wee doughnuts on it! A while ago we spent a Saturday night in (who am I kidding, we spend most Saturday nights in) making sprinkles! I was inspired by sweet ambs, who is the queen of royal icing. Turns out I do not have quite the same skills to create teeny little fiddly versions of food, but I CAN pipe circles, pipe more circles on top, and sprinkle them with hundreds and thousands! And so doughnut sprinkles were born!

Easy Chocolate Layer Cake
I used a super light chocolate cake here, but feel free to use anything that you like! Or not even use the sprinkles on a cake. I just think that they look extra cute this way. I went with homemade swiss meringue buttercream, but like I said before, go nuts with whatever suits you! I prefer a non crusting buttercream here over something like american, as it seems to hold the sprinkles on much more securely.

How to make Royal Icing Sprinkles
The recipe for the royal icing makes enough for a LOT of sprinkles. We ended up with about 250 little doughnuts. They are pretty quick to do once you get going, and once they are dry they keep in an airtight container for a very long time, so I prefer to make a lot all at once, and have enough for multiple cakes. I used meringue powder in the recipe as it is super easy, but any royal icing recipe should work here, provided it is nice and thick. It should come off the mixer the consistency of cream cheese, and you can then water it down to piping consistency from there.

The best food coloring for Royal Icing
Gel food colouring will also be your friend here as it is more intense and will not water down your icing too much. I used disposable piping bags, fitted with a round piping tip in a number of different sizes. For the doughnuts themselves I used a wilton #5, and then for the glazes I used whatever slightly smaller sized tips I had on hand. It doesn't matter what size you use as the icing is viscous enough that it shouldn't run everywhere, but anything between a #2 and a #5 should work well. That being said, if you don't have a small round tip, you can carefully chop the tip off an icing bag and get the same effect.

Tips and Tricks for homemade sprinkles
The sprinkles do take some time to dry out before you use them, so allow either a couple of hours or overnight for this. Drying time may vary depending on your humidity.
I made a wee template on the computer to put underneath the parchment paper to use as a guide. You can either freehand it, or if you would like to use mine, you can download it here!
Have fun! I would love to see the results if you give this one a try!

For more related recipes, check out:

❤️ Made this recipe and love it? ❤️
I would LOVE for you to leave me a review and star rating below to let me know how you liked it! Also, please make sure to tag me on Instagram!
Answers to your baking questions
Over the years, many of you have asked me questions about:
- baking in grams
- adjusting oven temperatures
- what kind of salt to use
- and many more!
I've curated and answered them all for your easy reference in this frequently asked questions post!
Recipe for Doughnut Sprinkle Cake
Print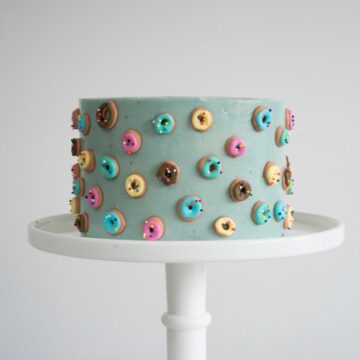
Doughnut sprinkle cake
- Prep Time: 1 hour
- Cook Time: 30 minutes
- Total Time: 3 hours
- Yield: 8 servings 1x
- Category: Cakes
- Method: Baking
- Cuisine: American
Description
This super cute chocolate layer cake is covered with a vanilla bean swiss meringue buttercream, and finished with homemade royal icing doughnut sprinkles.
Ingredients
Chocolate Cake
- 200g All-purpose flour
- 30g Cocoa powder
- 2 tsp (8g) baking powder
- ½ tsp (2g) baking soda
- 100g Unsalted butter, at room temperature
- 225g sugar
- 1 tsp Vanilla extract
- 2 large eggs
- 185g milk
- 1 Tbsp (15ml) lemon juice or white vinegar
- 1 tsp apple cider vinegar
Doughnut sprinkles
- 3 Tbsp meringue powder
- 90g water, plus extra to thin the icing as needed.
- 500g Icing sugar/powdered sugar
- Gel food colouring
- Sprinkles of your choice (I used 100s and 1000s)
Swiss meringue buttercream
- 150g egg whites
- 140g sugar
- 500g unsalted butter, cut into chunks, at room temperature
- 1 Tbsp vanilla bean paste
Instructions
CHOCOLATE CAKE
- Preheat the oven to 350f/180c. Grease and line three six inch cake tins.
- In a small bowl, combine milk and lemon juice/vinegar. Set aside. In the bowl of a stand mixer fitted with the paddle attachment, cream butter and sugar until light and fluffy. Add vanilla and beat well.
- Sift flour, baking soda, baking powder and cocoa together in a bowl. With the mixer on low add one egg to the creamed butter and sugar mixture, followed by half of the flour mix, another egg, and the remainder of the flour mixture. Mix briefly, then pour in milk/lemon juice mixture. Beat until well combined. Scrape the bowl down well, add cider vinegar, and beat again.
- Divide the mixture between the three tins. Bake for 25-30 minutes, checking after 25, until a skewer inserted into the middle of a cake comes out clean. Allow to cool in their tins for 10 minutes, then turn onto wire racks and allow to cool completely.
DOUGHNUT SPRINKLES
- Whisk meringue powder and water together in the bowl of a stand mixer. Add all of the icing sugar, and mix on low for 10-15 minutes until the icing is thick, white, and the consistency of cream cheese. Remove bowl from the stand mixer and add water a teaspoon at a time, mixing well between additions, until the icing is a pipeable consistency (I added about 6 teaspoons). You will need less water than you think!
- Add just over half of the icing to a bowl, and divide the remainder between as many small bowls as you would like to have glaze colours. (I made five glaze colours). Using a small drop of food colouring at a time, colour the larger bowl of icing light brown, and the remainder of the bowls your desired glaze colours. Mix well, and transfer each colour to a piping bag fitted with a small round tip (somewhere between a #2 and a #5)
- Place your paper template on a baking tray, and place a piece of parchment paper over the top. I like to use magnets to secure both pieces of paper to the tray, to stop them from moving. Pipe circles of the light brown icing onto the parchment paper, followed by a layer of the "glaze" colour. Sprinkle each doughnut with sprinkles. (see GIF below). I like to pipe a whole tray of the base brown, then follow with two lines at a time of the glaze colour, stopping between lines to put on the sprinkles before the glaze dries out. Place in a safe place and leave until dry (3-4 hours, preferably overnight). Once dry, remove from paper and store in an airtight container.
SWISS MERINGUE BUTTERCREAM
- In the bowl of stand mixer, combine egg whites, vanilla and sugar. Whisk briefly until combined. Place the bowl of the mixer over a small saucepan of water, taking care that the water does not touch the bowl. Turn the heat to medium.
- Whisking occasionally to prevent the egg white cooking, bring the egg mixture to 150f/65c. Place the bowl back onto the mixer, fitted with the whisk attachment, and whip on high speed until the mixture has doubled in volume and is completely cool. Feel the outside of the bowl with your hands - there should be no trace of heat left (this is especially important for the next step to ensure that the butter does not melt when you add it). Cooling may take up to 20 minutes.
- Once the bowl is cool, add the butter one chunk at a time. If the mixture looks curdled/melted, do not worry, just continue whipping, it will come together! Once all of the butter has been added, add vanilla, and mix on medium until smooth. Tint using gel food colouring if desired.
ASSEMBLY
- Trim the top of each cake if required, to ensure a smooth level surface. Place the first layer of cake onto a cake stand or turn table, and place a large dollop of buttercream on top. Smooth using an offset spatula, and then place the second layer on top. Repeat the filling process until the cake is stacked. Smooth a layer of buttercream over the top of the cake, then crumb coat it with a very thin layer, before placing in the fridge for 30 minutes or so to set. Remove from fridge, and frost with a second, thicker layer of buttercream. Use a bench scraper or offset spatula to smooth the sides of the cake.
- Carefully arrange doughnut sprinkles on the outside of the cake. Chill well to allow icing to set, which will help the sprinkles stay in place.
