
Soft and Buttery Homemade Parker House Rolls are a super fun shaped dinner rolls. Made with an easy white bread dough recipe, they are fun to make and perfectly soft. Shape these as the traditional parker house rolls, or divide the dough up and shape into classic round rolls - they are perfect either way. These rolls can be made all in one day, or you can work ahead and give the dough an overnight rise.

Hi hi! I am just popping in to share this super easy Parker House Roll recipe with you! I love making homemade bread recipes, and I truly think that bread rolls are one of my most favourite things to make. The process is so fun, and the final product is so satisfying.
These Parker House Rolls are a recipe that I am super proud of and so excited to share with you. They use my base white bread dough recipe, and are soft, fluffy, and just so buttery.
There are a few ways to make them - I explain both in the post. You can either make 12 regular round rolls, or divide the dough into 18 to shape them into more of the signature Parker House Roll shape, which is super fun to make and very easy!
This Parker House Roll recipe is a great option if you are just learning how to bake bread, or if you're a seasoned baker. To me, this is the perfect bread roll, and the options to finish them however you like are endless! I hope you enjoy them as much as we have!


What are Parker House Rolls?
Parker House Rolls are a kind of dinner roll - they typically have a folded over shape, although they can be made as a regular roll too. The name apparantely came from the Parker House hotel in Boston in the 1870s where a frustrated baker threw a half finished batch of rolls into the oven (Honestly, I get it).
Parker house rolls are a kind of dinner roll, but not all dinner rolls are Parker House Rolls, if that makes sense! I wanted to play around with the traditional shape, which is super easy to do and also gives an amazing textured roll - slightly crusty on the outside, perfectly golden brown, then super buttery on the inside from brushing the dough with butter before you fold up the roll.
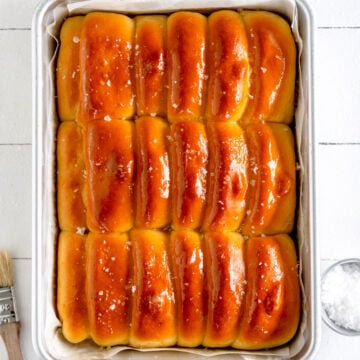
My version are soft, fluffy, and super buttery. They get baked until perfectly golden brown, then get a good old bath in butter when they come out of the oven. Just the best, truly. I'll be making them year round.

One Dough, Two Formats
I made this Parker House Roll recipe two ways - as 12 round rolls, or as 18 folded Parker House Rolls.
Both formats work great, I just love having options and I know that you do too! The white bread dough recipe is definitely going to be a staple in my house - I just love how easy these rolls are to make.
The dough recipe can also be used to make white bread loaf - so if you like you can split up the dough recipe to make half into rolls and the other half into a loaf of bread, or I often double it and make both bread rolls and loaves so I can pop some into the freezer.
For all the tips and tricks on how to make perfect white bread dough, along with ingredient questions and information on the first rise, please check out my White Bread Dough recipe! This recipe requires you to make the dough first following the instructions on the post.


Tips and Tricks for making Parker House Rolls
I have probably made bread hundreds of times now in my career as a baking blogger (I mean I have made these about 20 times in the last few months, I think Adventure dad is about 80% bread roll at this point), and here are the tips and tricks I have picked up along the way to make sure that things go as well as they can.
Remember that it does take a little practice to get the hang of working with dough, but this one is nice and soft but not too sticky so it is fairly easy to work with.
Make sure your dough is properly proofed.
This is a super crucial step - make sure that the dough is risen before you shape your Parker House Rolls. I cover this in huge detail in my white bread dough recipe - you can either do the first rise overnight in the fridge, or at room temperature. I find room temperature dough slightly easier to work with when it comes to shaping the dough into round rolls and getting a nice smooth surface, but it also will work just fine if you want to do that first rise overnight. For the folded over Parker House Rolls, chilled dough is nice and easy to roll out. Just make sure that you leave the dough at room temperature for 30 minutes or so before shaping, and remember that it will take longer to do the second rise as you are starting with slightly cooler dough. Either works great, just do what suits your schedule.
Use enough flour but not too much.
When you are shaping rolls, you want a little flour on your counter top but not too much, especially if you are shaping into round rolls. Just use enough to help the dough not stick - dust a little down before rolling out the folded version of the rolls.
Use a scale to weigh things out.
If you have been here for any amount of time you know I am FIERCELY team scale - it is so so helpful for making Parker House Rolls and other bread recipes. You have to divide the dough into either 12 or 18 pieces here, and there is just no way that you can eyeball that accurately. Things are going to get super wonky. Use a scale. This is actually one of my favourite parts of making bread - trying to get the perfect weight of each piece of dough each time is so much fun (maybe it's just me but it's the best when you nail the size of the dough ball first time).
Give yourself enough time.
I always tend to underestimate how long bread will take me (I never remember to account for the time that they are actually in the oven!) - by the time you get all the bits and pieces together, it can take a while and you can't really rush the rising of bread too much, so make sure you do account for enough time. Here is how long the process usually takes me:
- Make the dough - 15 to 20 minutes, by the time I get it all done and in the bowl to rise.
- Bulk Rising - anywhere from 60 minutes to 1 ½ hours depending on the temperature of the dough. If I want this to take longer I often start with cold milk (which is fine if you are using instant yeast as it does not have to be activated), and this will buy me a little more time. Alternatively the first rise can be done overnight - see my white bread dough post for information on this.
- Shaping - 20 minutes. I like to divide the dough up and shape it into balls then give it 10 minutes to rest on the counter to relax slightly before rolling out and shaping into folded rolls or re rolling for round rolls.
- Second Rise. This usually takes an hour for this recipe if the first rise was at room temperature, but again, this will depend on how warm your kitchen is and how warm your dough was to begin with.
- Baking. Allow 30 minutes for this. The rolls usually bake in about 25 minutes. I love to serve them super warm from the oven, but you do you here - they are also perfect baked earlier in the day (or even the night before) and then re warmed.
Remember that if you are worried the rolls will overproof before they get to the oven (if there are other things baking and the rolls have to wait their turn etc), that you can always pop them into the fridge to slow down the rising process. Don't do the whole rising process in the fridge (they overproof big time and it is so sad, see further down the post), but if you need to buy yourself 10-15 minutes and don't want them to overproof, the fridge is your friend.
Don't worry if they come out a bit wonky.
Making bread is practice. Sometimes I find it really hard to get a nice smooth surface on the rolls, or you end up with a few bubbles or one busts out in the oven. They will still taste good regardless! Homemade bread always does.


How to shape Parker House Rolls two ways
I have included two ways to shape these Parker House Rolls - we will call them the 'round rolls' and the 'folded over' rolls. There are detailed pictures below on how to shape each type.
I love both formats - the round rolls are great for making sliders or sandwiches, but there is just something so special about the folded over version. The inside gets this amazing texture, and there is a little pocket of butter in the middle of each one which makes that part of the dough super soft. You also get the maximum amount of area where the rolls touch which is my very favourite part of bread.
As the traditional folded over shape:
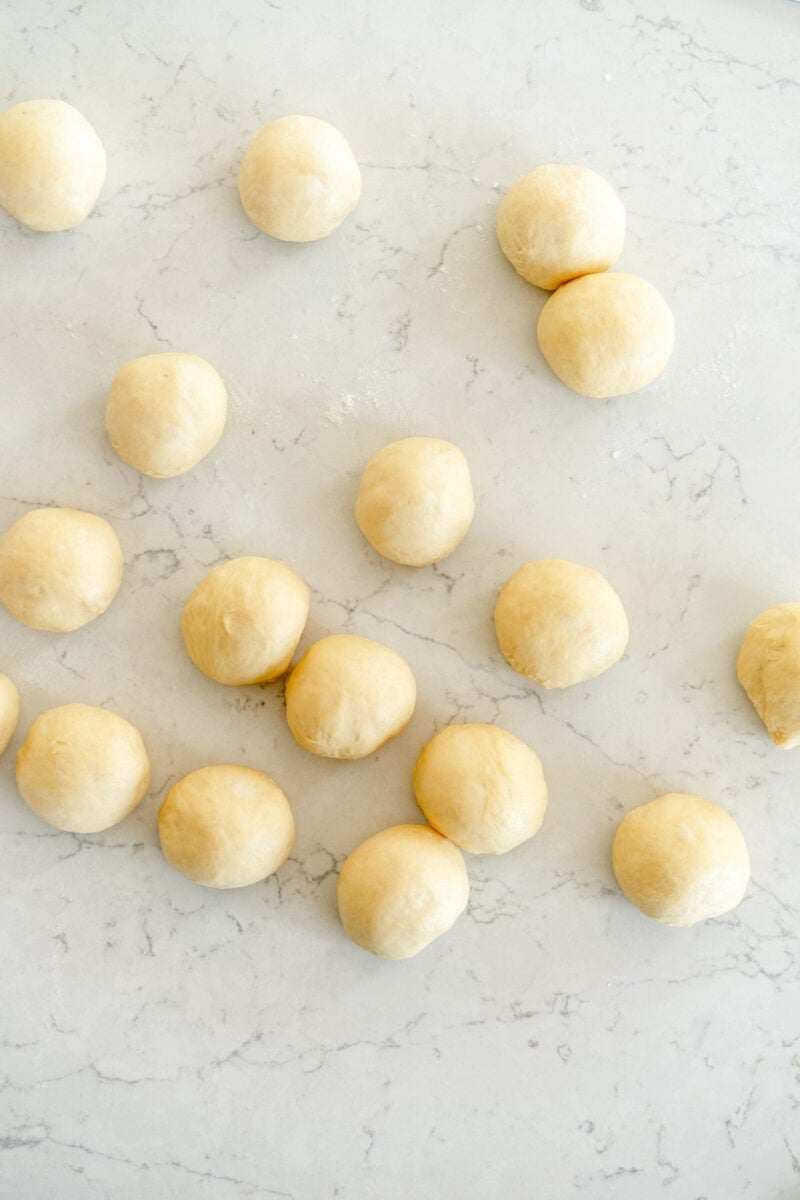
Step 1: DIVIDE. We are dividing the dough into 18 here - the rolls will sit in three rows of six. Plop your dough out onto a lightly floured work surface, and divide into 18 pieces - each should weigh about 45g each but weigh your overall dough first to double check this.
Shape each into a ball, and then leave to rest for 10 minutes or so to let them relax a little (if you are in a hurry you can skip this step).

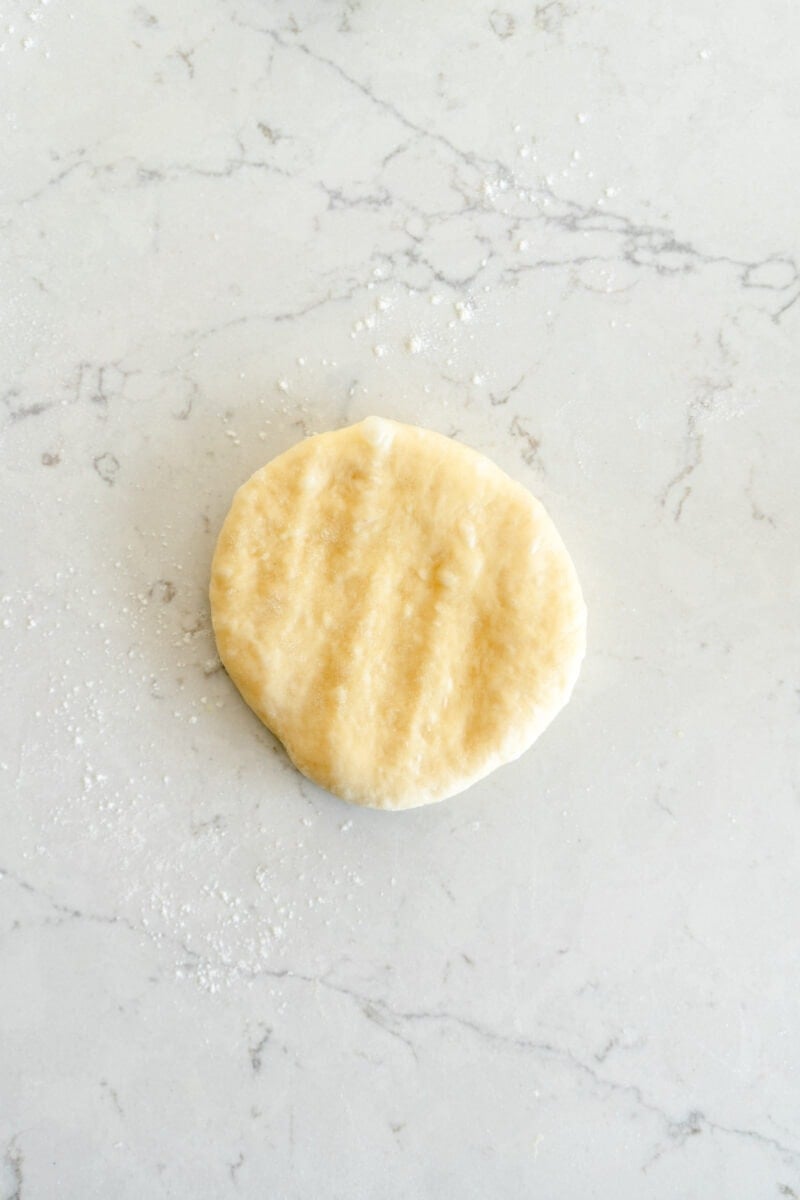
Step 2: FLATTEN. Work with one dough ball at a time. Lightly flour the surface if needed. Remember you are rolling it out and you don't want the dough to stick, so a little bit of flour is your friend here. Flatten the dough ball out with your hand.

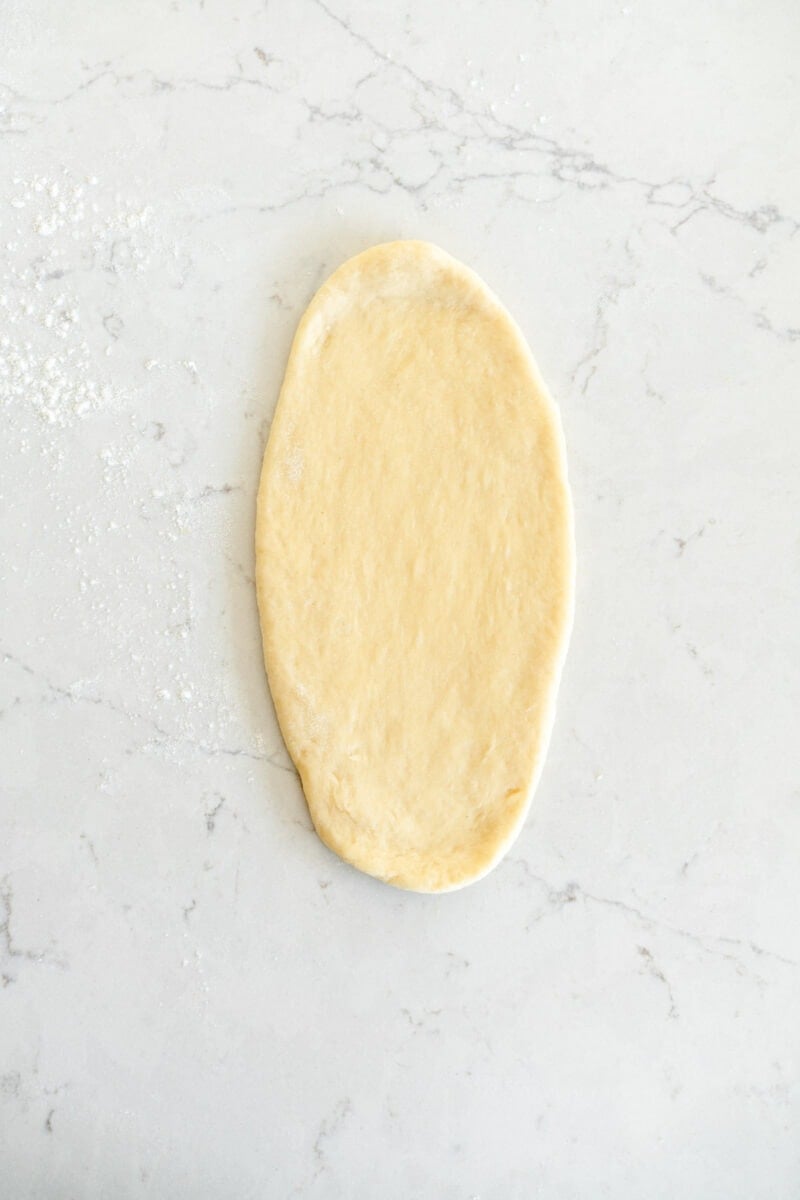
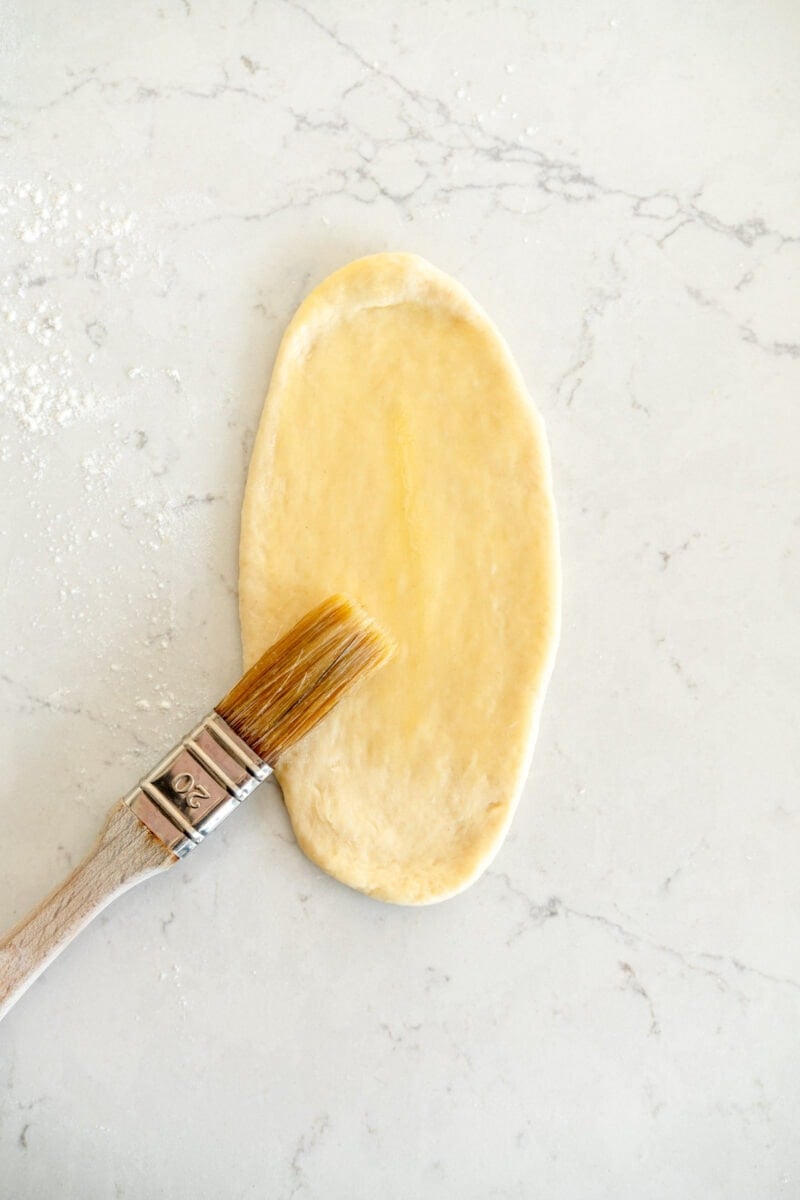
Step 3: ROLL. Using a rolling pin, roll the dough out into a long oval shape. Aim for approximately 16 cm / 6 inches long.
Step 4: BUTTER. Brush the oval of dough with butter.
Step 5: FOLD. Fold the dough over to form a clamshell shape of folded dough. Arrange in the pan - I do 3 rows of 6 rolls. I like to work in vertical lines so that I can make sure that they all line up nicely. Make sure there is enough room for them to fit. I use a 9"x13" (20x30cm) pan.

As a round 'regular' roll:
Step 1: DIVIDE. I shape this format of dough into 12, so turn your dough out onto a lightly floured surface and divide into 12 pieces, they should each weigh about 70g.
Step 2: SHAPE. Shape each one into a tight ball. Working with one piece at a time, flatten the dough and tuck the edges of the roll together to form a ball, then put the dough ball tucked side down and roll into a tight ball by cupping your hand into a 'claw' shape and using it to roll the dough ball. Use the tension from the counter to help with this - don't use too much flour here or you won't be able to get a good grip.


Step 3: REST. Cover the dough balls with a clean tea towel or plastic wrap and leave to rest for 10 minutes or so to relax a little.
Step 4: RE-ROLL. This step really helps give nicely shaped rolls. Once the rolls have rested, give them a quick re-roll (don't re-shape them, just repeat the claw hand shaping). This just makes sure that they are extra tightly rolled and will give nice fluffy bouncy rolls.


How to tell when Parker House Rolls are risen
The second rise (if the first rise has been done at room temperature) for these Parker House Rolls usually takes about an hour, depending on the temperature of your kitchen. If it is warmer it will go quicker, cooler then it will go slower. If you started with doing the bulk fermentation overnight, then it will take about 2-3 hours for the shaped dough to warm up and rise again.
It is important to go by how the dough looks, not a specific time. The best way to tell if bread is risen is by giving it the finger poke test - lightly flour a finger and then gently poke the surface of a roll. If it is not fully risen then the dough will spring back. If it is ready, it will leave an indentation that slowly springs back.

How to bake Parker House Rolls: Egg wash and then butter
I like to give my Parker House Rolls a coating of Egg wash before baking, then finish with butter after they come out of the oven.
Egg wash helps with browning - giving the dough a lovely golden brown and slightly shiny finish. If you do not have an extra egg on hand, I cover lots of alternatives in my egg wash post!
Once the rolls are baked, I like to give them a good coating of melted butter just to finish them off. I usually just use regular salted butter for this (or Unsalted with salt added), but you can do a garlic butter, a herb butter, a honey butter, whatever takes your fancy here.
If you are making the round rolls rather than the folded rolls, you can also give the rolls a butter bath half way through the baking process. About 15 minutes after they have started baking, remove from the oven, and brush all over with melted butter. Return them to the oven to finish baking, then add butter again.
How to tell when bread rolls are done baking
You can tell the rolls are done baking when they are pulling away from the sides of the pan and are evenly golden brown. This usually takes about 25 minutes in my oven.
If you want to double check this, you can use a digital thermometer - a lightly enriched dough like this one will temp at 190°f / 88°c when fully baked.


How do you store Parker House Rolls?
Parker House Rolls are best eaten fresh on the day that they are made but store super well in an airtight container at room temperature. Refresh in the oven or microwave, or lightly toast if you are eating them after the day that they are made. They should keep for 3-4 days.
Can Parker House Rolls be made ahead of time?
Yes - there are a few options here.
Make ahead and reheat.
The rolls can be fully finished ahead of time and then reheated to serve. If you do this, I like to leave off the final butter coating until just before I serve them. I often add a sprinkle of flaky sea salt to the tops of the rolls too, and make sure to only do this just before serving as the salt can make them go a bit weird and soggy.
To reheat the Parker house rolls, cover the pan with foil and place into a 350°f / 180°c oven for 10-15 minutes to re-warm, then remove the foil and warm for a further 2 minutes or so with the foil off to make sure there isn't any moisture hiding on the rolls, then finish with the melted butter.
Make ahead and freeze.
The great thing about this bread recipe is that it freezes super well. I haven't tested freezing the unbaked dough ahead of time, but I freeze baked bread all the time.
To freeze baked rolls, bake as directed but do not brush with the melted butter. Leave to cool then place into a ziploc or wrap well with plastic wrap. Store for up to 3 months. To serve, defrost at room temperature then re warm following the instructions above.

Can I do one or both rises in the fridge?
I wasn't initially planning on this, but I ended up going on a deep dive to test this. I made a double batch of my white bread dough, and ran a few tests just so I could show you what works best and what doesn't.
I often get asked if people can do the second rise in the fridge, and my answer is no. It leads to overproofing the rolls as they spend too long in the fridge, and the dough totally deflates when you go to bake it.
Overproofing is when the yeast in the recipe runs out of energy, and has no more to give in the oven, leading to dense, flat rolls rather than the nice soft fluffy rolls that we want. Overproofed rolls are still edible, they just won't be as nice and fluffy.
Here is what I tested and the results:
Room temperature first rise and fridge second rise.
I rose the dough as directed at room temperature, then shaped into 6 rolls and a loaf, and did the second rise in the fridge. They had 15 hours in the fridge for the second rise, and already looked overproofed when I took them out. I left them at room temperature for 2 hours so they could warm up slightly before baking, and then baked them off.
Result: Overproofed rolls. I do not recommend this method.
Fridge first rise and room temperature second rise.
If you are going to do a component of these rolls ahead of time, doing the first rise in the fridge is the way to go. I made the dough and shaped it, then gave it overnight in the fridge (from experience you can do up to 24 hours) then shaped the rolls as directed and rose and baked. They turned out basically the same as the rolls which had had both their first and second rise at room temperature, and baked up nice and fluffy as the yeast still had energy to give in the oven.
Result: Properly proofed rolls. I recommend this method - just make sure that you allow time for the dough to warm up slightly before shaping and allow for more time for them to rise before baking.

The results.
The images below show the results - you can see that the top rolls, which had a fridge first rise and a room temperature second rise, were much nicer - they baked up super fluffy and round as they should.
The bottom pan of rolls which had their second rise in the fridge overnight were already looking quite sad when I took them out of the fridge to warm up. There was just no way that they were going to perk up.
If your dough overproofs on the first rise it is possible to save it by just punching it down and shaping and proceeding, however if it happens on the second rise, the rolls will bake up much flatter.
To me, it is just not worth doing the second rise overnight. You do not save any more time, and the risk of overproofing the dough is too high.


This is the image which is the craziest to me - these were the EXACT same batch of dough, but the ones on the left had a fridge first rise and a room temperature second rise, and the ones on the right had a room temperature first rise and a fridge second rise. They totally overproofed, and were nowhere near as fluffy - if you didn't know, you would have thought it was a totally different recipe.


❤️ Made this recipe and love it? ❤️
I would LOVE for you to leave me a review and star rating below to let me know how you liked it! Also, please make sure to tag me on Instagram!
Answers to your baking questions
Over the years, many of you have asked me questions about:
- baking in grams
- adjusting oven temperatures
- what kind of salt to use
- and many more!
I've curated and answered them all for your easy reference in this frequently asked questions post!
Soft and Buttery Parker House Rolls
- Prep Time: 30 minutes
- Cook Time: 30 minutes
- Total Time: 4 hours
- Yield: 12 servings 1x
- Category: Bread
- Method: Baking
- Cuisine: American
Description
Soft and Buttery Homemade Parker House Rolls are a super fun shaped dinner rolls. Made with an easy white bread dough recipe, they are fun to make and perfectly soft. Shape these as the traditional parker house rolls, or divide the dough up and shape into classic round rolls - they are perfect either way. These rolls can be made all in one day, or you can work ahead and give the dough an overnight rise.
Ingredients
Bread Dough
- One batch of white bread dough, risen and ready to use (see dough post for rising options)
To Finish
- 60g salted butter, melted (if you only have unsalted that is fine, add a pinch of salt)
- Egg wash - 1 egg whisked with 1 tablespoon water
- Flaky Sea Salt to finish.
Instructions
SHAPE ROLLS
- Start with risen white bread dough. If you have done a fridge rise first, leave the dough to stand on the counter for about 30 minutes before shaping to allow it to soften slightly so it is easy to work with.
- Grease and line a 9x13" (20x30cm) pan with parchment paper, or generously butter the pan if it is non stick and you trust it.
- Melt the butter and leave it to cool slightly.
- Turn out the dough onto a lightly floured, clean work surface. Alternatively you can use a silicone baking mat so you don't have to use flour - this has been my preferred method lately.
- Divide the dough into 18 equal pieces, each weighing about 45g each. To work out the exact dough weight, weigh your dough and divide that number by 18.
- Shape each piece of dough into a tight ball by tucking the edges of the dough under, and then placing it seam side down on the counter top and using your hand in a claw shape to shape the dough into a ball.
- Rest the dough balls under a clean tea towel or plastic wrap for 10 minutes to allow the dough to slightly relax.
- To shape the parker house rolls, work with one piece of dough at a time. Lightly flour your surface, then flatten a dough ball with your hand. Roll out the dough ball into a long oval, about 6" /16cm in length.
- Brush the piece of dough with the melted butter, then fold it up into a clamshell shape. Arrange in the pan - I like to do 3 rows of 6 rolls, and arrange them in vertical lines rather than doing one row at a time so I can make sure they all fit nicely (see images in blog post). I add them as I shape them, but you could also shape them all at once and then arrange in the pan if that suits you bettter.
- Repeat with the remainder of the rolls until you have arranged all the rolls in your pan.
RISING AND BAKING
- Cover the pan with plastic wrap or a lid, and leave in a warm spot for about an hour, until the dough balls are puffy and when poked gently, an indentation is left that slowly springs back. This will take more time if you have started with cold dough.
- Toward the end of the rising process, preheat your oven to 350°f / 180°c and arrange a baking rack in the middle.
- Brush the rolls with egg wash, and place in the oven.
- Bake the rolls for 25-30 minutes, until they are a deep golden brown, and register 190°f / 88°c on a digital probe thermometer.
- Remove from the oven and brush with the remaining melted butter. Sprinkle with flaky sea salt if desired.
- Serve warm or at room temperature.
- Store leftover rolls in an airtight container at room temperature for up to 3 days. Refresh before eating.
Notes
The recipe notes are for making the folded rolls. To shape the dough into 12 round rolls, shape as follows:
Grease and line a 9x13" (20x30cm) pan with parchment paper, or just grease with butter. Turn out the dough onto a lightly floured surface. Divide the dough into 12 equally sized pieces (each dough ball should weigh about 70g). Working with one piece of dough at a time, flatten out the dough, then tuck under the edges. Cup your hand to create a 'claw' shape, then use the tension of the counter to roll the dough into a ball. Set aside. Repeat with the remaining dough balls. Cover the dough balls with a clean tea towel or plastic wrap and leave to sit for 10 minutes to relax. Give the dough balls a quick re-roll to help tighten them up, then arrange in the pan. Follow the rising and baking instructions in the method. Brush with melted butter when baked. If you like, you can also baste the rolls with some of the butter about 15 minutes through the baking process.
An extra third option - Fantail rolls:
This is a super fun variation on the Parker House Rolls. To make them, prepare the dough as usual, but give it a cold rise in the fridge (minimum about 4 hours and maximum 24 hours).
Butter the cups and top of a non stick muffin pan. Divide the dough into two pieces (do this by weight).
Working with one piece of dough at a time, shape the dough into a square then roll out on a lightly floured surface into a square 12" (30cm). Cut the dough into six 2" / 5cm strips. Brush with melted butter, then stack each strip on top of each other. Cut the strip of stacked dough into six 2" / 5cm pieces to give you six stacks of dough. Place each one, cut side up, into a cup of the muffin pan.
Repeat the process with the other piece of the dough to give you 12 rolls. Rise and bake the rolls as per the written recipe (the rise may take a tiny bit longer as you are starting with cold dough)
To make cheese stuffed rolls: Divide the dough into 12 pieces, each weighing about 70g each. Shape each into a 10cm cylinder (I prefer to work on a silpat mat with very lightly oiled hands rather than using flour). Cover with a clean tea towel and leave to rest for 15 minutes. Butter a 9x13" (20x30cm) pan, I used a quarter sheet pan. Cut mozzarella cheese into 12 rods - mine were about 4x2x1.5cm (1.5x0.7x05") and weighed about 15g. Once the logs of dough have rested, working with one at a time, flatten out one end slightly, then roll out into a long strip, pulling on the end as you go to stretch it out. The strip should be about 35cm long. Place the piece of cheese on the wider end and roll it up, pulling back toward you as you go to stretch out the dough so the bun rolls up nicely (you can see my do this on my instagram). Place seam side down on the sheet pan. Repeat with the other 12 rolls. Cover the rolls and rise and bake as directed. Once finished, brush with melted garlic butter - I melted down about 80g but do as much or as little as you like. These are best served warm when the cheese is melty but can be reheated in the oven to melt the cheese!
To make pumpkin rolls, there are notes in my white bread dough recipe for adding in pumpkin! Replace the milk in the recipe with pumpkin puree, and swap the water in the recipe for milk. Pumpkin puree is surprisingly high in moisture so these are the most amazing texture!
Comments
Rachael says
Can't wait to try these!
Phoebe says
This recipe was SO easy and SO delicious. I am never buying store brought buns again! Thanks Erin!
Erin says
Erin says
I just made the rolls and the dough is beautiful, comes together easily, baked up like a dream.🙌 Perfection! Just in time for Thanksgiving. Thanks so much for this recipe. It’s magic. Can’t wait to try it as bread loaf.
Kylee F says
Made thanksgiving morning for our late lunch, did 1 hour rise, shaped into Parker house rolls, then did 40 minute rise, my house was on the warmer side so this was plenty. Tons of compliments! Tastes delish, thank you! Ps I love how detailed your post is, and as always, grams >>>
Nancy says
Another winning recipe! I made a double recipe of round rolls and they were a big hit! Thank you for the detailed instructions on rising. I did the overnight fridge rise.
Gina says
These are possibly the fluffiest rolls I've ever made! So delicious and super simple to make as well. Definitely a new go to recipe - especially since my toddlers approve too!
Emily says
Made these rolls for Thanksgiving dinner and they were wonderful! Definitely going to be a new staple recipe in my home.
Liz says
10/10! So easy and delicious! I did the mixing and first proof in the bread maker to make it easier. Especially since all of Erin’s recipes are in grams ( 😍😍) there was no additional bowl cleanup once the dough was mixed and proofed all in the same container! They were absolutely phenomenal. Already planning to make these again asap.
Aly says
I made these for Thanksgiving and they were a huge hit. My son ate 4! I loved how easy the recipe was to follow, and all of Erin’s tips came in handy.
Sam says
AMAZING- these were rolls worth bragging about. Recipe is perfect! Going to remake this week for lil’ sandwich rolls.
Laine Thomas says
I love CloudyKitchen and I’ve yet to find a recipe that hasn’t been fantastic! I made two pans of rolls for Thanksgiving and it turned out so perfect. To clarify, I did not double the recipe, I made two separate batches of the basic white dough and then followed directions for the round rolls. This dough is silky smooth and so light and airy! Definitely worth baking!
Whitney B says
Made these for Thanksgiving and they were a hit!
I did a double batch so I could experiment with two shaping techniques. I did a batch of Parker House according to Erin’s instruction and the second batch I shaped into clover rolls, fitting them into a 12 count muffin tin. Both were perfection!
My only note for future bakers is that the double batch of dough didn’t quite fit into my 5qt stand mixer (KA Artisan). The dough crawled up the hook as a mixed. Once the ingredients incorporated I had to divide it in two to properly knead - easy fix!
Thanks for a great recipe!!!! 🥰
Jennifer Ly says
I made this recipe for thanksgiving and it was perfect! i’ve always wanted to make that ‘golden’ looking dinner rolls but most of the recipes i’ve seen looks lighter than i would like. thanks to erin for the tips and guide in making the most beautiful dinner rolls! photo shown is my spread for thanksgiving for 2 😂 can just see how beautiful the rolls looks.
Katie says
I made these for a holiday gathering and they were PERFECTION! I was a little nervous using a recipe I hadn't tested beforehand but the dough was delightfully soft and rose beautifully. The final product baked up perfectly and I loved the pocket of buttery goodness in the center. Forgot to take any pictures because we all devoured them so quickly.
The directions were clear and so easy to follow. Thank you for another excellent recipe that I will be coming back to again and again!
Erin Clarkson says
Yayyy I am so happy to hear this! It's such a lovely dough right
Kate says
I would include a photo but these were demolished before I remembered!
Easy to follow recipe (#gramsforthewin), and a delicious result of of 12 dinner rolls. Can't wait to use this recipe again and try the other variations.
Connie Sullivan says
Tried these last week and they were great, easy to follow and little work if you have a stand mixer. Thanks Erin for all the testing! x
Alex says
This was absolutely amazing! I made it for a family dinner and everyone loved it 😍
Erin Clarkson says
Amazing, they look so, so good!
N says
Parker House rolls aren’t a thing where I’m from but I was so intrigued by the shape that I made it for Xmas eve dinner. This was such a good recipe! Loved the texture and the buttery center. I think I might prefer the Parker House shape to the regular rolls. Mine lacked a bit of depth of flavor, so I might try the overnight rise as we do tend to favor longer ferments in our house. But I will also swap around ingredients as I didn’t have access to my usual brands last night and that could be a factor, too. All in all, a great bun recipe that I will be making again!
Rachael says
Husband allergic to eggs- Replaced the egg with 30g of milk and used cream instead of egg wash, and these rolls came out absolutely beautifully! Thank you
Nusrath Ahamed says
This dough is such a delight to work with!
Ness says
These are ridiculously good - thanks so much for providing a free and super thorough recipe! I’ve made these twice - first with stand mixer, and then I used the dough cycle on my bread machine. Both worked really well.
Chris says
I've made these twice and both times they were AMAZING! Everyone had seconds! They are soft and fluffy, and utterly delicious.
We used them for sliders and they were great.
Emma says
So easy. I’ve never made bread before and needed some tiny slider buns that I couldn’t buy anymore - so I made my own! I divided the dough into 25 and they were perfect. Erin’s instructions are always so detailed which makes doing seemingly tricky things a breeze!
Emily B says
ERIN CLARKSON! How dare you make these this good and simple! And by “how dare you” I mean thank you! These are dangerously delicious and straight forward, if your name isn’t Marilyn 😉
Thank you! Love to you, adventure dad, and the kitties❤️
Krissy says
My grandma made these for me when I was growing up and while I have her recipe, I still can't get them to turn out. I figured it must be something in the yeast back then. I have tried making them so many times and failed each time until I made yours and your step by step picture directions were so easy to follow that they tasted almost like my grandmother's. I'm wondering if you can double the recipe at all? I would love to make more pans of the Parker House Rolls.
Erin Clarkson says
Yes the recipe doubles perfectly! Just double all the quantities and make two pans
Rebecca Straight says
I’ve made these rolls for the past three or four family gatherings and they have been devoured like nothing else! (Which is a bit of a disappointment because it means I don’t leftovers 😩) But, seriously, these are the best yeasted rolls I’ve tried and I will never go back to other recipes! Cloudy Kitchen Dinner Rolls for Life!
Erin Clarkson says
yayyyyy! So so happy you love - I love this recipe so much 🙂
Haley S says
I made these for mini hamburger slider buns for a grazing table and they were so good!
I was a bit stressed attempting them for the first time the morning of the event but the recipe was clear, easy to follow and came out near perfectly. Being much smaller than the recipe size I should have baked them a few minutes less but can't wait to make them again!
Lauren Iagulli says
Mine looked great until I put the egg wash on and they just completely deflated. I was being as gentle as possible putting the egg wash on..Any idea what went wrong?
Erin Clarkson says
Hi! Yep it sounds like they were over proofed! Try proofing them for a little less time next time 🙂
Liz Levy says
Hi there! What size aluminum pans are you using? Thank you!
Erin Clarkson says
Hi, these are a 9x13 - the brand is nordicware 🙂
Kerry says
Love this recipe and Erin’s thoughtful descriptions and instructions. My husband, who is a professional baker and chef, made these for Thanksgiving and loved how thorough (yet easy!) this recipe is. I (not a chef, haha) made them last year for Christmas and felt the same. Family raved over them! Thanks again. ❤️
Brittney says
Absolutely love these! Made twice this week and planning to do a third batch to use for sandwiches. My 5yo ate 6 of them and gave 2 thumbs up!!
Easiest yeast dough I’ve tried, seriously so good.
Ali Lucchesi says
Made these rolls for thanksgiving and they were a huge hit! Made exactly as directed and really appreciated the instructions for making ahead and freezing.
Whitney B says
I had seen so many of Erin’s Instagram posts about these rolls that I HAD to try them, and I’m so glad I did! Made them for Thanksgiving yesterday, and I have never seen my family eat so much bread at a meal. My mom has already requested them for our next get together. Followed the recipe exactly for the folded rolls and they turned out perfectly. I will have to make more of Erin’s recipes because she makes them so detailed and easy to follow.
Jenny O says
These rolls are incredible. The white Bread Dough they are made from was so pillowy soft. The clam shell shape was a new thing for me. I made the mistake of not tucking the folded part under. I brought them to a Friendsgiving and they were a huge hit.
Trish says
YUM. Couldn’t have been easier to make for Thanksgiving. Will absolutely be making these again.
Emily says
I made these as 12 round rolls to have with pulled pork for a flat dinner and they went down a treat!! recipe was super easy to follow, making them today as parker house rolls today and can’t wait to see how they turn out!
Alison says
These rolls are an absolute dream of perfection.
They're amazing alone but can be used as a perfect little sandwhich vessel. Always a huge hit with my guests and kiddos! Thanks Erin xx
Heather P says
These came out so delicious and soft! I lost track of time so I over proofed them a tad before the oven, but the texture and taste are superb. Heed the advice of using parchment. I opted for butter and they stuck to the bottom of my pan. Perfect accompaniment for our Thanksgiving Dinner today.
Nichole says
Made these for Thanksgiving. The dough was so soft and smooth and made very fluffy rolls.
Judy says
I made these rolls for Thanksgiving and everyone loved them! Cloudy Kitchen’s recipes have been my go-to choice because I know they’ll be successful and delicious!
Melissa says
This is now my "go to" roll recipe!