
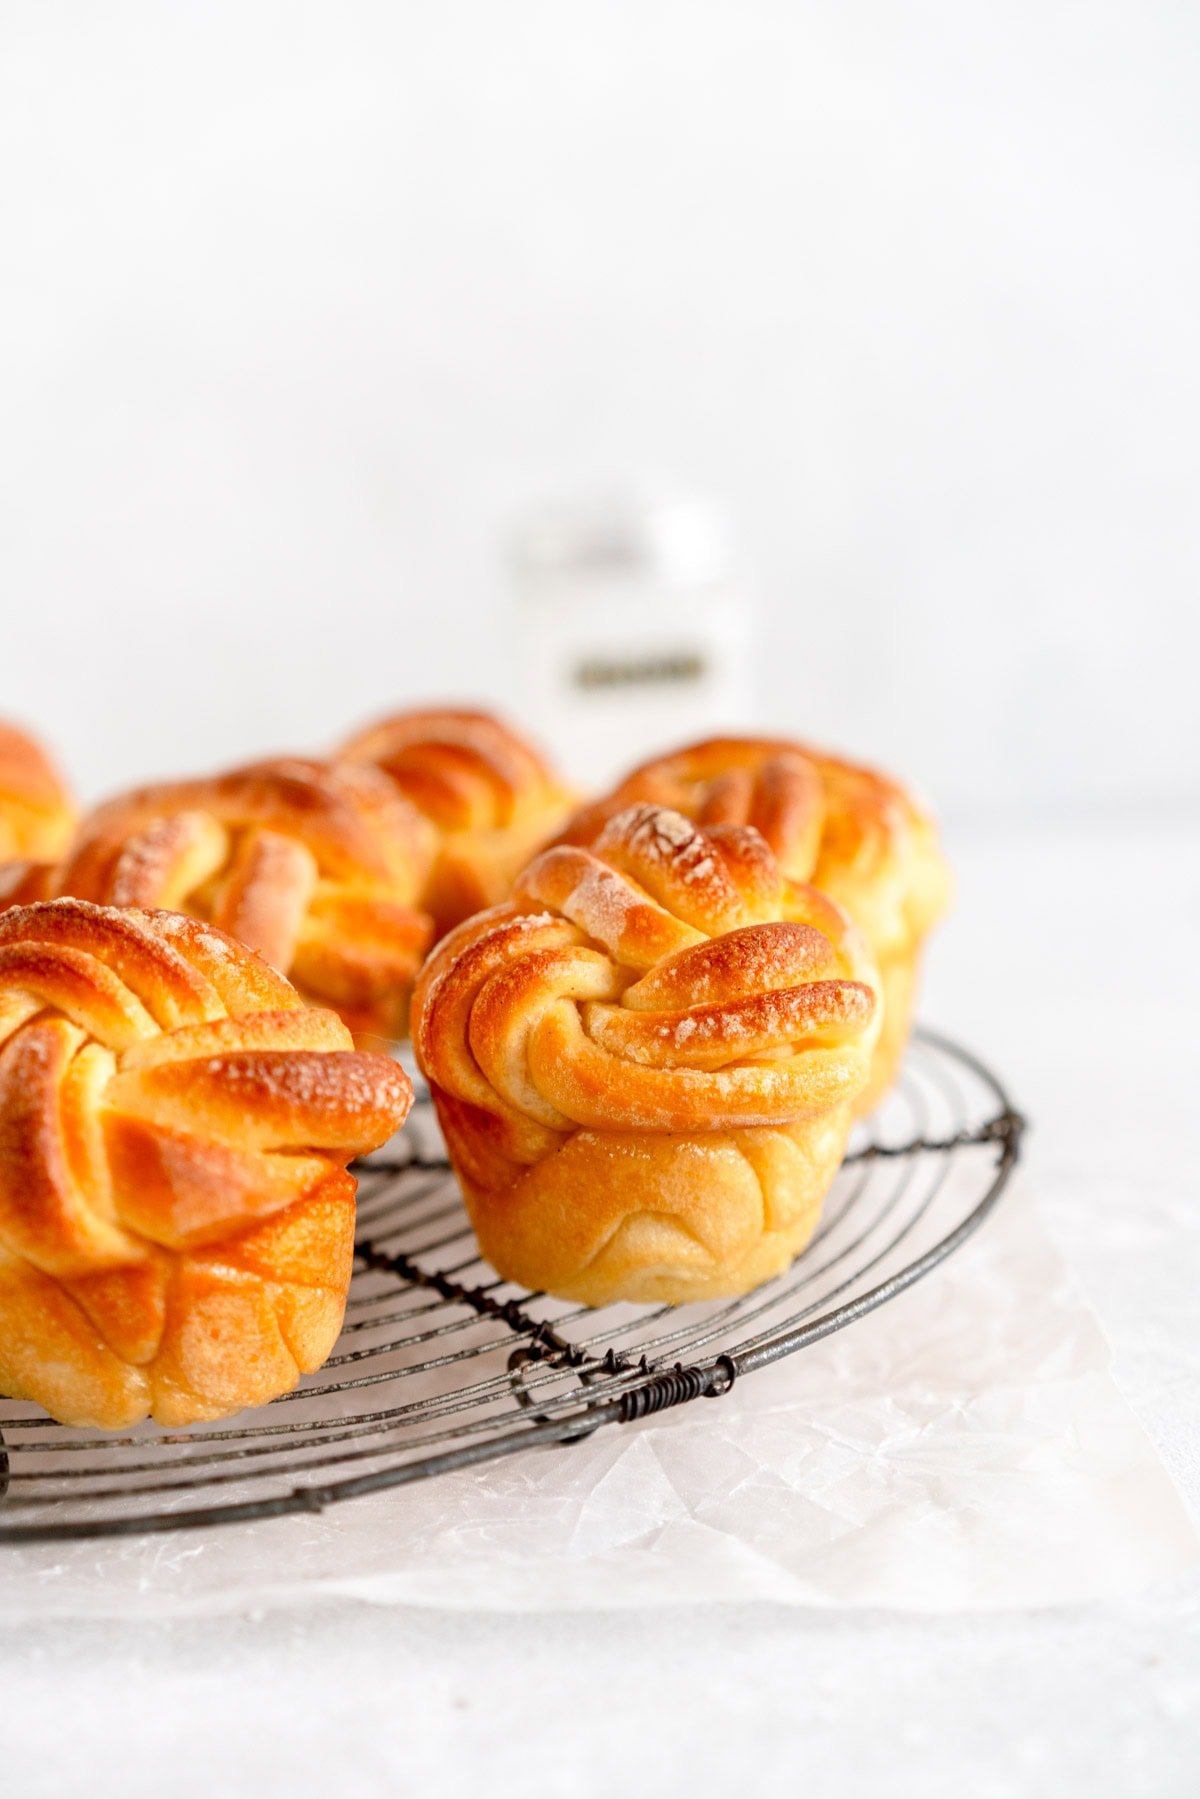
Soft and fluffy lemon buns are made with an easy enriched dough and filled with a lemon sugar mixture. The braiding is simple - you just cut them into strips and shape into beautiful buns! These are amazing served as is or you can finish them with powdered sugar or a lemon glaze. I made these in my new Ooni Halo Pro Spiral Mixer, which is my new favourite kitchen accessory!
Hi hi! I am just popping in to share the recipe for these easy soft and fluffy lemon buns with you, AND to tell you about a very new addition to my kitchen - the Ooni Halo Pro Spiral Dough Mixer!
These lemon buns are really easy to make - a basic enriched dough, flavoured with a little lemon, is made and chilled down to make it easy to work with, then rolled out, filled with more lemon sugar, and rolled up into super beautiful and easier-than-they-look buns, which proof for a second time then are baked up into little balls of lemon deliciousness.
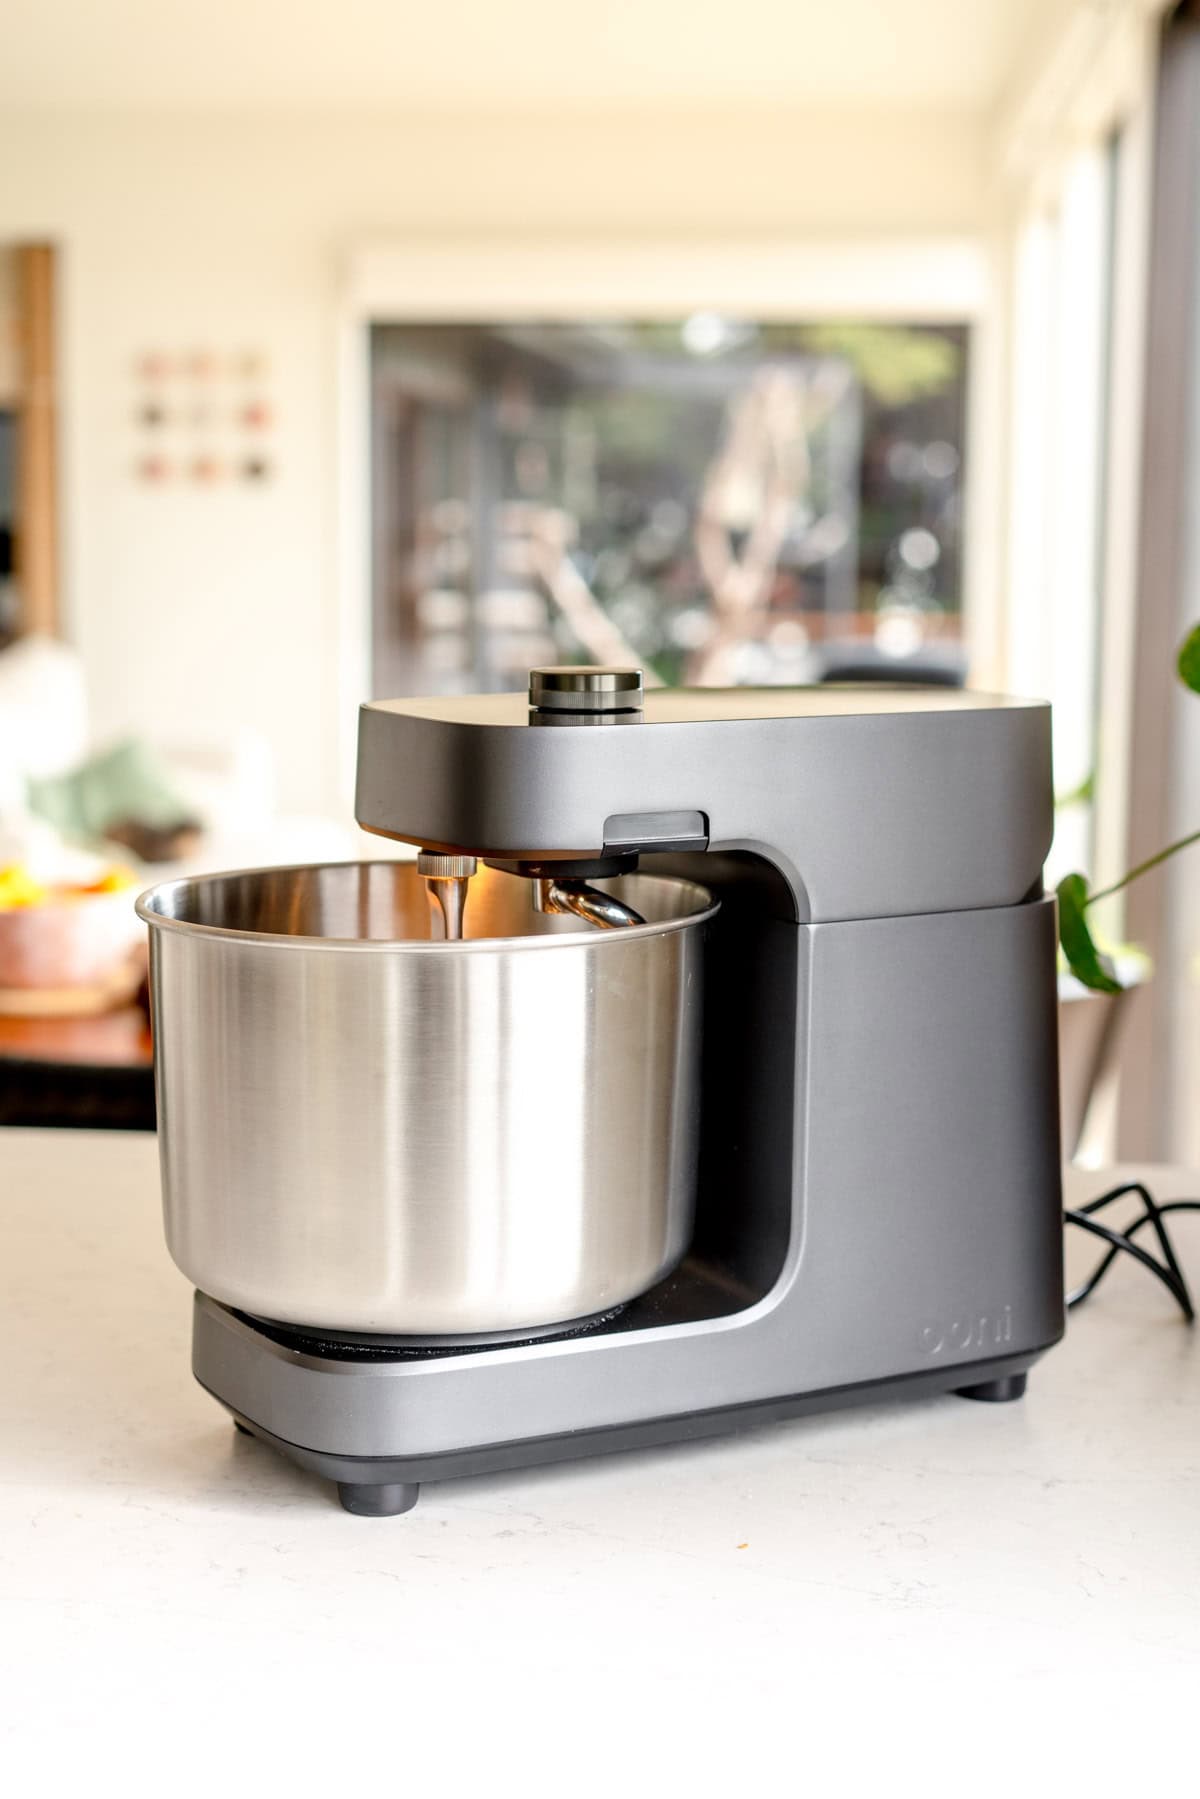
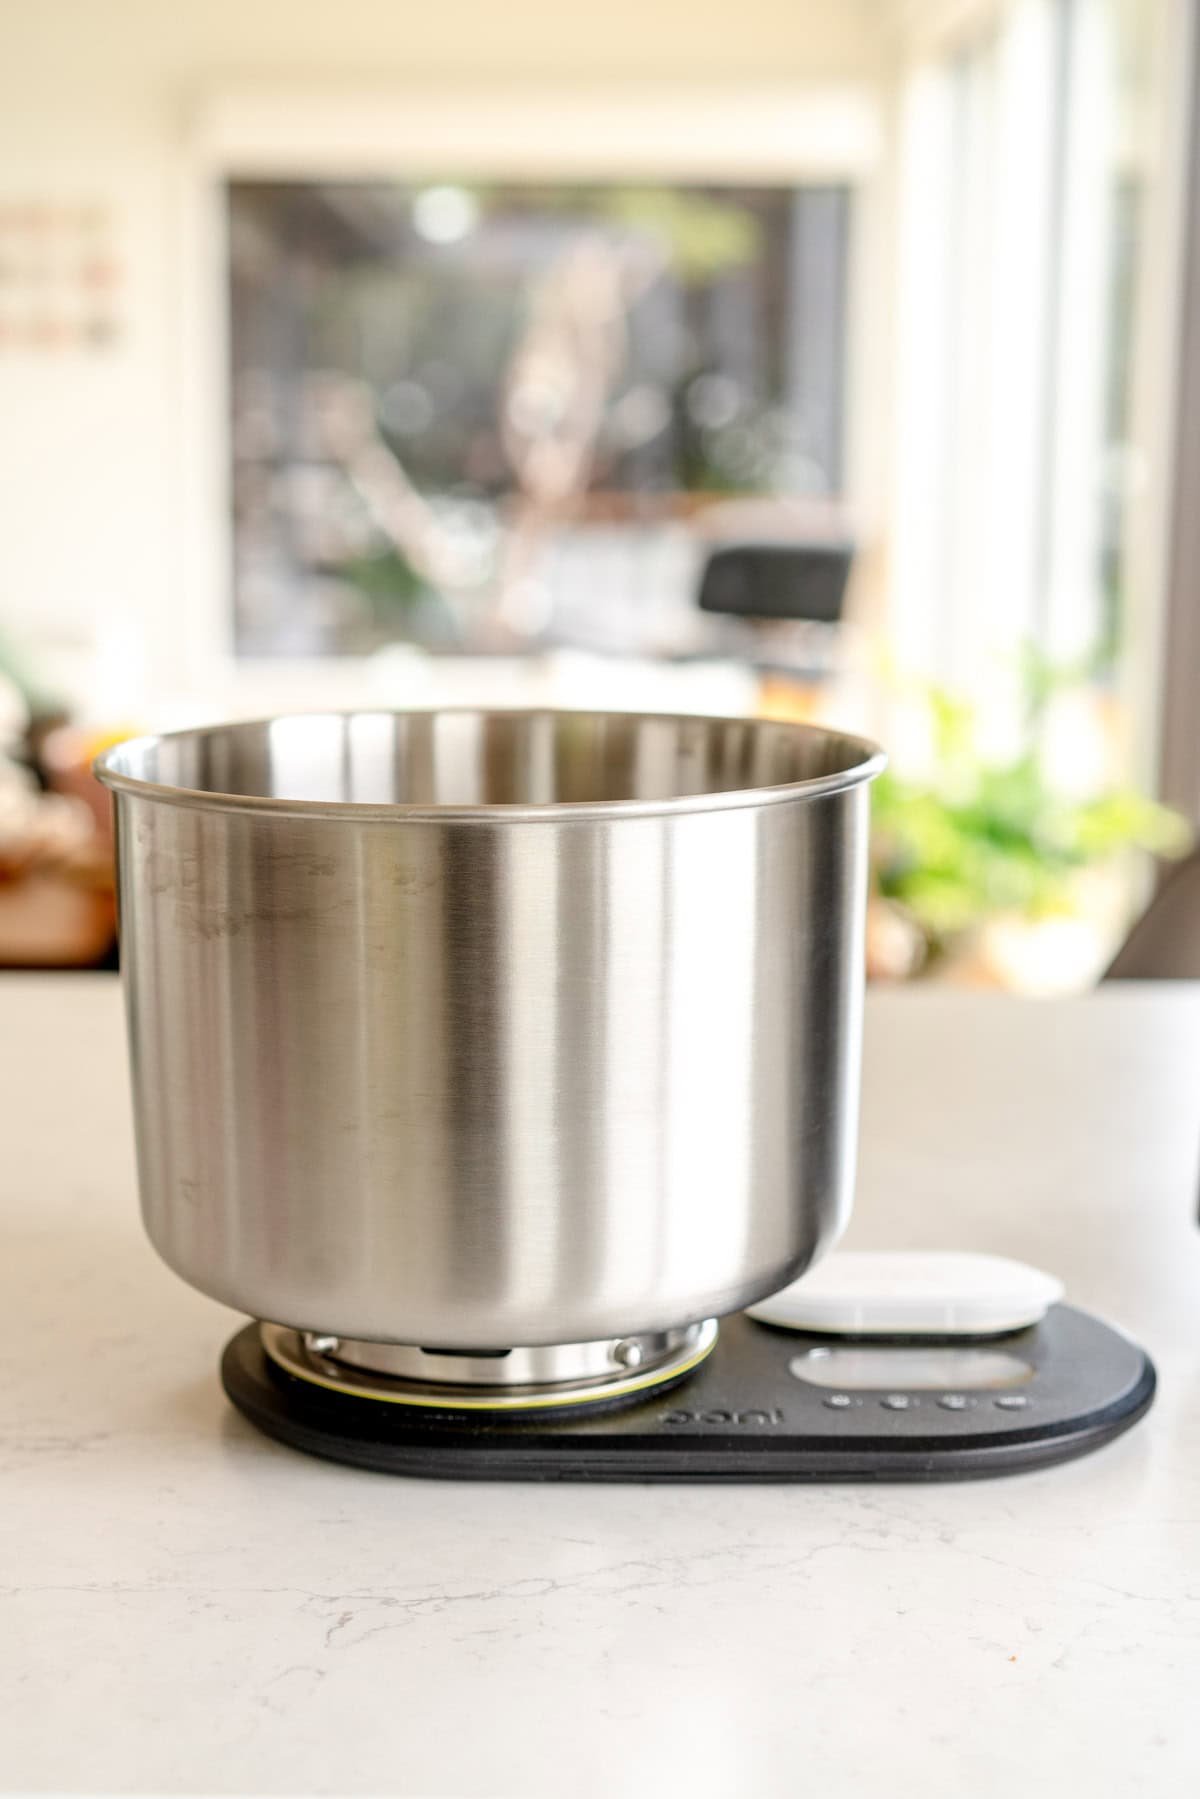
I used my brand new Ooni Halo Pro Spiral Mixer to make these buns. I have owned an Ooni Pizza oven for years now and it is one of my favourite things, so I was SO excited when they reached out about trying out their new mixer, which is truly a game changer, especially if you make a lot of dough! After playing around with it for a long time and really testing it out, I am so excited to tell you all about it!
This post is sponsored by Ooni. All opinions are my own. Thank you for supporting the businesses which help keep Cloudy Kitchen running! I have been given affiliate links to use throughout the post, thank you for your support!
My New Favourite Thing: A Spiral Mixer!
If you've ever peeked into the back of a bakery, you've probably noticed a massive mixer with a huge spiral hook on it. That is a spiral mixer, and it is designed especially to mix dough in the most efficient way possible.
Ooni has recently released an at-home version of this mixer, which is an absolute game changer when it comes to mixing dough. I have owned a bowl lift mixer for years now and while it does a great job with the whisk and paddle attachment, it leaves a lot to be desired when it comes to the dough hook.
Enter the Ooni Halo Pro Spiral Mixer. Designed with dough in mind, the mixer is not only beautiful enough to live permanently on my bench, but the way that it mixes dough is so clever. I no longer have to stand and hold my mixer to stop it walking across the bench.
How a spiral mixer works
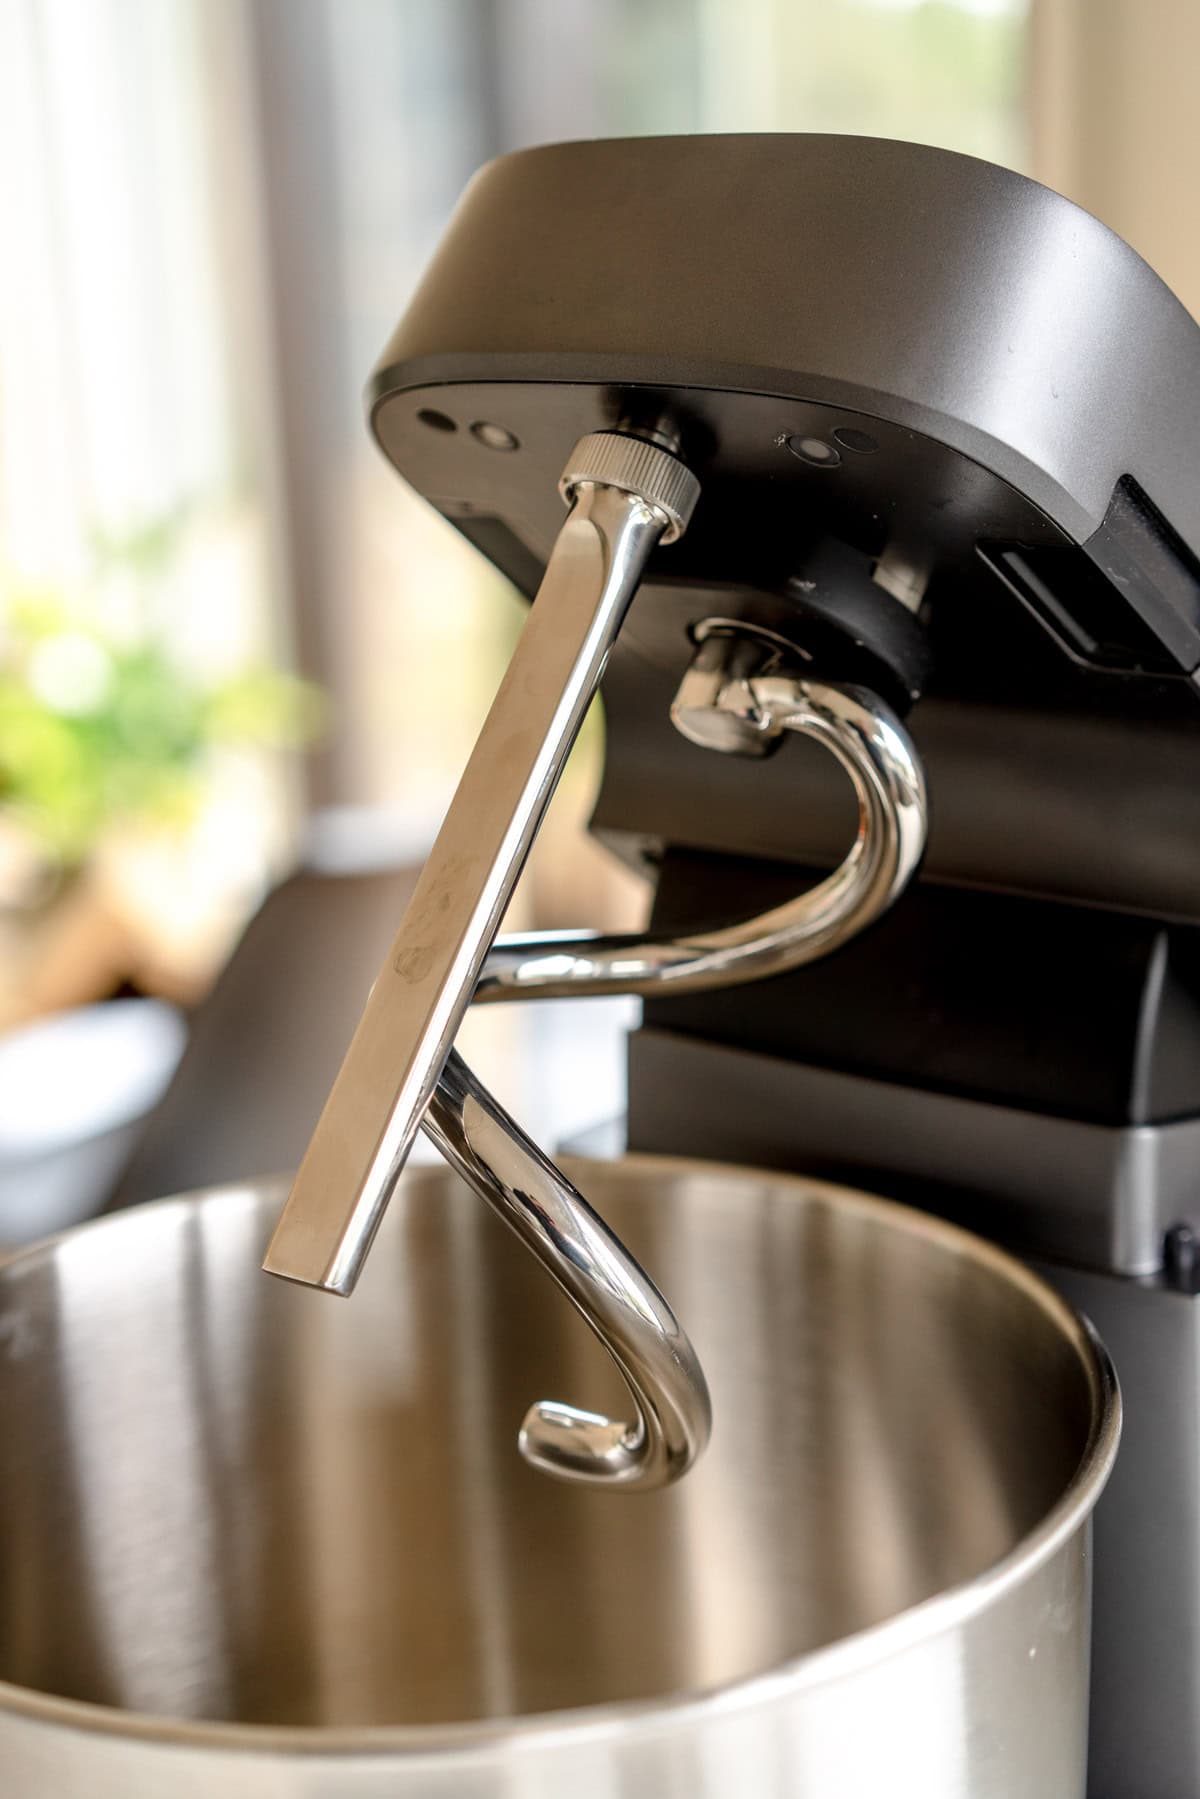
Unlike a planetary mixer which is what we are typically used to when we refer to a stand mixer, the Ooni Halo Pro Spiral Mixer differs in that both the mixing attachment and the bowl spin.
The Ooni Halo Pro Spiral Mixer comes with a dough hook, but the game changing part is that it has a breaker bar, which screws into the head of the mixer. The breaker bar does not move, and stops the dough from coiling up the dough hook as the dough mixes, which gives you a dual action kneading system. This gives you amazing bread dough, mixed efficiently and with an amazing finish. I tested it with sourdough, lower hydration dough, a cinnamon roll dough, my focaccia dough, and a really soft and sticky milk bread dough, and it was amazing for all of them, giving me dough with amazing gluten development and extensibility that is a dream to work with.
Features that I love
I have been playing around with the Ooni Spiral Mixer for a month or so now, to really put it through its paces when it came to being a workhorse in the kitchen, and it has passed every challenge I have set it. I expect my appliances to work hard, and I make a ton of dough. Here are a list of things that I love the most:
- Super Sturdy. A huge issue with a planetary style mixer is that it is not heavy duty enough to stand up to kneading bread without getting too hot or walking itself off the bench. I would have to stand and hold my planetary mixer down to keep it in place. The Ooni does not have any of those issues. I am able to easily carry it from room to room if needed, but once it is positioned on the counter, you can easily leave it there will full peace of mind that it won't be moving once you turn it on. I ran it at full speed with a relatively low hydration dough, and it didn't complain a single bit. If you have struggled with your mixer in the past you know how amazing this is!
- The control dial. I LOVE the control interface of the mixer. It has a single dial which you turn to either a % speed or you can set it to do a certain RPM depending on what you prefer. You turn the dial to the setting you want, and just tap it to stop the mixer. You also use the dial to set the timer. The interface is digital, so you have a ton of control over what you are doing.
- A Timer. This one is low key life changing for me. I am often multi tasking in the kitchen, and being able to set a timer for how long I want the mixer to go for is amazing, especially with a dough with multiple mixing stages or a long kneading cycle.
- The bowl is huge but in a good way. The Ooni Halo Pro Spiral Mixer bowl is 7 litres, which may seem large but it has straight sides, so it is very easy to work with. The bowl spins on the mixer, and there is enough space between the side of the bowl and the breaker bar to reach in with a spatula to scrape the side of the bowl without having to stop the mixer. Truly a dream.
- It has a light. Enough said. Stage lighting for your baking. The mixer also makes a delightful noise when you turn it on and off (which can be muted, but it makes me so happy)
- Easy to lift up and down. Whatever the opposite of clunky is, that is what that mixer is. There is a little button / catch on either side of the head of the mixer, which you lift to smoothly lift the head of the mixer up and down.
- The results are amazing. I caught myself standing and watching the mixer whenever I use it - it is absolutely fascinating to watch the dough develop, and the results are just amazing. It makes dough that is a dream to work with.
- Easy to wash. Everything comes off - both the dough hook and the breaker bar unscrew so I can just throw them into the dishwasher.
- Other attachments. While the Ooni Halo Pro Spiral Mixer is designed to make amazing dough, it also comes with a flexible beater and a geared whisk to make it versatile in the kitchen if you need it to be. While I will primarily be using this for dough, I also tested a triple batch of my brownie recipe using the whisk attachment and the mixer performed amazingly.
Super Easy Lemon Buns
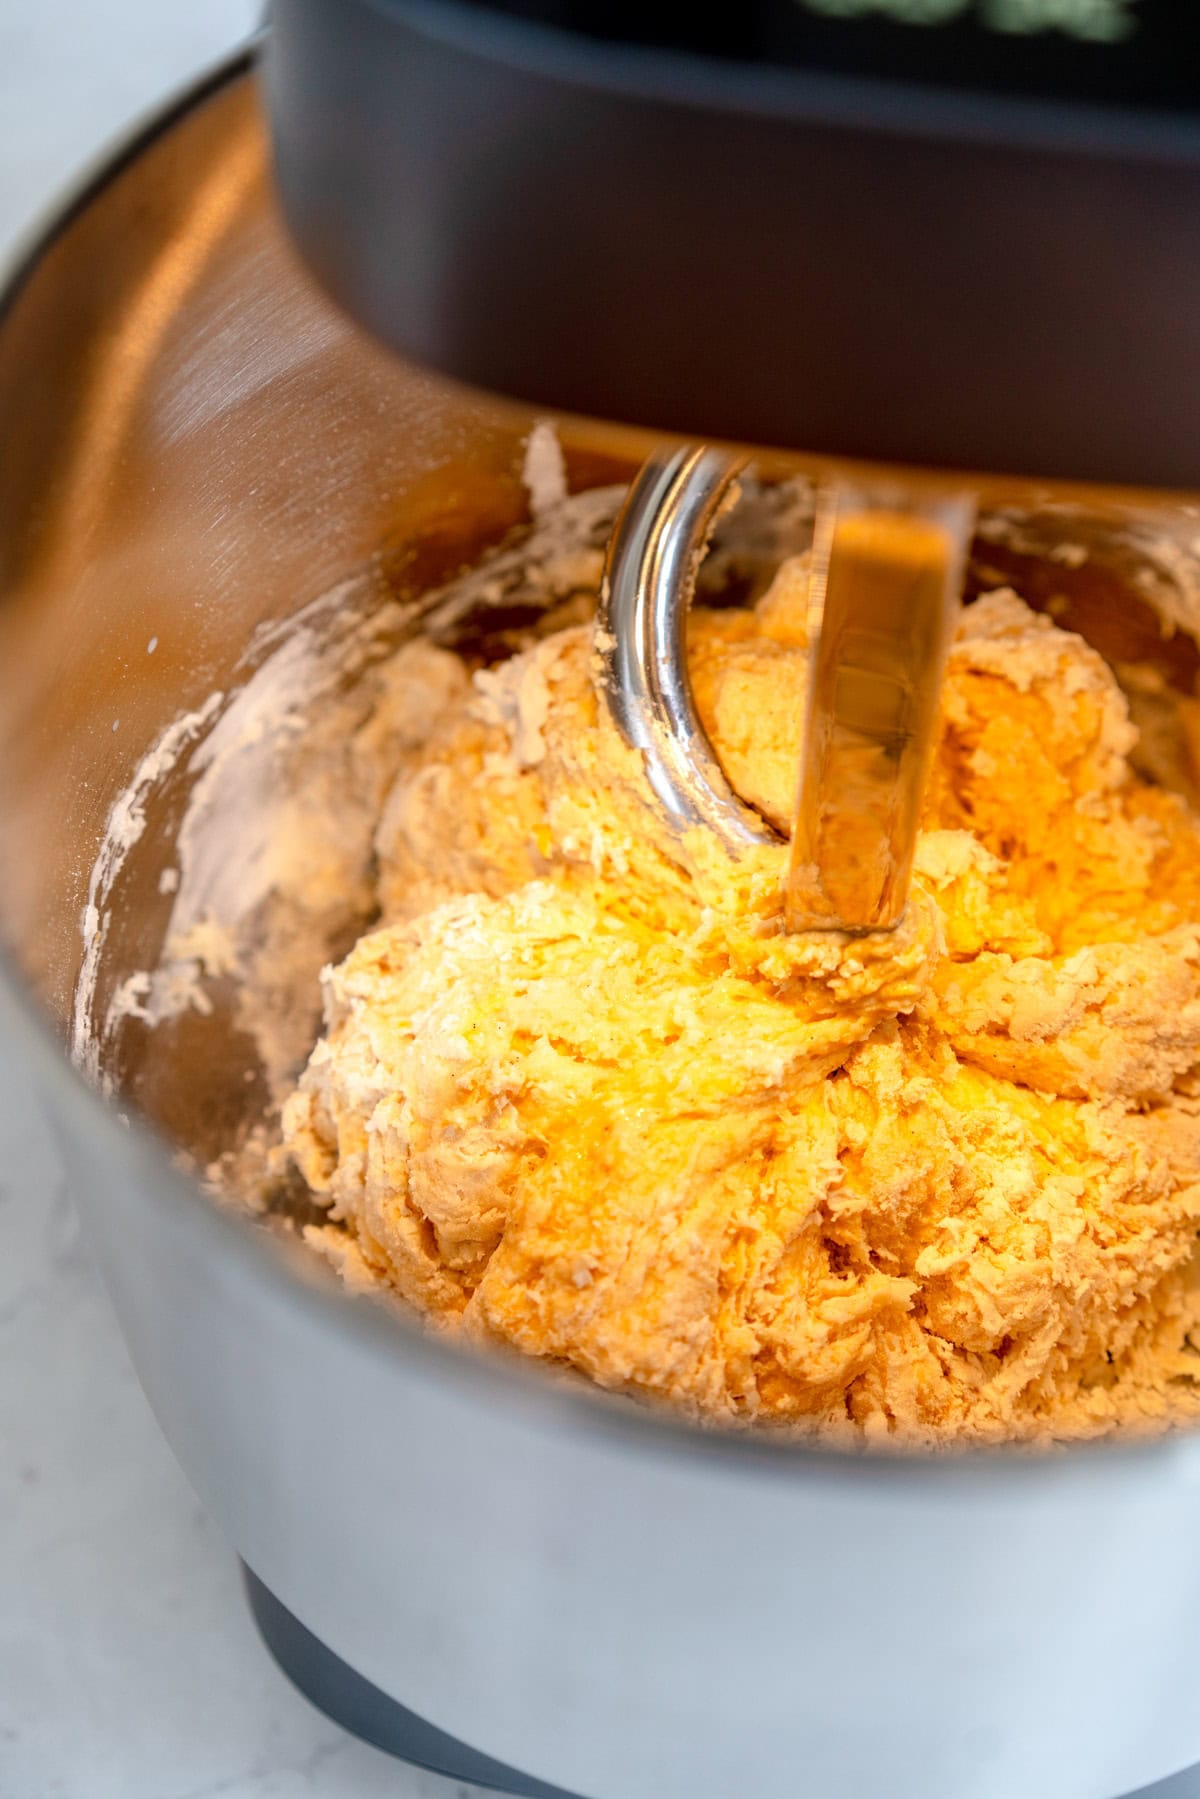
While I made a ton of different things to test out my new mixer, these lemon buns are super delicious, easy to make, and I know that you will love them. They start with a super easy dough which is the same one that I use to make my cinnamon rolls - it is a demi brioche style enriched dough, and I like to make it the day before or earlier in the day to give it time to firm up slightly as it rises, so that it is easy to roll out. This can be done up to two days ahead and will still work fine. The Ooni mixer made light work of the dough, even when I bumped the butter content up slightly.
If you have made my cinnamon bun twists before - these are the same format but a larger batch - this recipe makes 16 buns. I rolled mine out into one large piece of dough but if you are new ish to rolling dough out and worried it might go a bit wonky you can absolutely divide the dough into two pieces to make eight buns per piece of dough.
Double Lemon in one easy step
To make things easy, I flavoured these lemon buns with a really easy lemon sugar. You make one big batch at the start of the process and use this to both flavour the dough and fill the buns.

Shaping Lemon Buns
While these buns look fancy, they are really just dough rolled out, filled, then folded up into thirds, letter style. I found that when I was testing, it worked best to brush the dough with melted butter and then sprinkle with the lemon sugar rather than make a paste to spread on like you would with cinnamon rolls. A little of the sugar comes out when you are shaping them but this is fine!
Make sure that your dough has had enough time to chill down before you roll it out. It means that the butter firms up, and makes the dough easier to roll. I like to use a ruler and keep squaring off my edges with a bench scraper while I am rolling to help keep things nice and straight.

The dough is then cut into strips and placed onto a sheet pan. At this point I like to pop it into the fridge to make the next part a little easier.
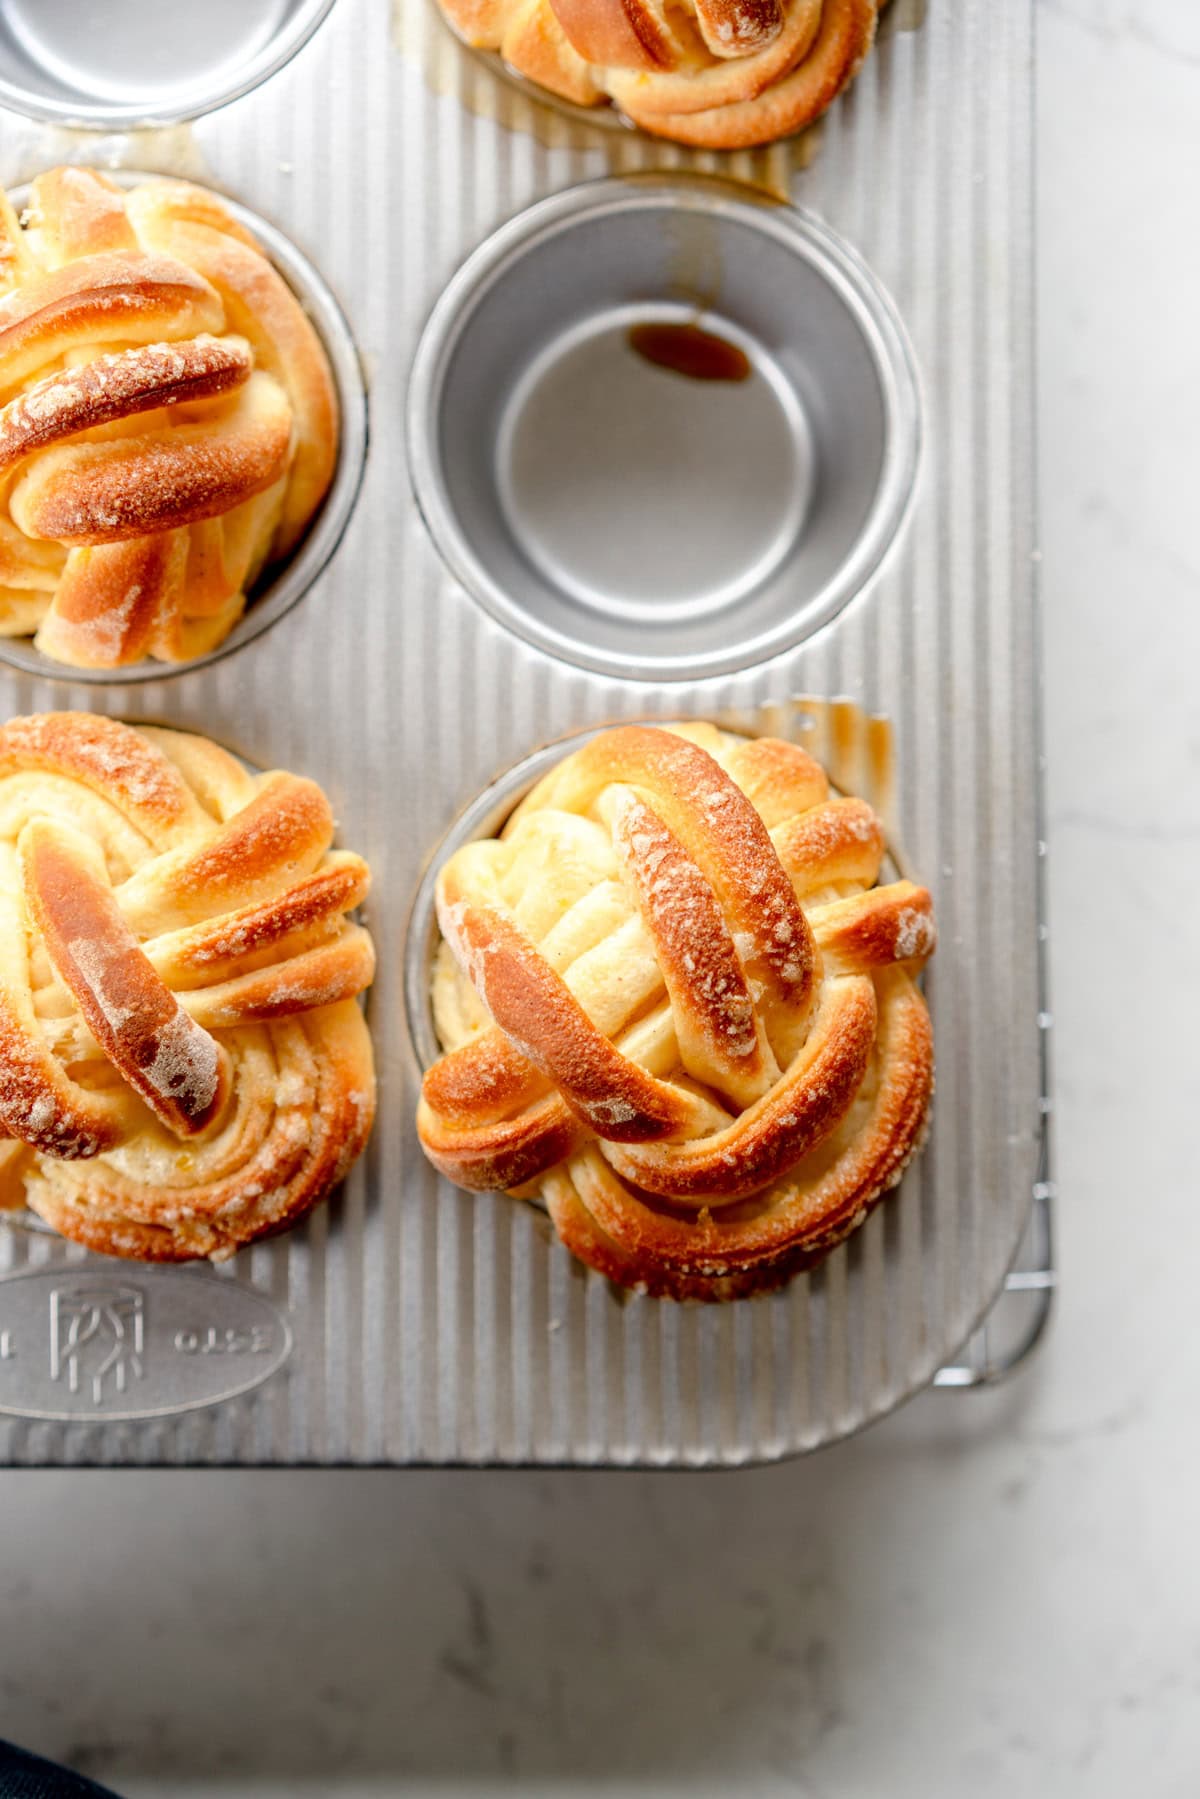
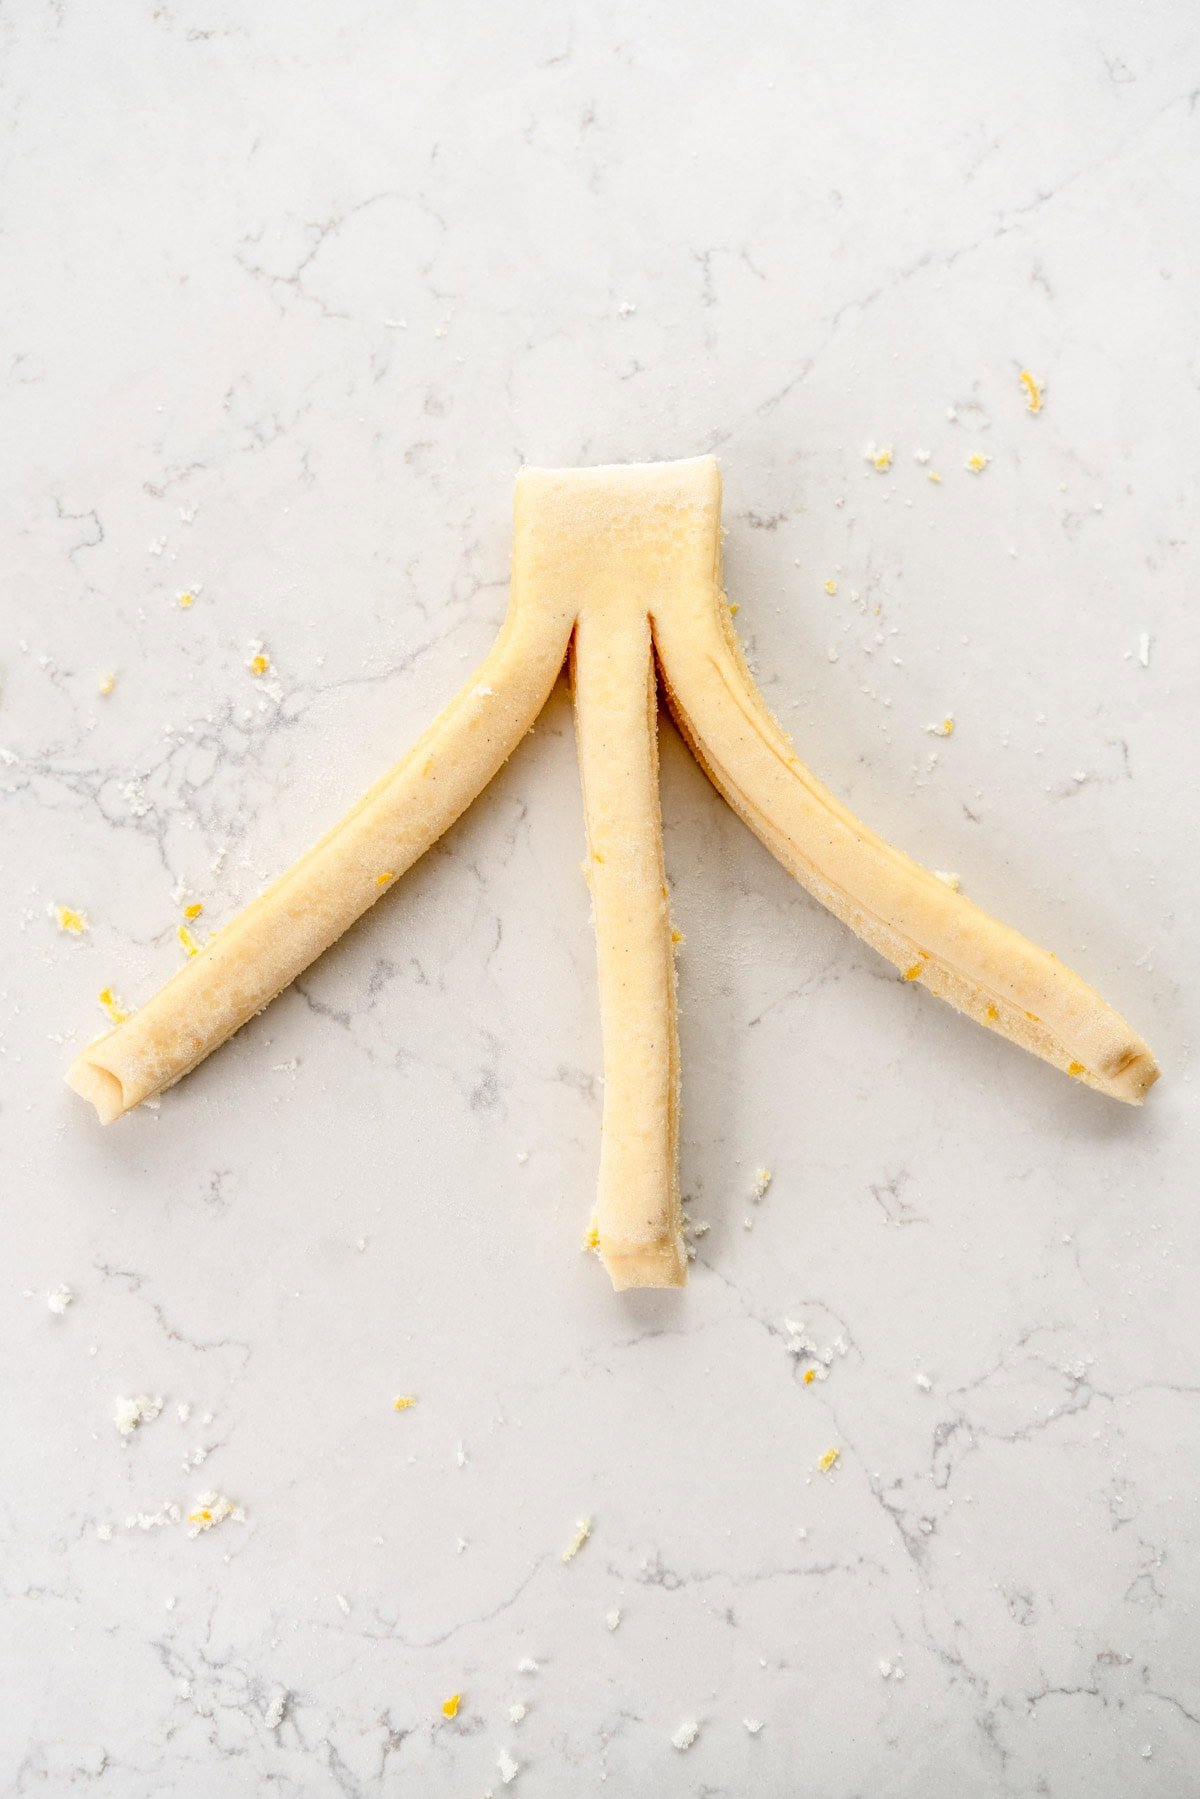
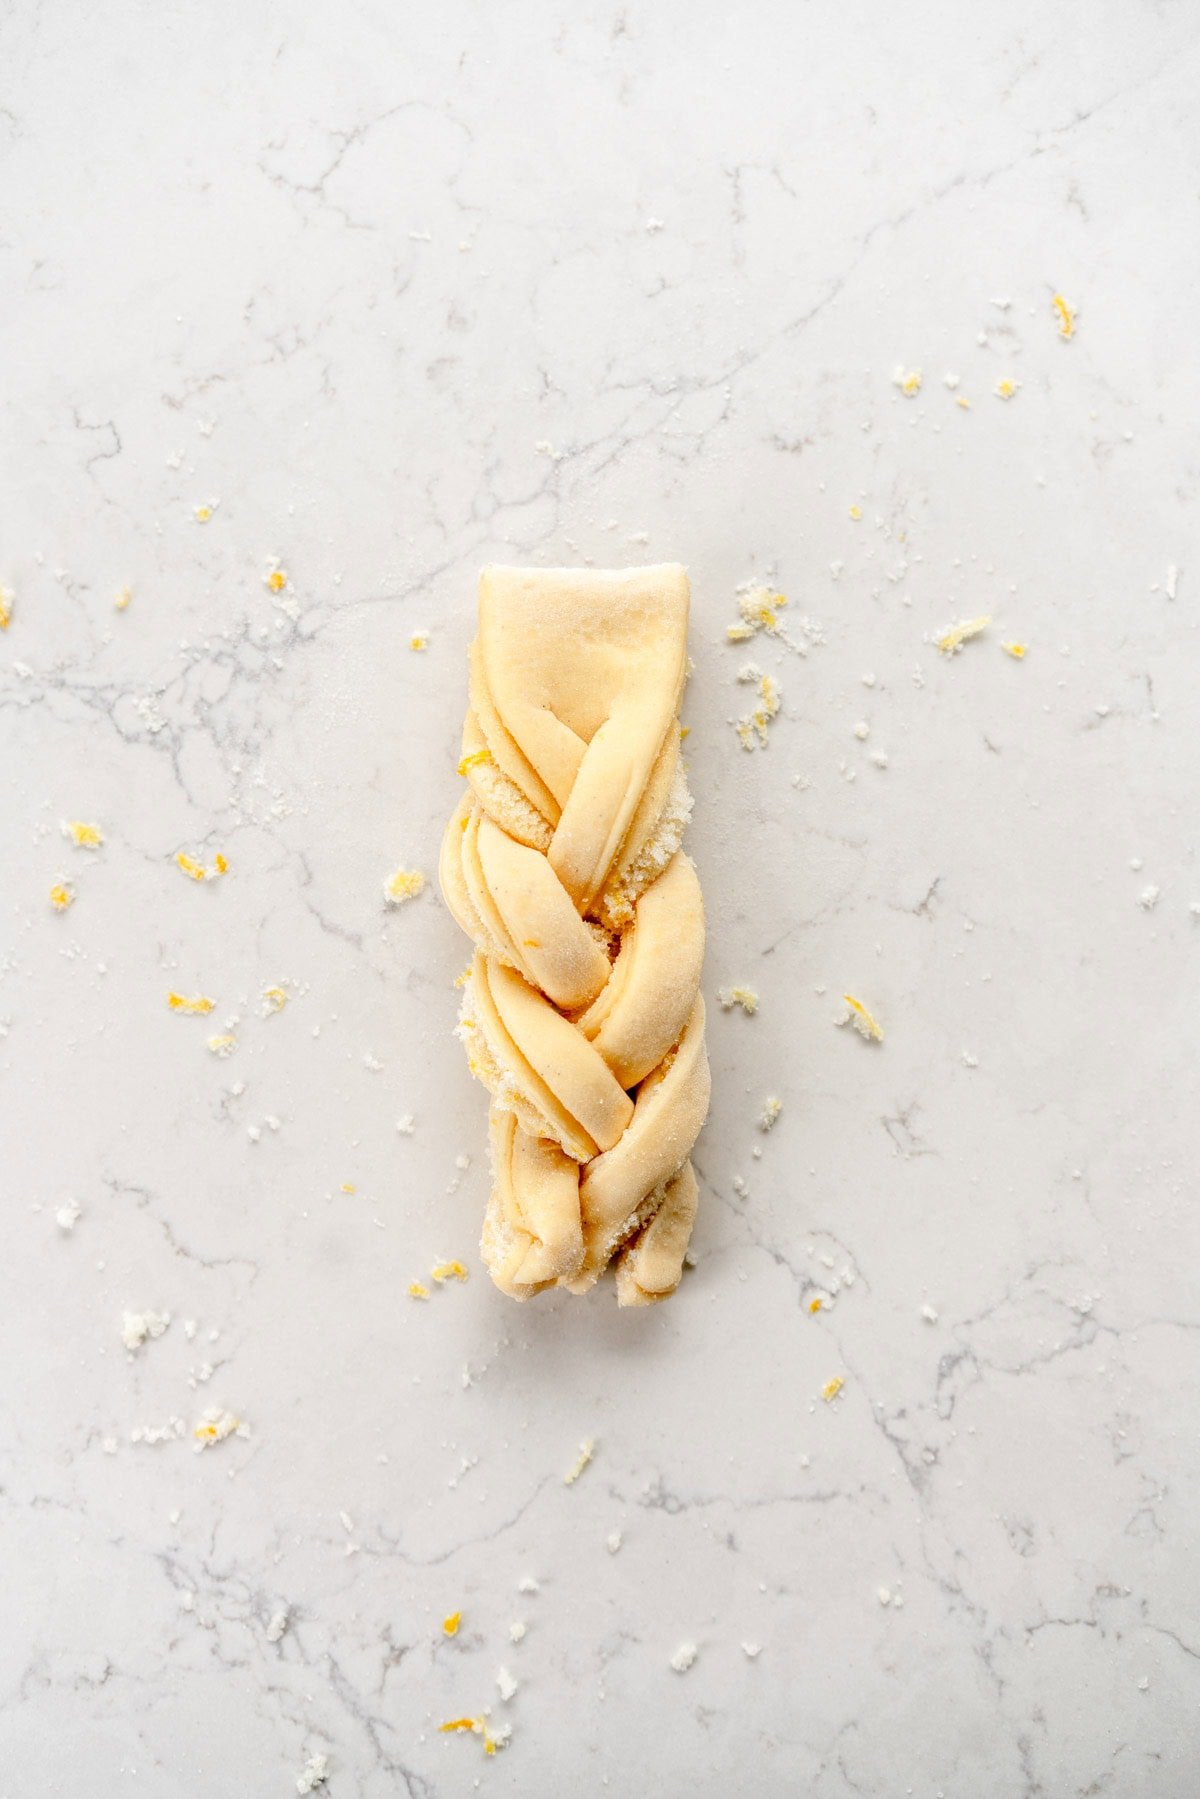
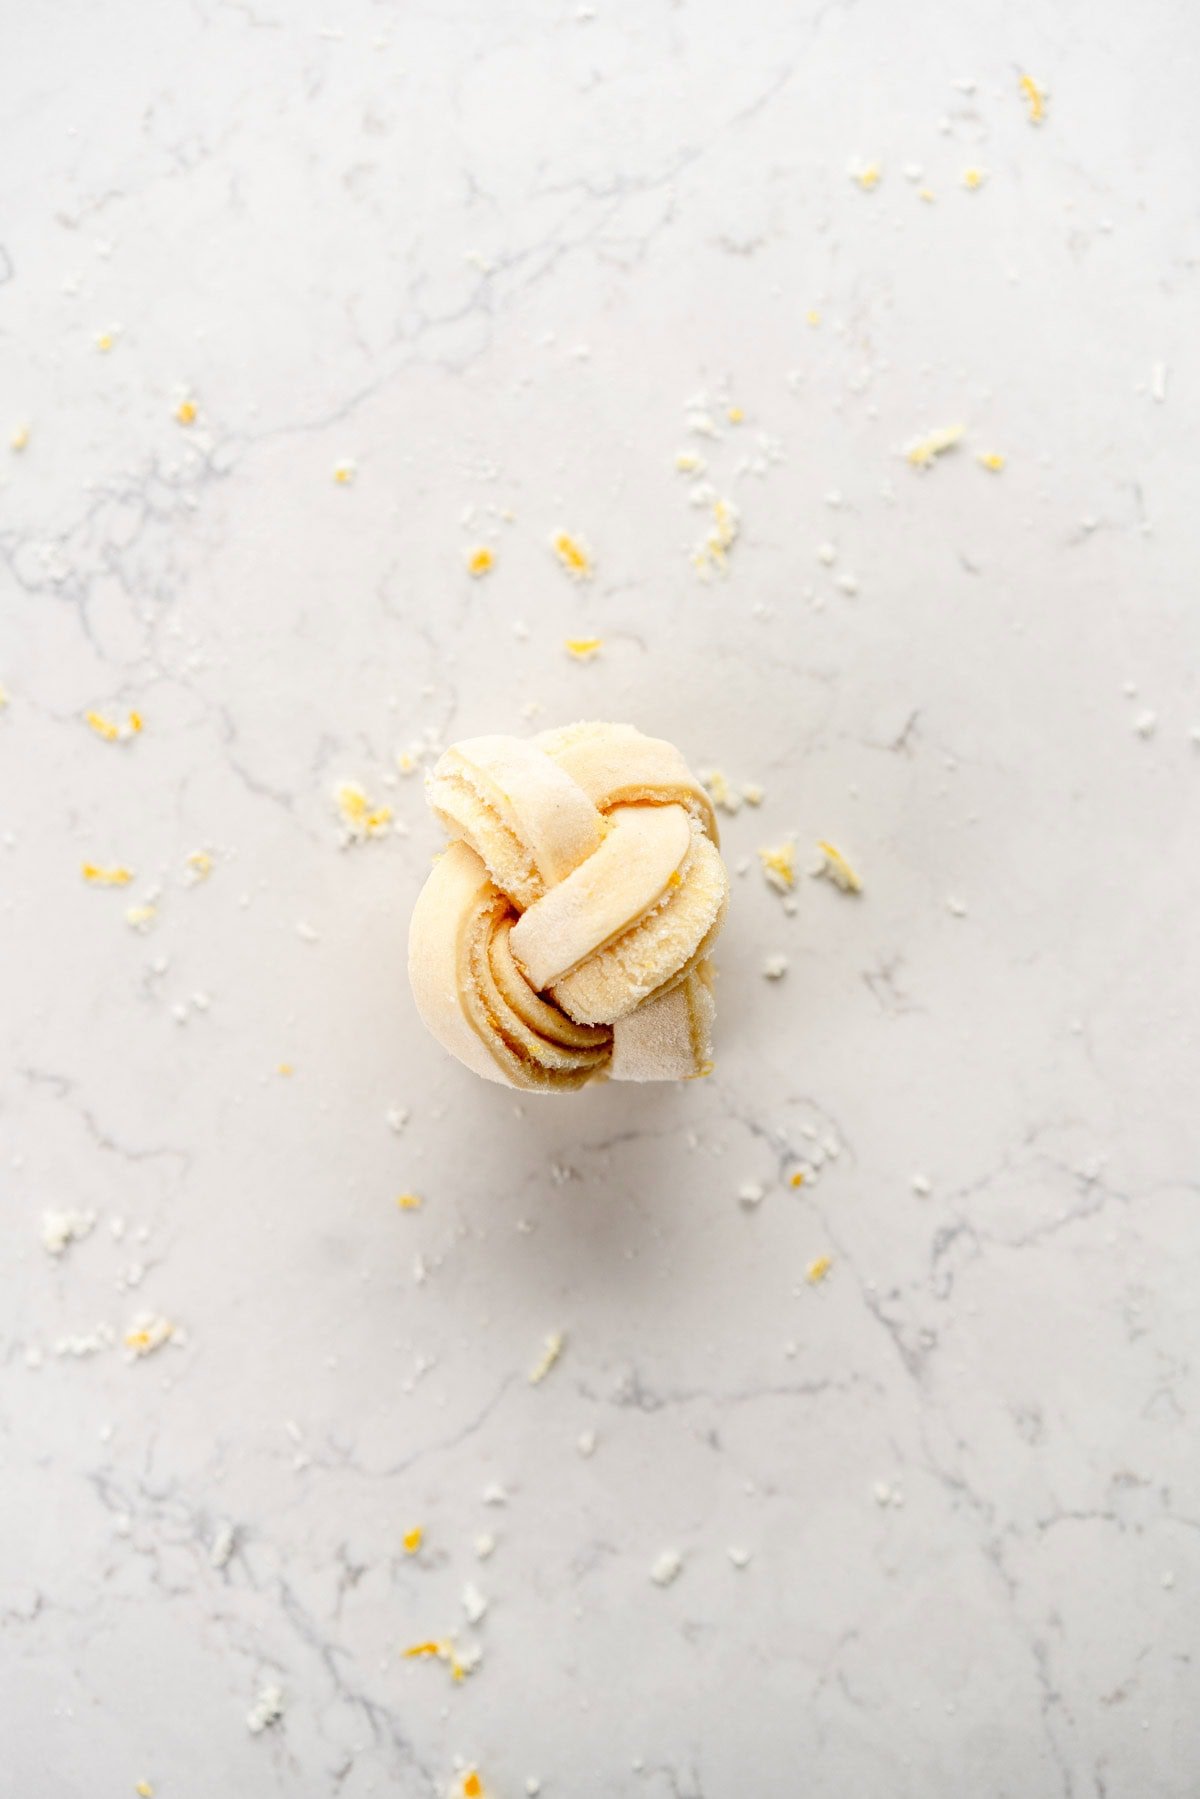
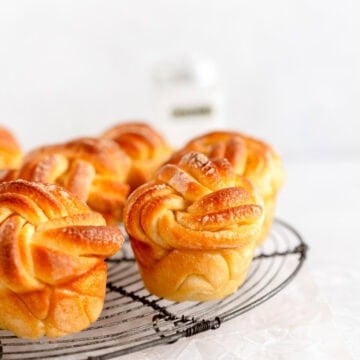
The shaping looks fancy, but it is super simple - it is just a simple braid. Rising and baking the buns in a muffin pan means that everything stays contained and the slightly messy bottom all gets baked into one dough mass and the pretty top is exposed, giving you beautiful braided buns!
You can see in the images below how I braid the buns:
Rising and baking Lemon Buns
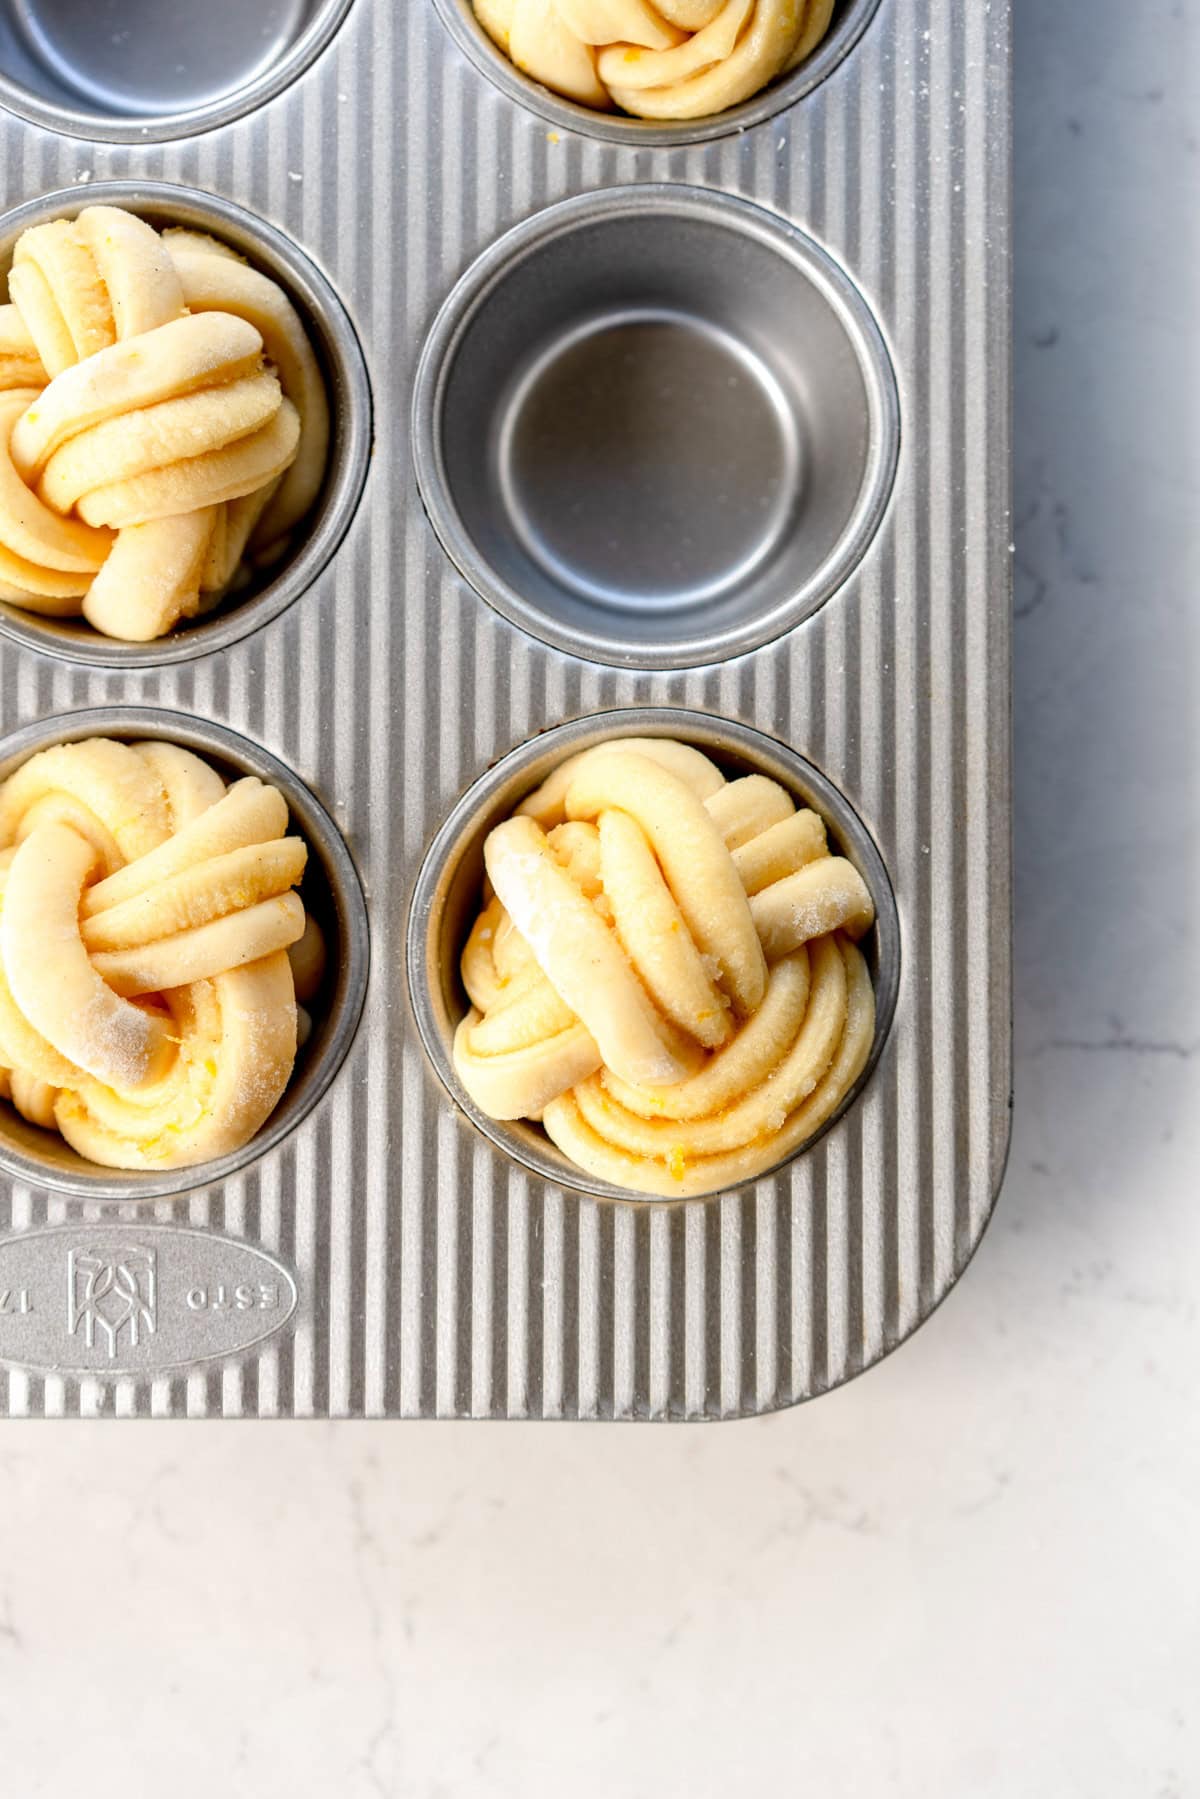
I like to make these in two muffin pans, and do 8 buns in each. I tried them on a baking sheet and it looked like a big tangle of spaghetti as they unrolled as they baked.
Place each rolled up bun into the cavity of a muffin pan, nestling them in nicely. Cover with plastic wrap and leave to proof again. If you have chilled the strips to help with shaping, the dough will need a little longer for the second proof - it is winter here in NZ at the moment and they took about 90 minutes to rise.
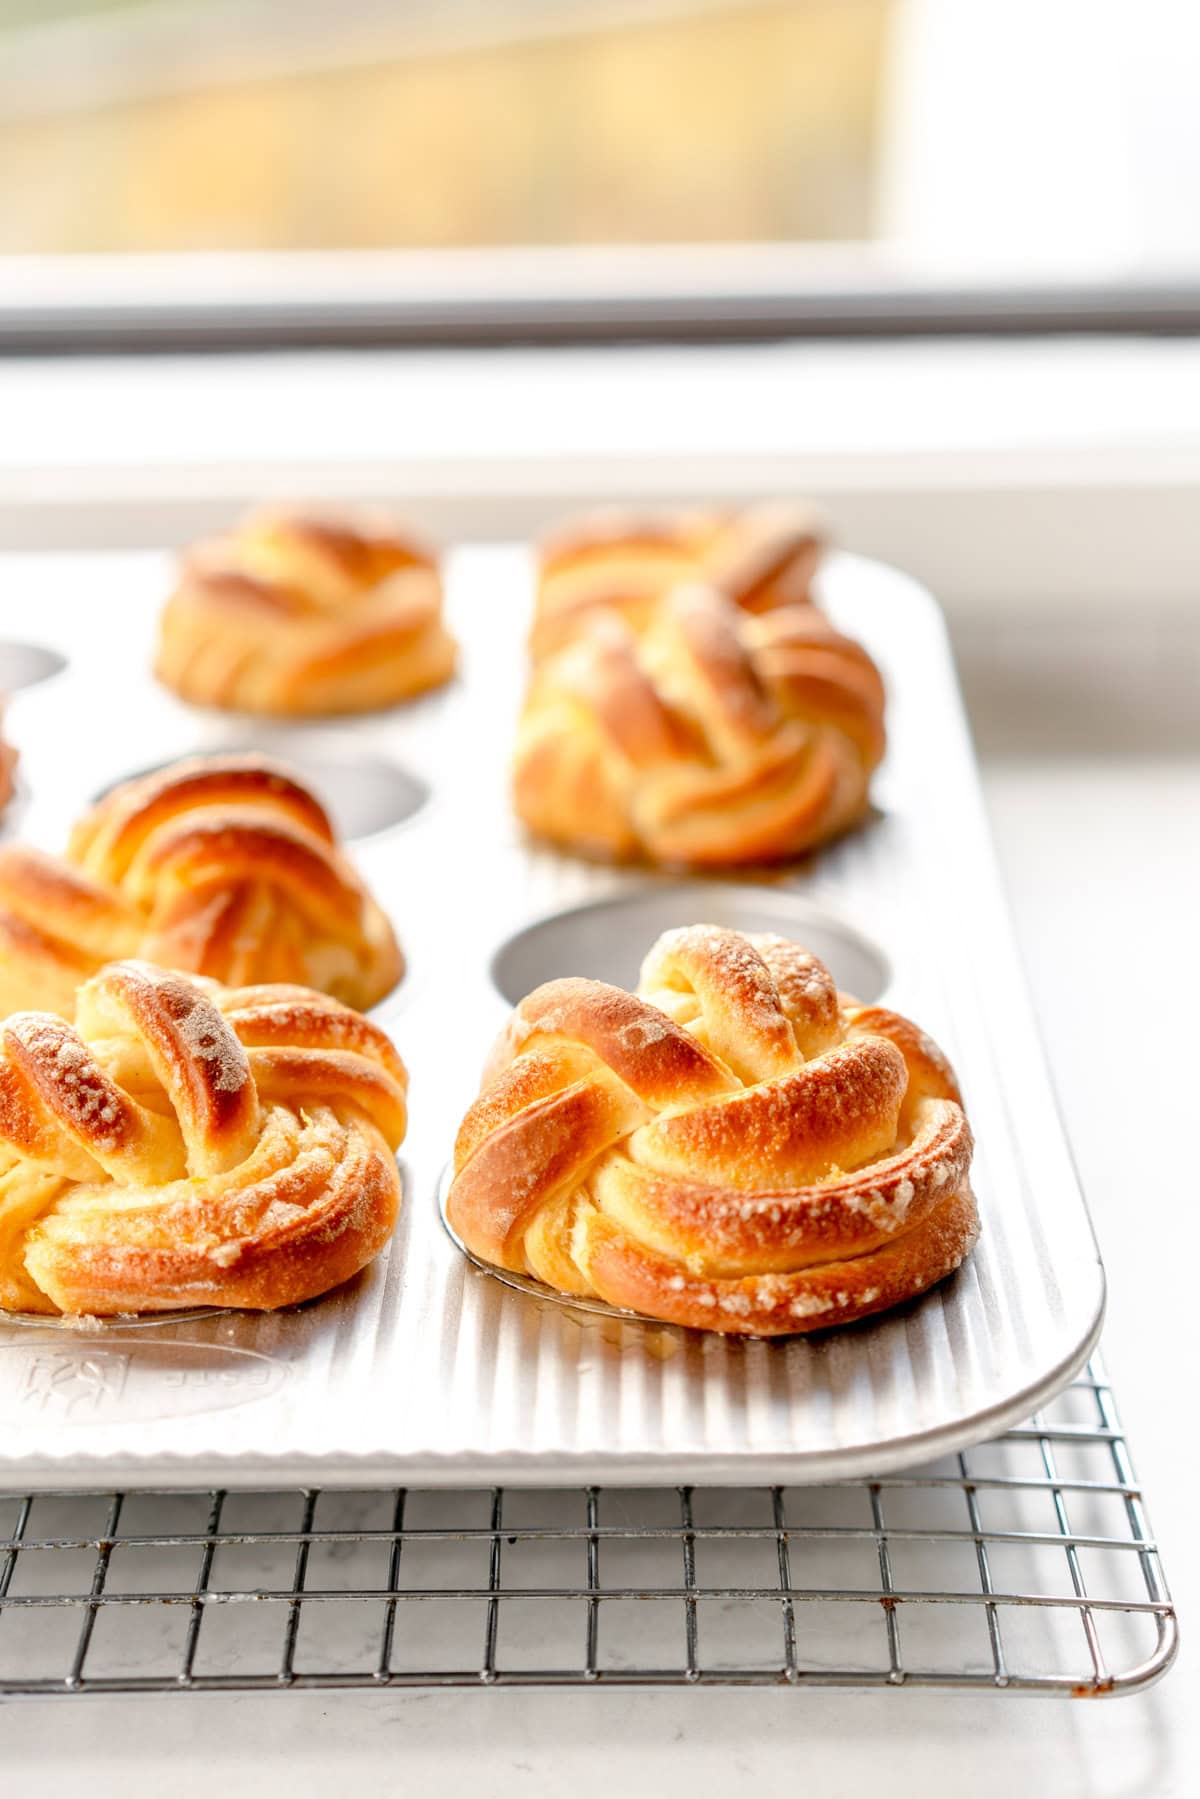
You know the buns are done when the dough leaves a small indentation that slightly springs back when pressed with a finger.
Bake in the pans until golden brown, then leave to stand for about 5 minutes before removing from the pans. Do not leave them too long as the lemon sugar mixture will cause them to stick.
I like to store my buns in an airtight container at room temperature. If you are eating them after the day you made them, I briefly warm them in the microwave to help freshen them up.
For more information on the mixer please head to Ooni's website to learn more about the Ooni Halo Pro Spiral Mixer! If you are in the US, please use this link
❤️ Made this recipe and love it? ❤️
I would LOVE for you to leave me a review and star rating below to let me know how you liked it! Also, please make sure to tag me on Instagram!
Answers to your baking questions
Over the years, many of you have asked me questions about:
- baking in grams
- adjusting oven temperatures
- what kind of salt to use
- and many more!
I've curated and answered them all for your easy reference in this frequently asked questions post!
Soft and Fluffy Lemon Buns
- Prep Time: 1 hour
- Cook Time: 30 minutes
- Total Time: 12 hours
- Yield: 16 servings 1x
- Category: Bread
- Method: Baking
- Cuisine: American
Description
Soft and fluffy lemon buns are made with an easy enriched dough and filled with a lemon sugar mixture. The braiding is simple - you just cut them into strips and shape into beautiful buns! These are amazing served as is or you can finish them with powdered sugar or a lemon glaze.
Ingredients
Lemon Sugar
- 250g granulated sugar
- 10g freshly grated lemon zest
Lemon Bun Dough
- 250g whole milk, lukewarm
- 2 large eggs (about 100g not including the shell), at room temperature
- 1 tsp vanilla bean paste or vanilla extract
- 565g All-purpose flour
- 50g of the lemon sugar
- 7g instant dry yeast
- 3g salt (I used kosher)
- 125g unsalted butter, at room temperature
Filling
- 30g unsalted butter, melted
- Remainder of the lemon sugar
Instructions
LEMON SUGAR
- Place the sugar into a medium sized bowl. Add the freshly grated lemon zest, and using your fingers, rub the zest into the sugar until well incorporated. This helps to release the oils and flavours of the lemon. Place into an airtight container until you are ready to use.
LEMON BUN DOUGH
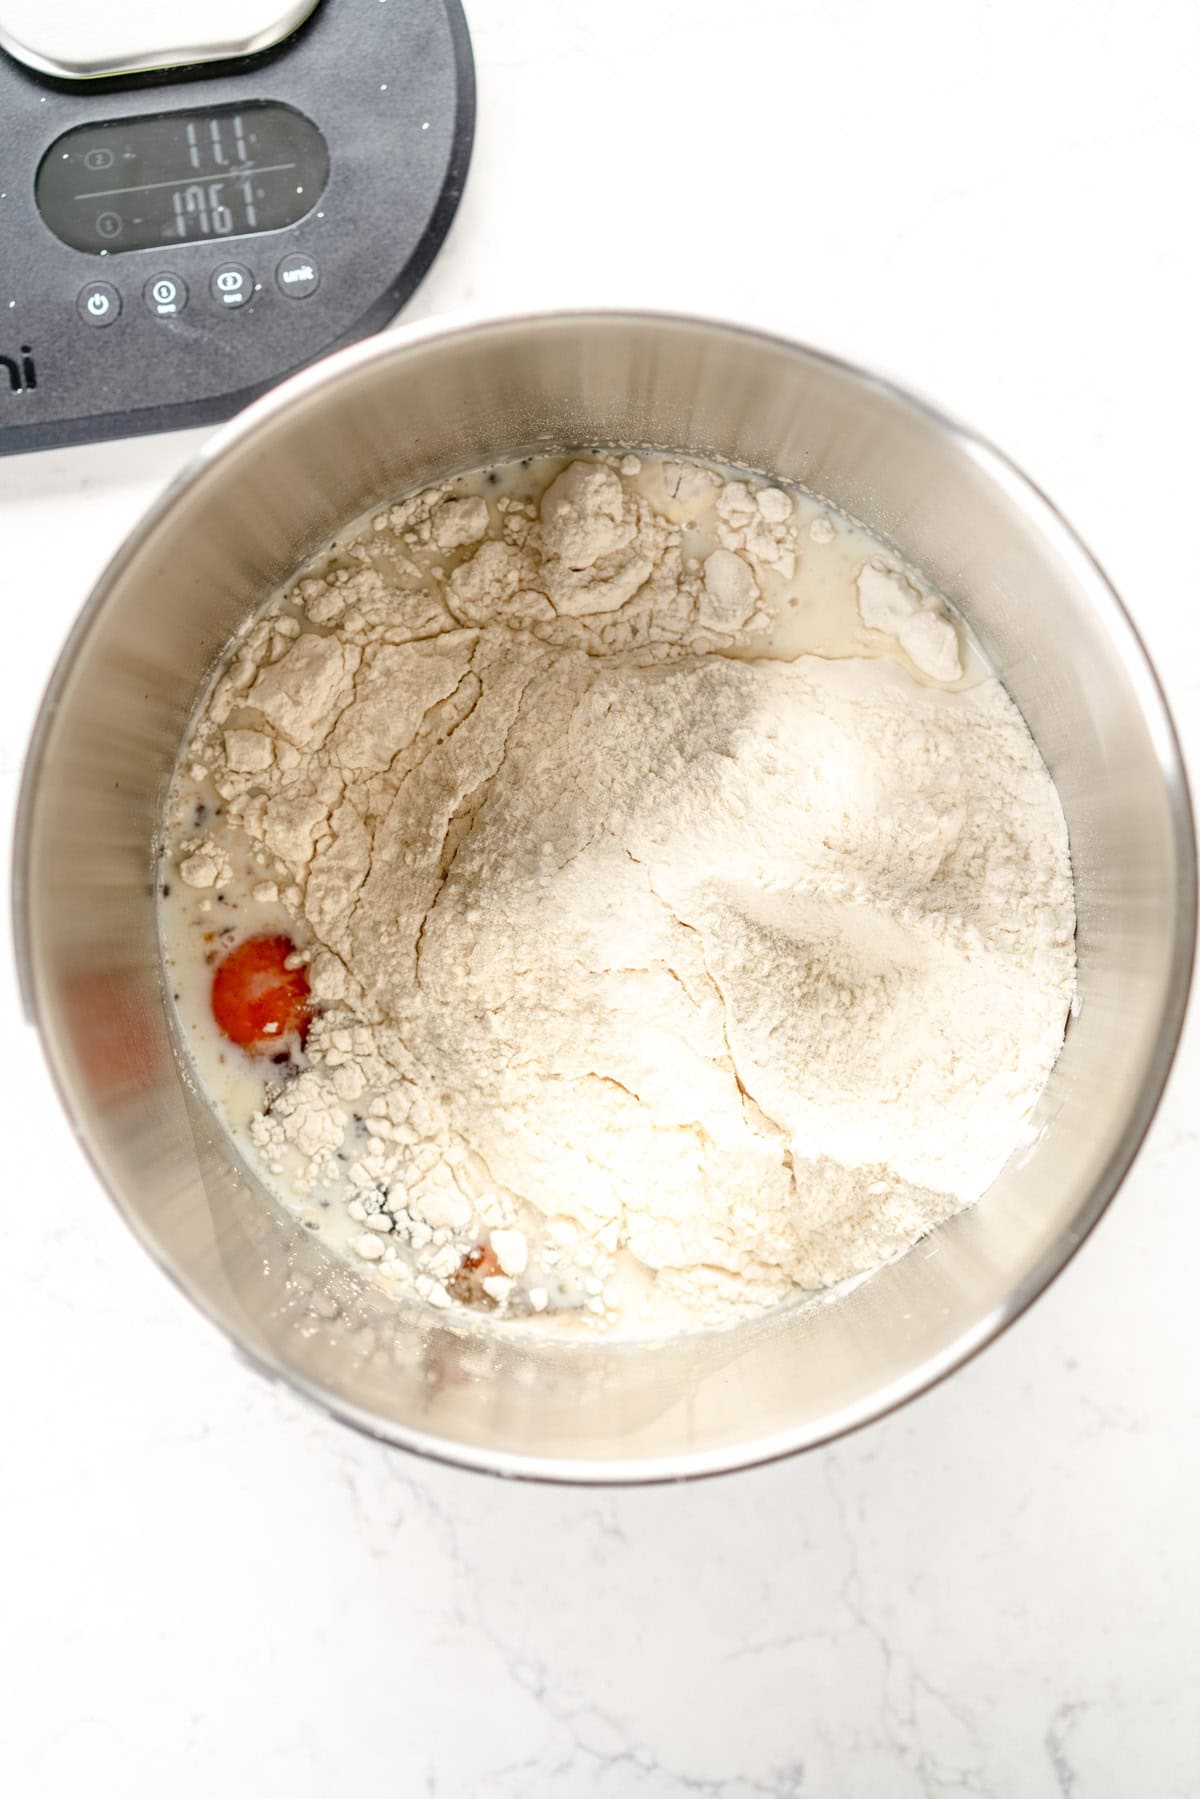
- Place all the dough ingredients except for the butter into the bowl of a mixer fitted with the dough hook attachment. I like to add them in the order that they are listed in the recipe - adding the liquid at the bottom of the bowl means you are less likely to get flour lumps stuck.
- Mix on low for 2-3 minutes, until the dough has come together. Increase the mixer speed and mix on medium speed for a further 5 minutes until the dough is smooth and elastic.
- Add the butter a little at a time, waiting until it is incorporated before adding the next piece. Once it has all been incorporated, mix the dough for a further 3-4 minutes until it is smooth and soft.
- Turn the dough out onto a counter and shape into a ball (I do not need to use flour here). Place into a greased mixing bowl and cover the bowl with plastic wrap. Leave on the counter for 10 minutes to kick start the rising process, then transfer to the fridge for at least 4 hours or up to overnight.
FILLING AND ASSEMBLY
- Grease two non-stick muffin pans - this recipe makes 16 buns so I like to do 8 in each pan. Grease 8 wells of the pan with baking spray or butter. I like to leave a gap between rolls where I can - with 8 rolls per pan, there will be some next to each other.
- For rolling the dough out I do this in one go, but if you are worried, you can divide it into two (see notes). For this recipe I have written how to do it all in one go. Turn the chilled dough out onto a lightly floured surface. Shape into a rectangle by patting it down or pressing down with your rolling pin and squaring off the edges with a bench scraper.
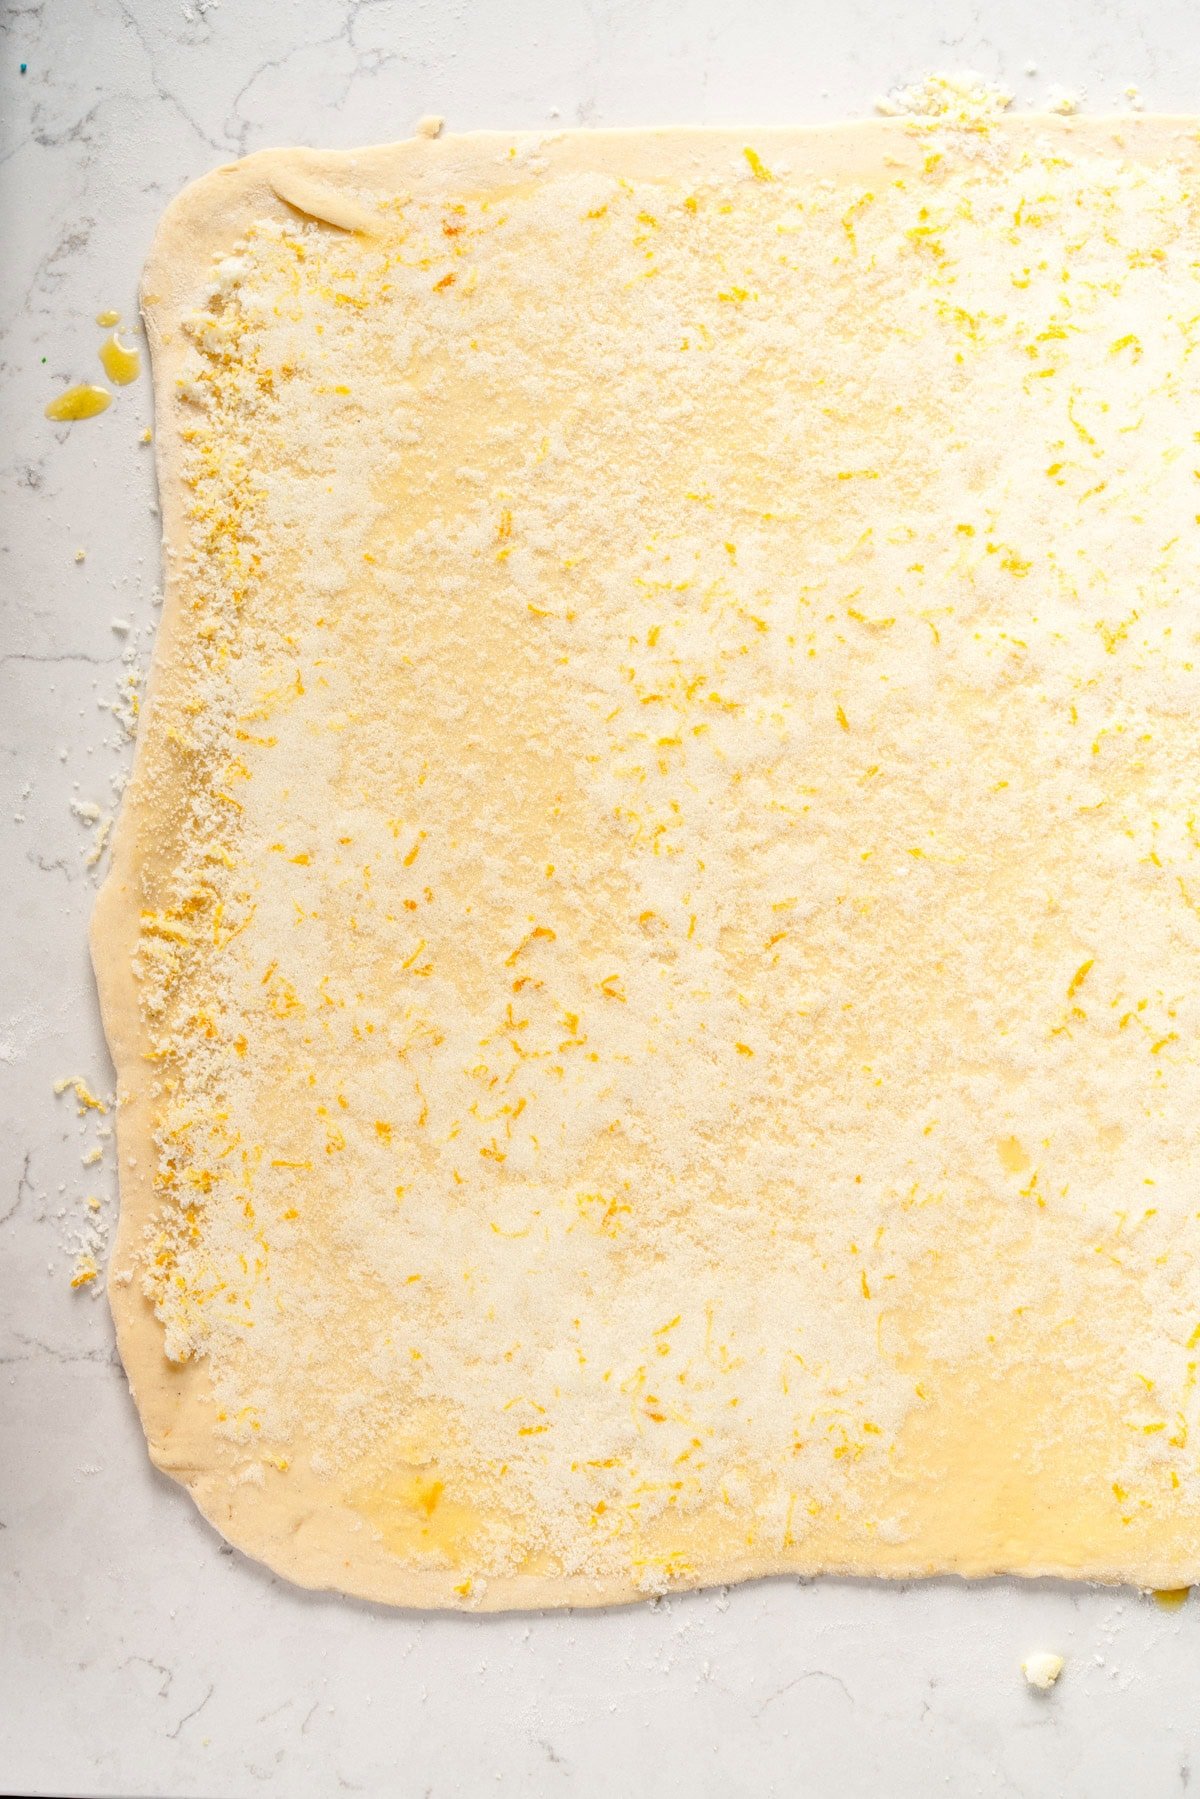
- Roll the dough out into a rectangle that is 36x64cm (14x25 inches). If you find the dough is snapping back on you, give it a few minutes to rest and then keep rolling. Square off the edges as you go.
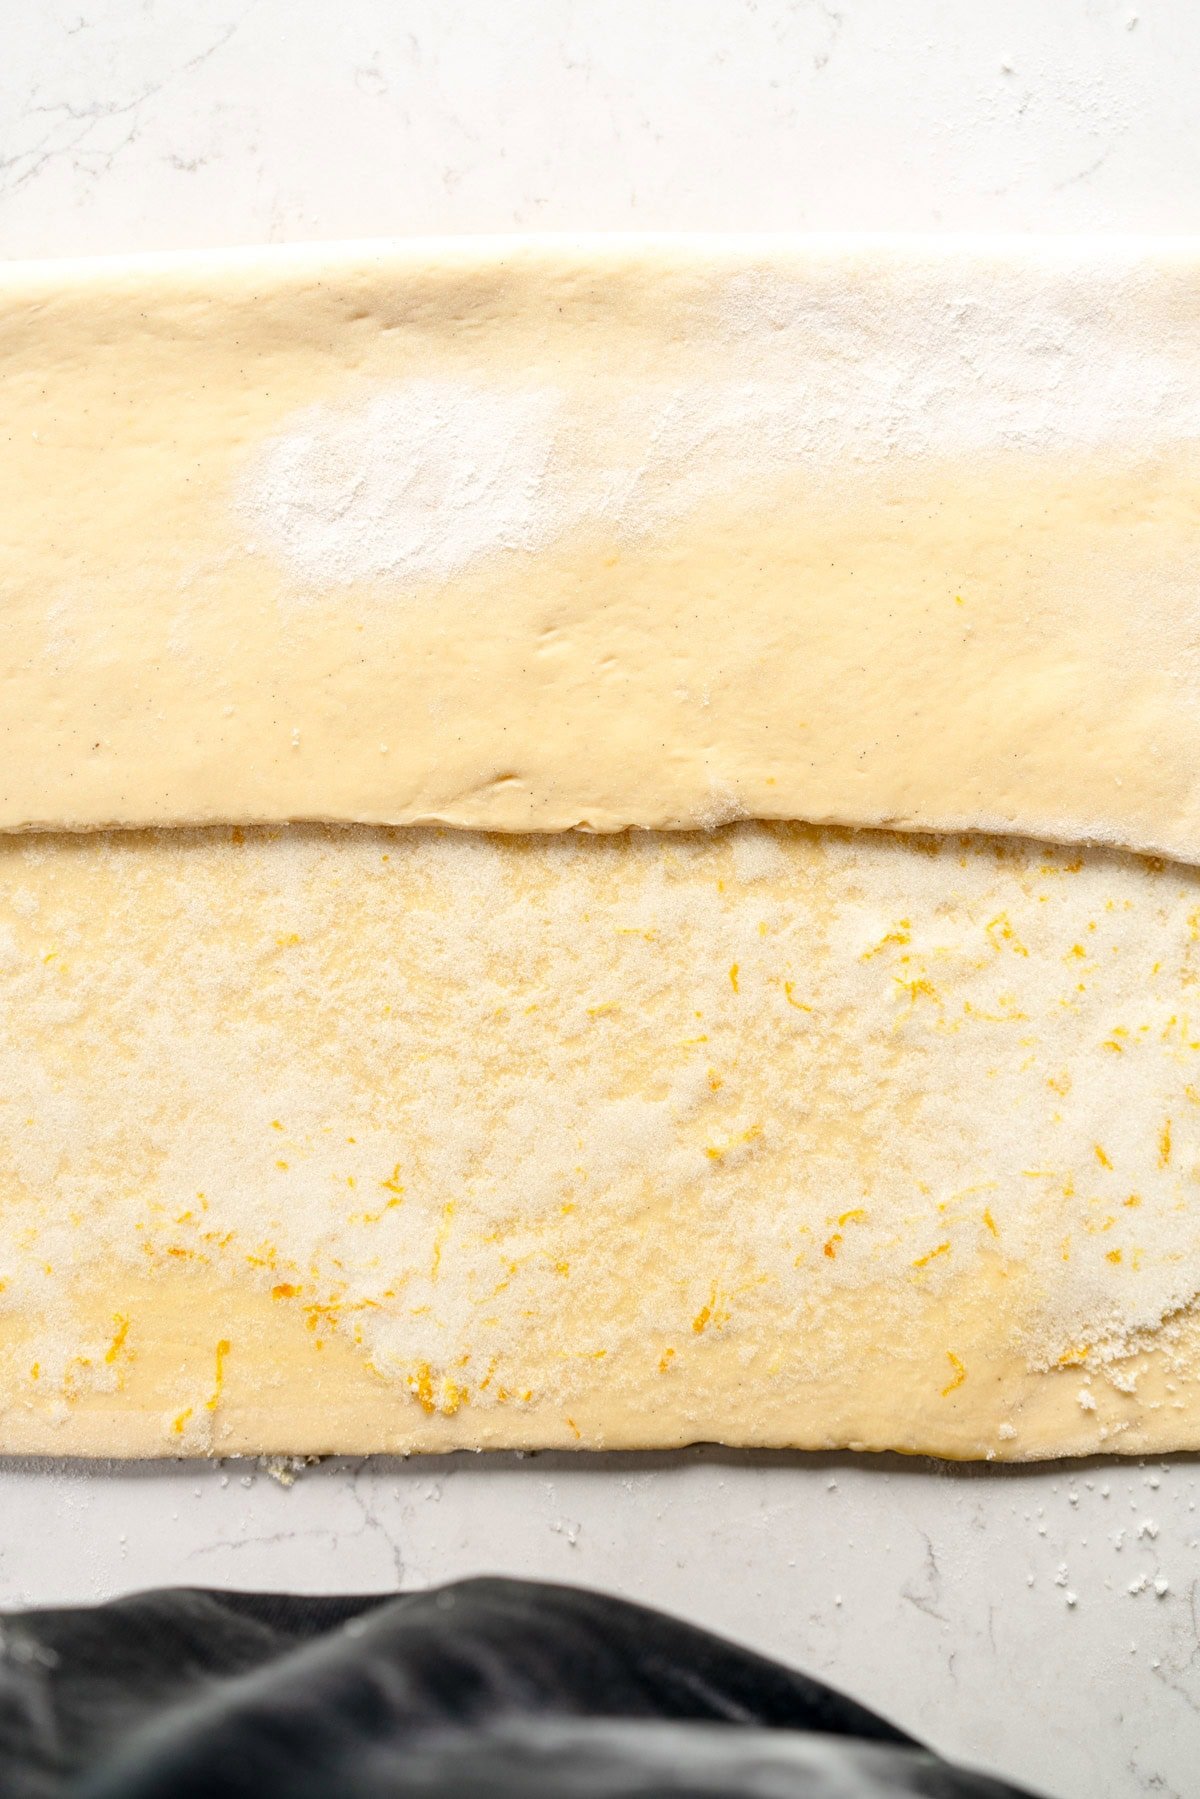
- Using a pastry brush, brush the dough with the melted butter, taking it right to the edges. Evenly sprinkle with the lemon sugar and press it down lightly.
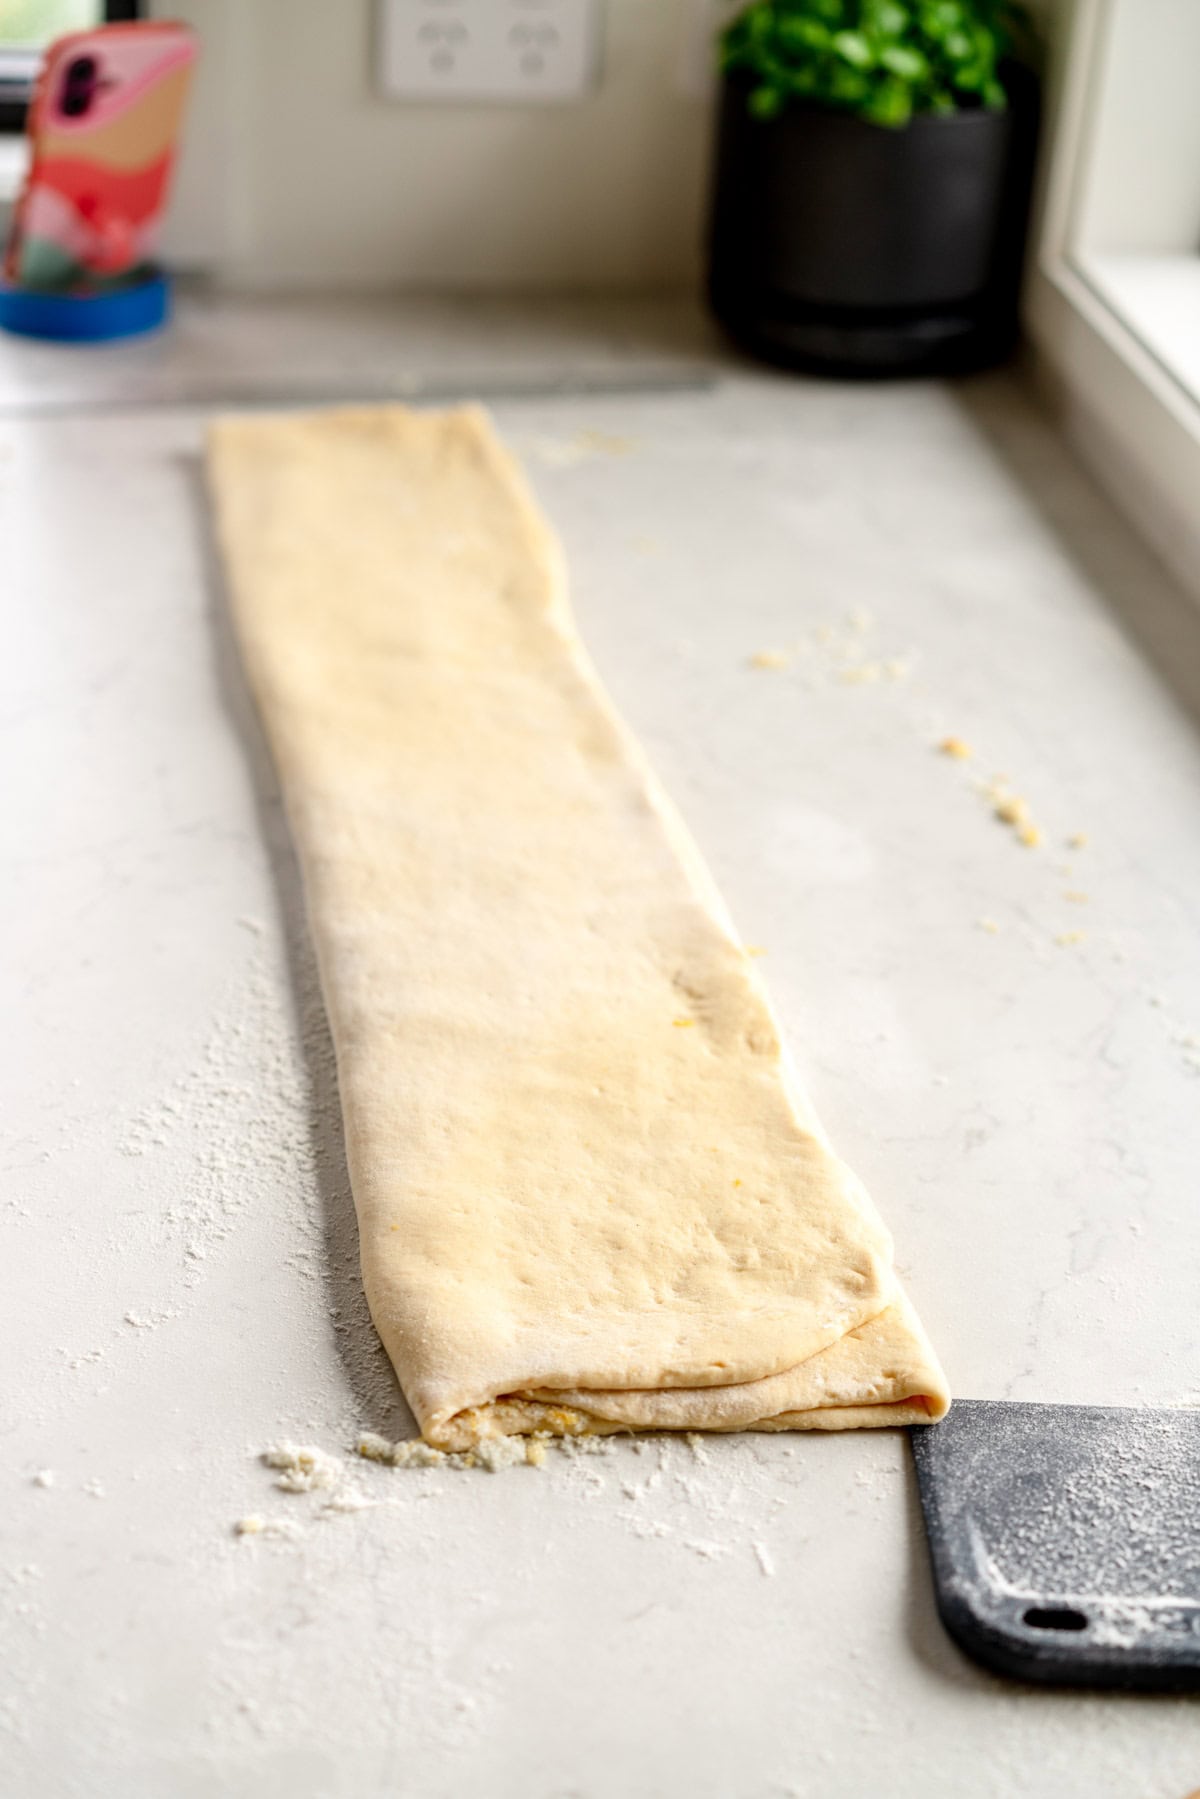
- Holding the long end of the dough, fold the dough into thirds like a business letter. To do this, take one edge and fold it ⅔ of the way down the dough, then fold the bottom edge up over to form one long folded strip of dough. Pat out gently to make sure that there are no bubbles.
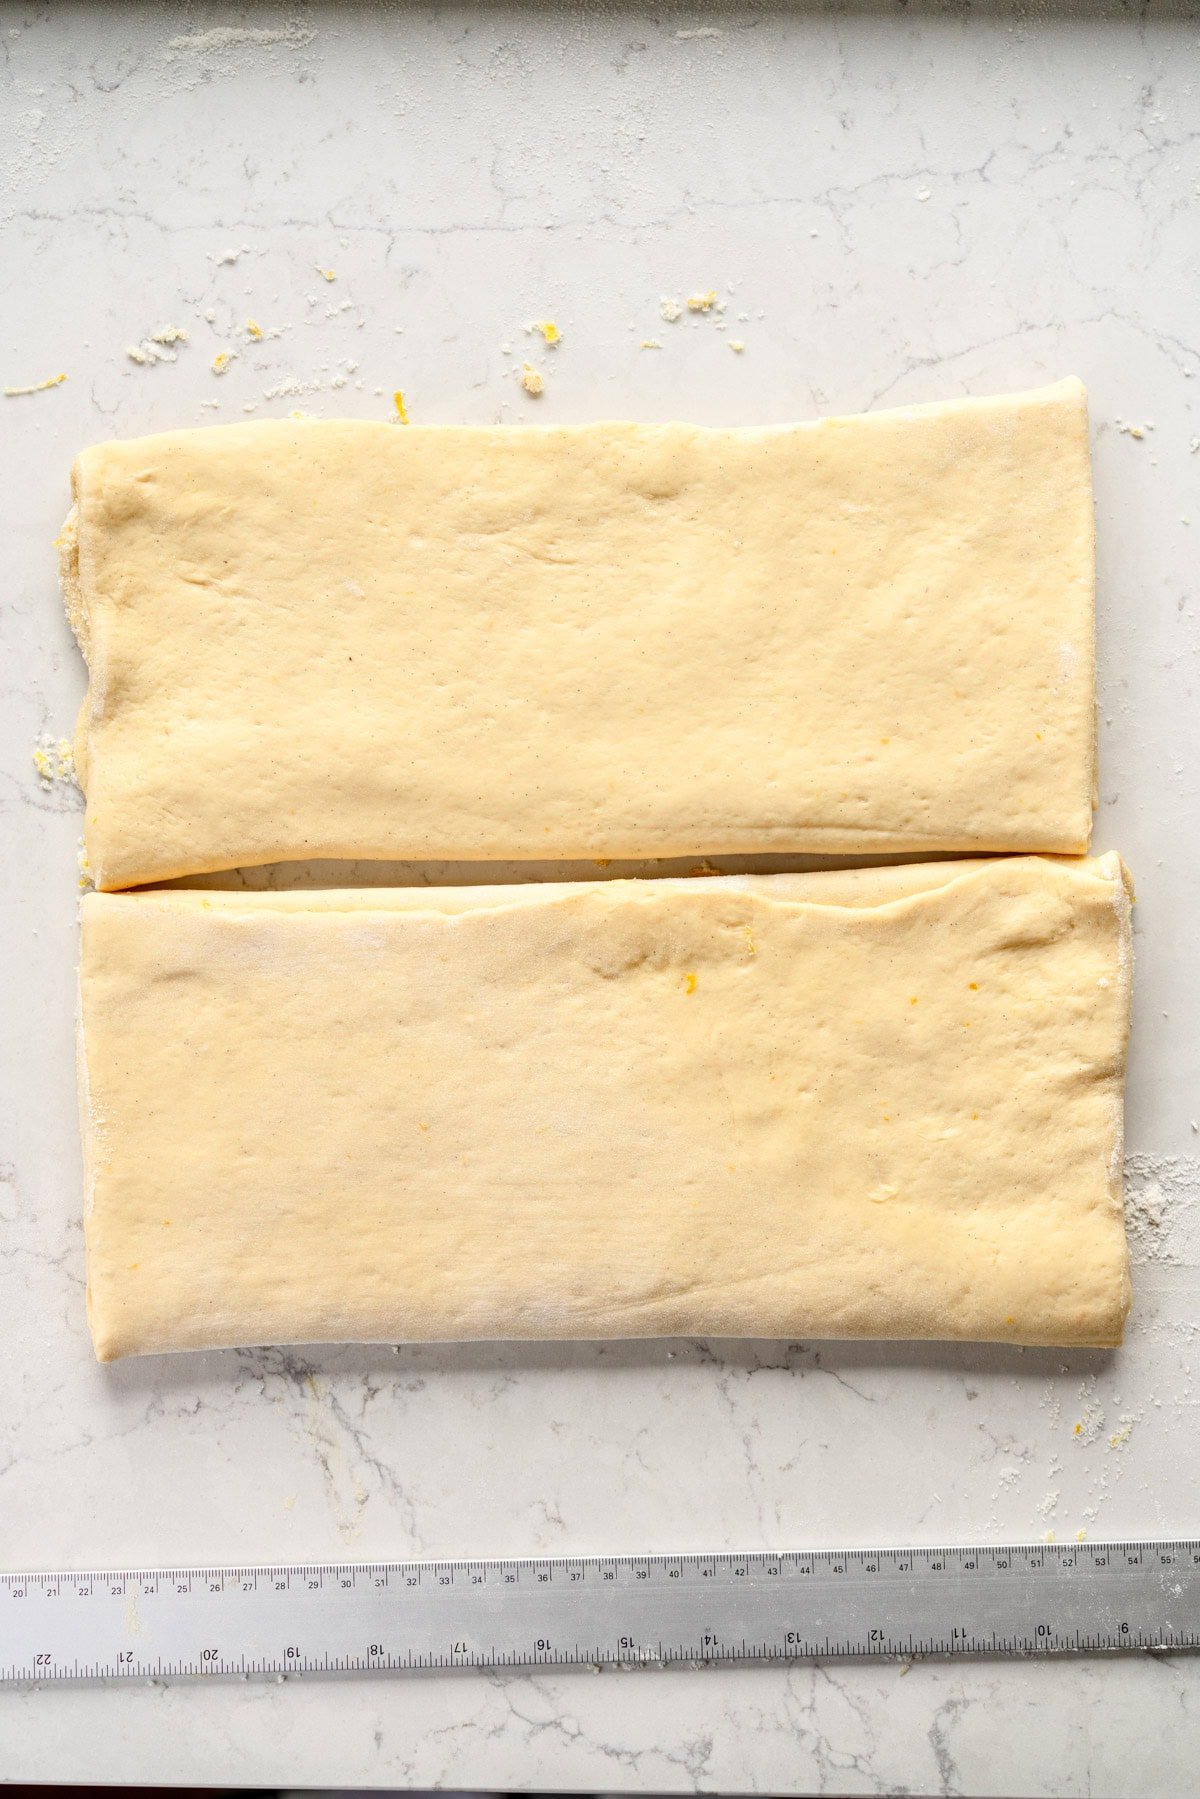
- Cut the dough into two 32cm pieces. Cut each piece of dough into 8 strips, each 4cm (1.5") wide, so you will have 8 strips of dough, 4cm across and about 12cm long.
- Transfer the dough strips to a parchment paper lined sheet pan (it is ok if you arrange them so they are touching). Repeat the cutting process with the other piece of dough so you have 16 strips of dough in total.
- Cover the pan lightly with plastic wrap and place into the fridge for 15 minutes to firm up slightly - this makes shaping much easier.
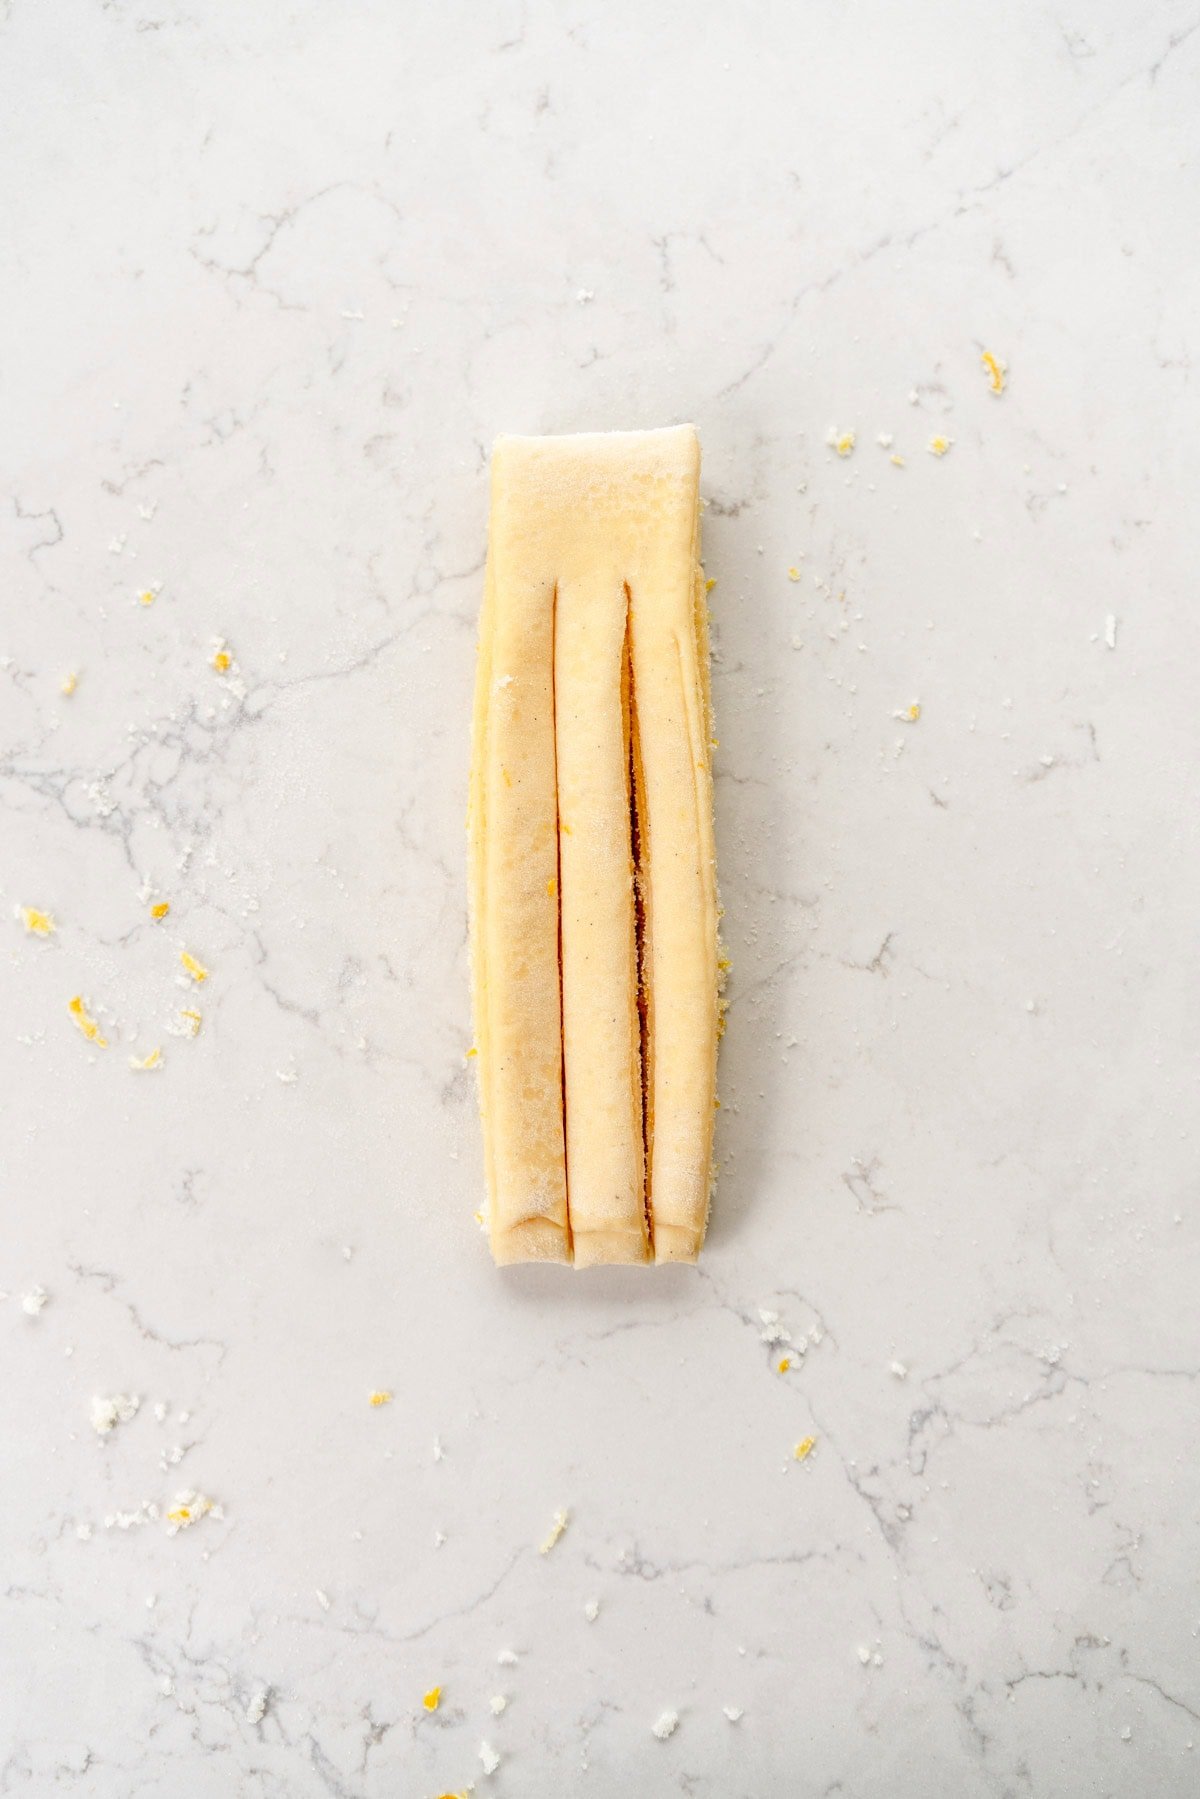
- Remove the dough from the fridge. Working with one piece at at time, cut the strip of dough into 2 pieces, leaving an end intact. Braid the strips of dough together to form a braid. Starting with the intact end, roll the whole braid up into a ball. Place into a cavity of the muffin pan.
- Repeat this process with all the remaining pieces of dough. Do not worry if some of them are messy or a little wonky. Rising will help this. Do 8 dough balls per pan.
- Lightly cover the pans with plastic wrap and place in a warm place until the buns are puffy and when pressed lightly with a finger, leave an indentation that slowly springs back, anywhere between 45 minutes to an hour and a half depending on your environment.
- Toward the end of the proofing process, preheat your oven to 180°c / 350°f. Remove the plastic wrap from the risen buns.
- Bake the buns for 15-2o minutes, until they are golden brown. Remove the buns from the oven and transfer from the pans to a wire rack soon after taking out of the oven so that they do not stick. Leave to cool on the wire pan.
- Store leftovers in an airtight container at room temperature - you can refresh them in the microwave the next day.
Notes
I left my lemon buns plain - if you would like to, you can finish them with a lemon glaze or a dusting of powdered sugar.
I rolled out the dough all in one big piece for these lemon buns. If you would prefer, you can divide it in two - follow the rolling and assembly instructions for my cinnamon twists but use the lemon bun filling.
Comments
Rachael says
This recipe is so easy to follow!
Erin Clarkson says
Yay I am so happy you loved!
Jessicah Win says
Hi, thanks for your review of the mixer, it looks amazing. Im in the market to replace my Kitchenaid and was windering if you will be further reviewing it's performance especially in relation to the creaming and whisking functions (pavlova?!) As I have read mixed reviews about how effective it is, especially for smaller/single batches. I'd really appreciate your perspective on it!
Erin Clarkson says
Hi! Yes I can - I will pop this information on my Instagram stories! I have tried the whisk attachment for making brownies so far and also made something with the paddle attachment but I guess it depends what you are going to use the mixer for the most! I will keep updating as I try different things in it though!
Lex says
Hi,
Can I put the braided buns in the fridge overnight then bring them out in the morning to come to temp before baking? Want to take some to work but would love them still a wee bit warm.
Also this recipe is SO good!!!!
Erin Clarkson says
Hi! I would just re-warm them at work if you can, I prefer to not do an overnight rise as the sugar attracts water and the filling can get a bit goopy and it is very easy to over proof them!
iram siddiqui says
Wow — these lemon buns look absolutely divine! 🍋✨ I love how the fluffy enriched dough is paired with zesty lemon sugar — such a bright, fresh twist on a classic bun. The step-by-step shaping and braiding makes them feel fancy but still doable, and I can almost smell that citrus aroma through the screen! 😍 Can’t wait to try this recipe at home (lemon glaze optional but totally tempting!). Thanks so much for sharing such a beautifully written and inspiring bake! 🙌💛
Sofia says
Omg these buns absolutely slap! I ended up dividing into 12 and mushing them all into one muffin pan as that’s all I had and they were perfect! Your recipes always deliver. Thank you! 🤩