
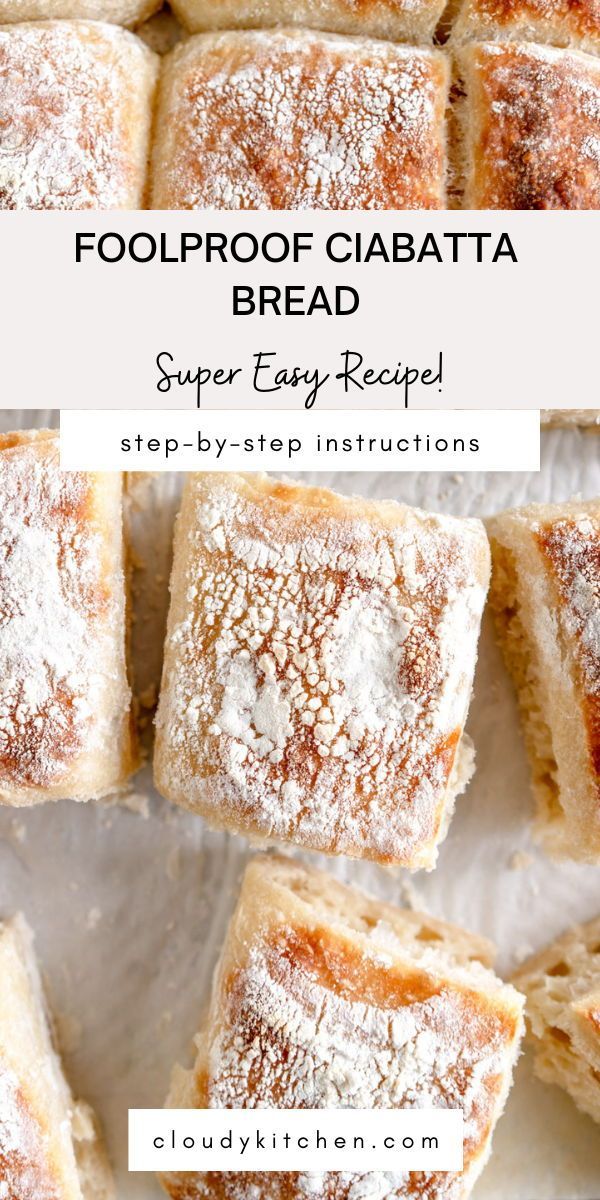
My easy Ciabatta Bread recipe will give you perfect crusty homemade bread with only five ingredients. This ciabatta dough can be made ahead and used to make either two loaves of ciabatta bread, or eight ciabatta rolls.

Hi! I am just popping in to share my easy ciabatta bread recipe with you! This super rustic, Italian style ciabatta bread is very low effort - it is a no knead bread recipe that uses an overnight rise to produce a super chewy, crusty bread. I love making homemade bread, and especially love a super easy no knead recipe that can be made ahead, such as my focaccia recipe. However, I was after something in a slightly different format - enter this easy ciabatta recipe. This recipe is great for serving alongside dinner, but also makes the most amazing sandwiches.
I tested this recipe over and over in different formats during the recipe testing process so that I could give you all the tips and tricks for making easy ciabatta bread - this dough can be used to make ciabatta loaf, ciabatta rolls, and a ciabatta pull-apart bread, or all three if you like, with only a few tweaks.
This is definitely not a super traditional ciabatta recipe, but it is my take on it - a simple, easy to make bread that we love and I really hope that you do too. There are a ton of tips and tricks in this post for you.


Don't be intimidated - here's how to shape ciabatta.
There are a few ways you can shape your ciabatta dough depending on the format that you want it to be in. You can either bake it as two loaves, or it can also be made into eight ciabatta rolls, or baked all together to make more of a pull-apart bread bun or ciabatta slider buns.
It is Very Important that you use enough flour both on your work surface and when handling the dough as it is quite sticky. A bench scraper will be your friend here.
About an hour before you are ready to bake, prepare your dough for baking and line a pan with floured parchment paper. Heavily flour a work surface (this is important to ensure the high hydration dough does not stick), then turn the dough out onto it.
To make loaves, shape the dough into a 24x24cm (9.5") square (It doesn't have to be super even), then cut down the middle to form two pieces of dough. Transfer to the baking sheet, flipping so the floured side is up (this is where the pattern on ciabatta comes from), then gently gently shape into loaves by tucking the edges under.
Leave the loaves to rise, then bake.

Another shaping option: Ciabatta Rolls
The process for making ciabatta rolls is very similar to making ciabatta loaves, except that you will shape the dough into a 28x20cm (8x11") rectangle instead, then cut into 8 rolls. Turn them over as you move them from the floured work surface to the sheet pan, to get the flour pattern from the counter as the top crust.
Arrange the ciabatta buns on your sheet pan so they have some space between them, as they do flatten out slightly as they rest. It is not the end of the world if they touch a little!


And one more for good measure: Ciabatta Slider Buns
Another way to bake this ciabatta bread which is even easier is to flop the dough out directly onto your sheet pan, and shape it into a square, then cut it into rolls and leave them as is. This means when they bake they will form a sort of pull-apart ciabatta bread, with super soft edges and a lovely crusty top.
To make ciabatta slider buns or ciabatta pull-apart bread, shape the dough into a 24x24cm (9.5") square and then cut into however many you want - I usually go for 16, so a 4x4 grid.
The bake time for rolls and a loaf is similar, so if you wanted to divide the dough into one loaf and four rolls, that would work, just space them out on the same baking sheet.


❤️ Made this recipe and love it? ❤️
I would LOVE for you to leave me a review and star rating below to let me know how you liked it! Also, please make sure to tag me on Instagram!
Answers to your baking questions
Over the years, many of you have asked me questions about:
- baking in grams
- adjusting oven temperatures
- what kind of salt to use
- and many more!
I've curated and answered them all for your easy reference in this frequently asked questions post!

How to make Foolproof Ciabatta Bread
- Prep Time: 2 hours
- Cook Time: 30 minutes
- Total Time: 12 hours
- Yield: 2 loaves 1x
- Category: Bread
- Method: Baking
- Cuisine: American
Description
This easy Ciabatta Bread recipe will give you perfect crusty homemade bread with only five ingredients. This ciabatta dough can be made ahead and used to make either two loaves of ciabatta bread, or eight ciabatta rolls.
Ingredients
- 525g Bread flour
- 15g extra virgin olive oil
- 395g water, lukewarm
- 50g water, lukewarm
- 3g instant yeast
- 10g salt
Instructions
- In a large bowl, combine together the flour and the oil mixed with the first measure (395g) of the water. Combine with a spatula or your hands to form a stiff, shaggy dough. Cover with a tea towel and leave to sit for 30 minutes - this step is called the autolyse and allows the flour to hydrate.
- After 30 minutes, combine the second measure of water (50g) with the yeast, and add to the bowl along with the salt. Mix in by pinching and squishing the dough with your fingers, then stretch it up and fold it over on itself until it starts to come together. Mix the dough for five minutes using the stretch and fold technique. To do this, reach under a piece of the dough and bring it up and fold it over onto itself. Rotate the bowl 90° and repeat again. Keep working your way around the bowl.
- Once you have finished mixing, transfer the dough into a lightly oiled bowl or plastic container, ideally with see-through sides. Cover with a lid or tea towel.
- Proof the dough for two hours, with a set of stretch and folds every 30 minutes (so a total of four sets of stretch and folds). To stretch and fold, you repeat the same motion as in the mixing phase - reach under, stretch the dough up and over itself, then turn the container 90° and repeat again until you have done four stretch and folds. Then cover the dough and leave to sit for 30 minutes until you repeat the next set of stretch and folds.
- Once you have finished the stretch and fold process, cover the bowl either with a lid or plastic wrap, and place into the fridge overnight, or for up to 24 hours.
- When you are ready to bake the ciabatta, line a baking pan with baking paper and lightly flour the paper. Heavily flour a work surface. Flour the surface of the dough, then turn out onto the floured surface. The dough is quite sticky, so using enough flour is very important.
- Pat the dough into a square approximately 24x24cm (9.5 inches square), adding extra flour if needed. Cut into two pieces, then, working with one at a time, transfer to the baking sheet, flipping over so that the floured side is facing upward. Tuck the edges of the dough under lightly and shape into a rough rectangle. Repeat with the second piece of dough, leaving space between the loaves for rising and spreading.
- Cover the pan loosely with plastic wrap or a lid, and place in a warm spot for 45 minutes to an hour to let the dough rise, until they have puffed up slightly and when gently poked with a fingertip, and indentation is left that slowly rises back.
- While the dough is rising, preheat the oven to 425°f / 220°c. Give the oven about 20 minutes to preheat to ensure that it heats up properly.
- Once the dough is risen, transfer to the oven, and bake for 18 to 20 minutes until the ciabatta is baked and golden brown and sounds hollow when tapped underneath.
- Remove from the oven and leave to stand on the pan for 5 minutes, then transfer to a cooling rack and leave to cool completely before slicing.
- Store leftovers loosely wrapped at room temperature.
Notes
Notes: This dough can also be shaped into 8 rolls. To shape into rolls, pat the dough into a 28x20cm (11"x8") rectangle and cut into rolls. Flip over onto the floured sheet pan and proof and bake the same way as the loaves. You can also dump the bread onto a tray and shape into a 24x24cm (9.5 inches) square then cut into 16 pieces, leaving them touching while they rise and then bake as a tray bake.
Bread flour is often also called high grade flour or strong flour depending on where you live!
I find the best way to keep track of rising dough is to have two timers - one for the overall time, so in this case 2 hours, and the other measuring the time between stretch and folds that you re set each time you perform a set of stretch and folds.
The best way to tell if a dough is ready to rise is to gently poke the top of the dough with a floured finger. If it springs back straight away, you know it needs more time. If it leaves a small indentation which slowly springs back, you know that it is proofed and ready to go into the oven. If you leave your dough rising for too long, the yeast can use up all its energy, and then have nothing to give when the dough goes in the oven.
You will know if you have over proofed your dough if it collapses when you touch it, or if it doesn't rise in the oven. It is also very important to make sure that your yeast isn't expired - to test this, place a little in some lukewarm water with a pinch of sugar, and check that it bubbles.
Can I add sourdough starter?
Yes, if you want to you can add discard to give flavour while still relying on the yeast to rise the bread, but I do not know the conversions for making a sourdough raised ciabatta - you are better looking for a sourdough specific recipe. To use some starter, replace some of the flour and water with sourdough discard at 100% hydration - so if you were using 100g starter you would remove 50g flour and 50g water from the quantities in the recipe and replace with the 100g of starter.
How far in advance can you make bread dough?
I left dough in the fridge for three days and it still baked up ok - it was definitely lacking a little in spring but it tasted amazing still. This dough is super forgiving as it doesn't really need to be shaped, so it was ok to just flop out and rise.
Can this recipe be made with active dry yeast?
I haven't tried it with active dry yeast, only with instant yeast, but it should be fine to sub the yeast 1:1, you may just need to activate it in the 50g water with a teeny pinch of sugar first then add the yeast mixture to the autolysed dough.
Comments
caribou says
this is my new favorite go to recipe!
stacy says
i made this as individual rolls and pull aparts. both are so so good. It such an easy dough to work with!
Mary says
Hi thank you for the recipe. But I didn’t get. The part. First measurement of water. Can please tell me is there the 395g water or the 50 g. That part is a bit difficult to understand. Well for me anyway 🙃
Erin Clarkson says
Hi! The first measure is the first one listed so 395 and the second is the 50g 🙂 I have edited the recipe to clarify!
Divya says
Hi!
Thank you for this simple recipe. I have a question, can I use a stand mixer for the first 5 minutes instead of stretch and fold to mix the dough?
Erin Clarkson says
Hi! I haven't tried it sorry - you probably could though!
Annette Venditti says
I tried this recipe for the first time and have experience making breads~ this was a great straight forward recipe with tons of great tips and info that is very helpful to all levels of bakers ~ I’m from Italy so ciabatta bread is a staple for us ~ I’m thrilled to now be making my own versus buying commercial varieties that are too heavy etc. Thanks so much Erin!! Can’t wait to try more of your beautiful recipes ❤️❤️❤️❤️
Shari says
This recipe was so fun and so yum! Thanks for creating such comprehensive recipes that are easy to follow and always result in delicious outcomes. Will be making this in all its forms for the foreseeable future!
Michele says
As usual, I find myself thinking "how many cloudy kitchen recipes can I make in 1 weekend? This weekend was tiramisu and ciabatta! The ciabatta recipe was easy to follow, thorough, and resulted in 2 beautiful big loaves of cibatta! It came out so soft and fluffy, moist and really delicious. We've eaten it with avocado, butter and radish, peanut butter and jelly (the toddler) and as sandwich bread. Fantastic every way, I will definitely be making this again. I want to try it as rolls next time so I can freeze some!
Steve says
Such a helpful "how to"!
Winnie says
This ciabatta went well with our soup dinner, and next morning we had it topped with scrambled eggs & bacon. The texture’s great and it’s easy to prepare! My kids gobbled it up and asked for more!
Elizabeth says
Really fantastic and easy to follow recipe! Thank you, Erin, for all of the insight into the recipe as well! I’m learning so much here and really enjoying it.
Brittney says
I've now made ciabatta twice in two weeks from this recipe! It's going in my regular rotation of bread baking.
Each step was perfectly written and resulted in lovely ciabatta - beautiful crumb and a chewy exterior.
Rachel says
Hi Erin
Made ciabata 3weekends in a row now. First time came out perfectly however 2nd and 3rd time had huge rise in the middle which resulted in a big hole in the bread that was quite unattractive. How do I prevent that? Followed your instructions to the T
Erin Clarkson says
Hi! Hmmm this could be that they weren't quite proofed, or you ended up with a big bubble in the dough when you shaped it?
Jane McD says
This is the fourt recipe I tried. The flour/water/oil ratio seems to work for me. The first batch came out great. Tasty and fluffy enough. I am preparing for the second batch right now, getting ready for tomorrow lunch time: sandwich picnic with family. I really enjoy your blog. You put in a lot of energy and care i your instuctions. For example, you revealed how to make the breadninto other shapes, with detailed instructions. I explore your other recipes too. Thanks for sharing.
Elizabeth says
Finally got around to making this and I’m so glad I did. Perfect and easy and delicious. Made it as two loaves but next time I think I’ll do rolls for easier freezing. Couldn’t ask for a better recipe for ciabatta. Takes a little planning ahead but it’s so worth it!
Sarah Wolf says
LOVED this recipe, and the dough is so much fun to work with! It helped a lot that the measurements were in grams because it was easier to cut in half and make just one loaf. (Having a scale obviously helps a lot in this process.) I did have to use all-purpose flour because I didn't have any bread flour, and while it worked well enough (and still tasted *fantastic*) I had to bake the loaf for about 25 minutes at 425 degrees and another 45 minutes at 375 to make sure it wasn't totally doughy on the inside. (If you have to go longer in the baking process I'd suggest covering the loaf with tin foil at some point to keep the crust from browning too much.) Given the quality of my oven, I'd assume I'd need to bake a whole loaf for longer than 18-20 minutes anyways even if I'd used bread flour. In the future I will definitely use bread flour and will likely shape the dough as rolls or oblong hoagies (best for sandwiches!) so that they'll bake all the way through faster. Highly suggest coating the dough with garlic powder, coarse-ground pepper and Everything bagel seasoning before baking! I'll also likely add roasted garlic cloves and/or peppercorns to the dough next time. I served the bread with seasoned olive oil (sprinkled with Parmesan, of course) and topped with artichoke hearts, roasted tomatoes and Bleu cheese. So.freaking.good. Thanks, Erin!! <3
Erin Clarkson says
Thank you so much! So happy you loved
David Douglas says
Since Sarah likes to add all sorts of stuff to her ciabatta bread then I suggest finely chopped Jalapeños mixed into the flour. Yummo! Obviously not "alot", just enough to add a flaviour.
Grace says
Ridiculously good!
So easy to follow, so satisfying to see the transformation, and so tasty.
The tip to add a pinch of sugar to the active dry yeast worked perfectly.
Immediately making another batch.
Lisa says
I made the ciabatta rolls yesterday and froze them as soon as they cooled as I'll use them this weekend when we have visitors. We tried one and it was delicious. Very easy to make. Thanks Erin.
Diane says
Baked this morning and already we have taken a large bite out of one loaf at lunchtime and will probably finish the first one off and start on the second for dinner. The recipe instructions are so comprehensive there are no surprises. The warning about how wet the dough is and how to treat it made it so easy to do all the steps without any problems. The end result is very tasty. BTW, I love grams- wouldn't touch a recipe given in cups. Go grams!
Sarah says
made these and they were an instant hit with my family! so delicious and easy too.
Julie says
This is my new favorite bread recipe. So easy and so delicious. Directions are really clear and helpful. Have made this twice in the last 2 weeks, both times as rolls which freeze really well. Used 1/3 white whole wheat flour with the bread flour (increased water by a tiny bit). Perfect. A clean cereal packet liner makes a great floured work surface, which can then be used to cover the rolls for the final prove - easy to clean and re-use next time, less single use plastic. I love this recipe. Thank you!
Andrea says
Hi Erin
This morning I'm giving this recipe a whirl, and so far so good. Just a question on the quantity of rolls...in the 1st note after the method, it says divide into 8 rolls but later in the note it says 16 rolls?
Thanks
Andrea
Erin Clarkson says
Hi! Yep it makes either 8 individual larger rolls, or you can flop the dough out and cut it into 16 for like a tray bake situation! just different formats of the same dough!
Kate says
Very detailed instructions! Not complicated at all.
For anyone who makes this and also doesn’t use Diamond crystal salt, don’t reduce the amount per the note. I did and the rolls definitely needed more salt. I guess the salt specific note only applies to volume (tsp) measures, not weight measures?
R says
Fantastic recipe which baked up perfectly the first time, using high quality bread flour made a huge difference. Great recipe even for beginners to master and the perfect batch size without being too large or small, which I find is a common fault of bread recipes.
The only issue to note, not a negative or the fault of the author at all, is that this style of bread takes longer to make. Best of you have time or are making over the weekend so you can get the timing right.
Tracey says
As always your recipes are fantastic! Made a batch two nights in a row because it was so delicious. So proud to be able to make homemade bread.
Hana says
Such a perfect recipe!! My family was so impressed, am making for the second time in 3 days.
Nicole McNab says
I will never buy Ciabatta Bread ever again, this worked out better than I could have imagined. The detailed hints and tips made it so easy and was so appreciated. Let's face it fresh bread baking is a magical smell and then to consume it fresh out of the oven is heaven. Thanks for sharing your wisdom Erin.
Kyra says
Loved this recipe! I was worried about how wet the dough would be but with enough flour it really was easy to handle and shape. I made the rolls which were perfect for sandwiches. My only mistake was not reading the recipe first and starting at 9pm - it was a late night but sooo worth it and I won’t make that mistake again 😂
Kelly T. says
This is a fabulous bread recipe. It’s so well-written and don’t skip the 5-minute stretch and fold at the beginning of the recipe. I left it out first time and my dough was a bit loose. Still fabulous. But loved it even more the second time through. I didn’t expect it to be as soft as it was after baking. That was a real treat.
Maya says
AMAZING cibiatta bread. Never had a bread like this before and it's so easy to make. Will be making every week! I love your bread recipes.
Jo says
Amazing recipe, these rolls were a huge hit at a family lunch! Will definitely be making again 🙂
(I used 1 tsp yeast as I don't think my scale is accurate to that small precise amount - just so I know next time!)
Terry says
hello, i have used this recipe to the letter, but it doesn't seem to rise enough (about 50% of the photo) what can I do to improve it please
Erin Clarkson says
Hi! sounds like you may not have let it rise enough, or your yeast was expired?
Alison says
I made the ciabatta today for a special lunch with friends. I made the slider size, and they turned out so well! Everyone loved them and gave me so many compliments. Thanks Erin for a well-written and clear recipe. I've never worked with such a high hydration dough, and your recipe notes gave me the skills and confidence to absolutely nail it. Thank you!
Alyssa Perevertaylo says
Absolutely my favorite go to bread. My kids call this “mommy’s yummy bread” it’s perfect in every way and so easy to make.’
Ashima Chawla says
I have been making this recipe religiously twice a week for months now. Everyone in my family and friends love it and my husband only wants to eat this now. Thank you for this amazing recipe!
Adam Laflone says
No poolish or Sponge recipe? you just throw it all into one... doesnt make sense.
Erin Clarkson says
It would make sense if you read the blog post, where I address this.
Kath C says
I’m new to bread baking and loving learning!! Thank you so much for this recipe, it was so clear to follow, and worked perfectly! To be honest I had doubts that I was messing it up along the way as I had no idea what to expect but this was so easy.
Claire B says
This recipe is SO EASY, delicious, really just perfect. I’ve made it one a week for the past few months and it’s always a reliable hit. Sometimes I change up half the wheat I use in it- depending on what I mill for my kids weekly sandwich bread. Usually a whole wheat or multigrain. And it’s great! I’ve pushed the dough in the fridge up to 3 days, still bakes well! Though oven spring seems to be best in that 24-48 hour window for me. Once I even baked it at like 15/16 hours - I just popped some of the biggest holes in it when i formed loafs so it wouldn’t be as airy.
My favorite way to eat it is with tomatoes and olive oil for breakfast! K I’ll stop obsessing. But seriously - make it. Super yummy!
Rowena says
Perfect texture. Delicious and so much better than store bought bread. Thanks for sharing Erin.
Morganne says
I have tried a few recipes for ciabatta and it’s never worked for me. These are amazing! Perfect and the directions are so easy to follow. I baked them as pull-apart rolls and I’ve never had better. Thank you!
Sanne says
I love this recipe!!! It really is foolproof. I have only made it as two loaves, and it loved by the whole family.
Tom says
I had never attempted to make
bread before. So, two days ago I attempted a ciabatta bread that did not workout at all. The recipe never made sense from the get go. Needless to say, I did another search..
Your recipe hit the nail square on the head. My loaves turned out very beautiful. They didn’t crisp on the crust the way I like, but are delicious. Next time, I was going to add a skillet with ice cubes and place it on the bottom rack. Also, maybe raise the temperature to 450.
Any suggestions would be appreciated.
Thank you for restoring my faith in my baking ability.
Erin Clarkson says
Hi! Yes adding steam will help and maybe increasing the temperature like you said 🙂
Sj says
Hi, I am in the middle of this recipe and I just wanted to check and make sure about the folding sessions… Is each folding session 5 minutes? Or is less time folding OK as long as you do some folding? Looking forward to the end result either way.
Erin Clarkson says
Hi! The first mixing period is 5 minutes, then it is just two sets of folds, each 30 minutes apart
Olivia says
Amazing ciabatta and so easy to make! I've started subbing half the bread flour with wholemeal flour and I can confirm the resulting ciabatta is still beautiful (though not quite as delicious as the full bread flour loaves)
L says
So much easier than I expected and so good! Your instructions are very helpful.
S says
Made these today and the recipe turned out perfectly!
Morgan French says
Absolutely the best easiest bread recipe ever! Made this for Christmas Day and being able to do the work the day before was great. Bread was flawless and all the family was so impressed.
Steph says
What a delicious recipe! Was so easy to follow and made 2 gorgeous loaves (slightly too brown, I need to use my oven thermometer next time as I’m sure the thermostat in my oven has gone) . The first was demolished as soon as it was cooled, and the second for brunch on Christmas Day
Loved that it was all weight measurements, which made it super easy to get the right measurements. Will definitely be making this again
Alex says
Super easy and delicious recipe! Prepared a 3x batch Xmas eve and took no time for fresh baked loaves on Xmas day
Hannah gunther says
As all stretch and fold breads are, a little time consuming but so worth it 🙂 your recipes are so trustworthy! Great to bring to a potluck or for some delish toast 😊
Em says
Hi- 50g of yeast is quite a lot?
Erin Clarkson says
The recipe doesn't use 50g it uses 3g 🙂
Nicole Reed says
After the second addition of water, the dough is so hard and I cannot even complete the folds as it doesn't stretch in any way. What is the issue here? I would love your help!
Erin Clarkson says
Something mustn't be right because it's a really high hydration dough. Are you sure you measured correctly?