
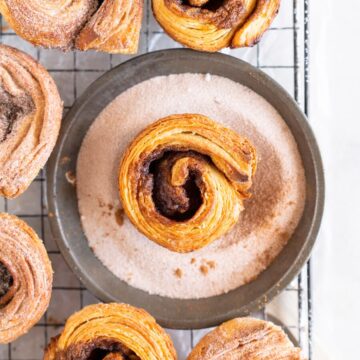
Cinnamon and Cardamom morning buns. These buns are flaky and sweet, with layers from the lamination. The base laminated yeasted danish dough is a fun, easy project, and these morning buns make a perfect breakfast.


Happy Thursday! I hope you are keeping well. I have been taking things a little more easy around here - working on a couple of more time consuming recipes to share with you, and a couple that need a lot of tweaking, along with a whole bunch of sourdough bread baking (which it looks like everyone else is joining in on too which makes me so happy because it’s so fun and satisfying!)
I sat down a few weeks ago and made a list of things that I either haven’t tried before (like milk bread), or that I have tried before and want to try again to get the hang of. I’m super stubborn and pretty competitive with myself, so I tend to get an idea in my head and then just keep chipping away at it until I am happy with the outcome and feel like I have gotten it right - things such as pie dough, choux pastry and macarons. I think it is hugely beneficial to learn through failure, and through practice, and that is how I have taught myself to bake - by doing a whole lot of research, giving it a go, taking loads of notes, and knowing what I need to work on for the next try to make it a little easier or tastier or more efficient.
Top of the list was yeasted laminated dough (basically croissant or danish dough). I tried it once a long time ago and had no idea what I was doing and it was a spectacular failure, but I’ve made it twice this week and taken a whole bunch of notes to add in to give you some wee tips and tricks to make the process easier, and I feel much more confident with it - so keep an eye out for more laminated doughs around this neck of the woods!
What actually spurred me to try yeasted laminated dough again was the arrival of the Bake From Scratch book Volume Four - put together by my friends at Bake From Scratch Magazine! Their books are the best - they are a compilation of their recipes from their magazine from the last year, and really are a ‘baking bible’ of sorts.
I have a couple of recipes in the book from work I did with Bake From Scratch the last year, but as I was flipping through the book I spied a recipe for danish dough, and asked Brian super nicely if I could share it with you. The book breaks down the process, and provides one danish dough that can then be adapted to make a variety of morning buns - savoury and sweet. I kept it simple with a cinnamon and cardamom variation, and they are so, so good. The layers baked up perfectly, giving it that shattery finish, made even better by the thick layer of cinnamon and cardamom sugar on the outside.
These are a bit of an undertaking - you make the dough and the butter block and leave them to chill overnight, and then in the morning or the next day you perform your laminations, which is basically where you are incorporating the butter into the dough. You lock the butter into the dough, then roll it out and do a series of folds, each one creating a layer of butter in the dough. As you do more folds, you get more and more layers, giving you a beautifully laminated dough. It can seem a little intimidating at first but just make sure that you read through the recipe a couple of times, I have broken down all the steps that you need to take.
A few wee tips:
The main thing you need to watch when you are making this is your dough and butter temperature. I find 15 min in the freezer before rolling out the dough to lock in the butter is good, and 7-10 minutes for the butter to stand on the counter to become pliable. You want them about the same temperature. If your butter is too warm then it will leak out and if it is too cold then it will break up within the dough and become lumpy. Just keep a very close eye on your timing - get a timer (I have about four of these and I love them) and stick to the timings strictly.
I added in some bread flour to the butter block to help keep it pliable and make it easy to roll out.
Obsessively square off your edges when you are rolling. Keep the dough edges as straight as you can - I use a bench scraper for this. It helps to keep your folds nice and neat.
Add flour as needed for the rolling, but brush off with a dry pastry brush before doing your folds so that you don’t incorporate the flour within the folds.
A good muffin pan helps. I use this - it is super non stick and I love it.
Watch these carefully when you are baking as the bottoms can burn quite easily. I start checking mine at 18 minutes.
These morning buns are made with a HALF batch of the dough - I made a full batch then cut it in half and used half to make these buns and wrapped the other half up tightly and froze it to use for another time. Don’t try and halve the dough from the start - make the full amount and freeze some.
The recipe in Bake from Scratch has 70g chopped pecans scattered on top of the cinnamon sugar. I didn’t have any so I left them out - add them in if you like!
Leave out the cardamom if you like!
❤️ Made this recipe and love it? ❤️
I would LOVE for you to leave me a review and star rating below to let me know how you liked it! Also, please make sure to tag me on Instagram!
Answers to your baking questions
Over the years, many of you have asked me questions about:
- baking in grams
- adjusting oven temperatures
- what kind of salt to use
- and many more!
I've curated and answered them all for your easy reference in this frequently asked questions post!
Cinnamon and Cardamom Morning Buns
- Prep Time: 1 ½ hours
- Cook Time: 40 Minutes
- Total Time: 2 hours 10 Minutes, plus overnight chill time
- Yield: 9 buns 1x
Description
Morning buns are flaky and sweet, with layers from the lamination. The base laminated yeasted danish dough is a fun, easy project.
Ingredients
Danish Dough
- 240g whole milk, at room temperature
- 1 large egg, at room temperature
- 1 large yolk, at room temperature
- 2 ¼ tsp instant yeast
- 520g bread flour
- 65g granulated sugar
- 45g unsalted butter, at room temperature
- 1 Tbsp salt
- 1 tsp vanilla bean paste
Butter Block
- 250g unsalted butter, at room temperature
- 50g bread flour
Filling
- 80g Unsalted butter, at room temperature
- 125g dark brown sugar
- 3 tsp cinnamon
- ¾ tsp cardamom
- ¼ tsp vanilla bean paste
- pinch of salt
Finishing Sugar
- 200g granulated sugar
- 2 tsp cinnamon
- ¾ tsp cardamom
Instructions
DANISH DOUGH
- In the bowl of a stand mixer fitted with the dough hook, whisk together milk, egg, egg yolk, and yeast. Add the flour, sugar, butter, salt, and vanilla bean paste, and mix at low speed until dough comes together, about 1 minute. Increase the speed to medium and mix until smooth and elastic, 8-10 minutes.
- Shape the dough into a ball and place into a lightly greased bowl. Cover the bowl with plastic wrap and leave to rise in a warm place, about 2 hours, or until doubled in size.
- Punch down the dough and shape into a 8”x10” (20x25cm) rectangle. Place on a sheet pan lined with parchment paper and dusted with a little flour (a quarter sheet pan is perfect for this), and wrap tightly in plastic wrap (I wrapped the whole pan in plastic and then placed it inside a large plastic bag just for some insurance). Refrigerate overnight.
BUTTER BLOCK
- In a small bowl, combine the butter and bread flour. Place onto a large piece of parchment, and shape into a 6”x9” rectangle on the bottom half of the parchment. Fold down the parchment to wrap up the butter block, and use a bench scraper to square it off. Refrigerate overnight.
LAMINATIONS
There are a few steps to this - I am going to list them first so you have a reference and then I will explain in depth. These are the steps that I did it it - IMPORTANT NOTE: If you feel like your dough is getting too soft and is feeling squishy after your first turn (after step 2), wrap it and place it in the freezer for about 10 minutes to let it firm up a little before doing step 3, which is your second Letter fold. Feel it out and do what feels like it will make the dough easy to handle. If you are worried your dough is too hard and the butter is too firm, leave it to stand at room temperature for 5 minutes or so before rolling it out. It is ok to go between the freezer and counter to keep your dough at a workable temperature.
-
Lock in the butter block
-
Roll to 12”x 18” (30x45cm), Letter fold 1
-
Roll to 12”x18” (30x45cm), Letter fold 2
-
Chill Dough 15 minutes
-
Roll to 12”x18” (30x45cm), Letter fold 3
-
Chill for 90 minutes.
Prepare your dough and butter block: Transfer your dough from the fridge into the freezer for 15 minutes. 10 minutes before you start rolling out your dough (so 5 min after you put your dough in the freezer), place your butter block on the counter to allow it to become pliable.
Lock in your butter block: Turn your dough out onto a lightly floured surface. Roll out to 10”x12” rectangle (25x30cm) and turn it so one of the short ends is facing you.
Unwrap the butter block by lifting up one side of the parchment, and use the other piece to guide it onto the bottom half of the dough, making sure there is about ½” gap around three sides (the fourth side will be the rest of the dough). Fold the dough down over the butter block and using your fingers, seal it into the dough, making sure that you don’t have any air bubbles.
Turn the dough 90 degrees, and immediately roll into a 12”x18” (30x45cm) rectangle. With the short side facing you, fold into thirds like a letter - bring the bottom half ⅔ of the way up and the top half down to cover it. Turn 90 degrees and roll out again to 12”x18” (30x45cm), then perform another fold.
Wrap the dough tightly in plastic wrap and place on a sheet pan and freeze for 15 minutes.
Remove the dough from the freezer and roll out a final time to 12”x18” (30x45cm). Perform one final letter fold. Cut the dough into two equal pieces and wrap one up tightly in plastic wrap and freeze for another time (thaw in the fridge overnight). Wrap the second piece tightly in plastic wrap and rest in the fridge for 90 minutes.
MORNING BUN ASSEMBLY
- Transfer the danish dough to the freezer for 15 minutes to firm up slightly. In a medium bowl, combine all of the filling ingredients and mix together until smooth.
- Brush the cups of a 12 tray muffin pan with melted butter and dust with granulated sugar, tapping out the excess.
- Turn the dough out onto a lightly floured surface, and roll into a rectangle about 8”x12”, 20x30cm. (the measurement you need to strictly stick to here is the width, otherwise the roll will be too fat to fit into the muffin tins).
- Spread the surface of the dough evenly with the filling, leaving a ½” border on a long edge. Then, starting on the opposite long side, roll up the dough into a tight spiral. Trim the ends if needed. Measure your log of dough and cut into 1” rolls. Place rolls, cut side up, into prepared muffin cups, pressing gently to help the dough fill the cups.
- Cover the pan lightly (I put it inside a big clear bag), and leave to rise in a warm, draft free place for 45 minutes to an hour, or until the rolls are puffy and when lightly poked with a finger, a small indentation is left.
- When there is 15 minutes to go on your rise, preheat your oven to 375°f / 190°c.
- Bake the buns until golden brown and a thermometer inserted in the centre registers 200°f /95°f, 20 to 25 minutes. Begin checking for doneness at 18 minutes and watch them carefully. Add foil half way through if needed to prevent excess browning (I did not need to). While the buns are baking, combine all the ingredients for the finishing sugar in a shallow bowl.
- Let the buns cool in the pans for about 10 minutes, or until cool enough to handle. Remove from the pans and toss in the finishing sugar. Let cool completely.
- Store leftovers lightly covered at room temperature. Refresh in the microwave if needed.
Notes
Recipe reprinted with permission from “Bake From Scratch, Vol 4”
Comments
Christa says
Any tips for using the frozen dough? I made these a couple weeks ago and they remind me so much of a bakery’s specialty croissants where I live. The flavor is spot on!
Erin says
Hi! You can use anywhere that a yeasted puff is called for! I am planning on hopefully working on a few new yeasted puff recipes soon! You could make the same rolls but mix up the filling ingredients too if you wanted!
Kaci says
My first time making anything like this. Instructions were easy to follow and very detailed. They turned out amazing! Thank you 🙂
Erin says
Hi! yay so glad you love!
Chandre says
Hi there! I'm such a fan of your recipes, I literally try something new on you website every other weekend! If I want to do these as plain croissants, does anything significant in the instructions or baking time change?
Erin Clarkson says
Hi! Hmmm I would follow a croissant specific recipe sorry! I don't have much experience with croissants, so not totally sure what the changes would be
Chandre says
Never saw your reply, and ended up preparing you exact recipe, but folded them as croissants and worked out perfectly!! Thanks for your great recipes!! 🌹
Reese Rachel says
There aren’t enough good things to say about this recipe!! The instructions are detailed and clear. The dough is so easy to work with. And while it does take a number of steps, you end up with bonus dough in the freezer for an even easier set of buns the next weekend! The first batch I made 100% true to the recipe. I knew as soon as I saw the perfect layers of dough and butter it was gonna be good. And they were the perfect combination of cinnamon roll and croissant. Flaky edges, doughy interior. Perfect! You noticed the cardamom, but it was just the right amount. For the second half I switched up the filling - less butter, white sugar, zest of a whole orange and more cardamom than cinnamon. Also excellent! Even from the freezer this dough was easy to work with. Because these were so good, I knew I could play a little without messing them up I tried baking half in just a cookie sheet, not in a muffin cup. They were flakier and spread more, but if you want shatteringly crisp layers, this worked! Again, can’t say enough about how great this morning bun be recipe is!
Alysa says
Hi there! I love all of your recipes! Can these be made in mini muffin pans. If so what temp and for how long would I bake them? Thanks
Erin Clarkson says
I haven't tried it sorry but it should be the same temperature but less baking time 🙂
Carmen says
Another solid recipe - I do have a question though on the filling. Some pretext; I've tried the butter brown sugar mixture per the recipe with these buns, the cinnamon knots, and the regular cinnamon roll recipe. It is a very soft filling with no stabilizer, and while I don't mind it spilling out for the cinnamon rolls (which are cooked in a high walled pan so it all sort of stays around the roll), the filling for these morning buns and the twist knots bubbles out of the dough almost entirely during the cooking process and pools at the bottom and out onto the muffin tin (like 80+%). Is this how it's supposed to be? Any suggestions on a starting point if I want to tweak it so that more of the filling stays inside? flour or some sort of starch maybe? It's so delicious I feel bad when I have to scrap out most of it from the bottom of the tins.