Description
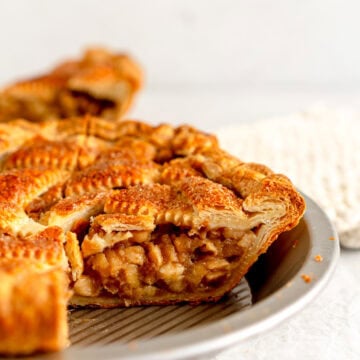
This is my classic apple pie with a buttery homemade pie crust and a gooey cooked apple pie filling. Keep it simple or add a fancy lattice - this is the perfect apple pie! Precooking the pie filling takes the guesswork out of making apple pie, and means you will have a perfectly set filling. My Apple Pie is the perfect make-ahead dessert.
Ingredients
Pie Crust
- One batch of my homemade pie crust, one half shaped into a disc and the other half shaped into a rectangle.
Filling
- One batch of Stovetop Apple Pie Filling, cooled to room temperature or stored in the fridge if you have made it ahead of time.
To Finish
- Egg wash - 1 egg whisked with 1 Tbsp water
- Raw / Turbinado sugar for sprinkling
Instructions
ASSEMBLY
- I like to make my pie crust at least 2 hours ahead or overnight to allow it to rest.
- On a lightly floured surface, roll the disc into a circle slightly larger than your pie dish. You want it to be approximately 1/8 inch (3mm) in thickness. Line a 9" pie dish, leaving the extra dough overhanging. Trim the dough so there is about 1 inch overlapping the edge of your dish. Place in the fridge while you prepare the lattice.
- Roll out the second piece of dough (the rectangle) into a rough rectangle approximately 1/8 inch thick. Use a pastry cutter to cut strips for your lattice. I used a fluted cutter.
- Place your strips onto a parchment paper lined baking sheet and store in the fridge until ready to use. Press together the scraps and re-roll, these are good for extra lattice strips if you need them.
- Add the cooled apple pie filling to the crust lined pie pan, smoothing down with the back of a spoon or an offset spatula to get rid of any air pockets.
- Arrange the strips of pie dough on the top of the pie, weaving into your desired lattice. Place into the fridge for 10 minutes to help set up.
- To crimp the pie, trim the bottom crust and the top lattice strips so they are even - leave some overhang for crimping but make sure that there is an even amount of dough extending around the edge of the pan. Fold the crust over onto itself toward the middle of the pie, tucking it gently against itself to form an even edge. Pinch gently to help it stay together.
- Crimp the crust as desired - I find when it is a thicker crust it is easier to do a larger crimp.
- Rest the pie in the fridge for at least 30 minutes. While the pie is resting in the fridge, preheat the oven to 425°f/ 220°c. Place a baking tray in the bottom third of the oven.
- Brush the latticed part of the pie with egg wash (no need to do the edge as this gets nice and brown), and sprinkle the egg washed parts liberally with raw sugar. Bake at 425˚f / 220˚c for 20 minutes, or until the pastry is set and beginning to go golden. Reduce the temperature 375°f / 190°c, and bake until the pastry is deeply golden and the filling is bubbling, 45 to 60 minutes. If at any time you are worried that it is browning too much, cover the edges of the pie with foil to form a shield.
- Remove from the oven and leave to cool on a wire rack until the pie is room temperature or slightly warm.
- Store leftovers lightly covered at room temperature for up to 2 days or in an airtight container in the fridge for up to 4 days. Reheat leftovers before eating if desired.
Notes
This whole pie can be made ahead of time if you like, and stored lightly covered at room temperature. To refresh it before eating, warm in a 325°f / 165°c oven lightly covered in foil until warmed through. It is also delicious eaten at room temperature.
I use a 9" non-stick pie pan made by USA Pan.